When trying to watch a movie streamed by the Plex Server of my DS713+, I used to get an error “Cannot load M3U8: 404 not found” (only on mobile devices or within a browser). This was due to a wrong “temp” directory configured (out-of-the-box) for transcoding purpose.
Click to Read MoreClick to Close
Watching movies was working fine with the Plex Theater on my PC.
I had the error message “Cannot load M3U8: 404 not found” only when trying to play movies within Chrome (on a PC or on a tablet).
I read on the web that this error could be due to the NAS struggling with transcoding the movie (which is done or not depending on the client’s spec). Plex clearly states that one needs a dual-core NAS to be able to do transcoding. But I have a DS713+. So it should have been fine
I also read that Plex Theater (on Windows) does not need any transcoding. As it was working fine, I definitively though there should be something wrong with the configuration of the transcoding…
I did look at the logs of Plex Server (in \\<MyNas>\plex\Library\Application Support\Plex Media Server\Logs) and found that error:
[code]ERROR – Exception handled: boost::filesystem::temp_directory_path: Not a directory: “/volume1/Plex/tmp_transcoding”[/code]
Checking directly on the NAS via telnet, I found that the right path should have been /volume1/Plex/Library/tmp_transcoding (Notice: “Plex” starts here with a upper case although the related shared folder accessible via SMB starts with lower case!!!)
So, I did force that correct value via the Plex server web interface > Settings > Transcoder > Show Advanced Settings > Transcoder temporary directory.
I have just moved my blog from my Synology DS209+ to my new DS713+.
If you see this, it means that the migration is successful 😉
Click to Read MoreClick to Close
The setup of the new DS713+ was straightforward and really easy using the setup Wizard of Synology. It took more time to screw the two drives (WD SE 2TB WD2000F9YZ) in the trays. Those trays look cheap (plastic) and fragile, but they are really easy to use, plug and unplug.
1/ I did use http://find.synology.com to search for my new DS. It worked fine and found both the 209+ and the 713+. From there I did start the setup on the 713+. It automatically download the latest version of DSM and install it.
2/ Once installed, a wizard opens within DSM to configured the most important features:
Create a volume with the disks (I didn’t create the default “Hybrid RAID (SHR)” as already suggested during the setup. I did a RAID 0 using the wizard instead).
Users and Shared Folders
File Station
Other Packages (I did re-install all my favorite packages): Audio Station, Cloud Station, CouchPotato Custom*, DNS Server, Download Station, Git, Mail Server, Mail Station, Media Server, Photo Station, phpMyAdmin, Plex Media Server, Python, Python 3, Surveillance Station Time Backup, Video Station, Web Console*, Config File Editor*, Webalizer, WordPress
…
3/ In the Package Center, I did reconfigure the custom “Package Sources” (required for * above):
http://packages.missilehugger.com : ‘Config File Editor’ and ‘Web Console’
4/ Via the Control Panel > Terminal, I did enable “telnet”
5/ I did next set a fix IP for the DS713+ on my DD-WRT router (under “static leases” in the “Service” tab) and did connect on the DS713+ via telnet to force it to renew its IP with the command “/etc/rc.network restart”
6/ I did also reinstall the package Perl, BootStrap Installer (Install Ipkg) and iPKGui (manage ipkg packages) – both from packages.quadrat.de – and configured the following package source: http://ipkg.nslu2-linux.org/feeds/optware/syno-e500/cross/unstable (name ‘cross’, type ‘scr/gz’, file ‘cross-feed.Conf’)
7/ I did install the “web-Console” package and logged in with admin/admin. Then I did restart the web-console after changing the password via the command (typing also the #) : #users modify admin
Notice: I didn’t use Synlogy’s migration wizard to backup and restore the full “configuration settings” as I wanted to clean a bit my NAS and restore/reconfigure only what I really still need. More details on migration methods are provided on Synology’s wiki.
Click to Read ‘Wordpress’ PartClick to Close
1/ Regarding WordPress, once the package installed, I did:
Export the ‘wordpressblog’ database from my DS209+
I did copy the following folders from the DS209+ on the DS713+
\wordpress\wp-content\icons
\wordpress\wp-content\themes
\wordpress\wp-content\uploads
\wordpress\wp-content\plugins
I did restore that backup on the DS713+
I had to reset the “Header Image” via Appearance>Themes>Customize.
I did check that all the plugin’s where enabled. All settings where correctly recovered from the backup restored previously.
I didn’t re-install the plugin MultiDomain as I am now using the DNS package of Synology to solve the issue I had in the past when accessing my blog from my intranet or from internet.
2/ I did copy the other webpages in /web from the DS209+ onto the DS713+
3/ I did reconfigure the port-forwarding on my DD-WRT (via the tab “NAT/QoS”) to forward the traffic on port 80 to the DS713+ instead of DS209+. I also configured “Wake on Lan” on the DD-WRT (via the “Administration” > “WOL”) to be able to wake-up my new NAS although it should run 24/7.
Et voilà… the “web part” of the DS713+ is up and running 😛
Click to Read ‘Photo Station’ PartClick to Close
1/ To move the Photo albums, I did use Synology’s “Main menu” > “Backup and Restore” feature on the DS209+.
On the DS713+, enable the “Network Backup” service (without rsync) via “Main Menu” > “Network Backup”. This is going to create a Shared Folder ‘NetBackup’.
Back to the DS209+, In the “Backup” tab of the “Backup and Restore” wizard, click create and select “Data Backup type”.
In the wizard, type a name for the backup and select “Network Backup (Synology Server)”. Let the DS209+ find the DS713+ (clicking into the “server name” combo-box) and use this one as server name for the backup destination (fill manually the password for the username and pick “NetBackup” as shared folder. Keep in mind the name of the “folder” to be created in “NetBackup” to store the backup).
In the tab where you can select application data, configuration, etc… pick
In the “Application” part, select “Photo Station”
In the “Shared folder” part, select “photo”
And finally “Back up immediately after the wizard finished”
2/ Next, on the DS713+, using the same “Main menu” > “Backup and Restore” feature, I did the restore
In the “Restore” tab, click on “Restore” and select “data”.
In the wizard, select “Local Restoration” and keep next “NetBackup” and select the name of the “folder” where the DS209+ stored its backup.
Do not select any “configuration settings to restore”
Select however all “items to restore” in the next screen. You will see that there is a “conflict” for the Shared Folder “photo”. No matter, the existing folder on the target will be overwritten.
Et voilà. It’s magic: all the photo and thumbnails are restored, including the albums, smart albums, covers, etc…
One thing is however not restored via this process: the users’ privileges… I presume that this is because I didn’t restore the users table. I had to grant access to the users to each album manually via the “Parameters” > “User accounts” menu of Photo Station.
Click to Read ‘Surveillance Station’ PartClick to Close
1/ To move the Surveillance Station settings, I did use also Synology’s “Main menu” > “Backup and Restore” feature on the DS209+.
First, I did disable all my camera in the Surveillance Station of the DS209+ via the “Main Menu” > “Surveillance Station” > “IP Camera”
Next, I did delete all the records as I wanted to only migrate the “settings”
Finally, I did a backup of ‘surveillance’ as I did for the Photo Station here above. I only had to provide another folder-name under ‘NetBackup’ than for the photo
2/ Next, on the DS713+, I did
“Stop” the Surveillance Station, via “Package Center” > “Surveillance Station” > Action “Stop”.
Restore the ‘surveillance’ following the same procedure as for the Photo Station.
Once the restore completed, “Run” the Surveillance Station, via “Package Center” > “Surveillance Station” > Action “Run”.
Go to the “Main Menu” > “Surveillance Station” > “IP Camera” and re-enable the camera. You can see that not only the camera are restored, but also the patrol settings, etc…
Notice: the paid licences have been transferred !!! What is weird: I was able to re-enable the camera also on the DS209+. Both NAS were then consuming stream from all the camera… I was not expecting the licenses to be usable on several devices ?!
Click to Read ‘Audio and Video Station’ PartClick to Close
1/ Simply copy the content of the Shared Folders “music” and “video” from DS209+ to DS713+. Audio Station and Video Station will re-index the files.
2/ Reconfigure Video Station (Collections and Custom Libraries must be redefined)
3/ Recreate your favorite Web Radio Station in the Audio Station
This is a bit of work but I didn’t find a backup/restore similar to the one available for the ‘photo’ and the ‘surveillance’. And I didn’t want to restore the full configuration of my DS209+ as-is.
Click to Read ‘Other’ PartClick to Close
1/ Reconfigure the other port-forwarding rules on the DD-WRT to transfer all required traffic to the DS713+:
Admin: 5000
WebDav and WebDav https: 8000 and 8443
Enable WebDav via “Main Menu” > “Control Panel” > “WebDAV”
Configure the port 8000 and 8443 resp. for http
CouchPotato: 5050
2/ Reconfigure the WorkGroup via “Main Menu” > ” Configuration Panel” > “Win/Mac/NFS” > “Windows File Service”
3/ Enable “Recycle Bin”, “Windows ACL” and “File Indexing” on required shared folders via “Main Menu” > ” Configuration Panel” > “Shared Folder” > (select a folder) “Edit”.
4/ Reconfigured the “DNS server” as made on DS209+. Or, use the “Export Zone” > “Complete Zone settings” menu of the “DNS Server” on DS209+ and then “Create” > “Import Zone” menu of the “DNS Server” on the new DS.
5/ Recreate the MySQL Backup Task and the reconfigure Time Backup’s tasks.
Click to Read ‘DDNS’ PartClick to Close
I also had to register my DDNS’ domain name olympe.diskstation.me for my new DS713+ instead of for my DS209+.
1/ Log in https://myds.synology.com
2/ Click on the “Unlink” icon on the row of your old DS.
3/ Select the old DS and click on “Delete” on the right side of the “DDNS status” header.
4/ Go now to the “Control Panel” of the new DS and click on “DDNS”.
5/ Click on “Add” and re-register the DS with the domain name that used to be linked to the old DS.
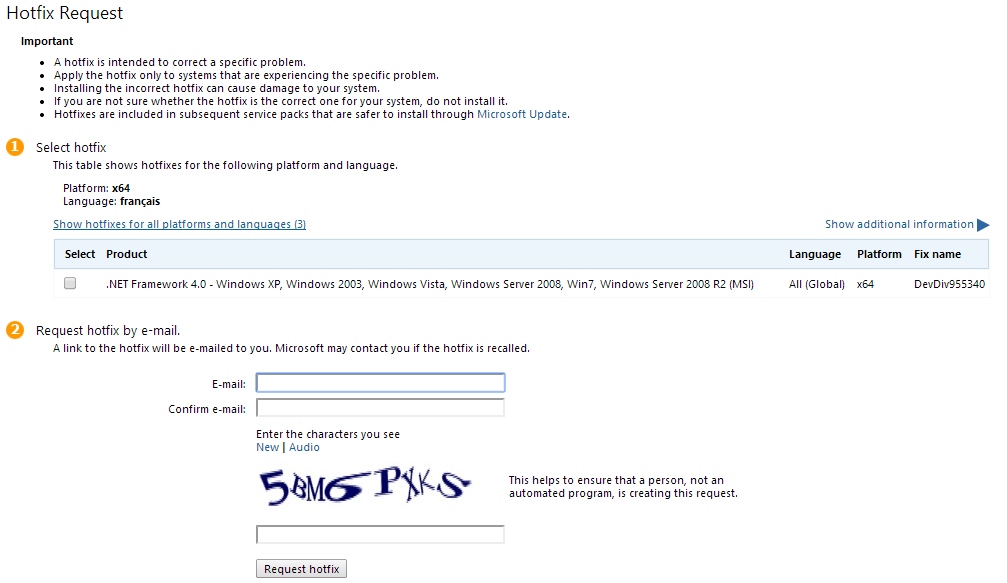
I found a kb (article from the knwledge base) of Microsoft mentioning an existing hotfix but not providing a link to download this one.
Here is a link to request Microsoft for such hotfix without going through the long and expensive process of a phone call, etc… E.g.: for a dummy kb 1234567: Click here.
Click to Read MoreClick to Close
I found a post that give all the requested details on that process: http://www.pesikov.tk/blog/request-download-kb-update-hotfix-directly-without-contacting-microsoft-customer-support-services/
Only notice that you must now use a parameter “ln” in the URL to enforce the language of the page. Ex.: http://support.microsoft.com/hotfix/KBHotfix.aspx?kbnum=1234567&ln=en-us.
Quite often, when I stop the Visual Studio debugger (possibly mainly when I just did an “edit and continue“) the mouse enters a kind of “ClickLock” mode: the text is automatically highlighted between the current mouse location and the location where it was when I stopped the debugger. Impossible to move the mouse (or the cursor using the arrows) without highlighting text (I.e.: doing a text selection)… So, impossible to work anymore as pressing any key will immediately delete the selection.
I found only a few reports about that “issue/behavior” on the web. I still have no idea how to prevent it. But I found a way to halt it when it occurs: Press Alt-Gr + CTRL + SHIFT
I used to root Kids’ tablet Fuhi Nabi 2 in order to be able to install Google Play. But I got a notification from Fuhi two weeks ago announcing that Google Play was now available out of the box with their latest update… This one upgrades from Android 4.0.1 to 4.1.1… So, hop, hop, hop, I immediately decided to rollback my tablet to a stock Rom and give a try to that new update. Piece of cake… if you know how to proceed…
Click to Read MoreClick to Close
The Nabi 2 had Rom 1.9.37 and TWRP Recovery Image 2.2.2.1.
I had a touch screen calibration issue with more recent TWRP. I didn’t try to most recent one however (E.g.: 2.6.3.0).
All TWRP versions tested for Nabi 2 can be found here as well as the native Recovery Image from Fuhu.
Download the stock Rom 2.0.5 and unzip it from your PC onto a SD card under \TWRP\Backups\<device serial number>\abcdstock123, then re-plug the SD into the Nabi 2
This is the folder where TWRP did store my backup when I did root the device
There should be 4 files: boot.emmc.win, boot.emmc.win.md5, recovery.emmc.win an System.ext4.win
Install PDA.Net, to be found here, if not available anymore on your PC.
Boot the Nabi 2 in recovery mode by pressing both the Volume + Button and the Power Button.
Press twice the Volume – Button to move to the menu “Recovery Kernel”
Press once the Volume + Button to enter the selected menu
it takes quite a few seconds to enter. Be patient.
Once entered in Teamwin (TWRP), select “Restore”
Then select “Using external SD” and pick the Stock Rom version 2.0.5 copied on the SD
Only restore System and Boot, but not your data!
I presume that all your data, if any, are in gmail, google+, etc…
Once the restore completed, reboot the system.
It will take some time to reboot, installing the various packages, etc…
Once back into Android, go to the “Settings” > “About” > “System Updates” > “Check now” for updates, “Download” it and install. Android will reboot at the end of that update.
This was actually the “first part” of the upgrade from the Stock Rom 2.0.5 to 2.3.11. With that first part, you are not yet running Android 4.1.1. You have to redo the step here above once more to install the “second part”.
Notice: I had an issue with the installation of the “first part”. I think that the “update” file was corrupted because I lost the Wi-Fi connection for a few seconds during the download. So, I had to restart the operation and it went then well.
I had a bigger issue when I tried to install the “second part” of the update. During the reboot, I got the red triangle dead Android picture… This is because I still had traces of rooted files on the tablet. The update din’t recognize some system files and refused to proceed further… Fortunately, there is a solution…
Download the fix OTA2.zip to be found here (named Part2 Work Around)
Copy the zip as is onto the SD card under \TWRP\ and re-plug the SD into the Nabi 2
Reboot into Recovery mode as explained previously
Now, instead of “Restore”, select “Install” and pick the file OTA2.zip from the “external SD”
As far as I am concerned, I did a “Wipe Cache/dalvik” after the installation..
Reboot the system.
Et voilà. The Nabi 2 is now running a fresh Jelly Bean with all kids’ favorite games re-installed from Google Play. Big big thanks to XDA-Developers’ community for providing such a great support!!
Notice: I am now running a US version instead of a UK version… But I don’t care as everything seems ok 😛
Click to Read MoreClick to Close
I am not that happy about the upgrade…
For sure, the new Android interface for the parents is great. But there is no real change for my kids except that:
It’s much slower to boot
It freezes regularly while my kids are unlocking the screen immediately after the boot. The lock screen start to slide and then freeze in the middle of the screen. I have no choice but hard-reboot (keeping the power button pressed for some seconds)
It also freezes sometimes while my kids are playing. Not often but still… I never had any issue in the past.
And a problem that I always had: when charging the tablet, the tablet always completely switch off and it’s a real pain to reboot it once charged. I always have to wait a bit (> 1 minute) after unplugging the tablet before being finally able to boot. Possibly due to the fact I am on 230V/50Hz and some kind of protection ? It looks indeed like the tablet refuses to boot because the battery is too hot…
As far as photos edition and printing is concerned, I only use two free softwares: FastStone and Paint.Net. I use FastStone to crop pictures using predefined standard photographic print sizes or to print pictures keeping its size…
Click to Read MoreClick to Close
Although Paint.Net is really great for editing photo (Ex.: clone and heal details, convert into Sepia, …) it can’t crop using predefined standard print sizes…
Also, assuming that I have a photo with a custom size and a resolution like 600×600 , I cannot print it in its actual size… Paint.Net will always resize the photo to fit the paper (although I do not check the option “fit picture to frame”) – or – will print Full page, 13×18, 20×25, 10×15, 9×13, Wallet (9 picture) or Contact sheet (35 pictures). As said by the Team developping Pain.Net : it would mean rewriting the printing functionality from scratch and isn’t something we’ll do because it would take months if implementation and debugging.
So, I use open my photos with FastStone and use its “Crop Board” as well as its “Print” feature.
If I have to edit the photo, I can open it within Paint.Net directly from FastStone using its “Edit With External Program”…
Notice: I use the “Sepia” adjustment of Paint.Net as the result is much better than with FastStone. I also use the “Clone stamp” of Paint.Net as I can adjust its width, something that I cannot do with FastStone.
Although my primary DNS is my Synology and the IP returned for ‘beatificabytes.be’ is expected to be the IP of my NAS, Chrome tried to access my blog on the web instead of locally. I thought it was an issue with the DNS and wanted to know how it resolved my domain name.
Click to Read MoreClick to Close
Windows is caching the IP resolved by a DNS. So, thinking my DNS was possibly off when Chrome tried to resolve my domain name, I had to view the content of the cache. This can be done with the following command:
ipconfig /displaydns
The result was clear. My DNS didn’t answer itself and the domain name was therefore resolved by the DNS of my provider:
www.beatificabytes.be
—————————————-
Record Name . . . . . : www.beatificabytes.be
Record Type . . . . . : 5
Time To Live . . . . : 30
Data Length . . . . . : 8
Section . . . . . . . : Answer
CNAME Record . . . . : <myNAS>.diskstation.me
Record Name . . . . . : <myNAS>.diskstation.me
Record Type . . . . . : 1
Time To Live . . . . : 30
Data Length . . . . . : 4
Section . . . . . . . : Answer
A (Host) Record . . . : 91.182.141.78
So, I tried to just flush the cache to see if my DNS would now resolve the domain name. The command to do so is:
ipconfig /flushdns
For information purpose, here are the commands to respectively turn off/on the DNS cache until next reboot:
net stop dnscache
net start dnscache
Flushing the DNS didn’t solve the issue unfortunately 🙁
Neither ipconfig /release nor ipconfig /renew did solve the issue either*… But this post is to keep a note about viewing/flushing the DNS cache only 😉
I just noticed that I can not use Chrome’s url field anymore to search on my blog as I did so far… Google is using now my blog’s search feature.. EXACTLY the opposite of my expectation!
Click to Read MoreClick to Close
As explained here, I use my blog as a knowledge base to be searched using Google.
Concretely, if I want to find something like the processor used on my desktop (named Chaos), I used to type this in the url field of Chrome: beatificabytes chaos
As I am very used to the keyword suggestion feature of Chrome, as soon as I see that the suggestion seems to match what I am typing, I press ‘tab’ to auto-complete it.
Moreover, I use very often the url ‘beatificabytes.be’. So when I type ‘bea’ as a first keyword, I am suggested ‘beatificabytes.be’. I never had any problem with that as searching for ‘beatificabytes chaos’ or beatificabytes.be chaos’ used to be equivalent.
But since a few days, when I type ‘tab’ to auto-complete ‘bea’, my keyword is replaced by ‘Search beatificabytes.be’. And if I add a keyword like ‘Chaos’ behind that, Chrome is using the WordPress’ search feature of my blog instead of searching via Google. Obviously, the result is disappointing.
So, I have no choice but type now ‘beatificabytes’ after another keyword. The down side is that in such a case, I don’t have the auto-completion anymore on ‘bea’ 🙁
I recently bought a Yamaha YSP-3300 to play the sound/music issued from my devices (HTPC, TV-box, video game console) while transfering the video to my TV. Unfortunately, my HTPC has a GeForce 7600 Go, and using the most recent drivers available for that graphic card, I had no audio via HDMI. The only solution I found was to install a much older version of the NVIDIA graphic drivers.
Click to Read MoreClick to Close
When I did upgrade my HTPC to Windows 8, the only compatible drivers were made available on LaptopVideo2go. It was a modified version of the NVIDIA setup package for Vista: the version 180.70 (to be found in the “Archived Releases” of LaptopVideo2Go : “18x Series” ).
But I had no audio via HDMI. I.e.: it was not working, whatever samples rates or audio format (Dobly, DTS, …) I was using and whatever audio drivers I was installing (Microsoft HD Audio or HD Realtek).
Notice that Audio via HDMI is definitively a feature of the graphic drivers! With the more recent versions of NVIDIA control Panel, there is an entry to enable audio via HDMI explicitly (or it is made clear when selecting the connector to the screen)
After an upgrade to Windows 8.1, I noticed that a version 307.68 of the NVIDIA drivers was automatically installed. But it also came without audio via HDMI either.
I finally found that the oldest NVIDIA drivers supporting audio via HDMI on my HTPC, whatever version of the audio drivers is installed (Microsoft or Realtek), was the version 173.90.
Notice: the version 174.16 is the last version to support audio via HDMI with the Microsoft HD Audio drivers. But Realtek HD Audio drivers come with some added value, reason why I stick to the version 173.90.
At the “Playback device” level, to get audio via HDMI, I had to select:
Either “Digital Audio (S/PDIF)” if using Microsoft HD audio drivers.
Or “Realtek Digital Output” if using Realtek HD Audio drivers.
Notice that unfortunately, under Windows 8.1, using any versions less or equal to 174.16 results in display issues:
IE starts to flicker when the mouse moves over the current page. This can be solved by enable software renderind instead of GPU rendering: go to “Internet Options” > “Advanced” > “Accelerated graphics” and tick the option “Use software rendering instead of GPU rendering”.
All tiles disappear from the Start Screen and it becomes impossible to “search” for files or apps anymore. This is not blocking for me as I did replace the Windows shell by Windows Media Center.
So, I will test those drivers under Windows 8 as soon as I have time to “downgrade” (concretely, reinstall the HTPC from scratch). But I am not expecting any improvement reason why I am already looking for a new HTPC…
I am pissed off by my current HTPC Acer iDEA 510… Too many issues with the video drivers, too slow for some heavy HD movies where many dots moves at the same times… I need a new one !
Click to Read MoreClick to Close
After some research, the easiest solution will be to buy a barebone matching my requirements:
One HDMI 1.4 connector with audio support
Once HD Audio Controller
One placeholder for a SSD
One Gigabit Ethernet controller
One IR receiver for a Windows MCE remote.
An Intel above or equal to Core i3-3225
Low power consumption (<~5w when idle)
Low noise level (~30db when idle, ~40db at full load)
A barebone solution will be a bit easier than buying each parts separated (case, Motherboard, CPU, PSU, …).
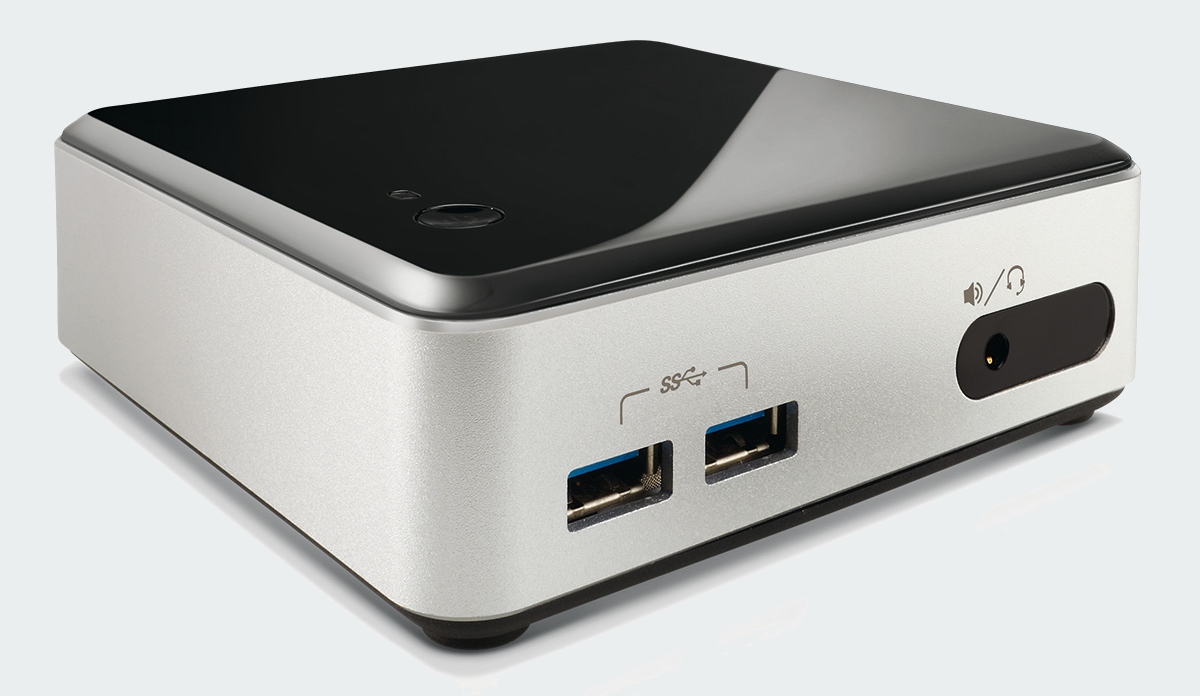
The barbone being closest to my requirements is the Intel NUC D54250WYK. Its processor is however a core i5-4250U which is unfortunately not as powerful as a core i3-3225 (See here). But with its GPU HD Graphic 5000, it seems to be from far good enough to play HD movies based on technical reviews.
It has two SO-DIMM slots supporting up to 16 GB of 1600/1333 MHz 1.35V DDR3L memory. So, I will take 2 x 8Gb Corsair Vengeance CMSX16GX3M2B1600C9 DDR3L 1600 MHz CL9 (PC3-12800).
two USB 3.0 connectors on the front panel and two USB 3.0 connectors on the back panel.
two USB 2.0 ports and one SATA port inside but there are IMO useless as there is no place at all in that small case.
a consumer infrared sensor on the front panel
a 8-channel (7.1) digital audio via its HDMI 1.4a output or via its DisplayPort 1.2 connector.
At full load, it seems it will be a bit louder than I was expecting from my future HTPC (reported to produce ~44db), because it’s not a passive cooling. But it’s still really ok. And from the power point of view, it consumes less than 5 Watts when idle. Perfect !