Author: vletroye

  • A non-pro Drone for fun & Video/Photo

    I already have a drone for fun, but would really love a new one following me and recording video when biking or skying with kids…

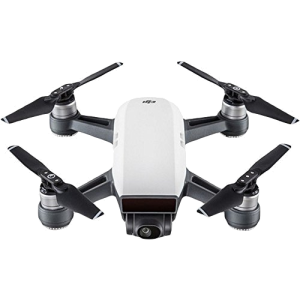
    I did a quick tour comparing brands and model and concludes that right now, the best one (compromise price/quality/feature) would be the DJI Spark.

    DJI Spark

    Click to Read More

    I have been considering:

    • Quality of image (better than Parrot Bebop 2) – full HD, 12MB, stabilized on 2 axis (but no big deal with this limitation)
    • Duration of the flight (15′)
    • Range of the flight (100 m or 2000m with the optional remote, at 13 m/s)
    • Obstacle Avoidance (forward facing and bottom facing sensors only)
    • Flight modes: Circle or Helix around the subject, auto landing and takeoff (from the palm), follow-me (tracking), Selfie, Tapfly (goes to the location indicated with your finger on the screen),
    • Easy to use for novice. has an optional remote, can connect with a Android phone, can be controlled with gesture.
    • Handle the wind very well.

    See review here.

    Other options that I could be considering are:

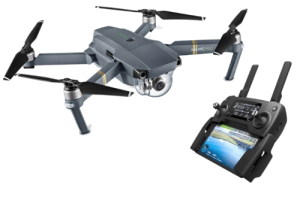
    • In my dreams only, a DJI Mavic Pro, decribed here. Just a question of price, as it’s making fun a bit too expensive…
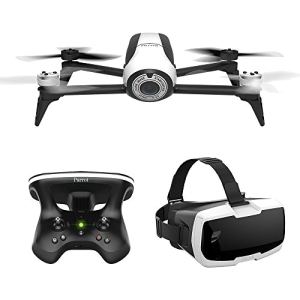
    • Maybe, because it comes with a FPV headset, a Parrot Bebop 2 Power, described here. But it’s less compact and portable than the DJI Spark and the quality of images is also lower. On the opposite, the flight can last for 30′ !
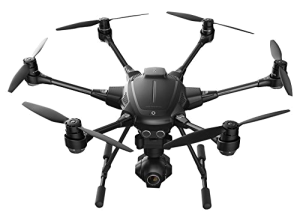
    • Possibly, a Yuneec Typhoon H, introduced here. It is more a pro device, more expensive, but very exiting :p Would be a better choice IMO than the DJI phantom from a quality/price perspective.
    DJI Mavic Pro
    Parrot Bebop 2 Power
    Yuneec Typhon H

    Edit 04/2018 I did chose for the Dji Spark with a Fly More combo.

    Edit 08/2019 I did crash my drone at least 10 times since I am flying with it. Sometimes in trees, sometimes in walls. I never broke anything in the past. But after my last crash, the engine of the camera stopped to work. I did sent the devive to DJI and they fixed it for 50€ of workforece + 18€ for the engine. The best suport in the world, with excellent and clear communication!

    Edit 10/2019 After one year and an half of practice with the Spark, I decided to upgrade to a Mavic. By chance, I have been able to aquire a Mavic 2 Pro with a “free SmartController”.

    Loading

    ,
  • TuneBlade: problem initializing audio capture.

    I just had this error message when trying to connect TuneBlade on my Airplay Yamaha: “There was a problem initializing audio capture. Exception from HRESULT 0x88890008”

    I fixed it in 5 seconds by reconfiguring my playback device.

    Click to Read More

    1. In the Systray, right the Speaker icon and select “Playback devices” in the menu. This is opening a “Sound” window.
      1. On Windows 10, there is no entry “Playback devices”. Instead, click on the entry “Sounds”
    2. In the tab “Playback” of this window, select the speaker currently used by the PC and click the button “Configure” at the bottom left.
    3. Do reconfigure your playback device.

    In my case, my playback device was reset to “Stereo” although it should have been 7.1 Surround. This usually happens after an upgrade of its Realtek Audio Drivers.

    Loading

  • Use a VPN between an Android mobile and a Synology NAS via Proximus network

    I spent hours trying to figure out why I couldn’t connect my Galaxy S7 onto my Synology using a PPTP VPN on the Proximus 3G/4G Network (Belgium) while it was working fine if connected via WiFi.

    Finally, I gave up and configured a L2TP/IPSec VPN. This one worked immediately like a charm, both on WiFi and 3G/4G. I am quite sure this is due to Proximus configuring my profile to use CGN (Carrier Grade NAT).

    Click to Read More

    I was initially inspired by this post (“Using Synology DiskStation as a VPN server using built-in Android VPN client”). So;

    • I did first configure my Synology VPN Server to use PPTP as explained here (Official Knowledge base Synology)
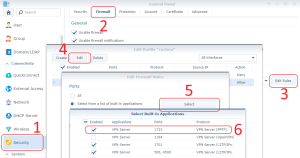
    • Next, I did open my Synology Firewall (port 1723 for PPTP) via the Control Panel > Security > Firewall > Edit Rules > Edit an entry to Allow > Select Built-in applications > VPN Server (PPTP)

    Open Firewall Synology for VPN

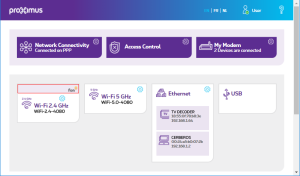
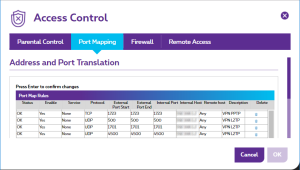
    • Then, I did configure my Modem to route the TCP port 1723 to my NAS via Access Control > Port Mapping

    Configure Proximus Modem Route

    Configure Proximus Modem Route

    • Finally, I configured a PPTP VPN on my Galaxy S7 via Settings > Connections > More connection settings > VPN > ADD VPN

    It worked immediately while connecting my Galaxy S7 via WiFi. But if failed while connected via 3G/4G. To investigate, I did enable the firewall of my dd-wrt router (placed between my modem and my NAS) and configured it to send all its firewall messages to the syslog server of my Synology (the “Log Center”). I those logs, I found packets corresponding most probably to the VPN requests from my Galaxy S7 (They were only arriving when I was trying to establish a connection). Those were not coming from my Galaxy S7’s IP. Instead, they were coming from another Proximus IP, with a protocol 47 (Generic Route Encapsulation)?! Could this be due to Proximus configuring my profile to use CGN (Carrier Grade NAT)? Unfortunately, I couldn’t check and reconfigure this myself as the option is not available anymore via the MyProximus administration interface…

    So, I decided to give up with this PPTP VPN and use a more secure but less performant VPN: L2TP/IPSEC with a PSK (IPsec pre-shared key). And miracle, after opening and routing the UDP ports 500, 1701 and 4500, it worked !

    Loading

  • IP Camera Apeman ID72 – Softwares, Firmware, …

    I just bought a cheap IP PTZ camera 1080p: an Apeman ID72. The user guide is enough to quick start. But I couldn’t find how to change the DNS settings, access the web interface, etc… I finally found a website with enough info to figure out the URL of the Web UI.

    Click to Read More

    I bought this camera as it supports ONVIF and I was intending to manage it from Synology’s Surveillance station. I did succeed but it was not obvious.

    1. ONVIF port is 10080
    2. Video format is H.264
    3. Audio format is G711.
    4. Resolution is set to 1920×1280
    5. Frame rate is 15
    6. Transport protocol is TCP

    I am using an ethernet connection between the camera and my Synology. The video is smooth and PTZ is responding fast.

    The Apeman ID72 is part of the “T,C Series” (it’s a C). It’s not from the “PnP T,C Series”.

    • Official Website: http://www.apemans.com (ID72)
    • EyeCloud Softwares: http://www.eyecloud.so (for Android devices, iPhone and Windows + IPCam Finder for Mac and Windows)
    • Online CD, Video and other software: http://cd.ipcam.so
      • Central Management Client (For PC): Central Management Client is a Windows software used to manage multiple IP cameras. It is characterized with multi-camera monitoring, PTZ control, record, alarm and access authority management function, as well as easy operation and strong capability.
      • Smart upgrade tool: Using this tool, you can just press a button to automatically upgrade IP-Camera’s firmware to the latest one. It can be used to update both the Http Web UI and the Firmware of the camera.
      • IP Camera Wizard: Use this tool to setup the Camera and configure its network environment.
        • At step 3, the wizard shows the http port configured to access the admin UI of the camera via a web browser (a.k.a.: Web UI).
          • Once connected via the browser, you have access to all the settings. This is for me the most convenient to do any advanced configurations.
        • Reconfigure that port, the submask and the gateway
        • Check the DDNS
        • Define Port Forwarding

    Using the IP Camera Finder from http://www.eyecloud.so, you will see the Http URL to be used to access the admin page in a browser (including the admin port if any). Notice that for some reason, the IP camera disappears and reappears very 3 seconds in that IP Camera Finder… So it’s nearly impossible to configure it there (it should be doable). I could only change settings via the Web UI or via the IP Camera Wizard.

    I did also use successfully the Central Management Client (“IP Camera Super Client”) from http://cd.ipcam.so to find my camera and note its IP and admin port.

    Notice that, via the Web UI, I tried to set 80 as the http port used to access that UI. Unfortunately, although this was rebooting the camera as expected, another port always appeared to be assigned after the reboot… I was only able to successfully change the http port via the IP Camera Wizard, via the “Advance Mode” and only when defining a “Static IP address” (it didn’t work when choosing “Dynamic IP address”). NB.: the http port is neither the ONVIF port, nor the RTSP port. The ONVIF port is 10080. The RTSP port can be changed via the Web UI.

    Each time I change a setting via the Web UI, the camera reboot and reset the http port I have configured 🙁

    I was not able to configure (or even find where to configure) the DDNS. I found the DDNS password in the tab “Other” of the IP Camera Wizard (in “Advance Mode”). But each time I enter the DDNS step of the “IP Camera Wizard” (in mode “Wizard”), I get an error message:

    Obtaining DDNS options from the camera…
    Failure: DDNS has not chosen then IPCam type, please click the “Settings” button to change the settings.

    I also get an error when entering the setp “Port Forwarding”:

    Error: unknown error

    please contact the IP camera supplier.

    I was also unable to disable the access to the camera via the Cloud. I am indeed not interested in that feature.

    To do a Factory Reset, you must use the Web UI (I didn’t find this option in the IP Camera Finder or IP Camera Wizard). Notice that I played with so many settings that I had to do a Reset Factory before being able to connect the camera with Synology Surveillance Station…

    As far as I am concerned, I have triggered the firmware update via eyeCloud on my Android Mobile (it’s done without manual intervention) as I didn’t find where to download the files. It succeeded without any problem. The versions are now:

    • Firmware: 48.53.203.110
    • Web UI: EN203.26.1.20

    Although the quality of the video is good, from a configuration perspective, I really prefer my Foscam cameras! Otherwise, it does not make a lot of noise when moving (compared to my Foscam) . The camera rotation speed can be adjusted and will be used by EyeCloud but not impact by Synology Surveillance Station.

    Loading

    ,
  • Home Made Cable Management

    It used to be a mess on my desk due to the amount of usb cables that I am using. I have now built my own solution to keep the cables well organized.

    Click to Read More

    The solution is based on the principle of pulley wheels. It’s ugly, quite expensive, but quite efficient. I did use:

    I can now access my cables easily when I need them. And they park automatically when I release them…

    Loading

  • Play “Steam” games like “Lego Star Wars” on NVidia Shield TV [streamed from PC]

    Today, my daughter asked me to buy “Lego Star Wars: The Force Awakens” for our NVIDIA Shield TV. Unfortunately, I found that it was not only ~30€ but also that it required a ~8€/month subscription to NVidia GeForceNow. As we really don’t play that often, this was not acceptable for me. Fortunately, as I have a PC with a Nvidia Geforce GTX 760 I found a solution without the need for a subscription: use “Steam (in BigPicture Mode)” and stream it to the NVIDIA. And “Cerise sur le Gateau”, it did only cost 6€ as there was a special promo this weekend on Instant Gaming.

    Click to Read More

    So, instead of buying Lego Star Wars: The Force Awakens for NVIDIA on GeforceNow, I bought if for PC on Steam with the idea to use it via “NVIDIA GameStream”.

    Once installed on my PC via Steam, I did try it. Unfortunately, instead of running correctly, it did start minimized. This is a well know issue with games from Steam and the solution is to define manually the resolution of your screen. For Lego Star Wars:

    1. Open the folder C:\Users\<Your Account>\AppData\Roaming\Warner Bros. Interactive Entertainment\LEGO STAR WARS The Force Awakens
    2. Edit the file PCConfig.TXT and set the resolution and the refresh rate of your main screen into it
      1. ScreenWidth 1920
      2. ScreenHeight 1080
      3. WindowWidth 1920
      4. WindowHeight 1080
      5. ScreenRefreshRate 60
    3. Save.

    Once successfully tested, I did close the game and, still on my PC, I did:

    1. Open NVIDIA’s GeForce Experience (Press :win: and type ‘GeForce’) and logged in with my account
    2. Open the Parameters (icon on the left of your account)
    3. Select the menu “SHIELD” on the right
    4. Enable the option GAMESTREAM
    5. And add the Steam game as those are not automatically detected (Ex.: C:\Program Files (x86)\Steam\steamapps\common\LEGO STAR WARS The Force Awakens\LEGOSWTFA_DX11.exe)

    Finally, on my NVIDIA Shield TV, I did:

    1. Open “NVIDIA Games” (It is under “Games” and not under “Applications”)
    2. Go to “My Library”
    3. Select “GameStream”
    4. The first time “GameStream” is accessed, it asks for your login. Use the same login as the one for “GeForce Experience”!
    5. Once connected, your PC is detected and
      1. All games available via GeForce Experience appear, including those you have added in GeForce Experience > Parameters > SHIELD. You can run any of those. They will play on your PC and be mirrored onto your NVIDIA
      2. one Icon STEAM also appears. This one can be used to start “Steam in BigPicture Mode” on your PC and stream it automatically to your NVIDIA.

    Screenshots here.

    Now, instead of using “NVIDIA Games”, I can also directly run “STEAM” (also available under Games).

    And obviously, not only the video but also the sound is redirected from your PC to your NVIDIA. And in the opposite direction, commands from your SHIELD Controllers are send to the PC. So yes, you can play with them.

    Loading

  • Android Remotes tested with NVIDIA Shield TV

    I have several Android remotes. Here is a short list of what keys are working well or not with my Nvidia Shield TV.

    Click to Read More

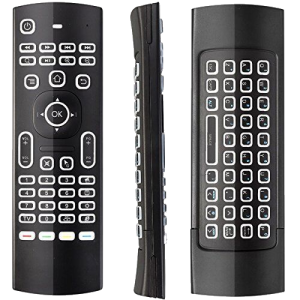
    FeBite Backlit 2.4G MX3

    Backlit Fly Mouse MX3 2.4G
    Backlit Fly Mouse MX3 2.4G

    This is an Air Mouse (with 3-Gyro + 3-G sensor,) Mini QWERTY Wireless Keyboard for Android, Windows, … , with IR learning (up to 5 keys) and Backlit (this is why it’s my preferred one)

    This remote does not look as cheap as the Rii i25 but, as far as I am concerned, with a weight of 100g and a size of 172x52x19mm, if does not fit in hands as well as the Minix.

    It’s an exact clone of the Rii MX3(Multifunction 2.4G Fly Mouse Mini Wireless Keyboard & Infrared Remote Control & 3-Gyro + 3-Gsensor for Google Android TV/Box, IPTV, HTPC, Windows, MAC OS, PS3)

    It works with 2 batteries AAA (Working Power: Less than 10mA in the work condition). When removed, one can store the receiver (a mini usb dongle) into the batteries slot, although not designed specifically for. This slot is also quite uneasy to open. The two batteries are “at the bottom” when using the remote as a pointer to control the mouse. So one does not feel their weight.

    NB.: I didn’t test yet the IR Learning feature.

    On the Home screen:

    using the Keypad side:

    • Power button is tuning on/off the NVIDIA (which is not the case with all remotes).
    • Fast-backward, Fast-forward, Previous and Next buttons do nothing except if a music is playing, for example with Spotify in the background.
    • Search button opens the Voice Search feature. NVIDIA is next waiting on you to press the microphone button. Unfortunately, this remote has no microphone.
    • Play/Pause button does nothing except if a music is playing, for example with Spotify in the background.
    • Zoom-in and Zoom-out buttons do nothing.
    • Menu button does nothing
    • Home button clicked once comes back on top of the home screen.
    • Home button clicked twice shows the list of opened apps.
    • Home button clicked for 3 sec shows NVIDIA’s Shadowplay menu.
    • Return button does nothing on the home screen. But is works well when one opens the search feature, the browser or most Apps (Ex.: works with Plex. Do not work with Netflix. In such a case use the Home button).
    • The D-pad (Left/Right/Up/Down) navigates between the Apps and the Ok button runs the one currently selected.
    • A Long press on the Ok button on an App will lock it. You can next move it left or right and press again Ok to release it at its new position.
    • Volume Up/Down and Prev/Next Program button do nothing.
    • Mute button does nothing
    • Mouse button (a.k.a. Cursor button) enables/disables the mouse pointer. Once enabled, use the remote to move the mouse and the Ok button to click (and e.g. select an App). Once disabled, the mouse pointer will freeze and soon disappear. Tip: You can temporarily disabled the mouse to move and realign the remote and the pointer if necessary.
    • All other buttons do nothing, except the Internet button which opens a browser and for sure, the Backlit button which turn on/off the keys. Extremely useful when using this remote in the dark (which is often the case when connected to an HTPC system, …). The light switch off after a few seconds if the remote does not move anymore.

    using the Keyboard side:

    • Left/Right/Up/Down can be used to navigate between Apps and Enter/Space can be used to run the currently selected App. But Left/Right/Down sometimes stop to work.
    • If one clicks the Search button, as it opens the Voice Search feature, the keyboard can’t be used.
    • To search, use the D-pad to select the Text Search feature. Once this feature opened, the keyboard can be used.
    • Backspace delete the last entered character.
    • Esc will cancel and exit the search feature. To reopen it easily, you can press Right and Enter
    • Press once Caps to switch into the capital mode. Press once again to switch back to the normal mode.
    • Press once ALT to switch into the special character or figures mode. Press once again to switch back to the normal mode.
    • Left/Right/up/Down can be used to select characters from the virtual keyboard. But pressing Enter won’t select the character currently focused. Instead the Virtual Keyboard will close.
    • Press once Enter to close the virtual Keyboard and once more to execute the search. It’s searching among the Apps, Youtube, Plex and Spotify if installed, …
    • If the Virtual Keyboard is closed, Left/Right can be used to edit the text entered.

    With Plex:

    • Power button is tuning on/off the NVIDIA (not just plex!).
    • The D-pad (Left/Right/Up/Down) navigates between the users or the Menus and the Ok button can be used to select.
    • While playing a movie, Ok does a pause/play and Down opens the menu (Return will close it).
    • The figures (1, 2, 3, 4, 5, 6, 7, 8, 9, 0) can be used to type users’ pins.
    • Fast-backward, Fast-forward can be used to rewind/skip x sec.
    • Previous and Next buttons do nothing.
    • Search button opens the Voice Search feature (useless without a microphone). Press Return to close the feature. It does not open the search feature of Plex. You must select it with the D-pad . It’s the native search feature of the NVIDIA.
    • Play/Pause button work as expected while playing a movie.
    • Zoom-in and Zoom-out buttons do nothing.
    • Menu button does something “not visible”. Once pressed, the D-pad does not work anymore. Press a second time to unlock the D-pad .
    • Home button clicked once shows the home screen although the movie is continuing to play and keeps visible in the background. Press Return to hide the home screen.
    • Home button clicked twice shows the list of opened apps. Any movie currently playing is stopped.
    • Home button clicked for 3 sec does nothing.
    • Return button open the previous screen. It can be used to exit a movie currently playing or to exit Plex.
    • Volume Up/Down and Prev/Next Program button do nothing.
    • Mute button does nothing.
    • Mouse button enable/disable the mouse pointer.
    • All other buttons do nothing, except the Internet and Backlit button.

    With Netflix:

    • Power button is tuning on/off the NVIDIA (not just Netflix!).
    • The D-pad (Left/Right/Up/Down) navigates between the users or the Menus and the Ok button can be used to select.
    • Up/Down can be used to open the menu while playing a movie. Return will close the menu.
    • Left/Right can be used to rewind/skip scene while playing a movie. Ok will continue to play from the selected scene.
    • Fast-backward, Fast-forward, Previous and Next work as expected while playing a movie.
    • Search button opens the Voice Search feature (useless without a microphone). Press Return to close the feature. It does not open the search feature of Netflix. You must select it with the D-pad. Next, use the keyboard. You can type of use the Arrows and Enter to select the letters on the Virtual Keyboard.
    • Play/Pause button work as expected while playing a movie.
    • Zoom-in and Zoom-out buttons do nothing.
    • Menu button does nothing.
    • Home button clicked once shows the home screen. Any movie currently playing is stopped.
    • Home button clicked twice shows the list of opened apps. Any movie currently playing is stopped.
    • Home button clicked for 3 sec shows NVIDIA’s Shadowplay menu.
    • Return button go back the previous screen. It can be used to exit a movie currently playing but won’t exit Netflix!.
    • Volume Up/Down and Prev/Next Program button do nothing.
    • Mute button does nothing.
    • Mouse button enable/disable the mouse pointer.
    • All other buttons do nothing, except the Internet and Backlit button.

    Spotify:

    • Power button is tuning on/off the NVIDIA (not just Spotify!).
    • The D-pad (Left/Right/Up/Down) can be used to navigate and the Ok button can be used to select.
    • Fast-backward, Fast-forward, Previous and Next work as expected while playing a music.
    • Search button opens the Voice Search feature (useless without a microphone). Press Return to close the feature. It does not open the search feature of Spotify. You must select it with the D-pad. Unfortunately, the keyboard does not work with Spotify’s search feature and no Virtual Keyboard opens… I think that the problem is with the search feature…
    • Play/Pause button work as expected while playing music.
    • Zoom-in and Zoom-out buttons do nothing.
    • Menu button does nothing.
    • Home button clicked once shows the home screen. Any music currently playing will continue.
    • Home button clicked twice shows the list of opened apps. Any music currently playing will continue.
    • Home button clicked for 3 sec shows NVIDIA’s Shadowplay menu.
    • Return button go back the previous screen, including to the home screen. But the music, if any, will continue to play.
    • Volume Up/Down and Prev/Next Program button do nothing.
    • Mute button does nothing.
    • Mouse button enable/disable the mouse pointer.
    • All other buttons do nothing, except the Internet and Backlit button. Notice that the music, if any, will continue to play when a browser is opened.

    Remote learning feature (copy/paste from here):

    If you would like your MX3 remote to learn some commands from another remote, then you can teach it to ‘copy’ the IR signal of the other remote. For instance, whilst the power button will turn your player off, it wont turn it back on because its not using the same ‘Turn on’ signal as your standard android remote.  So here is what to do:

    1. Get your standard android remote (or any remote that you want to replicate a button from) and place it end-to-end with the MX3 so that the IR receivers are facing each other.
    2. Then, on the MX3 press and hold the red TV button. You will see the LED flashing rapidly then slow to a steady flash (the steady flash means the X3 is now in ‘learning’ mode)
    3. Release the ‘TV’ button.
    4. Now press the power button on the standard remote (or whichever button you want to map) You will see the LED light stop flashing and glow continuously, at this point press the power button on your MX3 remote. The LED will then flash again and eventually extinguish. This means the MX3 has finished ‘learning’ the IR code from the other remote and has successfully mapped it to the power button

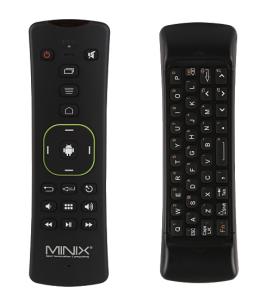
    MINIX  NEO A3 

    The Neo A3 of Minix has more or less the same features as the FeBite MX3, although a bit heavier and larger (making it more comfortable than the FeBite MX3). It has however no backlit but a microphone for Voice input.

    It works with two batteries AAA, one in each extremity, making it well balanced when using the keyboard. On the opposite, you can feel it, compared to the FeBite MX3, when using the remote as a pointer to control the mouse. NB.: one of the battery slot, when empty, can be used to store the receiver (a usb dongle). And both battery slots are easy to open.

    Minix Neo A3
    Minix Neo A3

    On the Home screen:

    using the Keypad side:

    • Power button is not tuning on/off the NVIDIA.
    • Settings button does nothing.
    • Recent Apps button does nothing. Double click the Home button instead.
    • Home button clicked once shows the home screen although the movie is continuing to play and keeps visible in the background. Press Return to hide the home screen.
    • Home button clicked twice shows the list of opened apps. Any movie currently playing is stopped.
    • Home button clicked for 3 sec does nothing.
    • The D-pad (Left/Right/Up/Down) navigates between the Apps and the Android button (Ok) runs the one currently selected.
    • Return button does nothing on the home screen. But is works well when one opens the search feature, the browser or most Apps (Ex.: works with Plex. Do not work with Netflix. In such a case use the Home button).
    • The Microphone does nothing if one does not open first the Voice Search feature with the D-pad. It works fine otherwise
    • Mouse button (A.k.a. Fly Mode) enable/disable the mouse pointer. Once enabled, use the remote to move the mouse and the Ok button to click (and e.g. select an App). Once disabled, the mouse pointer will freeze and soon disappear. Tip: You can temporarily disabled the mouse to move and realign the remote and the pointer if necessary.
    • Volume Up/Down buttons do nothing.
    • “Installed Apps lists” button does nothing.
    • Fast-backward, Fast-forward do nothing except if a music is playing, for example with Spotify in the background.
    • Play/Pause button does nothing except if a music is playing, for example with Spotify in the background.
    • Opposite to the FeBite MX3, there is no Zoom-in/Zoom-out buttons, no Previous/Skip buttons, no Browser button, no Search button, no Mute button.
    • A Long press on the Ok button on an App will lock it. You can next move it left or right and press again Ok to release it at its new position.
    • And no Backlit feature.

    using the Keyboard side:

    • Left/Right/Up/Down can be used to navigate between Apps and Enter/Space can be used to run the currently selected App.
    • To search, use the D-pad to select the Text Search feature. Once this feature opened, the keyboard can be used.
    • Backspace (Del) deletes the last entered character.
    • Esc will cancel and exit the search feature. To reopen it easily, you can press Right and Enter
    • Press once Caps to switch into the capital mode. Press once again to switch back to the normal mode.
    • Press Shit simultaneously with a letter to type its capital.
    • Press once Fn to switch between letters and special characters or figures.
    • Left/Right/up/Down can be used to select characters from the virtual keyboard. But pressing Enter won’t select the character currently focused. Instead the Virtual Keyboard will close.
    • Press once Enter to close the virtual Keyboard and once more to execute the search. It’s searching among the Apps, Youtube, Plex and Spotify if installed, …
    • If the Virtual Keyboard is closed, Left/Right can be used to edit the text entered.
    • Tab can be used on the Home screen to move to the next App. It does nothing in the Text Search feature.

    With Plex:

    • Power button is not tuning on/off anything.
    • Settings button does nothing.
    • Recent Apps button does nothing.
    • Menu button does nothing.
    • Home button clicked once comes back on top of the home screen.
    • Home button clicked twice shows the list of opened apps.
    • Home button clicked for 3 sec shows NVIDIA’s Shadowplay menu.
    • The D-pad (Left/Right/Up/Down) navigates between the users or the Menus and the Ok button can be used to select.
    • While playing a movie,
      • Ok does a pause/play.
      • Down opens the menu (Return will close it).
      • Right/Left rewind/skip x sec.
    • Return button opens the previous screen. It can be used to exit a movie currently playing or to exit Plex.
    • Volume Up/Down buttons do nothing.
    • “Installed Apps lists” button does nothing.
    • Mouse button enable/disable the mouse pointer.

    With Netflix:

    • Power button is not tuning on/off anything.
    • Settings button does nothing.
    • Recent Apps button does nothing.
    • Menu button does nothing.
    • Home button clicked once shows the home screen. Any movie currently playing is stopped.
    • Home button clicked twice shows the list of opened apps. Any movie currently playing is stopped.
    • Home button clicked for 3 sec shows NVIDIA’s Shadowplay menu.
    • The D-pad (Left/Right/Up/Down) navigates between the users or the Menus and the Ok button can be used to select.
    • Up/Down can be used to open the menu while playing a movie. Return will close the menu.
    • Left/Right can be used to rewind/skip scene while playing a movie. Ok will continue to play from the selected scene.
    • Return button go back the previous screen. It can be used to exit a movie currently playing but won’t exit Netflix!.
    • Open the search feature of Netflix and use the keyboard to search (Voice search does not work with the microphone). You can type of use the Arrows and Enter to select the letters on the Virtual Keyboard.
    • Mouse button enable/disable the mouse pointer.
    • Volume Up/Down buttons do nothing.
    • “Installed Apps lists” button does nothing.
    • Fast-backward, Fast-forward work as expected while playing a movie.
    • Play/Pause button work as expected while playing a movie.

    Spotify:

    • Power button is not tuning on/off anything.
    • Settings button does nothing.
    • Recent Apps button does nothing.
    • Menu button does nothing.
    • Home button clicked once shows the home screen. Any music currently playing will continue.
    • Home button clicked twice shows the list of opened apps. Any music currently playing will continue.
    • Home button clicked for 3 sec shows NVIDIA’s Shadowplay menu.
    • The D-pad (Left/Right/Up/Down) can be used to navigate and the Ok button can be used to select.
    • Return button go back the previous screen, including to the home screen. But the music, if any, will continue to play.
    • The microphone does not work as Spotify’s search feature and its Virtual Keyboard does not work ?!
    • Mouse button enable/disable the mouse pointer.
    • Volume Up/Down buttons do nothing.
    • “Installed Apps lists” button does nothing.
    • Fast-backward, Fast-forward work as expected while playing a music.
    • Play/Pause button work as expected while playing music.

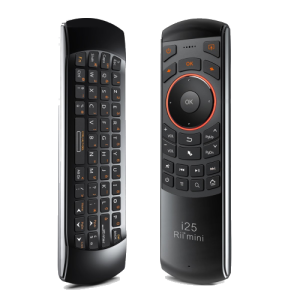
    Rii Mini i25

    The Rii mini i25 is a Mini wireless AZERTY keyboard with IR remote and Air Mouse similar to the FeBite MX3, although smaller (170x48x11mm) and 10g heavier (110g)… and without backlit or microphone.

    It has a built-in 450mAh lithium-ion battery that must be reloaded via usb micro-B. There is a switch on/off on the side. No slot to store the receiver (a usb dongle).

    Rii Mini i25
    Rii Mini i25

    The red buttons does nothing (Power off, Set, …, Source and return).

    There is a off button and the bottom-left, which turn off the NVIDIA, but does not turn it back on…

    All other keys works as described for the Minix Neo A3 (Read more details here).

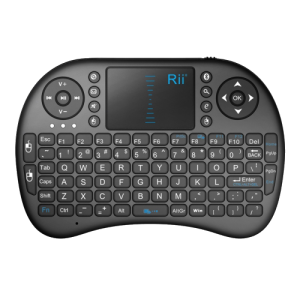
    Rii Mini i8 

    The Rii Mini i8 is also wireless keyboard, with a touch pad and an air Mouse but without 3-Gyro + 3-Gsensor, backlit or microphone. And because it seems extremely light (a feeling due to a large surface of plastic 148x97x18.5mm for only 109g), it looks cheaper than the others.

    It comes with a removable lithium-ion battery of 280mAh which can be reloaded via usb mini-B. The slot with the internal battery has enough space to store the receiver (a usb dongle).

    Rii Mini i8
    Rii Mini i8

    This is much more comfortable as a wireless keyboard to browse on a TV than a remote control for an HTPC.

    Loading

  • Synology: how to get MAC address from IP address and vice versa

    Here is how to retrieve the IP address of devices in the same LAN as your Synology, based on their a MAC addresses, and vice-versa.

    Click to Read More

    I am using a php script to executes various bash scripts. it requires the package inetutils that can be installed using ipkg. Type in a ssh console run as root: /opt/bin/ipkg install inetutils

    [php] <?php
    //Clean all MAC addresses from ARP table
    function FlushArpTable()
    {
        //only work if run as root
        $flush = exec("ip -s -s neigh flush all");
    }

    //Return 1 if the given $ip is a local one
    function IsLocalIp($ip)
    {
        //Get all local IP address from ifconfig
        //$localIp = `ifconfig | grep -Eo ‘inet (addr:)?([0-9]*\.){3}[0-9]*’ | grep -Eo ‘([0-9]*\.){3}[0-9]*’ | grep -v ‘127.0.0.1’`;
        $localIp = exec("ifconfig | grep -o $ip");
        return ($localIp == $ip);
    }

    //Ping $ip using inetutils (only this one works when not run as root)
    //return -1 if package inetutils is not installed (can be done using ipkg)
    function Ping($ip)
    {
        $ping = exec("if [ -f /opt/bin/ping ] ; then /opt/bin/ping -c1 $ip; echo 1; else echo -1; fi");
        return $ping;
    }

    //Return MAC address related to the given $ip address in ARP table or ifconfig
    //Ping the $ip if MAC is not found and $force=1
    //NB.: Synology local ip are not added in the ARP table, hence the use of ifconfig
    function GetMacFromArp($ip, $force = 1)
    {
        if (filter_var($ip, FILTER_VALIDATE_IP)) {
            // Look into the arp table for the MAC address linked to the given ip address
            $mac = exec("arp -a $ip | grep -o -E ‘([[:xdigit:]]{1,2}:){5}[[:xdigit:]]{1,2}’");
            $mac = trim($mac);
            
            if ($mac == "") {
                //if the ip is not in the ARP table, look for it via ifconfig
                $mac = `ifconfig | grep -E "HWaddr |inet |^$" | awk ‘$1=$1’ ORS="\n\n" RS="\n\n" | grep $ip | grep -o -E ‘([[:xdigit:]]{1,2}:){5}[[:xdigit:]]{1,2}’`;
                $mac = trim($mac);
            }
            
            if ($mac == "" && $force == 1) {
                echo "? ";
                Ping($ip);
                $mac = GetMacFromArp($ip, $force = 0);
            } else if ($force == 1) {
                echo "! ";
            }
        }
        
        return $mac;
    }

    //Return ip address related to the given $mac address in ARP table or ifconfig
    //NB.: Synology local ip are not added in the ARP table, hence the use of ifconfig
    function GetIpFromArp($mac)
    {
        if (filter_var($mac, FILTER_VALIDATE_MAC)) {
            // Look into the arp table for the ip linked to the given mac address
            $ip = exec("arp -a | grep $mac | grep -o -E ‘\b([0-9]{1,3}\.){3}[0-9]{1,3}\b’");
            
            if ($ip == "") {
                // if no ip found in the arp table, look for it into the ifconfig
                $ip = exec("ifconfig | grep -E ‘HWaddr |inet |^$’ | awk ‘$1=$1′ ORS=’\n\n’ RS=’\n\n’ | grep $mac | grep -o -E ‘addr:\b([0-9]{1,3}\.){3}[0-9]{1,3}\b’ | grep -o -E ‘\b([0-9]{1,3}\.){3}[0-9]{1,3}\b’");
            }
        }
        
        return $ip;
    }

    function DisplayMac($ip)
    {
        if (filter_var($ip, FILTER_VALIDATE_IP)) {
            $mac = GetMacFromArp($ip);
            if (filter_var($mac, FILTER_VALIDATE_MAC)) {
                echo "MAC of $ip is " . $mac;
                if ($ip != GetIpFromArp($mac)) {
                    echo " (? " . GetIpFromArp($mac) . " ?)";
                }
            } else {
                echo "MAC of $ip is unknown";
            }
            if (IsLocalIp($ip)) {
                echo " (a local IP)";
            }
            echo "<br/>";
        }
    }

    // Check if  ping works
    if (Ping("127.0.0.1") == -1) {
        echo "You have to install inetutils. Ex.: using ipkg";
    } else {
        //clean the arp table (only work when run as root)
        FlushArpTable();
        
        //Display the mac address of an ip in the LAN
        DisplayMac(‘192.168.0.19’);
        
        //get ip of all local interfaces
        $localIps = split("\n", `ifconfig | awk ‘/inet addr/{print substr($2,6)}’`);
        foreach ($localIps as $ip) {
            DisplayMac($ip);
        }
        
        DisplayMac(‘192.168.0.47’);
        
    }
    ?>
    [/php]

    Loading

  • Synology: System internal service [apparmor] failed to start

    Since I have upgraded my DSM 6.1.4 to the latest update, I have this error : “System internal service [apparmor] failed to start.”

    I did contact Synology ans the only solution is to reintall the DSM

    Click to Read More

    To confirm the problem, open a SSH console and enter the root mode as explained here.

    In that console, type: synoservice –is-all-up

    You should see that the apparmor service didn’t start properly after the reboot:

    root@YourNas:~# synoservice –is-all-up
    service [ “apparmor” ] failed on bootup.


    Here is the answer from Synology

    Good evening,


    thanks for contacting the Synology technical support and sorry for the late reply, we’re having an high volume of ticket.

    We’re aware of this issue, did you recently update your DSM?

    Anyway, I’m sorry but you will have to reinstall DSM to fix this issue, please take a full backup of your Data using “Hyper backup” or “Cloud Sync“.

    After that navigate to Control Panel -> Update and Restore -> Configuration Backup -> Backup Configuration-> Reset -> Erase all Data

    Reinstall DSM and restore Configuration and Data.
    Take in mind that the response time might be delayed a bit because of the high amount of Ticket that we received.

    Thanks for your understanding and for your patience.
    If you have any other question or doubt, don’t hesitate to contact me back.

    Best regards,
    xxxxxxxx

    Technical support FR

    Loading

  • Unattended GPG key generation to sign Synology Packages

    I am going to add a feature in my own version of SSPKS to sign Synology packages. But to do this, I need a way to create GPG key from a non-interactive script.

    Click to Read More

    I found the required documentation here and a sample here. I did adapt that sample to:

    • not require a passphrase as mentioned in the Synology documentation. This would break the build process.
    • to generate some entropy without the rng-tools (not available out-of-the-box for Synology)

    Obviously, you need gpg. I am using gpg2 made available by installing the package gpgme via ipkg as explained here.

    Create keys in your personal key rings

    First, put the parameters to be used by gpg into a file named ‘gpgKey‘ (don’t forget that it must be linux compliant => not CRLF (/r/n) but only LF (/n)*). Here under, I am using RSA 2048. Use your own name, comment and email address.

    Key-Type: RSA
    Key-Length: 2048
    Subkey-Type: RSA
    Subkey-Length: 2048
    Name-Real: Type Here your name
    Name-Comment: Type Here some comment
    Name-Email: Type Here your email
    Expire-Date: 0
    %no-protection
    %commit

    Next, save the following script in a file named ‘createGpgKey.sh’ (don’t forget about CRLF 😉 )

    #!/usr/bin/env bash
    if [ ! -f ~/.gnupg/gpg.conf ]; then
    mkdir -p -m 0700 ~/.gnupg
    touch ~/.gnupg/gpg.conf
    chmod 600 ~/.gnupg/gpg.conf
    tail -n +4 /opt/share/gnupg/gpg-conf.skel > ~/.gnupg/gpg.conf

    touch ~/.gnupg/{pub,sec}ring.gpg
    fi

    #generate some entropy
    (dd if=/dev/zero of=/dev/null) & pid=$!

    #generate the key (and a folder to be used later 😉
    mkdir -p -m 0700 gpg
    gpg2 –verbose –batch –gen-key ./gpgkey

    #kill the entropy generator
    kill $pid

    Then, move those two files into a public shared folder of your Synology. Ex.: ‘\\<Your Nas>\temp

    And open a ssh console as explained here (no need to enter the root mode) to go into the shared folder: cd /var/services/temp

    Finally, here is the output you should see when running your script: sh createGpgKey.sh

    gpg: skipping control `%no-protection’ ()
    gpg: writing self signature
    gpg: RSA/SHA1 signature from: “1418FFE0 [?]”
    gpg: writing key binding signature
    gpg: RSA/SHA1 signature from: “1418FFE0 [?]”
    gpg: RSA/SHA1 signature from: “71C22B00 [?]”
    gpg: writing key binding signature
    gpg: RSA/SHA1 signature from: “1418FFE0 [?]”
    gpg: RSA/SHA1 signature from: “71C22B00 [?]”
    gpg: writing public key to `/var/services/homes/<current user>/.gnupg/pubring.gpg’
    gpg: writing secret key to `/var/services/homes/<current user>/.gnupg/secring.gpg’
    gpg: /var/services/homes/<current user>/.gnupg/trustdb.gpg: trustdb created
    gpg: using PGP trust model
    gpg: key 1418FFE0 marked as ultimately trusted

    The keys are now stored into your home’s gpg folder: ls ~/.gnupg/

    You can check that the key id displayed above are stored using:

    • gpg2 —list-keys

    gpg: checking the trustdb
    gpg: 3 marginal(s) needed, 1 complete(s) needed, PGP trust model
    gpg: depth: 0 valid: 1 signed: 0 trust: 0-, 0q, 0n, 0m, 0f, 1u
    /var/services/homes/<current user>/.gnupg/pubring.gpg
    ——————————————–
    pub 2048R/1418FFE0 2017-12-26
    uid Your Name (Your Comment) Your Email Address
    sub 2048R/71C22B00 2017-12-26

    • gpg2 —list-secret-keys

    gpg: checking the trustdb
    gpg: 3 marginal(s) needed, 1 complete(s) needed, PGP trust model
    gpg: depth: 0 valid: 2 signed: 0 trust: 0-, 0q, 0n, 0m, 0f, 2u
    /var/services/homes/<current user>/.gnupg/secring.gpg
    ——————————————–
    sec 2048R/1418FFE0 2017-12-26
    uid Your Name (Your Comment) Your Email Address
    ssb 2048R/71C22B00 2017-12-26

    *: the trick to replace all CRLF by LF is to edit the file with notepad++, use the menu Encoding > Convert to UTF-8, and next do CTRL-H to search and replace /r/n with /n using the search mode = Extended. You can finally check that there is no more CRLF by using the menu View > Show Symbol > Show End of Line.

    NB.: the script could be a bit slow if there is not enough entropy (up to 45sec on my NAS)… (to download a big file within the download station can help 😉

    You can now export your public key using either your name, your email or the key id (from illustration here above, the key id is 1418FFE0): gpg2 –armor –export 1418FFE0 > gpgkey.asc

    This file ‘gpgkey.asc’ must be copied in the root folder of your SSPKS server, so it will automatically be added as a trusted publisher for anyone who is adding your SSPKS url in his list of “Package Sources”.

    Now, assume that you have the package to be signed (a spk file) and the ‘CodeSign.php’ script from Synology’s toolkit (it can be downloaded from github) in the same shared folder ‘temp’ used previously… Then, you can sign this package using: php CodeSign.php –sign=YourPackage.spk –keydir=~/.gnupg –keyfpr=1418FFE0

    Create keys in specific key rings

    Instead of using your personal key rings, you could prefer to store your keys in a dedicated folder… To do so, you can use the following parameters in your gpgKey file:

    Key-Type: RSA
    Key-Length: 2048
    Subkey-Type: RSA
    Subkey-Length: 2048
    Name-Real: Type Here your name
    Name-Comment: Type Here some comment
    Name-Email: Type Here your email
    Expire-Date: 0
    %no-protection
    # Write public key into a file pub.gpg
    %pubring gpg/pubring.gpg
    # Write secret key into a file sec.gpg
    %secring gpg/secring.gpg
    %commit

    Once the script createGpgKey.sh executed, you will find two files pubring.gpg and secring.gpg in the folder gpg (created by the script that run in /var/services/temp/).

    gpg: Generating a basic OpenPGP key
    gpg: skipping control `%no-protection’ ()
    gpg: writing public key to `gpg/pubring.gpg’
    gpg: writing secret key to `gpg/secring.gpg’
    gpg: writing self signature
    gpg: RSA/SHA1 signature from: “F93A0789 [?]”
    gpg: writing key binding signature
    gpg: RSA/SHA1 signature from: “F93A0789 [?]”
    gpg: RSA/SHA1 signature from: “8AAC41CF [?]”
    gpg: writing key binding signature
    gpg: RSA/SHA1 signature from: “F93A0789 [?]”
    gpg: RSA/SHA1 signature from: “8AAC41CF [?]”

    You can now sign your package using: php CodeSign.php –sign=YourPackage.spk –keydir=/var/services/temp/gpg –keyfpr=F93A0789

    You can also check your keys using:

    • gpg2 –no-default-keyring –secret-keyring ./gpg/secring.gpg –keyring ./gpg/pubring.gpg –list-secret-keys
    • gpg2 –no-default-keyring –secret-keyring ./gpg/secring.gpg –keyring ./gpg/pubring.gpg –list-keys

    And you can export your public key to be used in your SSPKS using:

    • gpg2 –no-default-keyring –keyring ./gpg/pubring.gpg –armor –export F93A0789 > gpgkey.asc

    Create keys with a passphrase

    In order to provide a passphrase, replace ‘%no-protection‘ in the parameters file with:

    Passphrase: Type Here your passphrase

    Loading