Category: Hardwares

  • Flash LSI 9211-8i and LSI 9201-16i on Asus P9X79 WS

    I did move my LSI cards 9211-8i and 9201-16i from my Asus Striker II Formula onto a P9X79 WS. Unfortunately, the MB couldn’t boot with both card plugs. I did upgrade the firmware and erased the bios of both cards to solve the problem.

    Click to Read More

    Actually, everything was working fine until I decided to upgrade the bios of my Asus P9X79 WS from the version 48022 of 2015 to the very latest 4901 of 2018 (An attempt to solve an issue with DIMM not recognized.. Attempt failed… I think the issue is actually with the CPU not supporting Quad Channel). Bref.

    After this upgrade, the Asus MB didn’t boot anymore. There was only a cursor blinking in the upper left corner. Clearly, IMO, the cursor of the LSI bios.

    • Booting without any LSI card was ok.
    • Booting with only the LSI 9211-8i was ok.
    • Booting with only the LSI 9201-16i was ok.
    • But booting with both LSI was failing although I tried to move them in all the various PCI-E x16 slots.

    So, I decided to attempt the upgrade of both LSI cards (currently with firmware IT version 19.00.00.00 and Bios 07.37.00.00). But while preparing the USB key to do this, reading a few articles, I realized that I could also completely erase the BIOS as I don’t boot from a disk on any of those Cards.

    So, here is what I did:

    1. Format a USB key as FAT32
    2. Download the legacy firmwares (and bios if you want) for the LSI cards from here (with Product Group = Legacy Product and Product Family = Legacy Host Bus Adapters)
      1. for 9201-16i, it’s here. You need two files
        1. 9201-16i_Package_Pxx_IT_Firmware_BIOS_for_MSDOS_Windows.zip 
        2. Installer_PXX_for_UEFI
      2. for 9211-8i, it’s here. You need two files:
        1. 9211-8i_Package_Pxx_IR_IT_FW_BIOS_for_MSDOS_Windows
        2. Installer_PXX_for_UEFI (which is actually the same file as for 9201-16i)
    3. From the Installer_PXX_for_UEFI, extract the file /sas2flash_efi_ebc_rel/sas2flash.efi and copy it on the USB Key root
    4. From the xxx_BIOS_for_MSDOS_Windows, extract
      1. the firmwares /Firmware/HBA_92xx_IT/xxx.bin and copy them in the USB Key root:
        1. 9201-16i_it.bin
        2. 2118it.bin
      2. the bios sasbios_rel/mptsas2.rom (it’s the same bios for both cards) and copy it in the USB Key root
    5. Now, you need a UEFI shell which works with the P9X79. This one for example or the v2 to be found here didn’t work for me. Instead, I was lucky with this one:
      1. download this Shell_Full.efi on your USB Key root
      2. and rename it Shellx64.efi
      3. for some users, they have to copy if from the root into sublfolders like:
        1. /efi/boot/Shellx64.efi
        2. /boot/efi/Shellx64.efi
    6. Plug the USB Key into your Asus P9X79 WS. For safety, remove all other USB keys and disconnect all HDD/SSD.
    7. Plug next only one SLI Card and upgrade it. Once done, remove it,n plug the other card and upgrade it too.

    To upgrade one SLI Card with your Asus P9X79 WS:

    1. Boot the PC and go into the Bios with Del or F2.
    2. Go into the “Advanced mode” (F7 or click on the button bottom left)
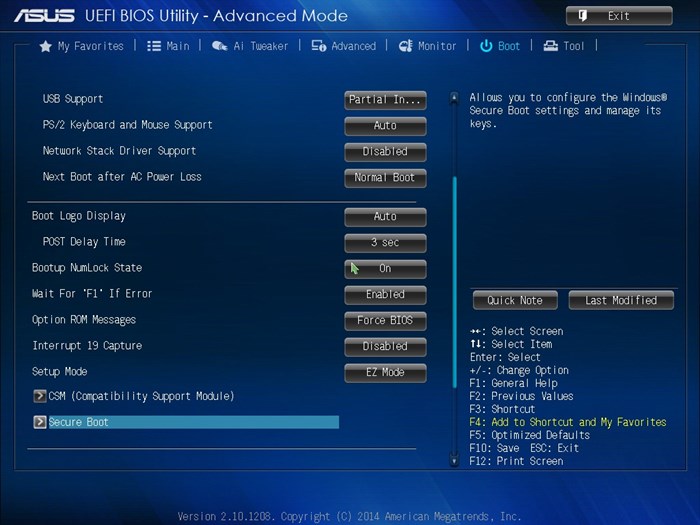
    3. Click on the “Boot” menu (upper right)  and scroll down until you see “Secure Boot” (screenshot 1)
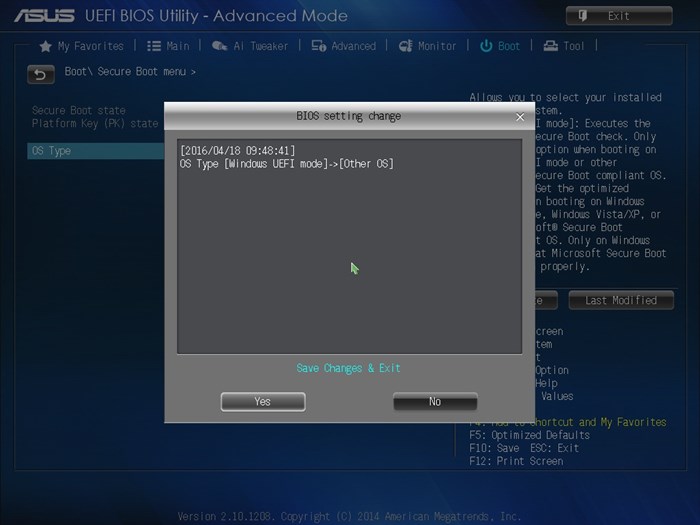
    4. Enter into “Secure Boot” and select “OS Type” = “Other OS” (screenshot 2). This is required to be able to use the UEFI Shell later
    5. Press F10 to “Save and Exit” (screenshot 3)
    6. Go back into the Bios with Del or F2.
    7. Go into the “Advanced mode” (F7 or click on the button bottom left)
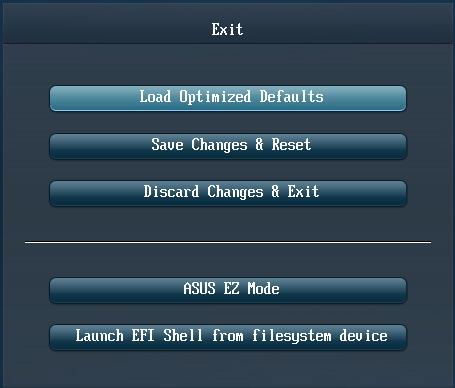
    8. Click on the “Exit” menu (upper right)
    9. Select “Launch EFI Shell from filesystem device” (screenshot 4)
      1. if you have only the USB key prepared previously plugged into the PC, you should soon see the EFI Shell loading
    10. Once the EFI Shell loaded, move to the USB Key and list its content with the commands fs0: and next ls. If you have several USB keys, you need to move onto the right one. You can use the command: map -b to list all available disks and identify the correct one. Ex.: if the correct one is “fs1 :Removable HardDisk – … USB(…)”, then you can move onto it with fs1:. You can break stop the map command by typing q.
    11. Now check the versions of your SLI card with
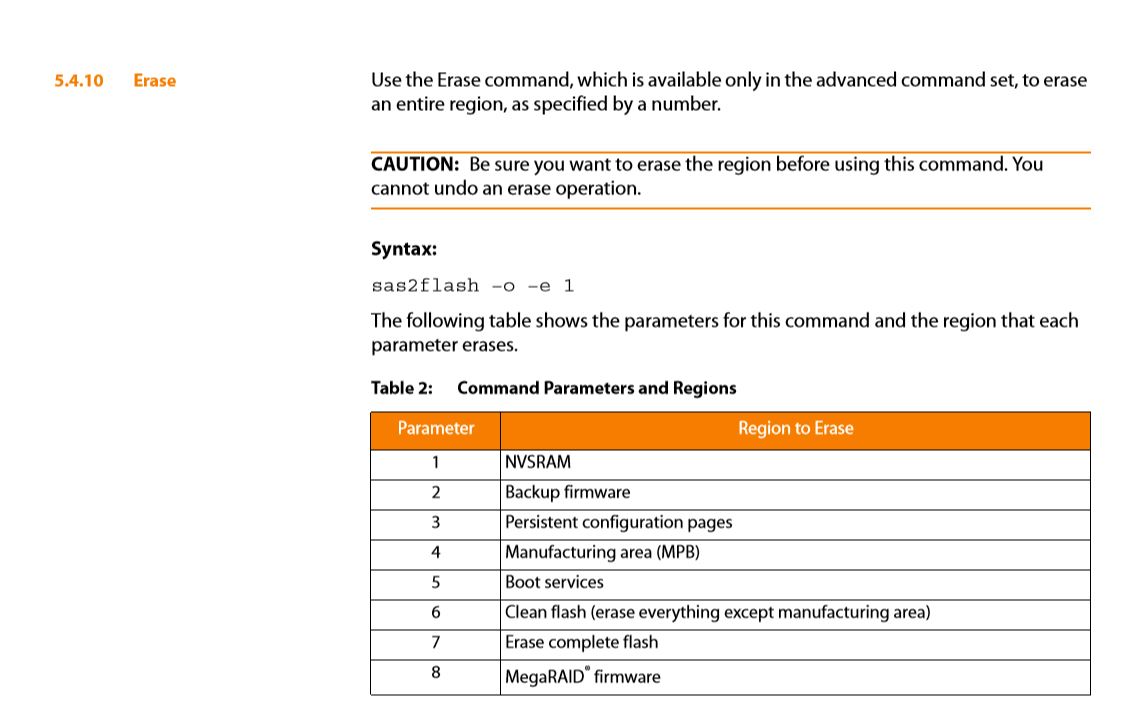
 sas2flash -list
    12. Remove the Bios with the erase command and the parameters 5 as documented in SAS2Flash_ReferenceGuide.pdf (screenshot 5) : sas2flash -o -e 5
    13. Possibly also erase the controller flash memory (I hadn’t to do it) with the command: sas2flash.efi -o -e 6
    14. Type again sas2flash -list to verify the Bios Version now reads N/A
    15. To load a new firmware, depending on the LSI card, type :
      1. sas2flash.efi -o -f 9201-16i_it.bin
      2. sas2flash.efi -o -f 2118it.bin
    16. To load the bios, type: sas2flash.efi -o -b mptsas2.rom

    Do this for each SLI card, one at a time.


    Documentation:


    Screenshot 1: Secure Boot

    Screenshot 2: Other OS

    Screenshot 3: Save and Exit

    Screenshot 4: Launch EFI Shell

    Screenshot 5: Erase command for sas2flash

    Loading

  • Devolo DLan (CPL) + Fibaro Wall Plug = network connection issues

    I notice some incompatiblity between Devolo DLan’s and Fibaro Wall Plugs

    Click to Read More

    In order to measure the power consumption of my Devolo DLan’s (a 500 Wireless+ and a 200 AV Wireless N), I did plug them into Fibaro Wall Plugs.

    It used to work fine at the begining. But now, the devices plugged on the DLan via ethernet or Wifi can’t connext to the network anymore.

    As soon as remove the Fibaro Wall Plug, everything works fine. I tried several times, with two distinct DLan, after resetting my router and my modem, after resetting the connected devices, etc… 

    I found only two other users experiencing also issues when combining Fibaro Wall Plugs and Devolo powerline devices… 

    Loading

    ,
  • IP Camera Apeman ID72 – Softwares, Firmware, …

    I just bought a cheap IP PTZ camera 1080p: an Apeman ID72. The user guide is enough to quick start. But I couldn’t find how to change the DNS settings, access the web interface, etc… I finally found a website with enough info to figure out the URL of the Web UI.

    Click to Read More

    I bought this camera as it supports ONVIF and I was intending to manage it from Synology’s Surveillance station. I did succeed but it was not obvious.

    1. ONVIF port is 10080
    2. Video format is H.264
    3. Audio format is G711.
    4. Resolution is set to 1920×1280
    5. Frame rate is 15
    6. Transport protocol is TCP

    I am using an ethernet connection between the camera and my Synology. The video is smooth and PTZ is responding fast.

    The Apeman ID72 is part of the “T,C Series” (it’s a C). It’s not from the “PnP T,C Series”.

    • Official Website: http://www.apemans.com (ID72)
    • EyeCloud Softwares: http://www.eyecloud.so (for Android devices, iPhone and Windows + IPCam Finder for Mac and Windows)
    • Online CD, Video and other software: http://cd.ipcam.so
      • Central Management Client (For PC): Central Management Client is a Windows software used to manage multiple IP cameras. It is characterized with multi-camera monitoring, PTZ control, record, alarm and access authority management function, as well as easy operation and strong capability.
      • Smart upgrade tool: Using this tool, you can just press a button to automatically upgrade IP-Camera’s firmware to the latest one. It can be used to update both the Http Web UI and the Firmware of the camera.
      • IP Camera Wizard: Use this tool to setup the Camera and configure its network environment.
        • At step 3, the wizard shows the http port configured to access the admin UI of the camera via a web browser (a.k.a.: Web UI).
          • Once connected via the browser, you have access to all the settings. This is for me the most convenient to do any advanced configurations.
        • Reconfigure that port, the submask and the gateway
        • Check the DDNS
        • Define Port Forwarding

    Using the IP Camera Finder from http://www.eyecloud.so, you will see the Http URL to be used to access the admin page in a browser (including the admin port if any). Notice that for some reason, the IP camera disappears and reappears very 3 seconds in that IP Camera Finder… So it’s nearly impossible to configure it there (it should be doable). I could only change settings via the Web UI or via the IP Camera Wizard.

    I did also use successfully the Central Management Client (“IP Camera Super Client”) from http://cd.ipcam.so to find my camera and note its IP and admin port.

    Notice that, via the Web UI, I tried to set 80 as the http port used to access that UI. Unfortunately, although this was rebooting the camera as expected, another port always appeared to be assigned after the reboot… I was only able to successfully change the http port via the IP Camera Wizard, via the “Advance Mode” and only when defining a “Static IP address” (it didn’t work when choosing “Dynamic IP address”). NB.: the http port is neither the ONVIF port, nor the RTSP port. The ONVIF port is 10080. The RTSP port can be changed via the Web UI.

    Each time I change a setting via the Web UI, the camera reboot and reset the http port I have configured 🙁

    I was not able to configure (or even find where to configure) the DDNS. I found the DDNS password in the tab “Other” of the IP Camera Wizard (in “Advance Mode”). But each time I enter the DDNS step of the “IP Camera Wizard” (in mode “Wizard”), I get an error message:

    Obtaining DDNS options from the camera…
    Failure: DDNS has not chosen then IPCam type, please click the “Settings” button to change the settings.

    I also get an error when entering the setp “Port Forwarding”:

    Error: unknown error

    please contact the IP camera supplier.

    I was also unable to disable the access to the camera via the Cloud. I am indeed not interested in that feature.

    To do a Factory Reset, you must use the Web UI (I didn’t find this option in the IP Camera Finder or IP Camera Wizard). Notice that I played with so many settings that I had to do a Reset Factory before being able to connect the camera with Synology Surveillance Station…

    As far as I am concerned, I have triggered the firmware update via eyeCloud on my Android Mobile (it’s done without manual intervention) as I didn’t find where to download the files. It succeeded without any problem. The versions are now:

    • Firmware: 48.53.203.110
    • Web UI: EN203.26.1.20

    Although the quality of the video is good, from a configuration perspective, I really prefer my Foscam cameras! Otherwise, it does not make a lot of noise when moving (compared to my Foscam) . The camera rotation speed can be adjusted and will be used by EyeCloud but not impact by Synology Surveillance Station.

    Loading

    ,
  • Android Remotes tested with NVIDIA Shield TV

    I have several Android remotes. Here is a short list of what keys are working well or not with my Nvidia Shield TV.

    Click to Read More

    FeBite Backlit 2.4G MX3

    Backlit Fly Mouse MX3 2.4G
    Backlit Fly Mouse MX3 2.4G

    This is an Air Mouse (with 3-Gyro + 3-G sensor,) Mini QWERTY Wireless Keyboard for Android, Windows, … , with IR learning (up to 5 keys) and Backlit (this is why it’s my preferred one)

    This remote does not look as cheap as the Rii i25 but, as far as I am concerned, with a weight of 100g and a size of 172x52x19mm, if does not fit in hands as well as the Minix.

    It’s an exact clone of the Rii MX3(Multifunction 2.4G Fly Mouse Mini Wireless Keyboard & Infrared Remote Control & 3-Gyro + 3-Gsensor for Google Android TV/Box, IPTV, HTPC, Windows, MAC OS, PS3)

    It works with 2 batteries AAA (Working Power: Less than 10mA in the work condition). When removed, one can store the receiver (a mini usb dongle) into the batteries slot, although not designed specifically for. This slot is also quite uneasy to open. The two batteries are “at the bottom” when using the remote as a pointer to control the mouse. So one does not feel their weight.

    NB.: I didn’t test yet the IR Learning feature.

    On the Home screen:

    using the Keypad side:

    • Power button is tuning on/off the NVIDIA (which is not the case with all remotes).
    • Fast-backward, Fast-forward, Previous and Next buttons do nothing except if a music is playing, for example with Spotify in the background.
    • Search button opens the Voice Search feature. NVIDIA is next waiting on you to press the microphone button. Unfortunately, this remote has no microphone.
    • Play/Pause button does nothing except if a music is playing, for example with Spotify in the background.
    • Zoom-in and Zoom-out buttons do nothing.
    • Menu button does nothing
    • Home button clicked once comes back on top of the home screen.
    • Home button clicked twice shows the list of opened apps.
    • Home button clicked for 3 sec shows NVIDIA’s Shadowplay menu.
    • Return button does nothing on the home screen. But is works well when one opens the search feature, the browser or most Apps (Ex.: works with Plex. Do not work with Netflix. In such a case use the Home button).
    • The D-pad (Left/Right/Up/Down) navigates between the Apps and the Ok button runs the one currently selected.
    • A Long press on the Ok button on an App will lock it. You can next move it left or right and press again Ok to release it at its new position.
    • Volume Up/Down and Prev/Next Program button do nothing.
    • Mute button does nothing
    • Mouse button (a.k.a. Cursor button) enables/disables the mouse pointer. Once enabled, use the remote to move the mouse and the Ok button to click (and e.g. select an App). Once disabled, the mouse pointer will freeze and soon disappear. Tip: You can temporarily disabled the mouse to move and realign the remote and the pointer if necessary.
    • All other buttons do nothing, except the Internet button which opens a browser and for sure, the Backlit button which turn on/off the keys. Extremely useful when using this remote in the dark (which is often the case when connected to an HTPC system, …). The light switch off after a few seconds if the remote does not move anymore.

    using the Keyboard side:

    • Left/Right/Up/Down can be used to navigate between Apps and Enter/Space can be used to run the currently selected App. But Left/Right/Down sometimes stop to work.
    • If one clicks the Search button, as it opens the Voice Search feature, the keyboard can’t be used.
    • To search, use the D-pad to select the Text Search feature. Once this feature opened, the keyboard can be used.
    • Backspace delete the last entered character.
    • Esc will cancel and exit the search feature. To reopen it easily, you can press Right and Enter
    • Press once Caps to switch into the capital mode. Press once again to switch back to the normal mode.
    • Press once ALT to switch into the special character or figures mode. Press once again to switch back to the normal mode.
    • Left/Right/up/Down can be used to select characters from the virtual keyboard. But pressing Enter won’t select the character currently focused. Instead the Virtual Keyboard will close.
    • Press once Enter to close the virtual Keyboard and once more to execute the search. It’s searching among the Apps, Youtube, Plex and Spotify if installed, …
    • If the Virtual Keyboard is closed, Left/Right can be used to edit the text entered.

    With Plex:

    • Power button is tuning on/off the NVIDIA (not just plex!).
    • The D-pad (Left/Right/Up/Down) navigates between the users or the Menus and the Ok button can be used to select.
    • While playing a movie, Ok does a pause/play and Down opens the menu (Return will close it).
    • The figures (1, 2, 3, 4, 5, 6, 7, 8, 9, 0) can be used to type users’ pins.
    • Fast-backward, Fast-forward can be used to rewind/skip x sec.
    • Previous and Next buttons do nothing.
    • Search button opens the Voice Search feature (useless without a microphone). Press Return to close the feature. It does not open the search feature of Plex. You must select it with the D-pad . It’s the native search feature of the NVIDIA.
    • Play/Pause button work as expected while playing a movie.
    • Zoom-in and Zoom-out buttons do nothing.
    • Menu button does something “not visible”. Once pressed, the D-pad does not work anymore. Press a second time to unlock the D-pad .
    • Home button clicked once shows the home screen although the movie is continuing to play and keeps visible in the background. Press Return to hide the home screen.
    • Home button clicked twice shows the list of opened apps. Any movie currently playing is stopped.
    • Home button clicked for 3 sec does nothing.
    • Return button open the previous screen. It can be used to exit a movie currently playing or to exit Plex.
    • Volume Up/Down and Prev/Next Program button do nothing.
    • Mute button does nothing.
    • Mouse button enable/disable the mouse pointer.
    • All other buttons do nothing, except the Internet and Backlit button.

    With Netflix:

    • Power button is tuning on/off the NVIDIA (not just Netflix!).
    • The D-pad (Left/Right/Up/Down) navigates between the users or the Menus and the Ok button can be used to select.
    • Up/Down can be used to open the menu while playing a movie. Return will close the menu.
    • Left/Right can be used to rewind/skip scene while playing a movie. Ok will continue to play from the selected scene.
    • Fast-backward, Fast-forward, Previous and Next work as expected while playing a movie.
    • Search button opens the Voice Search feature (useless without a microphone). Press Return to close the feature. It does not open the search feature of Netflix. You must select it with the D-pad. Next, use the keyboard. You can type of use the Arrows and Enter to select the letters on the Virtual Keyboard.
    • Play/Pause button work as expected while playing a movie.
    • Zoom-in and Zoom-out buttons do nothing.
    • Menu button does nothing.
    • Home button clicked once shows the home screen. Any movie currently playing is stopped.
    • Home button clicked twice shows the list of opened apps. Any movie currently playing is stopped.
    • Home button clicked for 3 sec shows NVIDIA’s Shadowplay menu.
    • Return button go back the previous screen. It can be used to exit a movie currently playing but won’t exit Netflix!.
    • Volume Up/Down and Prev/Next Program button do nothing.
    • Mute button does nothing.
    • Mouse button enable/disable the mouse pointer.
    • All other buttons do nothing, except the Internet and Backlit button.

    Spotify:

    • Power button is tuning on/off the NVIDIA (not just Spotify!).
    • The D-pad (Left/Right/Up/Down) can be used to navigate and the Ok button can be used to select.
    • Fast-backward, Fast-forward, Previous and Next work as expected while playing a music.
    • Search button opens the Voice Search feature (useless without a microphone). Press Return to close the feature. It does not open the search feature of Spotify. You must select it with the D-pad. Unfortunately, the keyboard does not work with Spotify’s search feature and no Virtual Keyboard opens… I think that the problem is with the search feature…
    • Play/Pause button work as expected while playing music.
    • Zoom-in and Zoom-out buttons do nothing.
    • Menu button does nothing.
    • Home button clicked once shows the home screen. Any music currently playing will continue.
    • Home button clicked twice shows the list of opened apps. Any music currently playing will continue.
    • Home button clicked for 3 sec shows NVIDIA’s Shadowplay menu.
    • Return button go back the previous screen, including to the home screen. But the music, if any, will continue to play.
    • Volume Up/Down and Prev/Next Program button do nothing.
    • Mute button does nothing.
    • Mouse button enable/disable the mouse pointer.
    • All other buttons do nothing, except the Internet and Backlit button. Notice that the music, if any, will continue to play when a browser is opened.

    Remote learning feature (copy/paste from here):

    If you would like your MX3 remote to learn some commands from another remote, then you can teach it to ‘copy’ the IR signal of the other remote. For instance, whilst the power button will turn your player off, it wont turn it back on because its not using the same ‘Turn on’ signal as your standard android remote.  So here is what to do:

    1. Get your standard android remote (or any remote that you want to replicate a button from) and place it end-to-end with the MX3 so that the IR receivers are facing each other.
    2. Then, on the MX3 press and hold the red TV button. You will see the LED flashing rapidly then slow to a steady flash (the steady flash means the X3 is now in ‘learning’ mode)
    3. Release the ‘TV’ button.
    4. Now press the power button on the standard remote (or whichever button you want to map) You will see the LED light stop flashing and glow continuously, at this point press the power button on your MX3 remote. The LED will then flash again and eventually extinguish. This means the MX3 has finished ‘learning’ the IR code from the other remote and has successfully mapped it to the power button

    MINIX  NEO A3 

    The Neo A3 of Minix has more or less the same features as the FeBite MX3, although a bit heavier and larger (making it more comfortable than the FeBite MX3). It has however no backlit but a microphone for Voice input.

    It works with two batteries AAA, one in each extremity, making it well balanced when using the keyboard. On the opposite, you can feel it, compared to the FeBite MX3, when using the remote as a pointer to control the mouse. NB.: one of the battery slot, when empty, can be used to store the receiver (a usb dongle). And both battery slots are easy to open.

    Minix Neo A3
    Minix Neo A3

    On the Home screen:

    using the Keypad side:

    • Power button is not tuning on/off the NVIDIA.
    • Settings button does nothing.
    • Recent Apps button does nothing. Double click the Home button instead.
    • Home button clicked once shows the home screen although the movie is continuing to play and keeps visible in the background. Press Return to hide the home screen.
    • Home button clicked twice shows the list of opened apps. Any movie currently playing is stopped.
    • Home button clicked for 3 sec does nothing.
    • The D-pad (Left/Right/Up/Down) navigates between the Apps and the Android button (Ok) runs the one currently selected.
    • Return button does nothing on the home screen. But is works well when one opens the search feature, the browser or most Apps (Ex.: works with Plex. Do not work with Netflix. In such a case use the Home button).
    • The Microphone does nothing if one does not open first the Voice Search feature with the D-pad. It works fine otherwise
    • Mouse button (A.k.a. Fly Mode) enable/disable the mouse pointer. Once enabled, use the remote to move the mouse and the Ok button to click (and e.g. select an App). Once disabled, the mouse pointer will freeze and soon disappear. Tip: You can temporarily disabled the mouse to move and realign the remote and the pointer if necessary.
    • Volume Up/Down buttons do nothing.
    • “Installed Apps lists” button does nothing.
    • Fast-backward, Fast-forward do nothing except if a music is playing, for example with Spotify in the background.
    • Play/Pause button does nothing except if a music is playing, for example with Spotify in the background.
    • Opposite to the FeBite MX3, there is no Zoom-in/Zoom-out buttons, no Previous/Skip buttons, no Browser button, no Search button, no Mute button.
    • A Long press on the Ok button on an App will lock it. You can next move it left or right and press again Ok to release it at its new position.
    • And no Backlit feature.

    using the Keyboard side:

    • Left/Right/Up/Down can be used to navigate between Apps and Enter/Space can be used to run the currently selected App.
    • To search, use the D-pad to select the Text Search feature. Once this feature opened, the keyboard can be used.
    • Backspace (Del) deletes the last entered character.
    • Esc will cancel and exit the search feature. To reopen it easily, you can press Right and Enter
    • Press once Caps to switch into the capital mode. Press once again to switch back to the normal mode.
    • Press Shit simultaneously with a letter to type its capital.
    • Press once Fn to switch between letters and special characters or figures.
    • Left/Right/up/Down can be used to select characters from the virtual keyboard. But pressing Enter won’t select the character currently focused. Instead the Virtual Keyboard will close.
    • Press once Enter to close the virtual Keyboard and once more to execute the search. It’s searching among the Apps, Youtube, Plex and Spotify if installed, …
    • If the Virtual Keyboard is closed, Left/Right can be used to edit the text entered.
    • Tab can be used on the Home screen to move to the next App. It does nothing in the Text Search feature.

    With Plex:

    • Power button is not tuning on/off anything.
    • Settings button does nothing.
    • Recent Apps button does nothing.
    • Menu button does nothing.
    • Home button clicked once comes back on top of the home screen.
    • Home button clicked twice shows the list of opened apps.
    • Home button clicked for 3 sec shows NVIDIA’s Shadowplay menu.
    • The D-pad (Left/Right/Up/Down) navigates between the users or the Menus and the Ok button can be used to select.
    • While playing a movie,
      • Ok does a pause/play.
      • Down opens the menu (Return will close it).
      • Right/Left rewind/skip x sec.
    • Return button opens the previous screen. It can be used to exit a movie currently playing or to exit Plex.
    • Volume Up/Down buttons do nothing.
    • “Installed Apps lists” button does nothing.
    • Mouse button enable/disable the mouse pointer.

    With Netflix:

    • Power button is not tuning on/off anything.
    • Settings button does nothing.
    • Recent Apps button does nothing.
    • Menu button does nothing.
    • Home button clicked once shows the home screen. Any movie currently playing is stopped.
    • Home button clicked twice shows the list of opened apps. Any movie currently playing is stopped.
    • Home button clicked for 3 sec shows NVIDIA’s Shadowplay menu.
    • The D-pad (Left/Right/Up/Down) navigates between the users or the Menus and the Ok button can be used to select.
    • Up/Down can be used to open the menu while playing a movie. Return will close the menu.
    • Left/Right can be used to rewind/skip scene while playing a movie. Ok will continue to play from the selected scene.
    • Return button go back the previous screen. It can be used to exit a movie currently playing but won’t exit Netflix!.
    • Open the search feature of Netflix and use the keyboard to search (Voice search does not work with the microphone). You can type of use the Arrows and Enter to select the letters on the Virtual Keyboard.
    • Mouse button enable/disable the mouse pointer.
    • Volume Up/Down buttons do nothing.
    • “Installed Apps lists” button does nothing.
    • Fast-backward, Fast-forward work as expected while playing a movie.
    • Play/Pause button work as expected while playing a movie.

    Spotify:

    • Power button is not tuning on/off anything.
    • Settings button does nothing.
    • Recent Apps button does nothing.
    • Menu button does nothing.
    • Home button clicked once shows the home screen. Any music currently playing will continue.
    • Home button clicked twice shows the list of opened apps. Any music currently playing will continue.
    • Home button clicked for 3 sec shows NVIDIA’s Shadowplay menu.
    • The D-pad (Left/Right/Up/Down) can be used to navigate and the Ok button can be used to select.
    • Return button go back the previous screen, including to the home screen. But the music, if any, will continue to play.
    • The microphone does not work as Spotify’s search feature and its Virtual Keyboard does not work ?!
    • Mouse button enable/disable the mouse pointer.
    • Volume Up/Down buttons do nothing.
    • “Installed Apps lists” button does nothing.
    • Fast-backward, Fast-forward work as expected while playing a music.
    • Play/Pause button work as expected while playing music.

    Rii Mini i25

    The Rii mini i25 is a Mini wireless AZERTY keyboard with IR remote and Air Mouse similar to the FeBite MX3, although smaller (170x48x11mm) and 10g heavier (110g)… and without backlit or microphone.

    It has a built-in 450mAh lithium-ion battery that must be reloaded via usb micro-B. There is a switch on/off on the side. No slot to store the receiver (a usb dongle).

    Rii Mini i25
    Rii Mini i25

    The red buttons does nothing (Power off, Set, …, Source and return).

    There is a off button and the bottom-left, which turn off the NVIDIA, but does not turn it back on…

    All other keys works as described for the Minix Neo A3 (Read more details here).

    Rii Mini i8 

    The Rii Mini i8 is also wireless keyboard, with a touch pad and an air Mouse but without 3-Gyro + 3-Gsensor, backlit or microphone. And because it seems extremely light (a feeling due to a large surface of plastic 148x97x18.5mm for only 109g), it looks cheaper than the others.

    It comes with a removable lithium-ion battery of 280mAh which can be reloaded via usb mini-B. The slot with the internal battery has enough space to store the receiver (a usb dongle).

    Rii Mini i8
    Rii Mini i8

    This is much more comfortable as a wireless keyboard to browse on a TV than a remote control for an HTPC.

    Loading

  • Rii mini i25: an Air Mouse/Wireless keyboard working with Windows, NVidia Shield TV, Plex…

    I just bought an Rii min i25 (< 35€) as an alternative for the NVidia Remote Controle (~50€). I am not disappointed !

    Rii Mini i25
    Rii Mini i25

    Click to Read More

    Although mine is not a model with audio (microphone and headphone), it’s clearly a great accessory to replace the native remote of the NVidia Shield TV. Notice that if it looks really nice, it’s not heavy. As a consequence, it does not feel robust in hand.

    Remote NVidia Shield TV
    Remote NVidia Shield TV

    I did test it with Plex, both on Windows 10 and on NVidia Shield TV. Everything is working out of the box, except the fast forward and fast rewind. Those two keys will probably need some remapping.

    Both on Windows and NVidia, I did use the wireless keyboard successfully (including the FN keys: mute, Home, PgDn, PgUp, End, Del, Ctrl-Alt-Del), as well as the Air Mouse.

    Regarding the Remote Control:

    • Volume + and  – worked both on Windows and NVidia.
    • Power off only worked on Windows not on NVidia.
      • But it was switching off Netflix.
    • Search and Home worked on NVidia
    • To do a selection in Netflix on NVidia, I had to lock the mouse before clicking on OK!
    • Fast Forward (+10 sec) and Fast Rewind (-10 sec) work fine within Netflix but not in Plex.
    • I noticed in Netflix that the arrows (left/right) which could be used to move forward or backward in the scenes was “sometimes” not working…
    • I noticed that sometimes, the axes up/down and left/right appeared to be inverted. I did fix that by keeping the remote on the table, parallel to the screen, keyboard up (i.e. just in front of me), for 10 long seconds.
    • To scroll the page in Chrome, take the remote (keyboard down), move the mouse onto the background of the page (where there is no field) and press the “turn back arrow”. Move next the remote up and down.
    • To enter the search bar in Chrome, (keyboard down) simply press the “search key”. To exit the search bar (keyboard up), press the “Esc” key.

    From installation perspective, there is nothing to do: just plug the receiver in a USB port and switch on the remote (Button On/Off, on the side, next to the micro USB Charging Port).

    Using the air mouse is very convenient. The experience is very similar to using the remote pointer of Smart Samsung TVs (a smart remote with a large trackpad). NB.: if the mouse pointer is out of alignment with your wrist, simply lock it using the ‘Lock’ button, the one with an arrow icon:

    Lock Button Rii mini i25

    As mentioned above, the keys can be reprogrammed by sending an IR signal from another remote whose the behavior must be copied.

    If you want to use an AZERTY model you will need the “External keyboard Helper Pro“.

    Loading

  • Chaos reincarnation

    Although I did upgrade some parts of my old PC Chaos, built end of December 2012, it’s suffering of his age. I have various issues with the power management, the USB ports, the sound, … So, I have decided to migrate its OS to a new hardware using Acronis Universal Restore.

    [Edit 1/1/2020] Minor update

    Click to Read More

    The new hardware includes:

    • 1 x motherboard MSI Z270 Gaming Pro Carbon (to replace the previous one which burned: MSI Z170A Gaming Pro Carbon) LGA 1151
      • CPU:  Intel socket LGA 1151 (for Core i7)
      • Chipset: Intel Z270
      • RAM : 4 x DDR4-3866+ (max 64GB) – Dual Channel Architecture
      • Storage: 6 x SATA 6Gb/s ports, 2 x M.2 ports
      • Slots: 3 x PCIe x16 (Support SLI and CrossFire), 3 x PCIe x1
      • LAN: 1 x Intel I219-V Gigabit
      • Audio: Realtek ALC1220 Codec, 7.1 Channel HD with S/PDIF output
      • Video:
        • HDMI (4096×2160@30Hz, 4096×2160@24Hz, 2560×1600@60Hz)
        • DVI (1920×1200@60Hz)
        • Support CrossFire and SLI
      • USB:
        • ASMedia® ASM2142 Chipset
          • 2 x Rear USB 3.1 Gen2 (SuperSpeed USB 10Gbps) – 1 x Type-C, 1 x Type-A
        • Intel® Z170 Chipset
          • 2 x Rear USB 3.1 Gen1 (SuperSpeed USB) ports
          • 4 x connectors USB 3.1 Gen1 (SuperSpeed USB) ports
          • 4 x back USB 2.0 (High-speed USB) ports
          • 4 x connectors USB 2.0 (High-speed USB) ports
    • 1 x cpu Intel Core i7-6700K (Skylake) at 4.4GHz.
    • 1x Air Cooler Noctua NH-D15.
    • 2 x 16GB Ram DDR4 at 1.20GHz (16-18-18-38-2N at 3200MHz) Gskill RipjawsV in Dual Channel mode (F4-3200C16D-32GVK).
    • 1 x SSD Samsung 850 PRO 256GB (MZ-7KE256BW).
    • 1 x case Be Quiet! Silent Base 800 High End ATX Tower PC (BG002).
      • Performing slightly better than the Be Quiet! Dark Rock Pro3 (BK019) according to various reviews, but more expensive.
    • 1 x PSU Corsair HX850i (850W) 80 Plus Platinum
      • A bit less performing than the Be Quiet! Dark Power Pro 11, but cheaper, guarantee twice longer (10 years), with manual and temperature-controlled fans, Semi-passive, consuming 0.00 W when Off and coming with Flat cables.
      • The choice between this one and the Corsair RM850i was very hard has the second one is nearly as efficient (although it’s only Gold) but ~18% cheaper. The HX comes however with 2 more connectors…
      • Don’t do the same mistake as I did. Air is suck into the PSU. Mount the PSU with the fan sucking the air from the bottom of the tower (if possible) instead of sucking air from inside the tower.
    • 2 x PCI Carte with 5 external USB 3.0 Ports and 1 internal USB 3.0 connector Inateck 
    • 2 x Icy Dock Trayless 3.5” SATA HDD Mobile Rack for 5.25 bay TurboSwap MB171SP-B with a fan cooler
      • To use SSD into those Racks, I use an Icy Dock MB982SP-1S 2.5” to 3.5” Full Metal SATA HDD and SSD Converter.

    Power Supply Calculator (from MSI): https://us.msi.com/power-supply-calculator

    BeQuiet! Silent Base 800
    BeQuiet! Silent Base 800

    MSI Z170A Gaming Pro Carbon
    MSI Z170A Gaming Pro Carbon

    MSI Z270 Gaming Pro Carbon
    MSI Z270 Gaming Pro Carbon

    Noctua NH-D15
    Noctua NH-D15

    G Skill Ripjaws V
    G Skill Ripjaws V

    USB Switch Aten US424
    USB Switch Aten US424

    Card Reader Kingston FCR-HS4
    Card Reader Kingston FCR-HS4

    Logitech Wireless Gamepad F710
    Logitech Wireless Gamepad F710

    Corsair Headset Vengeance 2100
    Corsair Headset Vengeance 2100

    Rapoo Wireless Keyboard and Mouse
    Rapoo Wireless Keyboard and Mouse

    HTC Vive Pro
    HTC Vive Pro

    Loading

  • SoundBlaster Audigy 2 NX USB – Cannot Unmute

    I have a very old SoundBlaster Audigy 2 NX USB (produced in 2002) and wanted to reuse it on my laptop, as I needed an optical audio output for some testing purpose. Unfortunately, it didn’t produce any sound… until I discovered that the Main volume was disabled in the Configuration pane.

    Sound Blaster Audigy 2 NX
    Sound Blaster Audigy 2 NX

    Click to Read More

    I was first impressed that, once that external audio card plugged on my PC (Windows 8.1 x64), Windows found, downloaded and installed drivers for it. I was actually not expecting such an old card to still be supported by Windows 8.1.

    But soon I noticed the “Mute” led that was on (red). And indeed, I was unable to get sound from my speakers 🙁

    Pressing the Mute button on the card, or using the remote control to unmute the card didn’t succeed. The led never turned off.

    Finally, I found that I had to:

    1. Right-click the speaker icon in the systray
    2. Select “Playback devices”
    3. Set the “Speakers” : “SB Audigy 2 NX” as “Default Device”
    4. Possibly set “Headphone” : “SB Audigy 2 NX” as “Default Communication Device”
    5. Double-click on “Digital Audio Interface” : “SB Audigy 2 NX” to access its properties
    6. Go to its tab “Levels” and enabled the speaker of the “Main Volume”, sometimes also named “Sum”. If it is already enabled, disable it first and then re-enable it!

    Config Audigy 2 NX
    Config Audigy 2 NX – named “Sum”

    Config Audigy 2 NX
    Config Audigy 2 NX – named “Main Volume”

    This is going to turn off the “Mute” led immediately. But if you press the Mute button on the card or mute it with the remote control, you will again not be able unmute it physically. You will have to redo the step 6 here above!

    Loading

    ,
  • Upgrade LSI 9201-16i and 9211-8i to Firmware 19.00.00.00 on Asus Striker II Formula

    I was using deprecated firmwares and drivers for my two LSI SAS Controllers and noticed a lot of errors in the Windows’ eventlogs like “Event 11 LSI_SAS2 The driver detected a controller error on \Device\RaidPort1”. So I decided to update them.

    Click to Read More

    Notice that I didn’t update the bios of my cards as recent versions are not compatible with my motherboard. See here.

    First, I did update the Windows Drivers. The most recent version of those drivers are available on LSI’s download page… (Search for “Component Type” = “Storage Component” with “Host Bus Adapters” as “Product Family”). E.g.: for “LSI SAS 9201-16i” see here and for “LSI SAS 9211-8i” see here.

    The update is easy and straightforward via “Computer Management” > “Device Management” > “Storage Controllers”. Right-click on the “LSI adapter xxxx” and select “Update Driver Software” > “Browse my Computer for driver software”. Then select the folder where you unzipped the drivers.

    Next step, I did update the Firmware. The most recent version of the firmwares is available on the download page too. As I have two card, I wanted to update them separately as the size of the firmware was 1KB different…

    I did start a CMD prompt as Administrator and used the sas2flash.exe command the folder “sas2flash_win_x64_rel” available in the zip with the firmwares.

    first I did check which number was assigned to each controller with the command “sas2flash.exe -list -c 0” and “sas2flash.exe -list -c 1”

    C:\sas2flash_win_x64_rel>sas2flash.exe -list -c 0
    LSI Corporation SAS2 Flash Utility
    Version 19.00.00.00 (2014.03.17)
    Copyright (c) 2008-2014 LSI Corporation. All rights reserved

    Adapter Selected is a LSI SAS: SAS2008(B2)

    Controller Number : 0
    Controller : SAS2008(B2)
    PCI Address : 00:04:00:00
    SAS Address : 500605b-0-01bd-bec0
    NVDATA Version (Default) : 11.00.00.07
    NVDATA Version (Persistent) : 11.00.00.07
    Firmware Product ID : 0x2213 (IT)
    Firmware Version : 17.00.01.00
    NVDATA Vendor : LSI
    NVDATA Product ID : SAS9211-8i
    BIOS Version : 07.15.00.00
    UEFI BSD Version : N/A
    FCODE Version : N/A
    Board Name : SAS9211-8i
    Board Assembly : N/A
    Board Tracer Number : N/A

    Finished Processing Commands Successfully.
    Exiting SAS2Flash.

    C:\sas2flash_win_x64_rel>sas2flash.exe -list -c 1
    LSI Corporation SAS2 Flash Utility
    Version 19.00.00.00 (2014.03.17)
    Copyright (c) 2008-2014 LSI Corporation. All rights reserved

    Adapter Selected is a LSI SAS: SAS2116_1(B1)

    Controller Number : 1
    Controller : SAS2116_1(B1)
    PCI Address : 00:03:00:00
    SAS Address : 5000000-0-8000-0000
    NVDATA Version (Default) : 11.00.00.05
    NVDATA Version (Persistent) : 11.00.00.05
    Firmware Product ID : 0x2213 (IT)
    Firmware Version : 17.00.01.00
    NVDATA Vendor : LSI
    NVDATA Product ID : SAS9201-16i
    BIOS Version : 07.15.00.00
    UEFI BSD Version : N/A
    FCODE Version : N/A
    Board Name : SAS9201-16i
    Board Assembly : N/A
    Board Tracer Number : N/A

    Finished Processing Commands Successfully.
    Exiting SAS2Flash.

    So, id 0 was for the LSI SAS9211-8i and id 1 was for LSI SAS9201-16i. So, I did update like this:

    C:\sas2flash_win_x64_rel>sas2flash.exe -o -c 0 -f 2118it.bin
    LSI Corporation SAS2 Flash Utility
    Version 19.00.00.00 (2014.03.17)
    Copyright (c) 2008-2014 LSI Corporation. All rights reserved

    Advanced Mode Set

    Adapter Selected is a LSI SAS: SAS2008(B2)

    Executing Operation: Flash Firmware Image

    Firmware Image has a Valid Checksum.
    Firmware Version 19.00.00.00
    Firmware Image compatible with Controller.

    Valid NVDATA Image found.
    NVDATA Version 11.00.00.00
    Checking for a compatible NVData image…

    NVDATA Device ID and Chip Revision match verified.
    NVDATA Versions Compatible.
    Valid Initialization Image verified.
    Valid BootLoader Image verified.

    Beginning Firmware Download…
    Firmware Download Successful.

    Verifying Download…

    Firmware Flash Successful.

    Resetting Adapter…
    Adapter Successfully Reset.

    Finished Processing Commands Successfully.
    Exiting SAS2Flash.

    C:\\sas2flash_win_x64_rel>sas2flash.exe -o -c 1 -f 9201-16i_it.bin
    LSI Corporation SAS2 Flash Utility
    Version 19.00.00.00 (2014.03.17)
    Copyright (c) 2008-2014 LSI Corporation. All rights reserved

    Advanced Mode Set

    Adapter Selected is a LSI SAS: SAS2116_1(B1)

    Executing Operation: Flash Firmware Image

    Firmware Image has a Valid Checksum.
    Firmware Version 19.00.00.00
    Firmware Image compatible with Controller.

    Valid NVDATA Image found.
    NVDATA Version 11.00.00.00
    Checking for a compatible NVData image…

    NVDATA Device ID and Chip Revision match verified.
    NVDATA Versions Compatible.
    Valid Initialization Image verified.
    Valid BootLoader Image verified.

    Beginning Firmware Download…
    Firmware Download Successful.

    Verifying Download…

    Firmware Flash Successful.

    Resetting Adapter…
    Adapter Successfully Reset.

    Finished Processing Commands Successfully.
    Exiting SAS2Flash.

    The PC did reboot without any issue and I have access to my diks.. but next:

    c:\sas2flash_win_x64_rel>sas2flash.exe -listallboards
    LSI Corporation SAS2 Flash Utility
    Version 19.00.00.00 (2014.03.17)
    Copyright (c) 2008-2014 LSI Corporation. All rights reserved

    No LSI SAS adapters found! Limited Command Set Available!
    ERROR: Command Not allowed without an adapter!
    ERROR: Couldn’t Create Command -listallboards
    Exiting Program.

    I wanted to check the controllers and unfortunately, they are not detected anymore by the tool 🙁

    Damned… I forgot to run it in a CMD prompt run as Administrator!!! Once run in such a CMD prompt, I got the expected info:

    c:\sas2flash_win_x64_rel>sas2flash.exe -listallboards
    LSI Corporation SAS2 Flash Utility
    Version 19.00.00.00 (2014.03.17)
    Copyright (c) 2008-2014 LSI Corporation. All rights reserved

    Adapter Selected is a LSI SAS: SAS2008(B2)

    Num Ctlr Board Name Serial Number
    —————————————————-

    0 SAS2008(B2) SAS9211-8i N/A
    1 SAS2116_1(B1) SAS9201-16i N/A

    Finished Processing Commands Successfully.
    Exiting SAS2Flash.


    c:\sas2flash_win_x64_rel>sas2flash.exe -listall
    LSI Corporation SAS2 Flash Utility
    Version 19.00.00.00 (2014.03.17)
    Copyright (c) 2008-2014 LSI Corporation. All rights reserved

    Adapter Selected is a LSI SAS: SAS2008(B2)

    Num Ctlr FW Ver NVDATA x86-BIOS PCI Addr
    —————————————————————————-

    0 SAS2008(B2) 19.00.00.00 11.00.00.08 07.15.00.00 00:04:00:00
    1 SAS2116_1(B1) 19.00.00.00 11.00.00.06 07.15.00.00 00:03:00:00

    Finished Processing Commands Successfully.
    Exiting SAS2Flash.

    Loading

  • Scan Negatives with Epson Perfection V550 Photo

    I always wanted a good device to scan all my negatives. I finally decided to buy an Epson Perfection V550 Photo…

    EPSON Perfection V550 Photo

    Click to Read More

    I didn’t want something like those small “film scanners” at ~80€ because those are actually camera taking a photo of the negatives. As a consequence, the quality of the output is only good enough to published the photo on the web or to watch them on a screen… Even with a higher DPI, the quality is still far from amazing.

    Typical cheap Film Scanner
    Film Scanner

    However, a real semi-pro film scanner cost at least 500€ and much more (1200€, 1500€, ..). As that was out of my budget, I was therefore looking for something as a “Reflecta CrystalScan 7200” (~200€), a typical great compromise between price and quality; the high quality of the output being mainly due to the feature named “Ice Techonology”. This one is amazing when used to remove dusts and scratches on photos. Unfortunately, it only scans the negatives one by one and one has to move the film manually. I would have needed ages to scan all my negatives…

    Reflecta CrystalScan 7200
    Reflecta CrystalScan 7200

    So, I finally decided to go for the excellent EPSON Perfection V550 Photo, the smallest in its family, but with all the features I needed. It uses the ICE Technology and scan up to 2×6 negatives from 35mm films at once at 6400 dpi. Here is an excellent review for details.

    And here is a demo of an automatic scratch and dust removal with EPSON Perfection V550 Photo’s ICE Technology:

    Demo of ICE Technology
    Demo of ICE Technology

    Here after, how I process to scan negatives from 35mm films into 10×15 photo, each one around 5MB, 7200x4800px, 24 bit depth (online documentation here and good guidance here and tutorials)

    1. Turn on the EPSON and wait until the « Ready » green led on the front panel stops blinking.
    2. Start the “EPSON Scan” software on the PC
    3. Choose “Home Mode”
    4. If the “Configuration” was changed in the past, reset the settings via the “Configuration…” button > tab “Other” > “Reset All”
    5. As far as I am concerned*, I go to the “Configuration…” button and in the “Color” tab, I select the option “ICM” with
      1. “EPSON Standard” as a “Source”
      2. “sRGB” as target (“RVB” in french)
      3. and the option “Display preview using Monitor Compensation” ticked
    6. As “Document Type”, choose “Color negative films”
    7. As “Image Type”, use “Color”
    8. As “Destination”, use “Other” and
      1. set 1200 as “Resolution”
      2. with 10×15 cm as “Target Size”.
    9. Under “Adjustement” select the option “DIGITAL ICE Technology…” (The only one enabled when one choose “ICM” in the “Color” tab of the “Configuration” windows.

    * I noticed that the result was often (but not always) better on my display screens. However, switching between the option “ICM” and Color Controls results in something weird… The background color of the photos become blue:

    Test #3 - EPSON V550

    Once all the steps above are done:

    1. Click on “Preview”
    2. Select the “negatives” to be scanned in the “Preview” window.
    3. Back into the “Epson Scan “ main window, Click on “Scan”
    4. In the new window (“File Save Settings”) select
      1. The location for the output (Ex.: My Pictures)
      2. A prefix for the images
      3. The “Type” of “Image Format”: “JPEG”…  Then click on “Options” next to the “Type” and be sure that you kept:
        1. “16” as compression level
        2. Encoding Standard
        3. Embed ICC profile
    5. Set the other option according to your preferences and click “Ok”.

    When the operation ends, it will open the destination folder if you did ask for it in the options above..

    To scan one negative, it takes close to 3 minutes on my PC (a Quad Core I7 3.6GHz, 16GB Ram) although 8 minutes are announced. The negative used for this test is a 14 years old AGFA film. Here it the outcome: a picture of about 5MB, 7200x4800px:

    My custom settings

    If I choose next “Printer” as “Destination”, still with “DIGITAL ICE Technology” enabled, it takes a bit less than 2 minutes to get a picture of about 2MB, 1800×1200.

    If I choose “Color Controls” in the “Configuration…” window instead of ICM with a “Display Gama 2.2” and a mean “Continuous Auto Exposure”, I have other options in the “Image Adjustment” pane. NB.: whenever you change an option in the “Image Adjustments” pane, look at the “Preview” pane to see what’s the results…

    Ticking then the options “Color Restoration” and “Backlight Correction” in addition to “DIGITAL ICE Technology”, I get this ugly output:

    Test #1 - EPSON V550

    Ticking the option “DIGITAL ICE Technology” with the “Backlight Correction” only, I get something better:

    Color Controls with ICE and Backlight Correction

    And ticking only the Image Adjustment “DIGITAL ICE Technology”, the output comes resp. in a bit less than 3 minutes at 1200 dpi (picture on top) and in a bit less than 2 minutes at 300 dpi (for printer, picture bellow):

    Color Controls at 1200 dpi with ICE Color Controls at 300 dpi with ICE

    Far from an expert in photography, I have my own preference for the results with only the “DIGITAL ICE Technology” Image Adjustment enabled…

    If I select 10 negatives (2 slides of 5) to be scanned at once with “ICM” selected in the “Configuration” and “DIGITAL Ice Technology” enabled, EPSON Scan announces 21 minutes for 300dpi, 1800×1200 (“Printer” as a destination)…. But it takes concretely only 16 minutes. With the very same options, but targeting 1200dpi, EPSON Scan announces 51’ and takes 30’.

    Now, instead of using the “Home Mode”, one could use the “default” mode, which is a the “Full Auto Mode” – used when one presses the rightmost button on the front of the scanner. Here is a result, a ~2MB picture, ~1800×1200 full of dust and scratches (as you can see in full size):

    Scanned in Default mode

    NOTICE: if getting noise and grain in the picture, read this tutorial to use the advanced mode and fix this issue.

    Final interesting touch: the scanner will automatically switch off when not in use anymore (Ex.: if the PC enter any standby mode due to inactivity).

    Another tutorial here to scan on a V550 with professional settings.

    [EDIT 07/2020] to scan B&W negative films, I had good results with

    • Type of image: 16 bits grayscale.
    • Resolution: 2400 dpi.
    • I do not use Unsharp Mask – I prefer to do it later with another software.
    • Grain Reduction – I use it with level medium.
    • Color Restoration – I disable it for black and white. If enabled, the images are less dark but this remove interesting shadows.
    • Backlight Correction – I disable it as it adds too much light. Try it to see if you like the results.
    • Dust Removal – I use it with level low. It can produce weird results (like removing closes eyes). Usually there is a trade-off in absolute image quality (sharpness) and effort you’ll have to expend later removing dust.
    • Digital ICE Technology – I disable it for Black and White. This setting uses an Infrared channel to detect and remove scratches and dust. The silver in B&W film interferes with this function. The results is really awful!

    Loading

  • Creative WebCam Live! Motion on Windows 8 x86

    I still have that very old webcam that I wanted to reuse under Win8 x86 on the PC of my daughter… It works fine with the drivers for Win2000 installed in compatibility mode…

    Click to Read More

    Creative WebCam Live! Motion
    Creative WebCam Live! Motion

    • Go to the support website of Creative.
    • Select “Web Cameras”.
    • At the very bottom, click on “If your product is not listed above, please click here”.
    • Select “Others” in the first column.
    • And select “WebCam Live! Motion” in the second column.
    • Then, click on “Next”.
    • Now, you see a list of “Latests Downloads”. Take the first one : “Creative WebCam Live! Motion Driver 1.11.02“. It’s a beta version for Vista.
    • Once those drivers downloaded, right click on it and open the “properties”.
    • If required, at the bottom of the “General” tab, “Unblock” the file
    • Then, in the “Compatibility” tab:
      • Select “Run this program in compatibility for”: “Vista”, and
      • Select “Run this program as an administrator”
    • Finally, run the setup.

    Loading