Category: Tips

  • Easily connect Ikea Tradfri bulbs on Philips Hue Bridge

    I did spent a lot of time trying to connect Smart/Cheap Ikea bulbs on my Philips Hue Bridge.

    I finally found an easy way: use the Android App HueDynamic !

    Click to Read More

    First, you must be sure to have Ikea Tradfri bulbs with a firmware >= 1.2.x

    To be sure about the firmware of Ikea bulbs, no choice but buy the Ikea Bridge and at least one Ikea Remote, then connect the bulb to the Android App “Tradfri”. If the firmware is obsolete, then the App can be used to trigger an update. But my experience is that even to connect the Ikea bulbs with their App, it’s a real pain in t…. Also, before connecting next the bulbs to the Philips Hue Brige, you will have to disconnect them from any Ikea remote and from to the App “Tradfri” (Check here).

    An option is however to check the batch id of the production, on the box. It is said that all bulbs produced with a batch id equal or above 1721 should have a firmware compatible with the Philips Hue Bridge.

    Here a sample of Ikea bulbs with a batch id 1733. I bought 6 of those and had (nearly) no issue to connect them.

    Ikea Tradfri Batch Id
    Ikea Tradfri Batch Id

    Once you have a bulb with adhoc firmware, turn it on and place it very close to your Philips Hue Bridge (less than 2 cm ;). The easiest for that is to use a cable like this one (I did one myself):

    Cable with adapter E14
    Cable with adapter E14           

    The bulb being on and next to the Hue Bridge, open the App HueDynamic and click on the three horizontal lines in the upper-left corner to open the menu. Then scroll down to the “Settings” section and pick the entry “Lights”:

    Click on the sign +, in the top-right corner to add the bulb:

    And select the option “With TouchLink” (This is the magic trick !!):

    Now, press the “TouchLink” button of your Philips Hue Bridge:

    The App HueDynamic will search for the bulb during 1 or 2 minutes… Once in touch with the bulb, this one will start to dim and bright several times before finally turning off. The App will continue to search for several minutes (for other bulbs) after that. When it stops to search, you see the bulb found on the screen. Accept it !

    Notice that this process failed for one of my bulb (out of 6). I tried twice and got each time the message here under:

    But when I came back to the list of bulbs, I saw that the bulb was actually in the list (Maybe I did something wrong without noticing ?!).

    Since the bulbs are connected, I have been able to combine them into rooms and control them with Philips Hue Motion Sensors. They work great so far !

    NB.: I read that Ikea remotes may not be used as once connected to a bulb, the bulb disappear from the Philips Hue Bridge… I didn’t try that yet and won’t 😉

    Loading

  • Reinstall Apps, Themes and Watch faces purchased on Samsung Galaxy Story

    After reinstalling my Gear S2 to connect it with a new Galaxy phone, I couldn’t find how to reinstall watch faces bought years ago.

    This can be done using the “Galaxy Store” app.

    Click to Read More

    1. “Galaxy Store” is an app preinstalled on Galaxy phones. Open it (Configuring your Samsung account if not yet done).
    2. Tap the 3 vertical dots on top right of screen
    3. Select “My page” (previously named “My Apps”).
    4. Select “All”
    5. Select the Watch, Apps or Themes
    6. Then re-download what you wish.

    To manage your Watch, install the “Galaxy Wearable ” App (previously named Galaxy Gear) via the Google App Store.

    Loading

  • Tips and tricks in French to use Philips Hue via Google Home

    Here is a list of a few tips & tricks to use the Bulbs of Philips Hue with a French Google Assistant.

    Click to Read More

    Important notice: based on my experience, Google Assistant is evolving fast (possibly learning). Meaning that at the beginning, only specific and correct sentences were supported.

    After some time, Google Assistant accept more flavor of those sentences.

    Synchronize Google Home and Philips Hue to see new Bubbles

    Prerequisite: link Google Home with your Philips Hue account.

    Reminder: Open the “Google Home” App. In the top part of the screen, there are various icons under the name of your house: “Eteindre” (Off), “Allumer” (On), “Lire” (Play) , “Ajouter” (Add), “Paramètres” (Settings) …. Click on “Ajouter” (Add) >  “Configurer un appareil” > “Fonctionne avec Google”. This is opening a screen to manage the linked accounts. Philips Hue must be added.

    Assuming that you have already linked Google Home with your Philips Hue account, when you add bubbles via the Philips Hue App, they don’t appear immediately in Google Home. To force Google Home to sync with Philips Hue, say “Ok Google” or “Dis Google”. Then “Mets à jour les lumières”, “Mets à jour les lampes” or “Synchronise les appareils”.

    [04/2019] It’s quite weird but initially the following sentences didn’t work: “Mets à jour les appareils”, “Synchronise les lumières”, “Synchronise les lampes”. Google was answering that you have to use Google Home for that… But after a few weeks, it started to work. It was not the first time that I notice this kind of “progress” with various commands. It’s seems that there is a kind of learning curve for the Google Assistant !

    Turn on/off Philips Hue’s lights

    Initially, I was only able to tell:

    • “Allume/éteins (le) X”, where X is the name of a light (Ex.: “Spot 1”, “Spot de Klara” – Notice that the names of my lights are not prefixed with an definite article ‘the’. So I can say “Allume le spot 1” or “Allume spot 1”).
    • “Allume/éteins (le) X à x%”,  where x is the percentage or luminosity
    • “Allume/éteins les lumières (de/du) X”, where X is the name of a room, to turn on/off all the lights in that room (Ex.: “Chambre de Klara”, “Bureau” – Notice that the names of my rooms are not prefixed with an definite article ‘the’).
    • “Allume/éteins les lumières (de/du) X à x%”, where x is the percentage or luminosity
    • “Allume/éteins les lumières” to turn on/off all the lights in the current room (I.e.: the room where the Google Assistant is assigned)
    • “Allume/éteins les lumières à x%”, where x is the percentage or luminosity

    Now, a bit confusing as not 10% consistent:

    • “Allume”, is going to turn on all the devices in the room, not only the light. In my case it also turn on Nvidia Shield TV
    • “Éteins”, does not work
    • “Allume/Éteins tout” turn on/off all the lights in the current room (I.e.: the room where the Google Assistant is assigned)
    • “Allume/Éteins tout dans (le/la) X” where X is the name of a room, to turn on/off all the devices in the current room (I.e.: the room where the Google Assistant is assigned)

    I also tried to use the word “lampes” instead of “lumières” but this was not recognized. I discussed that issue with Google Support. They told me that this was possibly due to the fact that the name of some lights used to be “lampe XYZ”. I did rename my lamps but without success at that time. Now, weeks later, it works. I can tell “Allume/éteins les lumières …” or “Allume/éteins les lampes …”. So, my experience is that the overall experience is not always consistent.

    Use Philips Hue Scenario

    To start a scenario named X, use the sentence “Active X”. Ex.: “Active Color Loop”

    To stop it, use the sentence “Désactive X” or “Stop X”

    Turn off and on only some Bubbles in a room using Philips Hue Scenario

    With Google Home, it’s currently not possible to create several groups of Bubbles in a room. It’s also not possible to include a Bubble within several rooms (if you want to use fake rooms to group your bubbles). But as a trick, you can create a “Scenario” within the Philips Hue App (Scene) to turn off or on any subset of Bubbles.

    Open the Philips Hue App and tap the room containing the Bubbles to group. Once the room opened, tap “Nouveau Scénario” (New Scene).

    On the color picker (color or white disc), you see your lamps (a bubble or small circles with the amount of bubbles, one bubble or circle per type of lamp – color or white). Tap the circle representing several bubbles to access each bubble individually and define its rightness or its state on/off in the Scene. You can decide to have x lights on, y lights off and z lights dimmed to 50%.

    Name that new scene like “les lumières XYZ” (the lights XYZ). Once Google Home and Philips Hue synchronized, you will be able to tell “Ok Google”, “Active les lumières XYZ” (Activate the lights XYZ).

    Combine commands into a routines [03/2019]

    I did create routines to combine commands into a sequence, with sometimes delays between each commands. Ex.: to turn on all the devices to watch a movie, I simply say “Ok Google, allume le cinéma”. The routine is a set of individual commands to turn on the projector, turn on the console NVidia and open the projection screen: “active l’allumage du projecteur”, “allume shield”, “active l’ouverture d’écran”.

    “active l’allumage du projecteur” and “active l’ouverture d’écran” are two scénario define in my Broadlink account (to remote control devices via IR: See this note). As those are accessing scenario via services, we have to use the verb “active”.

    “allume shield” is a native command of Google Home. Indeed, no need to integrate any service to remote contro a NVidia Shield TV. But keep in mind that there are plenty of issues with remote controlling Shield: can open Netflix, but can’t start a movie. the volume is decreased each time you tell a command but is not restored to its initial level once the command executed, etc…

    Command Somfy blinds with Tahoma box [04/2019]

    In the past, I used to control blinds motorized with Somfy via voice commands thanks to the integration between Google Home and the Tahoma box via IFTTT.

    Now, thanks to the native integration of “Somfy Tahoma & Connexoon” services with Google Home, I could get rid of IFTTT to control the blinds.

    Here are the supported sentence once all devices are assigned to rooms in Google Home:

    • “Ok Google, ouvre/ferme X” – X being the name of a blind (“store” or “volet” in Tahoma)
    • “Ok Google, ouvre/ferme X à x %”

    X can have articles but Google Assistant will quickly learn that there are various flavor possible: “le volet du salon”, “le volet au salon”, “mon volet du salon”.

    To close all the blinds, I was only able to do it for sure with

    • “OK Google, ouvre/ferme tout” to close all blind in the home
    • “OK Google, ouvre/ferme tout dans X” to close all blinds in a room named X. Another way is to tell :” Ok Google, ouvrir X”. This is not a nice French sentence and seems a direct translation of the English version. Notice that if X = “Bureau”, you won’t be able to tell “Ok Google, ouvrir le Bureau”. To do that, the room must be named “le Bureau” instead of simple “Bureau”.

    Although the documentation of Tahoma pretends that we should be able to tell “OK Google, ouvre/ferme tous les volets” to close all the blinds in the current room (room where the Assistant is assigned), this does not work. Also notice that you may not open the door of the Garage due to Google security Policy applied on the integrated services. You may only do it via IFTTT !!!

    use several commands and/or routines together

    I discovered by accident that Google Home was supporting sentences combining several commands X, Y, Z …, simply by telling “Ok Google, X et Y et Z …”. Ex.:

    • “Ok Google, allume le cinéma et ferme tout dans le bureau” where “allume le cinéma” and “ferme tout dans le bureau” are two distinct routines.
    • “Ok Google, allume le cinéma et ferme tout dans le bureau et éteins tout” where “allume le cinéma” and “ferme tout dans le bureau” are two distinct routines.

    Loading

  • Acronis cannot access backup file due to credentials of network share

    Trying to backup an image of my PC with Acronis True Image 2016 on my Synology, I got an error message like “Acronis cannot access backup file [due] to credentials [when accessing the] network share”.

    I couldn’t find the way to change those credentials… But finally found a trick (?) to be prompted!

    Click to Read More

    Concretely,

    • after adding a new backup, I clicked “Select Destination” and used the ‘Browse…’ option to “Set a custom location for the backup”.
    • Next, I picked “My NAS connections” where my Synology was already listed (configured more than 2 years ago) and there, browsed to a sub-folder on the “home” share.
    • Unfortunately, clicking on “Back up Now” resulted, after longs minutes, into an error message complaining about the credentials.

    Probably because Acronis is using the Windows Credential Manager, I couldn’t find how to change the credentials within Acronis.

    But changing again the destination and typing manually the path “\\<MyNAs>\\home\Acronis\<PC Name>” instead for Browsing for that folder, I was prompted for a login/password.

    Acronis Credentials Network

    Et voilà…

    Loading

  • Cannot login into Somfy website with my email address

    Come on Somfy’s guys… I failed to login into your Somfy Tahoma Website because of a stupid “Case” coding !

    Click to Read More

    I did create an account on Somfy Connect Website as I always do on all websites; with the first letters in uppercase for my first-name and surname.

    But on Somfy Tahoma Website, I couldn’t login with that account. I lost long minutes to figure out that on this second website, I had to type my email in lower case!!!

    Beginners !

    Loading

  • Start with DJI Spark – my own notes.

    These are a few notes for myself. I did indeed struggle to start with my DJI Spark

    Click to Read More

    Power on/off

    The power button is:

    1. on the top-right for the RC (the Remote Control).
    2. on the battery for the aircraft (the DJI Spark)

    Before switching on the RC or the aircraft, charge them by plugging the batteries on the battery loader + connecting the remote with the white USB cable on the same loader.

    Both the RC and the aircraft can be switch on by:

    1. pressing the power button once and immediately after
    2. pressing+holding it until the 4 leds are on (White leds on the RC, green leds on the aircraft).

    Once the RC or the aircraft switched on, the amount of leds being on represents the power level (1, 2, 3 or 4). The aircraft will play a short music. Its two front led should keep red while the two back leds will blink quickly.

    The switch off the RC or the aircraft, do the same operation as to switch it on.

    If the aircraft is switch off but not the RC, this one will start to beep after some time. Press any button to stop the beeps.

    Leds

    Front Leds (same side as the camera) are used to show the orientation.

    • Solid red (= not flashing) once the aircraft is turned on, to indicate the nose of the aircraft.

    Back Leds (same side as the battery) are used to show status (See User Manual for details):

    • Slow green flashing = Positioning mode with GPS
    • Two green flashes = Positioning mode with Vision System (no GPS signal)
    • Slow yellow flashing = Neither GPS signal nor Vision System (Ex: not enough light or uniform surface)

    Update the firmware.

    I found it much more easy (stable) to update the aircraft via a PC (using the DJI Assistant 2 software) than via a mobile (using the DJI GO 4 app).

    1. Install DJI Assistant 2, to be found here, on your PC and run it.
    2. Plug a battery into your DJI Spark.
    3. Connect the DJI Spark to the PC using the usb cable. The usb connector is behind a small trap, at the back of the device, above the battery.
    4. Turn on the DJI Spark. DJI Assistant 2 will soon detect it.
    5. Do a Firmware update.
    6. Redo this for each battery. Indeed, they are Intelligent Flight Batteries that need also a firmware
    7. Connect next the Remote Control to the PC.

    Notice: the remote control cannot be updated via DJI Assistant 2. It may only be updated from GJI GO 4, installed on a mobile device.

    Official Videos to update firmware:

    1. with DJI Assitant: https://youtu.be/PRlV8fsVV0U
    2. with DJI GO 4: https://youtu.be/HZE-fP28htI

    Some users report that they had to install an older version of the DJI Go 4 on their mobile, available here:
    https://www.apkmirror.com/apk/dj … droid-apk-download/

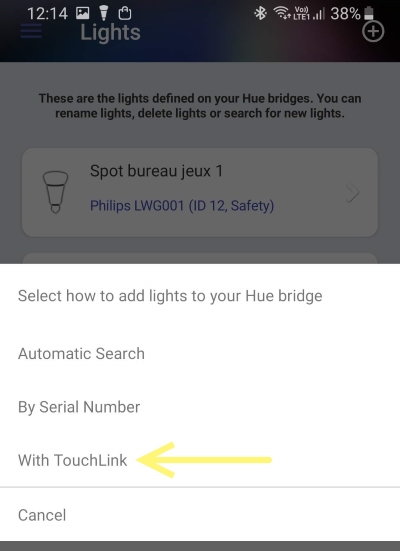
    Solve trouble to link RC and Spark.

    Linking the RC and the aircraft using the DJI Go 4 app can be difficult… if it’s the case, you can do it manually (without the app)

    Reset first the DJI Spark with the steps 1 to 5:

    1. Power up your aircraft .
    2. Press next its power button for 9 seconds (until you hear 1, next 2, and finally 3 beeps)
    3. Restart your aircraft (power off and on again)
    4. Press next its power button for 6 seconds (until you hear 1 and next 2 beeps)
    5. Restart your aircraft one more time.
    6. Now power up your remote (just now) and keep it next to the DJI Spark (< 20cm). If the led on the left is red, it means the RC needs to be linked with the aircraft.
    7. Press the power button of the aircraft for 3 seconds (until it does 1 beep). The front light should blink red.
    8. Press 3 keys on your remote to start the connection: the Pause button, the Fn button and the Custom button (which is bottom right, under the ‘camera’ shooter button). press them until the RC starts to beep continuously.
    9. Wait until the leds start to blink slowly red.

    If you don’t want to link the RC with the aircraft but only your mobile, skip the step 5 to 9 and instead, connect you mobile on the aircraft’s wifi.

    If not working, do it again but skip step 3 to 9. If DJI GO 4 is prompting you to switch the WLAN settings because you fly in another country, click CANCEL! This is said to be caused by the flight simulator which is ‘flying’ the drone in China. It should be fixed if the drone has enough GPS signal and a new home position.

    Video: https://youtu.be/GOi9WiS-PF8

    Asked for a China Mainland Number

    I didn’t test this yet, but keep it here, just in case… So far, I just click ‘Cancel’ when I am asked to switch the WLAN settings. If I accept by mistake, I am not able to connect to the aricraft WIFI anymore and has to do a complete reset as explained above.

    1. Uninstall DJI App
    2. Install a File Browser app on your phone (I used FX)
    3. Delete all folder and files you can see with the word DJI in it
    4. (Main Storage > DJI Folder), (Main Storage > dji.go.v4 Folder) and there may also be a DJI text file in Main Storage also.
    5. Reinstall the app
    6. Log into app and turn off BOTH China settings
    7. Restart App
    8. Turn on RC and AC and connect as normal

    Fly with just the Remote Control

    Yes, it’s doable! Connect the RC with the aircraft. Once done, move the left sticks bottom-right (pointing at 4h30) and the right stick bottom-left (pointing at 7h30). The motors will start to turn slowly but the aircraft won’t take off.

    Next, push the left stick up to take off. Keep it down for a few seconds to land.

    The button Pause can be used to immediately ‘stop’ and hover. The button RTH (Return To Home) should also work, but who knows where ‘Home’ is defined! (NB.: the home Point should have been recorded automatically when the aircraft was turned on.. But the GPS was possibly missing a signal. So, always check the status LED before flying: they should slowly flash green. Also note that the Home Point is redefined every 15m if the aircraft is following a subject (ActiveTrack) with Dynamic Home Point enabled).

    Without a mobile connected, you won’t see any warnings, etc… The flight will be limited to ~30m (To be verified… )

    https://www.djivideos.com/watch/84606e93-55cc-47d8-aec0-942e6ad354a9?autoplay=false&poster

    NB: I am using this cable to connect the RC and my mobile: Lindy USB 2.0 Cable Type Micro B – USB cable – Micro USB B OTG. The red end must be connected to the RC and the black one on the mobile. it is the OTG end. Always plug the cable first into the mobile and only next the OTG end in the remote.

    Use Gesture Mode

    Once the aircraft turned on and the front Leds is solid red, tap twice the power button of the battery to enter the gesture mode. Keep the aircraft in front of your face, camera pointing at you.

    The aircraft should beep twice and the front Leds should become solid green, meaning that it has succeeded in face detection. Otherwise retry to tap twice the power button of the battery and keep the camera well aligned in front of your face.

    After face detection, the leds turn solid red and the aircraft will take off and hover. You can start doing gesture at ~0.7m of the aircraft. Check that the front Leds are solid green. Solid red means that the gesture mode has quit. Blinking yellow means that it’s not working fine. (Blinking red means that the aircraft will take a selfie or video).

    Batteries

    1. Discharge the battery to 40%-65% if it will NOT be used for 10 days or more. This can greatly extend the battery life.
    2. Intelligent batteries will automatically discharge themselves after 10 days of non-use.
    3. DO NOT store the battery for an extended period after fully discharging it. Doing so may over-discharge the battery and cause irreparable battery cell damage.
    4. The battery will enter hibernation mode if depleted and stored for a long period. Recharge the battery to bring it out of hibernation.
    5. Remove batteries from the aircraft when stored for an extended period.
    6. Never over-discharge, as this may lead to battery cell damage.
    7. Battery life may be reduced if not used for a long time.
    8. Fully charge and discharge the battery at least once every 3 months to maintain battery health.
    9. Discharge a battery by turning on the aircraft and waiting until the battery is empty.

    Calibration

    The process can be tricky and looks like being freezed. But watch thist : https://youtu.be/df3ulddOqzU

    Tutorials

    1. Beginners guide: http://www.wanderworx.com/dji-spark-beginners-guide
    2. RTH: https://store.dji.com/guides/how-to-use-the-djis-return-to-home
      1. You need to record first your Home Point with at least 10 satellite GPS connections.
      2. If the drone is between 3m to 20m from its home point then it will just land.
      3. If the drone is more than 20m away, then it’ll ascend to the set RTH height before heading back home.
    3. Official Tutorials, Spec and User Manual: https://www.dji.com/spark/info
    4. DJI GO 4 Manual: https://store.dji.com/guides/dji-go-4-manual
    5. A lot of materials: http://www.spark-help.com/Spark

    Replace Propellers

    You should notice that there is a difference between the propellers: 2 have white circles on top and two don’t.

    The propellers with the white circles must be installed on the motors that have similar white marks on top.

    Find lost DJI Spark

    If you lose your spark, e.g. after a crash, there are  various ways to find it:

    Via your “Flight List”:

    • Run “DJI GO 4” App
    • Under “Enter Device”, there are 4 entries: Equipment, Editor, SkyPixel and Me… Click on “Me”.
    • Click next on “Flight Record”
    • You see your Flight Total time, Travel Distance, Flight Times, Top Distance, Top Altitude, Top Speed… And at the bottom, you can open your “Flight list”. Do that.
    • Select your very last flight. You will enter a map
    • If your GPS works, you should see you as a large blue dot, the path followed by your drone and its position as a red triangle
    • Move toward the red triangle.

    Via Find “My Drone”:

    • Run “DJI GO 4” App
    • In the upper-right corner, open the menu
    • Select Find My Drone
    • You will see a map with where you are (blue triangle) and where is your drone (red triangle)
    • Click on the drone (red triangle) and you get a menu to make it beeps or lights if connected. You also see its coordinates
    • Click on the coordinates. This is going to copy them into the clipboard.
    • Open Google Maps and paste the coordinates. NB.: the separator must be a dot. Ex.:  50.894952, 4.341613
    • If your GPS works, you should see you as a blue dot
    • Move toward the target.

    Via the map in Fly Mode:

    • If the drone is still connected, and you see a mini map on your screen, as a picture in the first person view, open it.
    • You should be indicated as a large blue dot  and your drone as a red triangle.
    • Move toward the red triangle.

    Do Sphere photos

    1. Use DJI Media Maker on PC to create the Panoramique 360
      1. Drag and drop the folder, with the parts, from the sd card (<drive>:\DCIM\PANORAMA\100_xxx) onto DJI Media Maker and select Mode: Panorama 360°
      2. Select the Output Folder. I pick a the “public” shared folder on my Synology as one has next to transfer the image on a mobile/tablet.
    2. + Tiny Planet Maker on Android:  https://www.youtube.com/watch?v=_pMZFLYbqoU
      1. Transfer the panoramique image produced on your PC with DJI Media Maker and enjoy 😉

    Or download the tiny planet directly from the DJI while connected and in “Fly mode”

    1. In the bottom-right corner of the DJI Go 4 app, whil ein Fly mode, there is a “play” icon. Press on ti.
    2. There, once can see the Library with videos, photos and panoramics including photospheres.
    3. Click on a photosphere to download the picture and create the globe.
      1. Look at the blue progress bar at the bottom of the screen for the progress. It can be very slow, first downloading all images and assembling them next (stitching Pano images)
      2. Do not go back to the library (arrow in the upper-left corner of the screen) during the download as progress would be lost. You may do it during the assembling part however.
      3. Once the download is done, the screen can become black with a spinning icon never stopping. Go back to the library and reopen the photosphere
      4. You can touch the photosphere to zoom-in but will not be able to zoom out manually
    4. Next you will be able to store it in the your local album of your phone (for edition) using the icon “download” in the bottom-right corner

    Once photosphere downloaded from the DJI spark with the DJI GO 4 app, they can be opened with Theta+. This one is really great as it can create Ballon mirrors, tiny planets, animations, …

    1. Theta+ 1.6.1 for Android use to work also with photosphere created wtom a PC using DJI Media Maker : https://www.youtube.com/watch?v=0oAPxgZ1kP8&t=194s 
      1. This version has 3 butons on Theta+’s home screen : Edit image, Animation and Timelapse. If not, you don’t have the right version
      2. Mirror APK: https://apkpure.com/theta/com.thetaplus
      3. But since my first attempts, it does not see any photos in my library anymore… It’s a pity because it was doing very nice animations.

    Mode Fly Modes

    Use DJI Go 4 Mod from here.

    You will have access to all Mavick Pro’s fly modes, described here.

    Take photos

    When used Auto-Exposure, it can be useful to lock it. For that, touch the screen on the area to be used. A target with an opened lock appears and the exposure is adapted. Touch the lock and it will be closed. A message “Auto Exposure locked.” appears. Touch again somewhere to unlock the Exposure and recalculate for the selected area.

    Legal information

    European information : http://dronerules.eu/en

    All legal Belgian information: https://mobilit.belgium.be/fr/transport_aerien/drones (No version [EN]).

    A Belgian Brochure: https://mobilit.belgium.be/sites/default/files/resources/files/asil_2017_01_pilotage_de_drones.pdf (Version [EN]).

    List of restricted area:

    • https://www.dji.com/flysafe/geo-map
    • in Belgium: https://droneguide.be

    Loading

  • TuneBlade: problem initializing audio capture.

    I just had this error message when trying to connect TuneBlade on my Airplay Yamaha: “There was a problem initializing audio capture. Exception from HRESULT 0x88890008”

    I fixed it in 5 seconds by reconfiguring my playback device.

    Click to Read More

    1. In the Systray, right the Speaker icon and select “Playback devices” in the menu. This is opening a “Sound” window.
      1. On Windows 10, there is no entry “Playback devices”. Instead, click on the entry “Sounds”
    2. In the tab “Playback” of this window, select the speaker currently used by the PC and click the button “Configure” at the bottom left.
    3. Do reconfigure your playback device.

    In my case, my playback device was reset to “Stereo” although it should have been 7.1 Surround. This usually happens after an upgrade of its Realtek Audio Drivers.

    Loading

  • IP Camera Apeman ID72 – Softwares, Firmware, …

    I just bought a cheap IP PTZ camera 1080p: an Apeman ID72. The user guide is enough to quick start. But I couldn’t find how to change the DNS settings, access the web interface, etc… I finally found a website with enough info to figure out the URL of the Web UI.

    Click to Read More

    I bought this camera as it supports ONVIF and I was intending to manage it from Synology’s Surveillance station. I did succeed but it was not obvious.

    1. ONVIF port is 10080
    2. Video format is H.264
    3. Audio format is G711.
    4. Resolution is set to 1920×1280
    5. Frame rate is 15
    6. Transport protocol is TCP

    I am using an ethernet connection between the camera and my Synology. The video is smooth and PTZ is responding fast.

    The Apeman ID72 is part of the “T,C Series” (it’s a C). It’s not from the “PnP T,C Series”.

    • Official Website: http://www.apemans.com (ID72)
    • EyeCloud Softwares: http://www.eyecloud.so (for Android devices, iPhone and Windows + IPCam Finder for Mac and Windows)
    • Online CD, Video and other software: http://cd.ipcam.so
      • Central Management Client (For PC): Central Management Client is a Windows software used to manage multiple IP cameras. It is characterized with multi-camera monitoring, PTZ control, record, alarm and access authority management function, as well as easy operation and strong capability.
      • Smart upgrade tool: Using this tool, you can just press a button to automatically upgrade IP-Camera’s firmware to the latest one. It can be used to update both the Http Web UI and the Firmware of the camera.
      • IP Camera Wizard: Use this tool to setup the Camera and configure its network environment.
        • At step 3, the wizard shows the http port configured to access the admin UI of the camera via a web browser (a.k.a.: Web UI).
          • Once connected via the browser, you have access to all the settings. This is for me the most convenient to do any advanced configurations.
        • Reconfigure that port, the submask and the gateway
        • Check the DDNS
        • Define Port Forwarding

    Using the IP Camera Finder from http://www.eyecloud.so, you will see the Http URL to be used to access the admin page in a browser (including the admin port if any). Notice that for some reason, the IP camera disappears and reappears very 3 seconds in that IP Camera Finder… So it’s nearly impossible to configure it there (it should be doable). I could only change settings via the Web UI or via the IP Camera Wizard.

    I did also use successfully the Central Management Client (“IP Camera Super Client”) from http://cd.ipcam.so to find my camera and note its IP and admin port.

    Notice that, via the Web UI, I tried to set 80 as the http port used to access that UI. Unfortunately, although this was rebooting the camera as expected, another port always appeared to be assigned after the reboot… I was only able to successfully change the http port via the IP Camera Wizard, via the “Advance Mode” and only when defining a “Static IP address” (it didn’t work when choosing “Dynamic IP address”). NB.: the http port is neither the ONVIF port, nor the RTSP port. The ONVIF port is 10080. The RTSP port can be changed via the Web UI.

    Each time I change a setting via the Web UI, the camera reboot and reset the http port I have configured 🙁

    I was not able to configure (or even find where to configure) the DDNS. I found the DDNS password in the tab “Other” of the IP Camera Wizard (in “Advance Mode”). But each time I enter the DDNS step of the “IP Camera Wizard” (in mode “Wizard”), I get an error message:

    Obtaining DDNS options from the camera…
    Failure: DDNS has not chosen then IPCam type, please click the “Settings” button to change the settings.

    I also get an error when entering the setp “Port Forwarding”:

    Error: unknown error

    please contact the IP camera supplier.

    I was also unable to disable the access to the camera via the Cloud. I am indeed not interested in that feature.

    To do a Factory Reset, you must use the Web UI (I didn’t find this option in the IP Camera Finder or IP Camera Wizard). Notice that I played with so many settings that I had to do a Reset Factory before being able to connect the camera with Synology Surveillance Station…

    As far as I am concerned, I have triggered the firmware update via eyeCloud on my Android Mobile (it’s done without manual intervention) as I didn’t find where to download the files. It succeeded without any problem. The versions are now:

    • Firmware: 48.53.203.110
    • Web UI: EN203.26.1.20

    Although the quality of the video is good, from a configuration perspective, I really prefer my Foscam cameras! Otherwise, it does not make a lot of noise when moving (compared to my Foscam) . The camera rotation speed can be adjusted and will be used by EyeCloud but not impact by Synology Surveillance Station.

    Loading

    ,
  • Home Made Cable Management

    It used to be a mess on my desk due to the amount of usb cables that I am using. I have now built my own solution to keep the cables well organized.

    Click to Read More

    The solution is based on the principle of pulley wheels. It’s ugly, quite expensive, but quite efficient. I did use:

    I can now access my cables easily when I need them. And they park automatically when I release them…

    Loading

  • Play “Steam” games like “Lego Star Wars” on NVidia Shield TV [streamed from PC]

    Today, my daughter asked me to buy “Lego Star Wars: The Force Awakens” for our NVIDIA Shield TV. Unfortunately, I found that it was not only ~30€ but also that it required a ~8€/month subscription to NVidia GeForceNow. As we really don’t play that often, this was not acceptable for me. Fortunately, as I have a PC with a Nvidia Geforce GTX 760 I found a solution without the need for a subscription: use “Steam (in BigPicture Mode)” and stream it to the NVIDIA. And “Cerise sur le Gateau”, it did only cost 6€ as there was a special promo this weekend on Instant Gaming.

    Click to Read More

    So, instead of buying Lego Star Wars: The Force Awakens for NVIDIA on GeforceNow, I bought if for PC on Steam with the idea to use it via “NVIDIA GameStream”.

    Once installed on my PC via Steam, I did try it. Unfortunately, instead of running correctly, it did start minimized. This is a well know issue with games from Steam and the solution is to define manually the resolution of your screen. For Lego Star Wars:

    1. Open the folder C:\Users\<Your Account>\AppData\Roaming\Warner Bros. Interactive Entertainment\LEGO STAR WARS The Force Awakens
    2. Edit the file PCConfig.TXT and set the resolution and the refresh rate of your main screen into it
      1. ScreenWidth 1920
      2. ScreenHeight 1080
      3. WindowWidth 1920
      4. WindowHeight 1080
      5. ScreenRefreshRate 60
    3. Save.

    Once successfully tested, I did close the game and, still on my PC, I did:

    1. Open NVIDIA’s GeForce Experience (Press :win: and type ‘GeForce’) and logged in with my account
    2. Open the Parameters (icon on the left of your account)
    3. Select the menu “SHIELD” on the right
    4. Enable the option GAMESTREAM
    5. And add the Steam game as those are not automatically detected (Ex.: C:\Program Files (x86)\Steam\steamapps\common\LEGO STAR WARS The Force Awakens\LEGOSWTFA_DX11.exe)

    Finally, on my NVIDIA Shield TV, I did:

    1. Open “NVIDIA Games” (It is under “Games” and not under “Applications”)
    2. Go to “My Library”
    3. Select “GameStream”
    4. The first time “GameStream” is accessed, it asks for your login. Use the same login as the one for “GeForce Experience”!
    5. Once connected, your PC is detected and
      1. All games available via GeForce Experience appear, including those you have added in GeForce Experience > Parameters > SHIELD. You can run any of those. They will play on your PC and be mirrored onto your NVIDIA
      2. one Icon STEAM also appears. This one can be used to start “Steam in BigPicture Mode” on your PC and stream it automatically to your NVIDIA.

    Screenshots here.

    Now, instead of using “NVIDIA Games”, I can also directly run “STEAM” (also available under Games).

    And obviously, not only the video but also the sound is redirected from your PC to your NVIDIA. And in the opposite direction, commands from your SHIELD Controllers are send to the PC. So yes, you can play with them.

    Loading