Month: November 2020

  • Easy replacement or upgrade of HTC Vive Headset’s lenses

    I did scratch the lenses of my HTC Vive Pro while keeping my glasses to play. I couldn’t find original replacements lenses but realize that I could simply use the lenses of my Samsung GearVR instead. And the result is amazing !

    Click to Read More

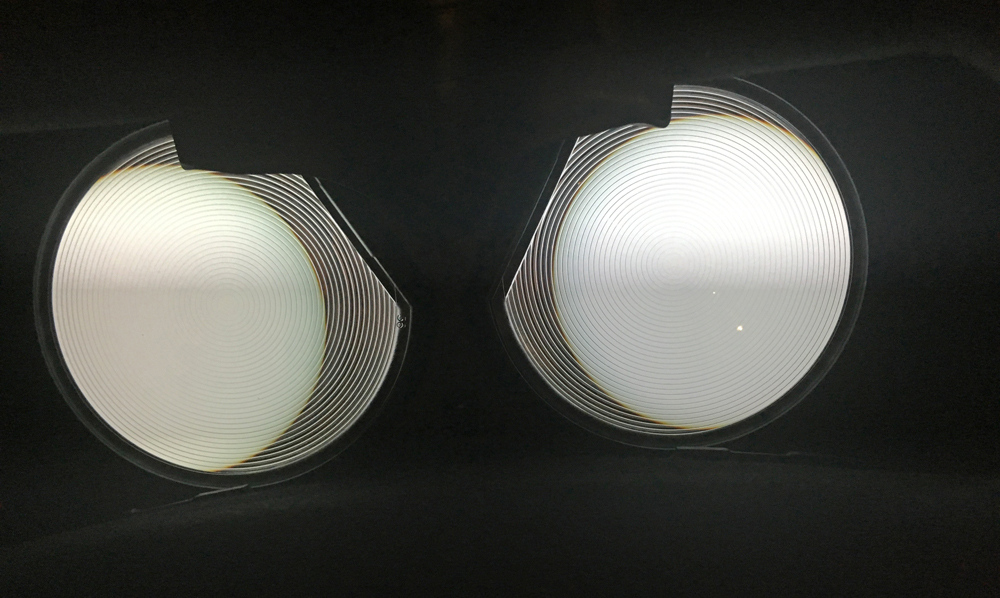
    As you know if you googled for information about the lenses of the HTC Vive, those are “Fresnel lenses“. I.e.: a set of flat surfaces with different angles. Many people suffers of “God Ray” artifacts with those lenses. I personally found indeed the visual experience as quite poor for such a high-end headset.

    The good news is that it’s very easy to replace those lenses. And it can be done:

    1. Not only with cheap 3D printed adaptors to reuse the lenses of a old Samsung GearVR.
    2. But also with prescription lenses adapted to your eyes if required.

    First, a lot of information can be found on Google with the keywords : HTC Vive GearVR lens Mod.

    If you need prescription lenses, simple google for HTC Vive prescription lenses. There are plenty of serious sites and they provide both the lenses and the adaptors:

    If you want to reuse the lenses of an old Samsung GearVR:

    • You need to print your own adaptors. Plans can be found on Thingiverse. Ex.: here or here.
    • Or you can buy them on internet. There are plenty on eBay (with or without lenses). Search for HTC Vive Mod Upgrade Kit
    • The adapters are the same for the HTC Vive, HTC Vive Pro and HTC Cosmos also.
    • The Samsung GearVR lenses MAY NOT BE those from the 2015 version (the white model). Those are smaller. You need a dark blue version of 2016 or 2017!

    There are many How-to on the web, such as this video which is quite complete for HTC Vive or this one for HTC Cosmos.

    Notice next that opposite to what is illustrated on some video, I had no need to unscrew anything to pop out the lenses. Neither on the GearVR, nor on the HTC Vive.

    The result is really fairly dramatic!

    Et voilà.

    Loading

  • Plugin “Move WordPress Comment” not working anymore

    I just noticed that this really great plugin “Move WordPress Comment” was failing when trying to move comments. Fortunately, the fix was easy.

    Click to Read More

    This plugin is very useful when you started a discussion thread (I.e.: you reply on a comment), but the person does not answer on the last comment. Instead, he starts a new comment. In such a case, the plugin can be used to move his last comment under the last reply in the discussion thread;

    Example, here under, I could attach the second discussion thread under the last reply of the first discussion thread by typing the id #46705 of that last reply into the “parent comment” of the first comment #46719 of the second discussion thread and clicking “Move”.

    Unfortunately, this plugin is now returning an error “Uncaught ArgumentCountError: Too few arguments to function wpdb::prepare()”

    The fix is really simple. Go to your WordPress Dashboard, under the menu “Plugins” and select the “Plugin Editor”.

    Next, in the top-right corner, set “select plugin to edit” = “Move WordPress Comment” and click “Select”.

    Then, go to line 63 or search for “prepare”. This methods requires 2 parameters. So, in the where clauses of the SQL Update statements, replace the variables by %s and move the variables into a second parameters.

    It should result into this:

    // move to different post
    if ( $postID != $oldpostID ) {
    $wpdb->query( $wpdb->prepare( "UPDATE $wpdb->comments SET comment_post_ID=$postID WHERE comment_ID=%s;", "$commentID") );

    // Change post count
    $wpdb->query( $wpdb->prepare( "UPDATE $wpdb->posts SET comment_count=comment_count+1 WHERE ID=%s", "$postID" ) );
    $wpdb->query( $wpdb->prepare( "UPDATE $wpdb->posts SET comment_count=comment_count-1 WHERE ID=%s", "$oldpostID" ) );
    }

    // move to different parent
    if ( $parentID != $commentID ) {
    $wpdb->query( $wpdb->prepare( "UPDATE $wpdb->comments SET comment_parent=$parentID WHERE comment_ID=%s;", "$commentID" ) );
    }

    Finally, click on “Update File”, at the bottom of the Plugin Editor.

    Et voilà,

    Loading