Month: December 2013

  • Remote control for electrical sockets (via ethernet)

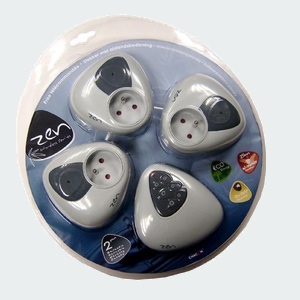
    There are many different models of basic and cheap remote controls for electrical outlets. I have some from Chacon (the Zen model). But this kind of remote is usually limited to max 4 sockets.

    Power Outlets with remote control "Zen"
    Power Outlets with remote control “Zen”

    So, I am looking for something else.

    Click to Read More

    The best solution would be to control the sockets via Ethernet from a PC, an Android or an iOS. But as I don’t have an Ethernet plug next to each power outlet, I would love Devolo to develop a solution with support to switch on/off the power outlet via CPL… Unfortunately, they don’t have it (yet) 🙁

    Belkin has a solution named WeMo, a Wi-Fi enabled Switch that lets you turn a power outlet on/off from anywhere using an Android or a iOS. It’s however quite expensive: ~50€ for one outlet.

    Belkin WeMo
    Belkin WeMo

    There are also solutions based on X10, but to simply remotely control power outlets, it’s over-killed IMO.

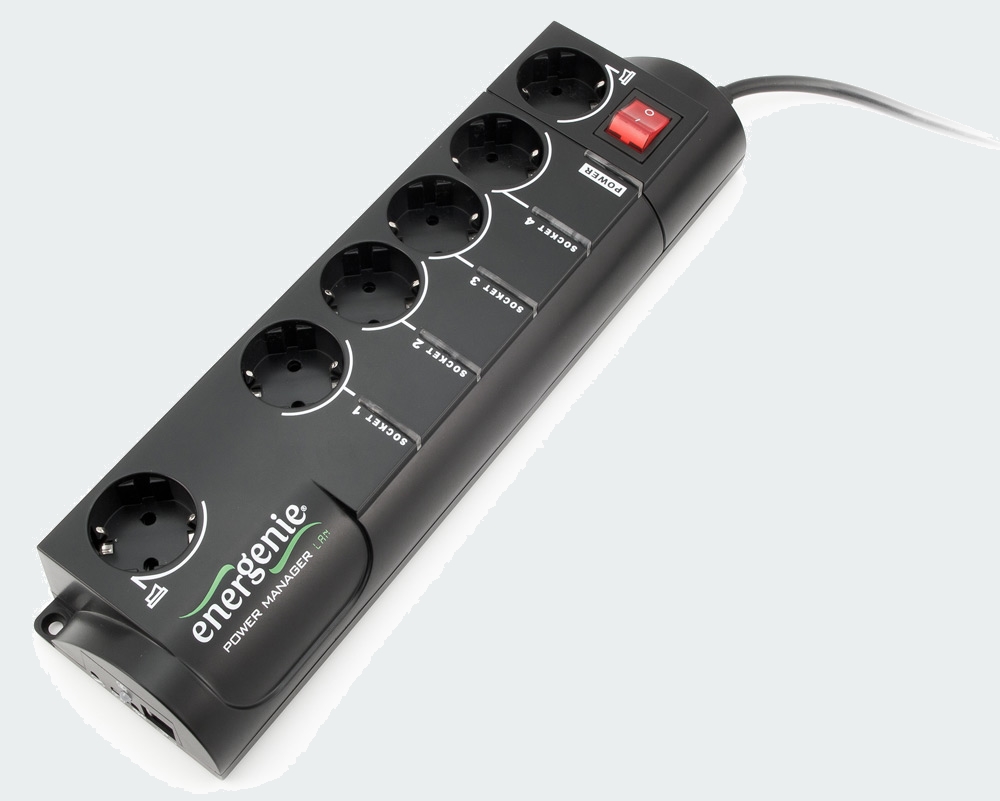
    So a fallback solution, could be to combine a very old Devolo dLAN® 85 HSplus with a device like the EnerGenie EG-PMS2-LAN which is an advanced surge protector with power management features. It is possible to individually switch 4 sockets on/off via Ethernet (local network or Internet from a PC, an Android or an iOS), by timer schedule, or by programmable special events… I already have an old USB version of that device (it is more than 8 years old now but still supported on Windows 8.1)

    EnerGenie EG-PMS2-LAN
    EnerGenie EG-PMS2-LAN

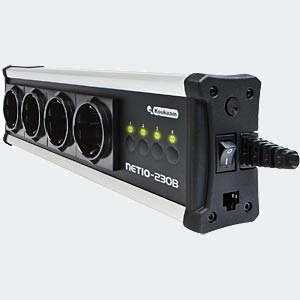
    An alternative to the EnerGenie device could be the NetIO 230B from Koukaam. It does also allow control from a PC/Android or iOS device. The command interface via http is well documented.

    Koukaam NETIO-230B
    Koukaam NETIO-230B

    I am however still not convinced… and really hope Devolo will do something :p

    EDIT 01/04/2014  I wrote to DEVOLO and got an answer !!!

    Click to Read More

    I was far from expecting an answer but couldn’t resist to ask DEVOLO if something similar to the Belkin Wemo was planned for the coming months… If not, I was suggesting to introduce such a feature request to their R&D department…

    I was actually surprised to quickly get an answer from their support team. DEVOLO has some plan that will probably offer what I want and much more at a democratic price (compared to the current product on the market).

    http://www.devolo.com/en/Press/Press-Releases/2014/devolo-Home-Control-Home-automation-made-simple-devolo-announces-a-new-product-portfolio-for-greater-comfort-convenience-security-and-energy-efficiency

    I am very excited  😛

    EDIT 04/07/2015  I finally bought 10 Chacon Wi-Fi Neo, 25€ each, at MediaMarkt (Promo).

    Click to Read More

    More than one year after my email to Devolo, there is still no Home Control Solution in shops here. I can only see some products on German websites…

    So, I finally decided to buy the Chacon Wi-Fi Neo solution (also sold with the name Ankuoo) which works quite well although not perfect. It’s indeed sometimes not easy to configure it for the first time. And sometimes, the scheduler doesn’t work as expected (turn on/off the device on schedule)…

    Chacon WiFi Neo
    Chacon WiFi Neo (Belgian version)

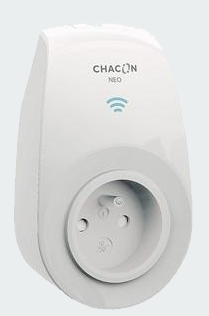
    But to switch on/off a device remotely from a mobile device, it works very well!

    Details here. (The Belgian version is not available anymore)

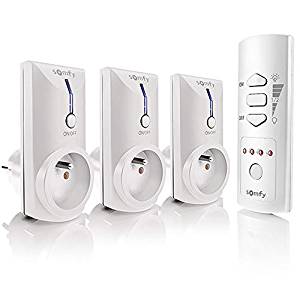
    EDIT 07/06/2018  I have now replaced all my Chacon Wifi Neo by Somfy Plugs that can be controlled with my Google Assistant via the Somfy Tahoma portal. I am indeed using that system since I have installed Somfy shutters and blinds at home.

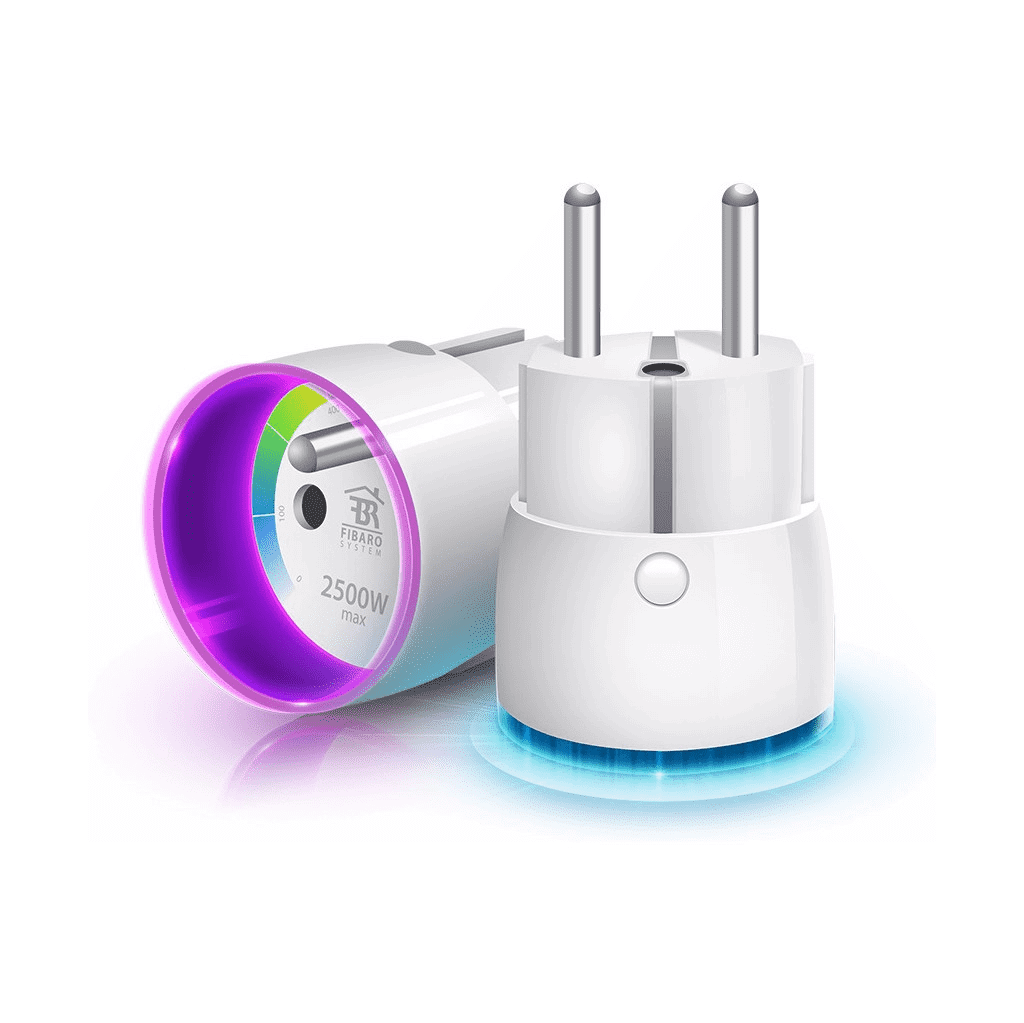
    EDIT 02/08/2019  I have now a set of Fibaro Plugs which can be controlled by my Z-wave bridge (installed for my Engie BOXX to control the power, gaz and water consumption at home). They are just amazing !!

    Loading

    , ,
  • Wi-Fi issues…

    Information possibly useful to understand, investigate and solve Wi-Fi issues.

    Click to Read More

    Here is a really interesting paper. I did copy the most useful part here:

    • 0.5-2 Mbps: Is enough for chatting and mailing services, though it will slow down some content-heavy websites for users with a 20+ Mbps download bandwidth.
    • 4-5 Mbps: Enough for handling all websites and basic video streaming.
    • 20+ Mbps: Minimum required for HD streaming. Typical bitrate of a 720p iTunes TV show is 2-6Mbps, but routers need to compensate for dropouts, other connected clients and prebuffering…
    • 50+ Mbps: Enough for 1080p movies and over-the-air backups.

    Some routers have a “Power savings” mode to save a few milliwatts. Unfortunately reduces bandwidth disproportionately.

    By doubling the distance between a router and a client, the throughput could shrink to one-third of its original value.

    Water acts as a blockade for 2.42GHz signals: Get all objects that contain any form of liquids out of the way Including radiators, flower pots, aquarium, …

    Also make sure that metal objects are not in the way of the router and the clients.

    Smooth and shiny surfaces are prone to reflecting signals and thus either creating drops or massive signal problems.

    Use a Wi-Fi heatmapping tool to measure the impact of distance, frequency changes and building structures on signal strength such as Heatmapper for Windows.

    Motherboards are working in the “Gigahertz” spectrum. That “noise” is being picked up by built-in Wi-Fi transmitter and the higher that noise is, the more likely it is for your wireless adapter to lower bandwidth automatically. As CPUs these days clock dynamically, the Wi-Fi adapter needs to constantly adapt the link rate which not only causes a variation in Mbps but may also be the cause for dropped connections. Especially on laptops, the Wi-Fi adapter is often built close to the memory and CPU bus, which is a major source for problems.

    Modern routers with “dualband” send two network signals: one at 2.4GHz which is crowded, and one at 5GHz, which is far less crowded and offers more channels. Keep both networks enabled on the router, connect the mobile devices to the 2.4 GHz network (as they other don’t supprt 5GHz) and enable only the 5GHz network on laptops and desktops.

    If choosing the 5GHz frequency band is not possible on the laptops/desktops, limit the router to sending out signals at intervals of 20MHz. It might reduce overall throughput a bit, but it will give a stronger signal with less dropouts.

    Reminder: all info above come form a paper of Sandro Villinger posted on TechWorld.

    Other information I have collected:

    WiFi Channels/Frequencies
    WiFi Channels/Frequencies

    Here in Europe, the frequency 2450 MHz is used by microwave ovens. Those could possibly disturb the Wi-Fi channels 9 and 10 that are both next to 2450 MHz. But if one does, it must be replaced immediately! Radiation that escapes from a microwave oven while it is in use may not exceed 5 mW (per cm2 at a distance of 5 cm). So, if your experience Wi-Fi issues when using a microwave oven, the leakage radiation is probably exceeding a lot that limit (It happens as some of my colleagues already experienced).

    Frequencies from 2400 to 2450 MHz (Wi-Fi channels 1 to 8) are used by “radio amateur”. Those could impact the Wi-Fi signal as their radio signal goes up to 120 Watts while Wi-Fi is usually around ~18-30 mWatts.

    Channels 1, 5, 9 and 13 are known to be used by some wireless transmitter and camera (at least here in Europe). Based on this info and those above, channel 13 seems to be the best candidate to avoid issues. InSSIDer is a tool for Windows that can be used to get information on channel usage in the area.

    Use iPerf to measure the improvement of the Wi-Fi signal.

    Before moving to the channel 13, my Wi-fi signal was lost every few seconds… Since it is on the channel 13, it’s stable as a rock!

    Loading

  • The perfect AirPlay Speaker for my Synlogy

    I just bought 3 x Philips Fidelio SoundAvia wireless speaker AD7000W/12 with AirPlay. This model is must cheaper than any other AirPlay device and fully compatible with my Synology DS209+ running the Audio Station of DSM 4.2.

    Click to Read More

    Philips Fidelio AD7000W/12
    Philips Fidelio AD7000W/12

    I paid only 109€ (instead of the official price: 149€) for this device, which is reported as a good one (Look for reviews on the web). It’s especially much cheaper than any other devices except the Philips DS3800W/10. But this last one, which actually used to be more expansive than the AD7000W/12 in the past, is not as good although better designed. I took 3 AD7000W/12 (for the price of one single Soundlink Air, the cheapest Bose AirPlay device). I will  use them respectively in the bathroom, in the kitchen and in my room.

    It’s perfect for a Synology as there is not useless feature, like a docking for iStuff that don’t need, no remote control as I have my mobile phone, etc… So I paid only for what I really need: a basic AirPlay Speaker.

    Take note that there is no need for an iPad, iPod or iPhone to configure the Philips Fidelio AD7000W/12. It’s presumed to be configurable auto-magically via WPS but I didn’t succeed to do so (I.e.: using the PBC – Push-Button Configuration – which is the WiFi setup button on the back of the device). Fortunately, it is really easy to configure the AD7000W/12 with a browser from any wireless client device such as a tablet, a laptop, a mobile phone, …

    Notice: when unwrapping the device, on the connectors at the back of device, there is a sticker explaining that one has to push the physical WiFi setup button for 5 sec to configure the network for the first time. This could be confusing if you read next the Quick Guide. Indeed, this one explains two ways to connect the device to the WiFi router: a first method using WPS and a second method using an iStuff. In both cases, you have to press the physical WiFi setup button. But the mistake would be to press this button for 5 seconds when using the WPS method. It must only be pressed for 5 seconds if you want to use the second method. So, here is my experience:

    1. Switch on the device. The button is on the back, close to the top, next to the Volume + and – buttons.
    2. On the back too, there is a green led blinking rapidly in the middle of the WiFi setup button, at the bottom, on the right of the USB connector. Wait for 35 sec until it starts to blink slowly. The device is then ready to be configured.

    To connect the AD7000W/12 to a WiFi router using a browser (Connect the devices one by one if you have several):

    1. Press the WiFi setup button for 5 sec (= blinks 5 times). The led will then start to blink alternatively green and orange.
    2. Soon after you should see, with your wireless client device, a new opened WiFi network  named like Philips_Fidelio_AirPlay. Connect to that network.
    3. Open a browser and navigate to 192.168.1.1 to access the network configuration page of the AD7000W/12. If you are using a laptop, althoug configured to get an IP via DHCP, you could have to reconfigure it to use a fixed IP like 192.168.1.2, gateway 192.168.1.1, mask 255.255.255.0. I had to do even after I didn’t succeed with a simple “IPConfig /renew”. With a mobile and a tablet, it worked out of the box.
    4. In the configuration page, edit the name of the device to make it unique and select the SSID of the WiFi network on which it will have to connect. It works fine with my network configured to use WPA2.
    5. Type the Passphrase of the WiFi network and Apply the configuration.
    6. The led will restart to blink rapidly in green.
    7. As soon as device is connected on the selected WiFi network, it produces a clear “Beep” sound and the led stops blinking.
    Philips Fidelio Configuration
    Philips Fidelio Configuration

    To connect the device using WPS:

    1. Press the WPS button on your WiFi router. It has better be configured to use WPA2
    2. Press the WiFi setup button on your device (a simple click of less than 1 sec). The led will start to blink alternatively red, green and orange.
    3. Wait for up to 2 minutes. The device should auto-magically connect on the WiFi router and produce a clear “Beep” sound once connected.

    This second approach didn’t work for me ?!

    As soon as the Philips Fidelio AD7000W/12 is connected on the WiFi network, it becomes available as a target device for the Synology Audio Station (either in the Web UI or in the Apps for mobile). One can see targets like “XXX( DLNA)”, “XXX (AirPlay)” and “Multiple AirPlay Device” where XXX is the name you gave to the device (“Philips Fidelio ####” by default). All those targets work but you will possibly have to be patient for the music to arrive with DLNA targets (?). I takes a few seconds more than with AirPlay on my infra.

    If you don’t want to see the speaker as both an AirPlay device and a DLNA device, you must tick “Do not Search for DLNA devices” in the “options” tab of your Audio Station’s settings.

    Notice that the feature “Multiple AirPlay Device” only works if turned on from Audio Station “browser based”. It means that you must first select that target in the Audio Station’s web based UI. You will then be prompted to select which AirPlay devices must be used. Once this is done, you can use the “Multiple AirPlay Device” target also within the Audio Station Apps for tablets and mobiles. There is no support (today) to select via the mobile App which devices are part of the target “Multiple AirPlay Device”.

    Notice also that selecting the target device is really easy on a mobile phone via the App. First select the music to be played in a library. Then, on the next screen you will be able to select the target:

    Audio Station Apps
    Audio Station Apps

    For an unknown reason, it’s not as obvious with the App on my tablet ? To select the target on my table I have indeed to open the settings of the App. This is really not convenient at all!

    Notice finally that each device has its own queue. So you can then switch between target devices and manage their queues independently.

    Loading

    ,
  • Send Custom (email) Notifications from scripts running on a Synology

    I use a custom script on my Synology DS209+ (DSM 4.2) DS713+ (DSM 5.1) to backup the databases and was recently asked how to notify the administrator about the success or the failure of that script. The easiest solution is to use the native Notification mechanism of the DSM. It notifies not only by email but also with popup messages, SMS, Skype, etc….

    If you are using DSM 6.x, look at the new version of this post, located here.

    Click to Read More

    First, create the texts for the Notifications to be sent:

    1. Open a dos command prompt
    2. Execute: telnet <YourSynoHostname>
    3. Login as ‘root’
    4. Use the password of your Administrator
    5. Execute: cd /usr/syno/synoman/webman/texts/
    6. Execute: ls
    7. Now you see a list of folders for each language supported by your Synology. Assuming that your DSM is configured to run in English (the default), we will use here after the folder ‘enu’ (but read the notice at the end of this post if you want to configure Notifications for another language)
    8. Execute: cp enu/mails /volume1/web/
      1. I presume here that the web station is enabled, otherwise, copy the file ‘mails’ in any other shared folder.
      2. This file contains the Notification messages used by the Synology.
    9. Open now this file ‘mails’ with notepad++: \\<yourSynoHostname>\web\mails
    10. Add two new “tags” at the end of the file. E.g.: “MySqlBkpError” and “MySqlBkpOK” (see bellow for details to possibly be used for those tags)
    11. Save the changes.
    12. Back to the telnet console, execute: cp /volume1/web/mails enu/mails
    [MySqlBkpError] Category: Backup/Restore,Important
    Title: Database backup failed
    Subject: Database backup on %HOSTNAME% has failed

    Dear User,

    Database backup on %HOSTNAME% has failed.

    [MySqlBkpOK] Category: Backup/Restore
    Title: Database backup succeeded
    Subject: Database backup on %HOSTNAME% has succeeded

    Dear User,

    Database backup on %HOSTNAME% has successfully completed.

    Next, complete your script to notify the Administrator about the Success or Failure of its last action:

    1. Edit your script with notepad++ once it has been copied in a shared folder of your Synology as made here above with the file ‘mails’.
    2. After the action to be reported, add the code here bellow.
    3. Save your changes and copy the file back to its original location

    if [ $? -eq 0 ] then /usr/syno/bin/synonotify MySqlBkpOK
    else /usr/syno/bin/synonotify MySqlBkpError
    fi

    Now, define those custom Notifications to let them appear in the “Advanced” tab of the “Control Panel” > “Notifications” pane where you will be able to enable “email”, “sms”, … for them.

    1. Go back to the telnet console and execute: cp enu/notification_category /volume1/web/
      1. If you want to define those notifications for another language, used the adequate folder instead of ‘enu’.
      2. Notice that I presume you are still in the path set previously, i.e.: /usr/syno/synoman/webman/texts/
    2. Edit the file ‘notification_category’ with notepad++
    3. Look for the following definition in that file: {“group”:”Backup/Restore”,”name”:”NetBkpS3OK”,”title”:”Amazon S3 backup completed”}
    4. Insert the following definition next to it (don’t forget the coma), save the changes and copy the file back to its original location: cp /volume1/web/notification_category enu/notification_category

    ,{“group”:”Backup/Restore”,”name”:”MySqlBkpOK”,”title”:”Database Backup completed”},{“group”:”Backup/Restore”,”name”:”MySqlBkpError”,”title”:”Database Backup failed”}

    Finally, check that the “Notifications” are enabled on your Synology and tick options like emails, SMS, … for the new tags:

    1. In your DSM, go to “Control Panel” > “Notification” > “E-Mail”
    2. Tick the option “Enable e-mail notifications”.
    3. Complete all the fields in that tab. At least: SMTP server, SMTP port, SMTP authentication and Primary email.
    4. Send also a test mail from this tab to verify your settings.
    5. Go next to the “Advanced” tab
    6. Tick the “E-mail” option (and possibly others) for the two new tags which appear now in the list.
      1. If the tags do not appear, close and reopen the control panel.
      2. The tags appear with their title “Database Backup completed” and “Database Backup failed”

    And here are the outcomes: a popup message and an email

    Database Backup Email
    Database Backup Email
    Database Backup Custom Notification
    Database Backup Custom Notification

    Pay attention that the tags are case sensitive ! Also backup the changes you made in the file ‘mails’ and ‘notification_category’ as they will be overwritten for sure when you will update the DSM… Finally, delete the files ‘mails’ and ‘notification_category’ from your web folder…

    Notice: to declare Notifications for other languages, you will apply the tips here above in the files under your own language folder. A reader, Kasak, kindly reported however that he had to declare the ‘tags’ not only in the ‘mails’ file under the folder of his language (E.g.: ‘fre’), but also under the English (enu) folder.

    Notice: as reported by another reader, Pieter Hooftman, you will see your notifications in Control Panel > Notifications > Advanced tab if and only if you filter them on “All Notifications”. If you need to filter your custom notifications, you have to add it into each section of the file “notification_category” (there is one section per filter). Concretely, look for each occurrence of {“group”:”Backup/Restore”,”name”:”NetBkpS3OK” and insert your in front.

    Notice: as reported by k13tas, it’s much easier to reuse an existing notification and customize its text via Control Panel > Notification > Advanced. Indeed, customized text are not lost after a DSM update. That being said, once a custom notification added in the file “notification_category”, you can also customize its text. Once this is done, the notification will always be available to be used with /usr/syno/bin/synonotify, even after a DSM update, although not visible anymore in the Advanced tab – which is far from ideal.

    As creating manually custom notifications is far from ideal, please vote for my feature request on Synology’s forumhttp://forum.synology.com/enu/viewtopic.php?f=3&t=92727

    Loading