Month: April 2016

  • PatchCleaner: a Must Have to remove unused “Windows Installer”

    Patch Cleaner
    Patch Cleaner

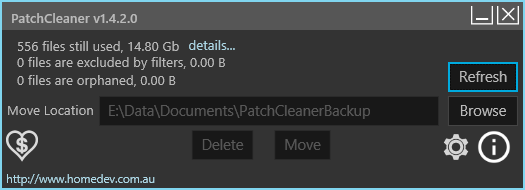
    PatchCleaner identifies redundant/orphaned installer files that can be deleted.

    Click to Read More

    When applications are installed and updated on the Windows Operating System a hidden directory “c:\Windows\Installer” is used to store the installer (.msi) files and the patch (.msp) files.

    Generally these files are important as during updating, patching or uninstalling software it will use the .msi/.msp files. If you blanketly delete all the files in this folder, you will find yourself needing to rebuild windows.

    Over time as your computer is patched and patched again, these installer files become outdated and orphaned. They are no longer required, but they can take up many gigabytes of data.

    On my Windows 8, it reduced the content of C:\Windows\Installer from 24Gb to 8.2Gb !

    It’s IMO enough to illustrate its interest 😉

    NB.: DO NOT USE Windows UnUsed Files Cleanup Tool… It does not detect correctly unused installer as illustrated on the screenshot here bellow

    False Unused
    False Unused

    Download: http://www.homedev.com.au/free/patchcleaner

    PS.: to clean WinSxS, also look at http://www.thewindowsclub.com/winsxs-folder-cleanup-windows-8-1

    Loading

  • Awesome Duplicate Photo Finder

    Duplicate Photos Finder
    Duplicate Photos Finder

    This is a free simple but very efficient tool to find similar images or exact duplicates.

    Click to Read More

    My favorite paid tool to do this is “Visual Similarity Duplicate Image Finder”. But although “Awesome Duplicate Photo Finder”‘s interface is less complete, it’s really excellent too.

    Pro’s:

    • It has an extremely simple user interface,clean and nice, as I like them.
    • It finds similar images or only exact duplicate photos if you tick the option “Search Only 100% Identical Pictures” in the menu Settings.
    • It searches through the various image types: JPG, BMP, GIF, PNG, TIFF
    • It is able to compare pictures that was resized or with corrected colours (black and white photos for example).
    • You can search inside multiple folders or drives.
      • Better than “Visual Similarity Duplicate Image Finder”, you can simply drag and drop the folders into the interface.
      • It works with network drives and removable devices (USB etc.).
      • I prefer the folder browser of this tool as it’s faster than “Visual Similarity Duplicate Image Finder”, especially for network folders. Anyway, the easiest way to add network folders is also by drag and dropping them into the interface.
    • You can move or delete duplicate photos (or the originals) as well as open a File Explorer to browse the location of those duplicate photos (or the originals).
      • Deleted photos can b e moved into the recycle bin (this is an option).
      • Another option is to not be prompted to confirm the deletion.
    • You can sort the duplicate photos based on their location or on the location of the originals as well as on the rate of Similarity.
    • There is a standalone version.

    Con’s:

    • One cannot specify the minimal rate of Silimarity as one can do with “Visual Similarity Duplicate Image Finder”.
    • It’s not slow, but not IMO pushing the limits of the machine. On a Quad Core i7-3820 HyperThread 3.6GHz scanning 37.500 photos on a local drive, it took 85 minutes using less than 15% CPU and not saturating at all the IO (NB.: more pictures there are, slower it is!).
    • The setup version is reported by Avast as being infected by OpenCandy-D. This is just an adware but still, who wants that :/

    Download: http://www.duplicate-finder.com/photo.html

    Loading

  • Synology upgrade to DSM 6.0

    A few notes about the upgrade from DSM 5 to 6

    Click to Read More

    • First, stop Plex (as it prevents DSM 6.0 to install)
    • Upgrade to DSM 6.0
    • Upgrade all the required Packages
    • Start Plex
    • Not working anymore:
      • Login in a telnet session as ‘root’
      • ‘homes’ link in /var/services is pointing at /volume1/@fake_home_link
        • open a ssh session as root,
        • do: rm homes
        • and: ln -s /volume1/homes homes
      • Access right to shared folders
        • admin has no access anymore to various shared folders. Ex.: /volume1/homes/admin
        • Go to DSM > Control Panel > User
        • Edit the ‘admin’ account and got the the ‘permissions’ tab
        • Reapply the access rights
      • Web Console.

        • Doesn’t open anymore… It must now be accessed under the web path /webman/3rdparty, via its url: http://hades:5050/webman/3rdparty/webconsole/wc.cgi.
        • I did a new package to start it automatically. See attachments at the bottom of this post. Once installed, open Web Console and change your password (default is “admin”) using the command:  #users modify admin
      • JDownloader (does not start anymore)
        • Java Manager not installed anymore. It is replaced by the new Java package for a more convenient installation procedure.
        • Edit the file S99jdownloader.sh to replace “/volume1/@appstore/JavaManager/Java/bin/java” by “/usr/local/bin/java”
        • In that file also change the path to create the pid file into a folder where admin is granted write access !
        • Login into a ssh session and enter the root mode (sudo -i)
        • Execute “rm /var/run/S99jdownloader.pid”
        • Check that all files in /volume1/@appstore/jdownloader belong to ‘admin’
        • Exit the root mode
        • Execute “sh S99downloader.sh start”
        • Check the output in the nohup.out file
      • Filebot does not run anymore
        • Reinstall the “Unofficial Java Installer”
      • FileBot Node does not start anymore
        • Uninstall filebot and filebot-node
        • Uninstall node.js and java 8
        • Delete all the old scheduled tasks related to filebot
        • Delete the input and the output folders (where media files to be renamed are located)
        • Recreate empty input and output folders (as admin – via the File Station, not as root)
        • CTRL-F5 in the browser to fully refresh DSM
        • Install the unofficial java installer of RedNoah + node.js v4
        • Install filebot (version from Package Center) and filebot-node (the version filebot-node-0.2.0-B1-noarch of RedNoah)
        • If it does still not run, test it via a SSH
          • login as admin
          • DO NOT RUN ANYTHING AS ROOT. So, don’t execute: sudo -i
          • cd /var/packages/filebot-node/target/
          • ./start
          • Check the errors returned by this command if any
          • Check also the logs: cat /var/log/messages
        • filebot-node is installed in /volume1/@appstore/filebot-node with
          • a sytmbolic link from /var/packages/filebot-node/target/ and
          • a symbolic link from /usr/local/filebot-node
          • filebot-node schedule a task to run its command /usr/local/filebot-node/task xxx where xxx is the id of a task defined into /volume1/@appstore/filebot-node/data/task/xxx.argsp
      • AcpiOnLan (DSM SSO login not working anymore)
        • the port to access DSM in admin mode (required to do a login via the page /webman/login.cgi) is not anymore stored in /etc/synoinfo.conf with the key secure_admin_port or admin_port respectively for http and https. AcpiOnLan was fetching the port in that file. Instead, AcpiOnLan must now fetches external_port_dsm_https or external_port_dsm_http
      • WordPress
        • After the update of WordPress, as usually, I had to save (although not changed) the current option selected in the “Settings” > “Permalink Settings” otherwise no page was accessible anymore via permalinks (as returned by google search).
        • The automated WordPress update failed to complete. I should have enabled ftp first. I did a manual upgrade.. But the problem was most probably with the owner of the files… (See next)
        • Upgrading plugins didn’t work either… But this problem was solved by executing, as root: chown -R http:http /volume1/web/wordpress

    Loading