Month: March 2019

  • Amazing Broadlink Mini R3 with Google Home

    I have just configured a Broadlink Mini R3 to be used within Google Home’s scenario to control several devices. Works really like a charm !

    Click to Read More

    It’s just amazing that this little device can perfectly remote control my projection screen 7 meters away, the projector 2 meters away on the ceiling and the ampli which is in the room but not in sight.

    I bought 3 of them from China for 13€ each.

    Quick memo about how to configure them:

    • First step, install the App “ihc for EU” (special version compatible with GDPR for EU) to detect the device, assign it to the right room and add appliances (either from the library available out of the box or custom ones)
      • Attention: if you change later the room assigned to the RM mini 3 in the app, you loose all the appliances configured with it.
    • Next, configure some scenes to be used via Google Home. Their name will be used by Google Assistant.
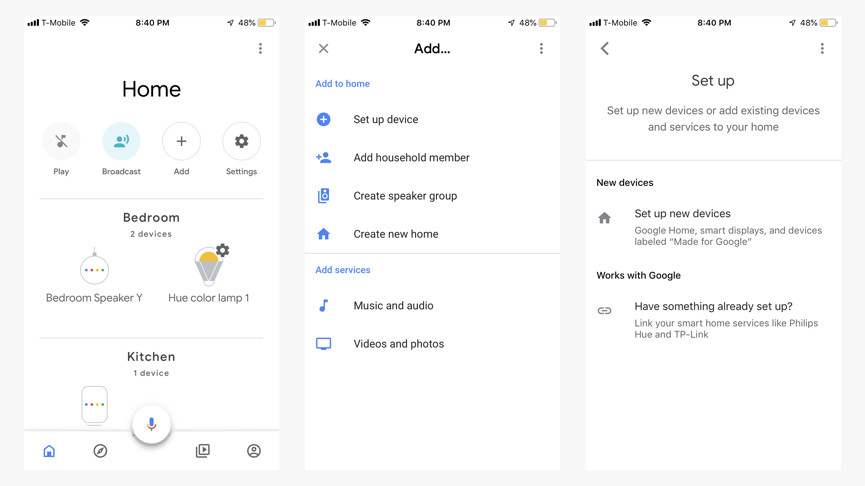
    • Then, make the mini R3 accessible via your Google Assistant : Go to “Google Home” and “click Add” > “Setup a device” > “Works with Google”. There, link your “BroadLink Smart Home for EU” account with Google Home
    • Finally, use ‘in french’ : “Ok Google, active {le|la|l’} <xxx>” where <xxx> is the name of a scene and “le”, “la”, .. is optional
    Google Home Add Device
    Google Home Add Device

    Tip:

    • use “Ok Google, synchronise les appareils” to refresh the name of the scene in Google Home if you did rename them in the “ihc” app.
    • use scenario (“routines”) in Google Home to combine “IFTTT actions”, “scenes of other products like Philips Hue” and scenes from “Broadlink”.

    Using the “ihc” app, you can update the firmware: click on the RM mini > the three dot in the top-right corner > “Check for firmware updates”

    To configure an appliance, don’t hesitate to use one which does not work perfectly. At least, you will have all the related icons and be able to reconfigure them. Creating a “UserDefine” appliance, you won’t have many different icons available. Also, the configuration of  “UserDefine” appliance can’t be “backuped”. Not problem however to use “UserDefine” appliances in “scenes” to be called from Google Home.

    Once an appliance added, you can reconfigure the buttons: click on the appliance > the three dot in the top-right corner > Learn

    Don’t forget to backup the settings of your appliances once reconfigured!!! It’s the best ways to reuse them on other RM mini later: click on the appliance > the three dot in the top-right corner > Backup IR code sets

    Loading

  • Easily connect Ikea Tradfri bulbs on Philips Hue Bridge

    I did spent a lot of time trying to connect Smart/Cheap Ikea bulbs on my Philips Hue Bridge.

    I finally found an easy way: use the Android App HueDynamic !

    Click to Read More

    First, you must be sure to have Ikea Tradfri bulbs with a firmware >= 1.2.x

    To be sure about the firmware of Ikea bulbs, no choice but buy the Ikea Bridge and at least one Ikea Remote, then connect the bulb to the Android App “Tradfri”. If the firmware is obsolete, then the App can be used to trigger an update. But my experience is that even to connect the Ikea bulbs with their App, it’s a real pain in t…. Also, before connecting next the bulbs to the Philips Hue Brige, you will have to disconnect them from any Ikea remote and from to the App “Tradfri” (Check here).

    An option is however to check the batch id of the production, on the box. It is said that all bulbs produced with a batch id equal or above 1721 should have a firmware compatible with the Philips Hue Bridge.

    Here a sample of Ikea bulbs with a batch id 1733. I bought 6 of those and had (nearly) no issue to connect them.

    Ikea Tradfri Batch Id
    Ikea Tradfri Batch Id

    Once you have a bulb with adhoc firmware, turn it on and place it very close to your Philips Hue Bridge (less than 2 cm ;). The easiest for that is to use a cable like this one (I did one myself):

    Cable with adapter E14
    Cable with adapter E14           

    The bulb being on and next to the Hue Bridge, open the App HueDynamic and click on the three horizontal lines in the upper-left corner to open the menu. Then scroll down to the “Settings” section and pick the entry “Lights”:

    Click on the sign +, in the top-right corner to add the bulb:

    And select the option “With TouchLink” (This is the magic trick !!):

    Now, press the “TouchLink” button of your Philips Hue Bridge:

    The App HueDynamic will search for the bulb during 1 or 2 minutes… Once in touch with the bulb, this one will start to dim and bright several times before finally turning off. The App will continue to search for several minutes (for other bulbs) after that. When it stops to search, you see the bulb found on the screen. Accept it !

    Notice that this process failed for one of my bulb (out of 6). I tried twice and got each time the message here under:

    But when I came back to the list of bulbs, I saw that the bulb was actually in the list (Maybe I did something wrong without noticing ?!).

    Since the bulbs are connected, I have been able to combine them into rooms and control them with Philips Hue Motion Sensors. They work great so far !

    NB.: I read that Ikea remotes may not be used as once connected to a bulb, the bulb disappear from the Philips Hue Bridge… I didn’t try that yet and won’t 😉

    Loading