I have just received the “Raspberry Pi Model B” I ordered two weeks ago on “RS Components” website. It rocks !!!
Within 30 minutes, I was watching on my HD TV a 1080p movies streamed from my NAS :p
Click to Read More
Mine is in a black case bought from RS components. I also bought there a power supply and a HDMI cable. The big advantage of using a Raspberry pi is that
- It has a very low power consumption (about 1-2 watts at idle)
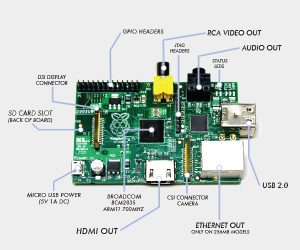
- It is really small 85.60mm x 53.98mm x 17mm (invisible behind the TV)
- It has a HDMI with Audio with CEC support (you can pilot XBMC on the Raspberry Pi with the TV remote control)
- It comes with codec license for MPEG4 & H.264 (hardware accelerated)
- Licenses can also be bought here to play back MPEG2 or VC1.
- The Model B comes with 512MB Ram (Only 256 on the Model A)
- It boots a Linux from a SD card (= silent) in about 50 seconds (depending on the distribution). There are 3 distributions of Linux with XBMC targeting the Raspberry Pi (see the wiki here). Some Install Guides:
- Raspbmc (The one I am using)
- OpenElec
- XBian
- Look at this comparison (and read also its previous version)
- A 2GB SD is enough, but I use a 16GB class 6, the only SD I had
- There are 2 USB slots that I use for a keyboard and a mouse. That can be expanded with a USB hub (There is only one USB port on the Model A). A USB HDD can be plugged to add extra storage if required.
- There is a 10/100Gbs Ethernet Port (No Ethernet port on the Model A) with supports of various power management wakeup features, including Magic Packet™, Wake-on LAN (WOL) and Link Status Change. UNFORTUNATELY, albeit Pi’s Lan chipset does support WOL, the Pi’s lack of power management (ACPI) means it doesn’t support this Lan chipset features 🙁
- It does not need a fan cooler (= silent)
- The Model B uses a standard power supply capable of supplying 5V 700ma (the Model A requires 5V 300ma)
- The GPU is capable of 1Gpixel/s
- It can be easily overclocked (and overvolted to increase stability) up to 1000MHz (without making the warranty void !). By default the Raspberry Pi runs as 700Mhz and is overclocked at 800Mhz by RaspBmc…
- Overall real world performance is something like a 300MHz Pentium 2 with great graphic performances.
As mentioned, I decided to install RaspBmc. It’s really straightforward [EDIT: RapsBmc is now deprecated and replaced by Osmc).
- Plug the SD card in a PC (I am using Windows 8 )
- Format the SD card, e.g. using a tools dedicated to SD/SDHC/SDXC like “SD Formatter“.
- Download the raspbmc installer (Not available anymore on the official webstite) and “run As Administrator” the setup.exe . It will automatically download an image and copy it to the SD card.
- Plug next the SD card in the Raspberry Pi, plug the HDMI cable on the TV (I didn’t test the RCA/Audio output), plug an Ethernet cable and plug the power supply. Select the right HDMI input on your TV and you should see the Raspberry PI display. It will configure itself (get an IP address from DHCP server, download the latest release/updates, etc…) and after about 20 minutes, it should start XBMC.
- In XBMC, go to the main menu > System > Lower submenu > System info and take note for your URL. You can also get there the MAC Address if you prefer like me to configure your DHCP server to assign a fix IP to the Raspberry PI (recommended to remote control XBMC or configure NFS access to Synology – reboot required).
- On your PC, run a Browser and type the IP address of the Raspberry PI to get access to the XBMC web control UI (on the port 80 configured by default in Raspbmc). It can be used to remote control XBMC.
- On your Android Phone, install the XBMC official Remote Control (Not available anymore) and configure it with the IP address of the Raspberry Pi with port 80 (this is the default of RaspBmc). There is neither a username nor a password defined by default in RaspBmc for accessing the Web Control UI (Another good remote for Android is Yatse Widget).
- On Synology, enable the “guest” account and grant read access on the shared folders “music”, “video” and “photo” (I still have to find where I can configure a username in raspbmc to access smb/nfs – I know I could at least do it on the smb/nfs sources configured in XBMC: protocol://user:pass@synoIP/sharename)
- The default username is “pi” and the default password is “raspberry”, but for some reasons, adding such a user on the Synology with adhoc rights on the shares does not grant raspbmc access on those ?!
- On XBMC, add video, music and photo sources. I am not using “uPnP” as it does not support use of metadata stored next to the media files. Instead I am currently using smb.
- On XBMC, you can go to the menu “Programs” to get access to the RaspBmc settings.
The Android Remote Control for XBMC works really fine, as well as controlling XBMC with the TV Remote, which makes this HTPC from far the greatest for that price: ~35€!
A few notes:
- WOL does not work because the lack for “power management” on Raspberry Pi. The only other way to “power on” the device remotely is to plug its power cable into a USB port on the TV (USB voltage is standardized at 5.0v, so you only have to check the max A supported by your TV). When you turn on the TV the pi powers on too. However, the Pi draws less power when turned on then many Tvs do when off, so there is really no reason to ever turn it off. Turning it off would not significantly reduce power consumption unless it is also unplugged.
- So, don’t ever use the “Power Off” button of XBMC. The only way to restart the Raspberry Pi would be to unplug and plug back in the power supply.
- Power over Ethernet (PoE) is not yet supported. Maybe in a future version of the Raspberry Pi.
- In XBMC, go to the main menu > System > Lower submenu > Settings > Apparence > Region. Set e.g. the “Langue of the interface” or your language as “Preferred Language for audio” although you like to watch the movies in O.V.
- In XBMC, go to the main menu > System > Lower submenu > Settings > Services > SMB Client. Change the name of the Workgroup to match your.
- Login on the Raspberry Pi via SSH (using Putty, username “pi”, password “raspberry”. Note: “root” user is disabled by default on RaspBmc) and Raspbmc will prompt you to choose your keyboard layout – use the space bar to select a layout and Tab to move the cursor onto the Ok button. On the next screen, set your layout as the default one and wait until it’s “generated” (can be a long process). Continue the configuration with the selection of your region and country. Type “exit” to close the SSH session.
- Raspbmc overclocks the Raspberry Pi to a safe clock frequency (from the default 700MHz to 800Mhz). Notice that a change of the clock frequency does not blow the OTP (Over Temperature Protection). It is overvolting that does this. Overclocking is therefore not making the warranty void while overvolting will permanently set a bit which invalidates the warranty. Overvolting will also reduce the lifespan.
- Here is a tutorial to overclock the Raspberry Pi with RaspBmc via SSH
- Here is a tutorial to overvolt the Raspberry Pi with RaspBmc via SSH
- Here is a tutorial to do the same with the Raspbery config tool (if not using RaspBmc
- And here are more details on possible values for the overclocking/overvolting.
- With RaspBmc, there is no need to manually update the firmware (via SSH). This is done automatically by RaspBmc, insuring that the kernel is fully compatible.
site: http://www.raspberrypi.org (Look at the quick-start-guide and the FAQ)
RaspBmc: http://www.raspbmc.com (Look at the FAQ)
XBMC for Raspberry: http://wiki.xbmc.org/index.php?title=Raspberry_Pi/FAQ
buy: http://raspberrypi.rsdelivers.com/default.aspx?cl=1
![]()
Leave a Reply