Looking for the best price to deliver a package ?
Packlink.com allows to compare the costs for shipping parcels from everywhere to everywhere: https://www.packlink.com/
![]()
The Joys of Computing
Looking for the best price to deliver a package ?
Packlink.com allows to compare the costs for shipping parcels from everywhere to everywhere: https://www.packlink.com/
![]()
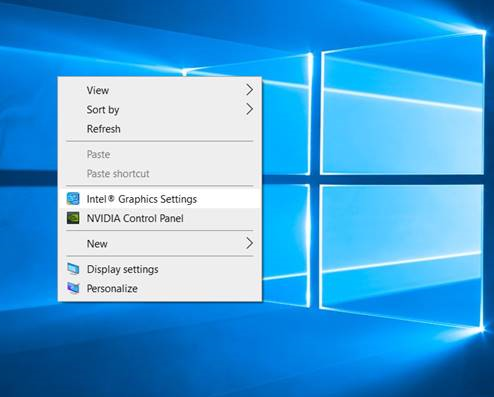
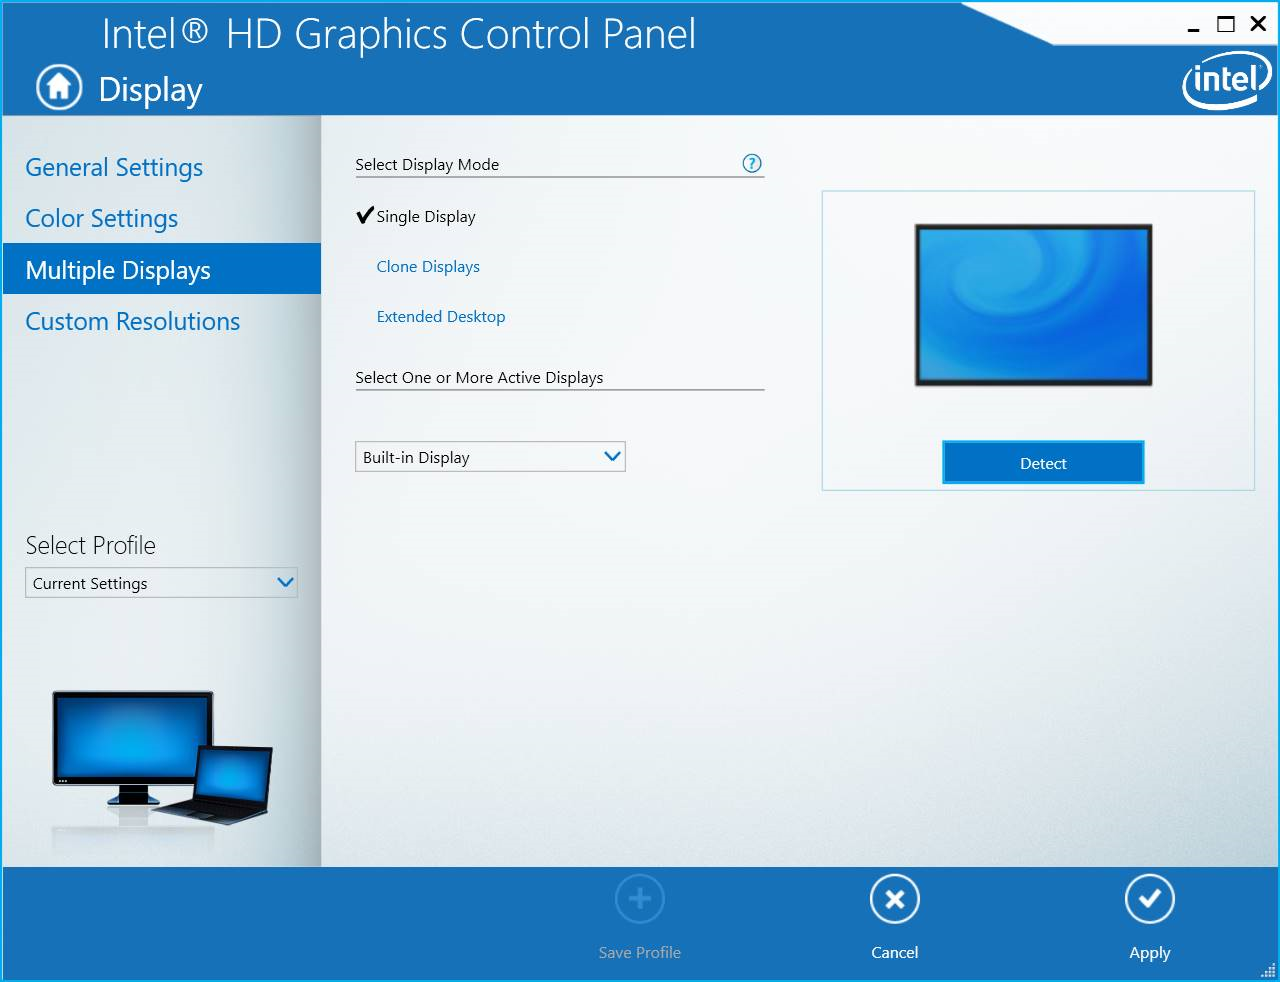
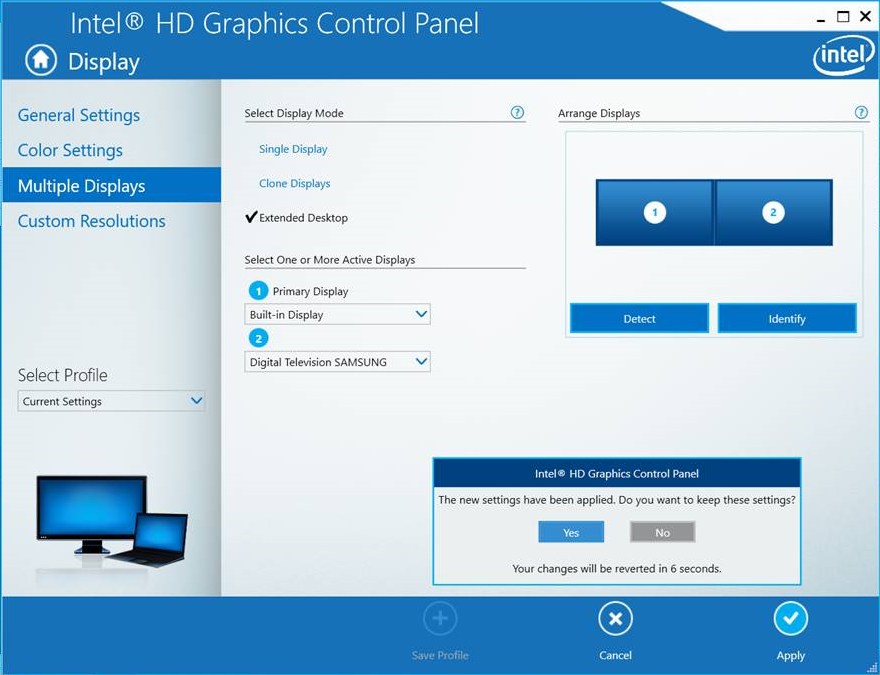
When I connected for the first time my Lenovo Yoga on my TV, using a HDMI cable, I couldn’t extend my Desktop to this second screen, using the F10 key. The solution was to do via the Intel Graphics Settings.
Click to Read More
Notice: I also had an issue with the HDMI port. I think this issue results from the pulling force exerted the each time one opens or closes it (the hdmi port is really next the lid). The “contacts” of the port are faulty (Loose contacts). As a solution, I had to push up the cable lightly up to force a good contact.
![]()
My daughter suddenly couldn’t use the inventory anymore in Vivecraft, once opened. She couldn’t pick or move items in there. The cause was that Vivecraft’s window was not active on the PC at that moment.
Click to Read More
Vivecraft is a mod that turns Minecraft into an exceptional VR experience. Concretely, I use it to run the game from SteamVR and play with it using my HTC Vive pro setup (Be sure to setup and run the game as explained here. Launching the game from the VR Room or Steam does not work).
When my daughter experienced her issue with the inventory, I was working on the PC at the same time. Vivecraft works indeed fine if someone else is using the PC, as long as you don’t need the mouse to interact with the game. And this is the case when you want to use the inventory or use some menus.
Concretely, on the screenshot here under, the cursor + will only appear if, on the PC, the window of the game is activated. I.e.: if you clicked on it with the mouse or used Alt-Tab to give it the focus.
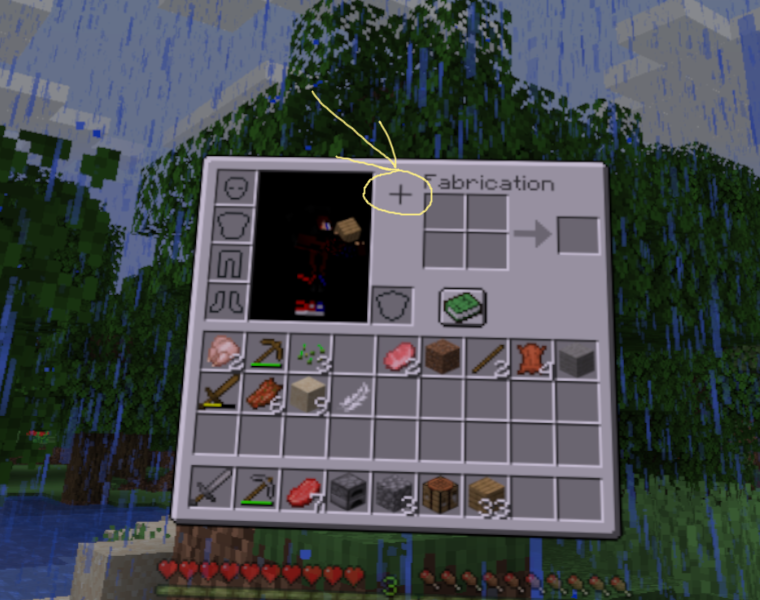
So, each time my daughter want to use the inventory, I temporarily give the focus to the window of ViveCraft by switching to it with Alt -Tab. I can next continue to work…
Et voilà.
![]()
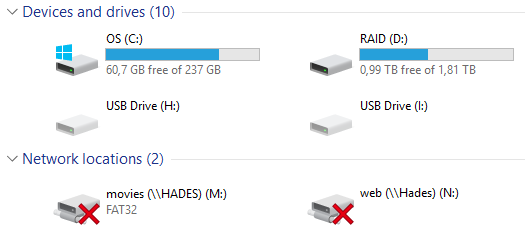
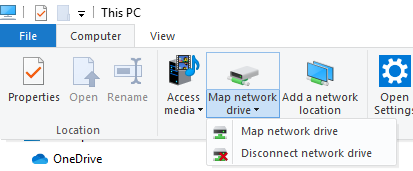
Recently, I plugged on my PC various devices having an internal SD card or an internal Memory. And although I could hear the typical sound made by Windows when a device is plugged in, no new Drive appeared in Windows Explorer. The problem was with a Mounted Network Share using the same letter as the one assigned by Windows to the new Drive.
Click to Read More
Looking into the “Device Manager” console, I didn’t see any devices not recognized as illustrated here under. So, the device was correctly recognized and its drivers correctly installed.
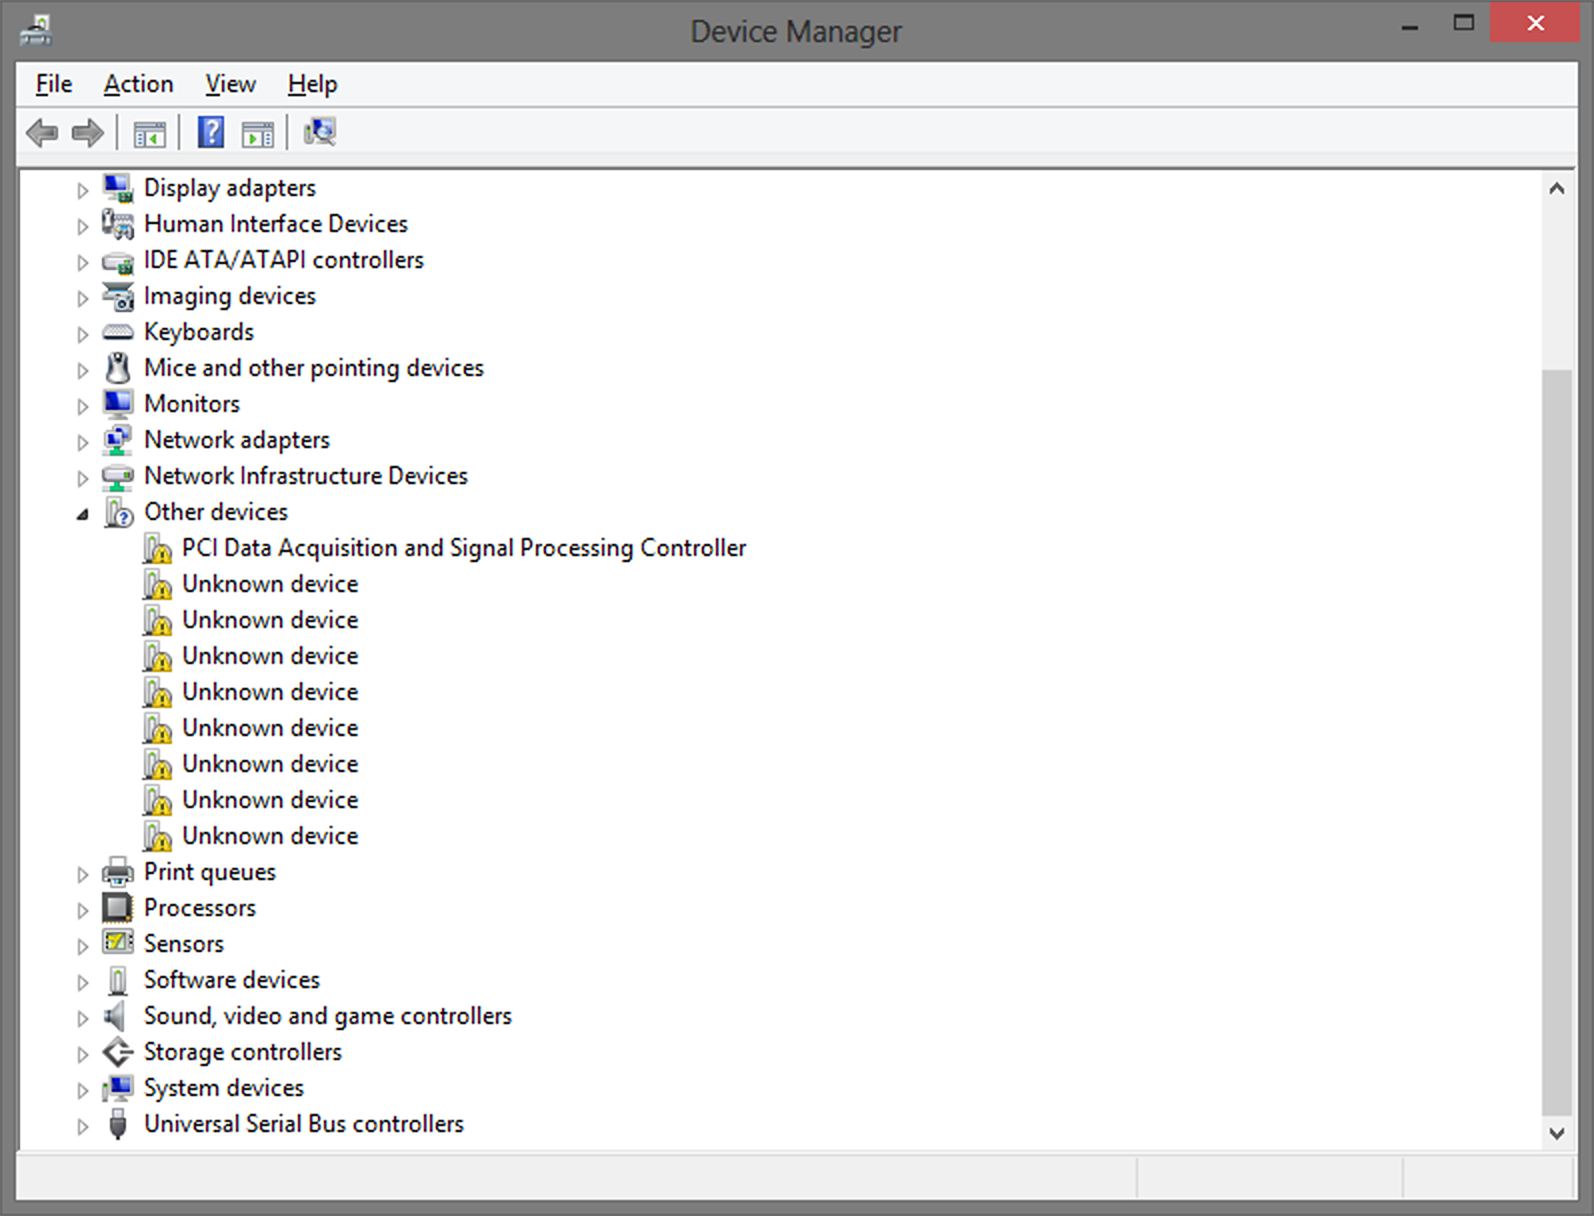
I tried different USB cables and different USB ports (both 2.0 and 3.0), but without success either.
Finally, I opened the “Computer Management” Console and looked into the “Disk Management” part. There I saw a Drive greyed out. I noticed that it was assigned with a letter which was actually used by a Mounted Network Drive. I did simply right click on it to “change Drive letter” with another one and it appeared magically into the Windows Explorer.
To be complete, I have to mention that the conflicting Mounted Network Drive was not available and all letters between C: and the one used for the Mounted Network Drive where in use . This was maybe the actual root cause of Windows assigning the same letter to a new USB Drive.
Et voilà.
![]()
When I visit my account on the website of Samsung, it is always displayed in Dutch (used in Brussels, my location) instead of French (my language).
Click to Read More
Setting the language “French (European)” in my profile is not fixing this issue. The solution is to change the language on this membership page.
![]()
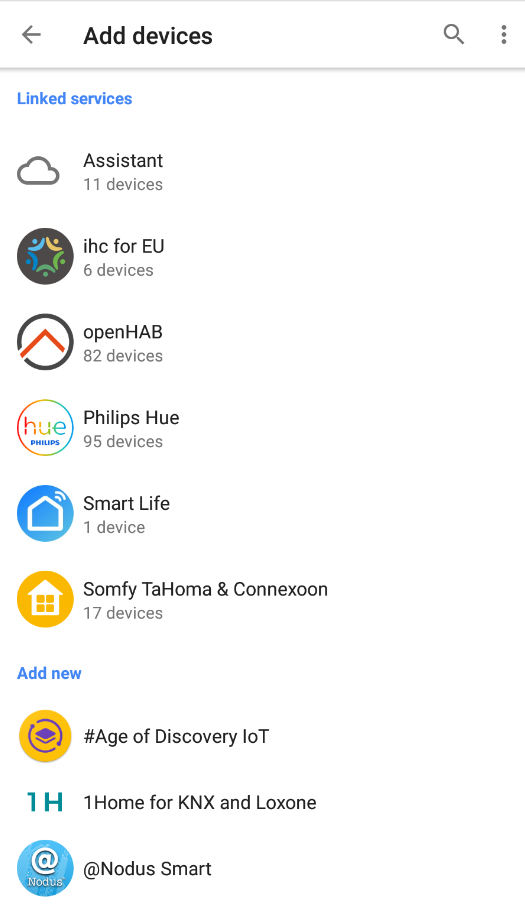
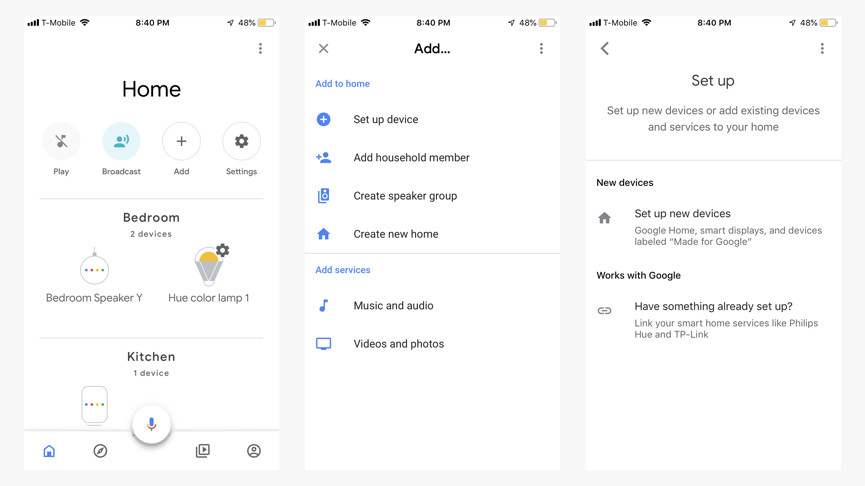
I couldn’t find anymore where one can link Google Assistant with External Services in the Google Home App. Seems like Google changed the way to access the menu for that purpose in their App.
Click to Read MoreOnce in Google Home, click on the “Account” icon at the bottom right.
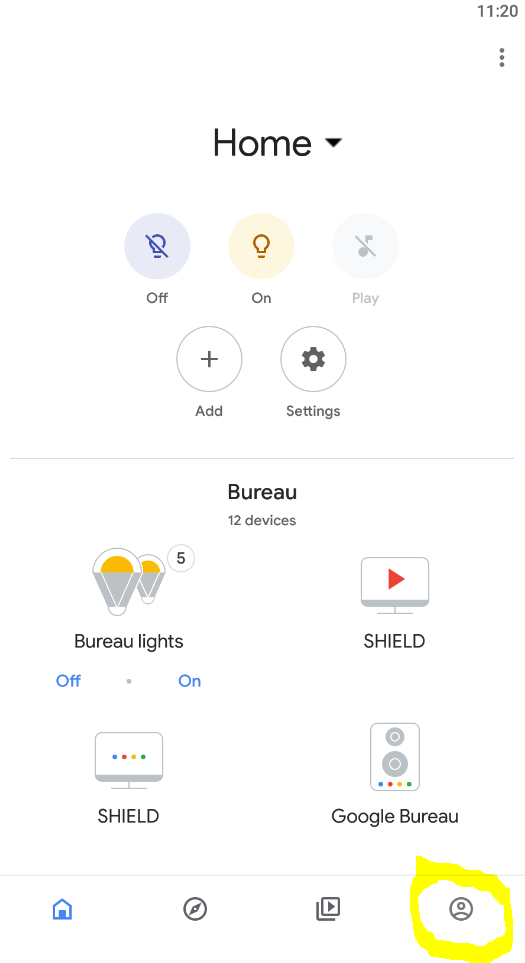
Next, click on the Gear icon “Settings”
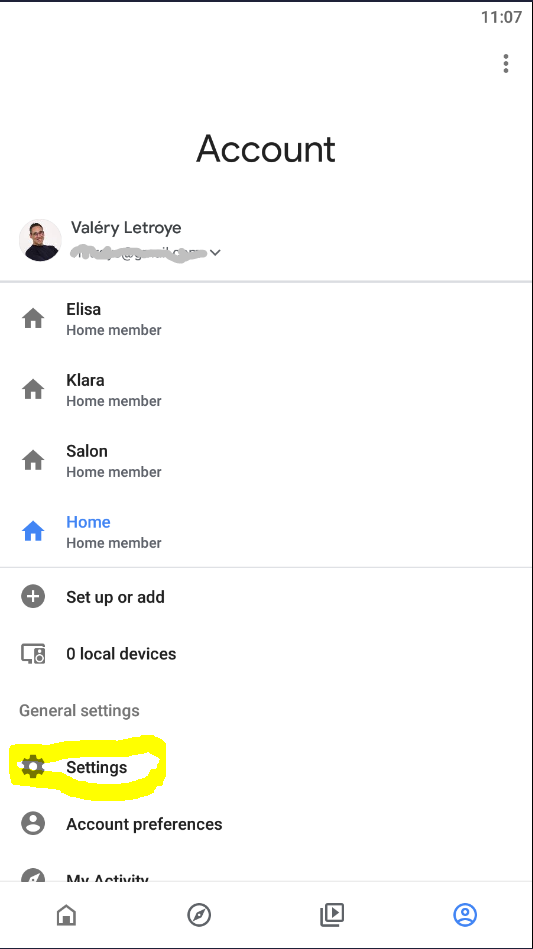
Select the Tab “Assistant” and in there, the “Home Control”
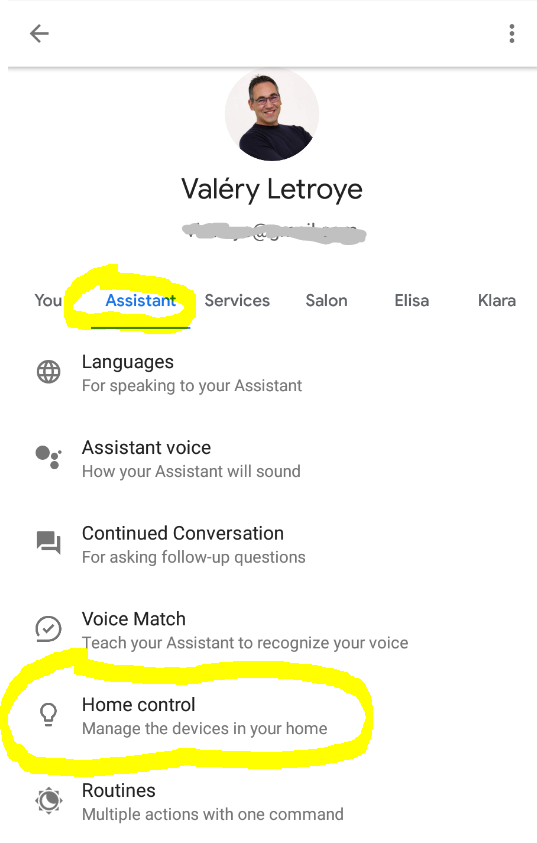
And here, you can click on the blue “+” at the bottom right.
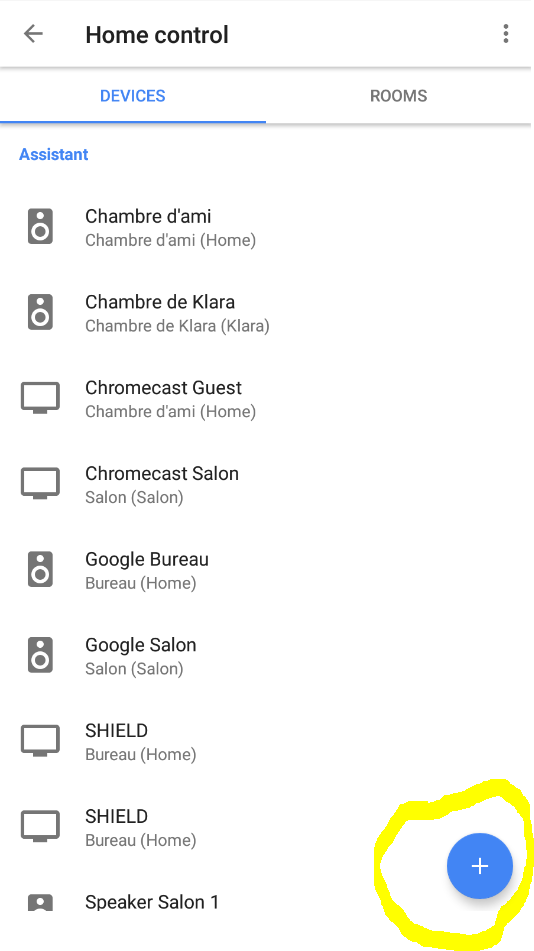
And here we are:
![]()
I have connected the DVI output of my PC on a HDMI input of my Yamaha HTR-4067 but was missing the sound. I solved that issue by connecting the S/PDIF output of my sound card on an AV port the Yamaha and “combining” both HDMI and AV.
Click to Read More
Theoretically, one should be able to have music via the DVI port of a PC by using an adequate DVI to HDMI adapter (19 pins). But my problem is that my internal sound card is dead and I am using an external one. The easiest for me was therefore:
Notice that one can select a different “Audio Input” for each HDMI input.
![]()
Nobody knows the mail address of my actual mailbox. Instead, I always communicate an alias (for example: Me @ BeatificaBytes.be).
Unfortunately, with the latest update of Outlook 2016, to use such an alias as “From” is not a piece of cake anymore… The trick is to use the good old “Mail” tool of the Control Panel.
Click to Read More
The reason for me to use an alias is that this alias is forwarded to a “gmail” mailbox, where the antispam is quite efficient. And gmail transfers the remaining emails to my actual mailbox (on my own server/within my own domain).
I access next my actual mailbox via IMAP with Outlook. I never use the intermediary mailbox on gmail.
With the latest version of Outlook 2016, I couldn’t configure a different mail address than the “user account” of my actual mailbox (which is the mail address that I want to keep secret 😉 ).
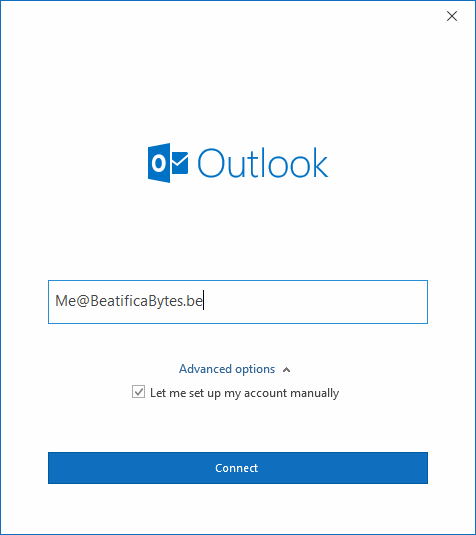
I.e.: if I type Me @ BeatificaBytes.be in the config screen above, outlook will use that both for the “From” Field and as user account to connect onto my IMAP server.
This is an issue as the alias Me @ BeatificaBytes.be is not valid as an account to connect on my actual mailbox.
Obviously, I could configure Outlook with my actual account and define next my alias as a Reply Address. But than, the recipient would see my actual mail address.
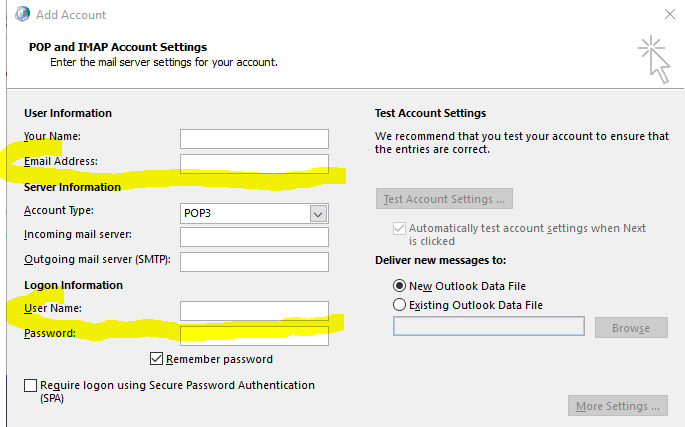
The easiest is to use to good old “Mail” tool:
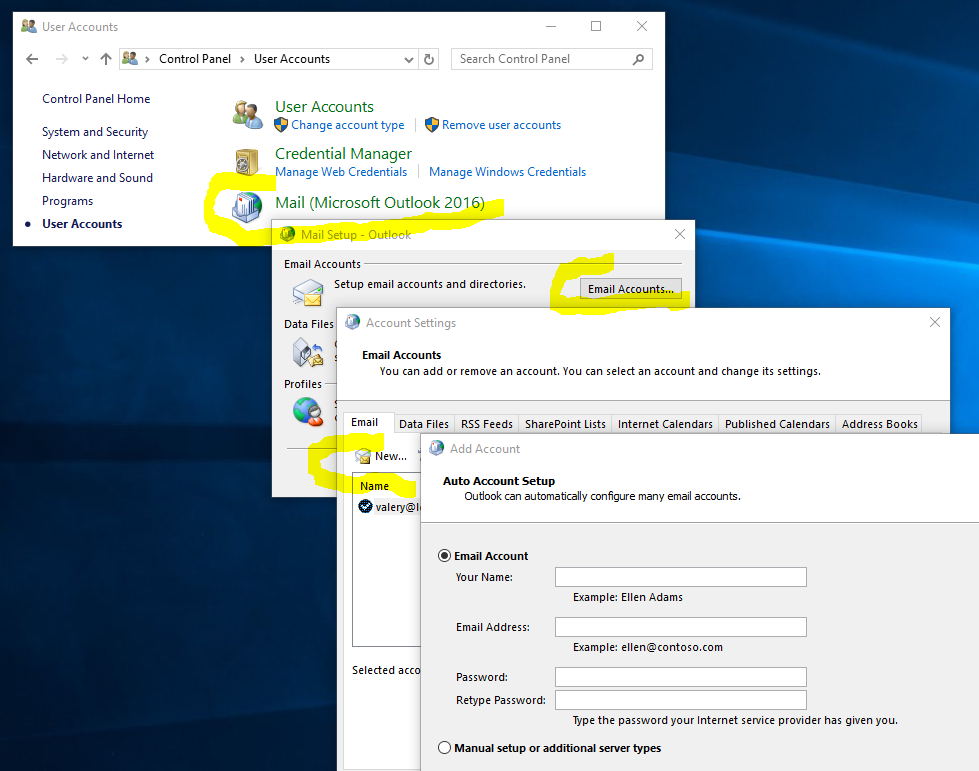
As usually:
Et voilà…
![]()
Since I have defined several “home” structures in the App “Google Home”, I can only add new rooms in the last one created.
Google Support told me that the only way to workaround that limitation was to delete all the homes, except the one to be completed, and re-create the others later.
Click to Read More
First, let me explain why I have created several home structure in the App “Google Home”: I wanted to grant my kids access on only a subset of the devices (lights, google home mini, chrome casts, blinds, …)
So, I have created
I have shared each “Kid” home with its owner and the “Common” home with everyone.
Here is the standard way to add a room into a home when one has only one home (Thx to Thomas Ott):
A: if you have devices not yet assigned to any home, you can use it to create a new room into which that device will be automatically moved:
You can loop on this § A to create one room for each device not yet assigned.
B: if all your devices are already assigned to a home, use anyone to create a new room into which that device will be automatically moved and move the device back to the right room later.
Once the new room created, the device being now assigned to that room, you must move it back to its original location (or loop first on this § B to create all the new required rooms).
B.1.:
B.2.:
![]()
I have just configured a Broadlink Mini R3 to be used within Google Home’s scenario to control several devices. Works really like a charm !
Click to Read More
It’s just amazing that this little device can perfectly remote control my projection screen 7 meters away, the projector 2 meters away on the ceiling and the ampli which is in the room but not in sight.
I bought 3 of them from China for 13€ each.
Quick memo about how to configure them:
Tip:
Using the “ihc” app, you can update the firmware: click on the RM mini > the three dot in the top-right corner > “Check for firmware updates”
To configure an appliance, don’t hesitate to use one which does not work perfectly. At least, you will have all the related icons and be able to reconfigure them. Creating a “UserDefine” appliance, you won’t have many different icons available. Also, the configuration of “UserDefine” appliance can’t be “backuped”. Not problem however to use “UserDefine” appliances in “scenes” to be called from Google Home.
Once an appliance added, you can reconfigure the buttons: click on the appliance > the three dot in the top-right corner > Learn
Don’t forget to backup the settings of your appliances once reconfigured!!! It’s the best ways to reuse them on other RM mini later: click on the appliance > the three dot in the top-right corner > Backup IR code sets
![]()
Acer iDea 510 AirPlay Android Backup DD-WRT DNS DS209+ DS713+ DS1815+ FlexRaid Galaxy Galaxy S2 Galaxy S7 Google Assistant Google Home HTPC Kies MCE MySQL Nabi 2 Nvidia TV Shield One Plus One OpenHab Outlook Philips Hue Plex RAID Raspberry PI Remote Desktop Root Access Samsung Scripts Synology Team Build Visual Studio VMWare Wi-Fi Windows Windows 8 Windows 8.1 Windows 10 Windows Server 2012 XBMC Xpenology ZigBee