I did move my LSI cards 9211-8i and 9201-16i from my Asus Striker II Formula onto a P9X79 WS. Unfortunately, the MB couldn’t boot with both card plugs. I did upgrade the firmware and erased the bios of both cards to solve the problem.
Click to Read More
Actually, everything was working fine until I decided to upgrade the bios of my Asus P9X79 WS from the version 48022 of 2015 to the very latest 4901 of 2018 (An attempt to solve an issue with DIMM not recognized.. Attempt failed… I think the issue is actually with the CPU not supporting Quad Channel). Bref.
After this upgrade, the Asus MB didn’t boot anymore. There was only a cursor blinking in the upper left corner. Clearly, IMO, the cursor of the LSI bios.
- Booting without any LSI card was ok.
- Booting with only the LSI 9211-8i was ok.
- Booting with only the LSI 9201-16i was ok.
- But booting with both LSI was failing although I tried to move them in all the various PCI-E x16 slots.
So, I decided to attempt the upgrade of both LSI cards (currently with firmware IT version 19.00.00.00 and Bios 07.37.00.00). But while preparing the USB key to do this, reading a few articles, I realized that I could also completely erase the BIOS as I don’t boot from a disk on any of those Cards.
So, here is what I did:
- Format a USB key as FAT32
- Download the legacy firmwares (and bios if you want) for the LSI cards from here (with Product Group = Legacy Product and Product Family = Legacy Host Bus Adapters)
- From the Installer_PXX_for_UEFI, extract the file /sas2flash_efi_ebc_rel/sas2flash.efi and copy it on the USB Key root
- From the xxx_BIOS_for_MSDOS_Windows, extract
- the firmwares /Firmware/HBA_92xx_IT/xxx.bin and copy them in the USB Key root:
- 9201-16i_it.bin
- 2118it.bin
- the bios sasbios_rel/mptsas2.rom (it’s the same bios for both cards) and copy it in the USB Key root
- the firmwares /Firmware/HBA_92xx_IT/xxx.bin and copy them in the USB Key root:
- Now, you need a UEFI shell which works with the P9X79. This one for example or the v2 to be found here didn’t work for me. Instead, I was lucky with this one:
- download this Shell_Full.efi on your USB Key root
- and rename it Shellx64.efi
- for some users, they have to copy if from the root into sublfolders like:
- /efi/boot/Shellx64.efi
- /boot/efi/Shellx64.efi
- Plug the USB Key into your Asus P9X79 WS. For safety, remove all other USB keys and disconnect all HDD/SSD.
- Plug next only one SLI Card and upgrade it. Once done, remove it,n plug the other card and upgrade it too.
To upgrade one SLI Card with your Asus P9X79 WS:
- Boot the PC and go into the Bios with Del or F2.
- Go into the “Advanced mode” (F7 or click on the button bottom left)
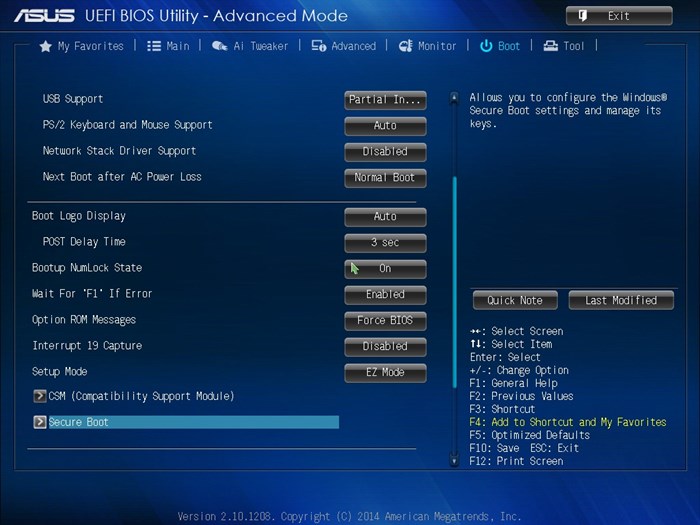
- Click on the “Boot” menu (upper right) and scroll down until you see “Secure Boot” (screenshot 1)
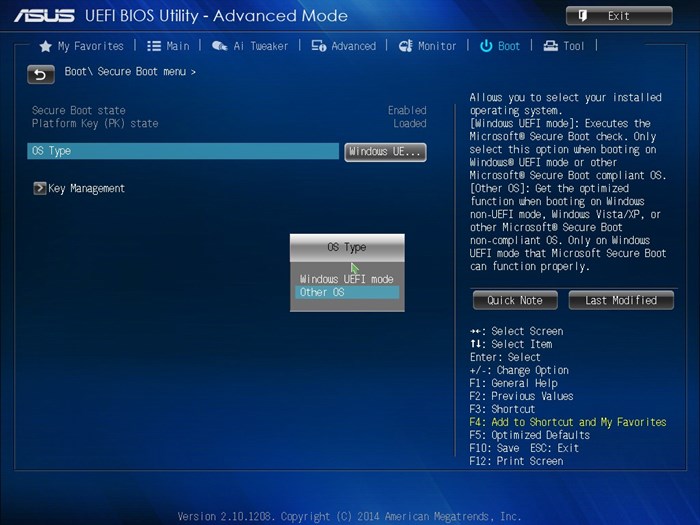
- Enter into “Secure Boot” and select “OS Type” = “Other OS” (screenshot 2). This is required to be able to use the UEFI Shell later
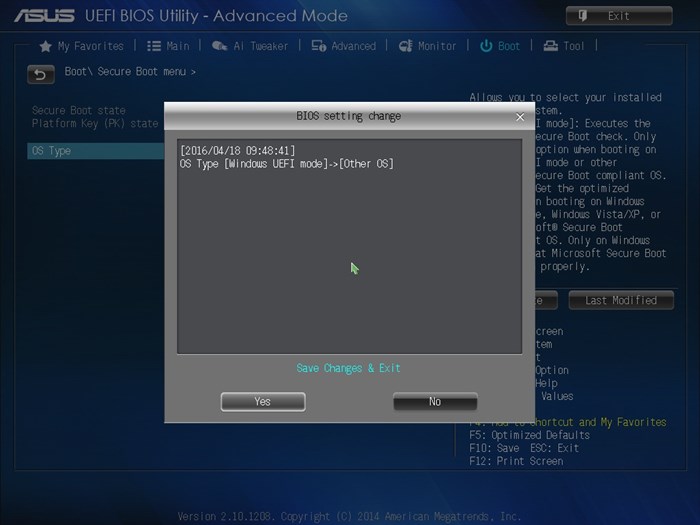
- Press F10 to “Save and Exit” (screenshot 3)
- Go back into the Bios with Del or F2.
- Go into the “Advanced mode” (F7 or click on the button bottom left)
- Click on the “Exit” menu (upper right)
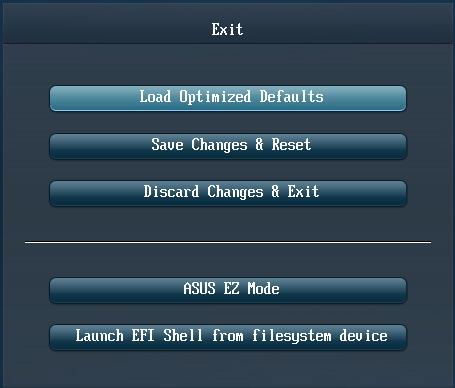
- Select “Launch EFI Shell from filesystem device” (screenshot 4)
- if you have only the USB key prepared previously plugged into the PC, you should soon see the EFI Shell loading
- Once the EFI Shell loaded, move to the USB Key and list its content with the commands
fs0:and nextls. If you have several USB keys, you need to move onto the right one. You can use the command:map -bto list all available disks and identify the correct one. Ex.: if the correct one is “fs1 :Removable HardDisk – … USB(…)”, then you can move onto it withfs1:. You can break stop themapcommand by typingq. - Now check the versions of your SLI card with
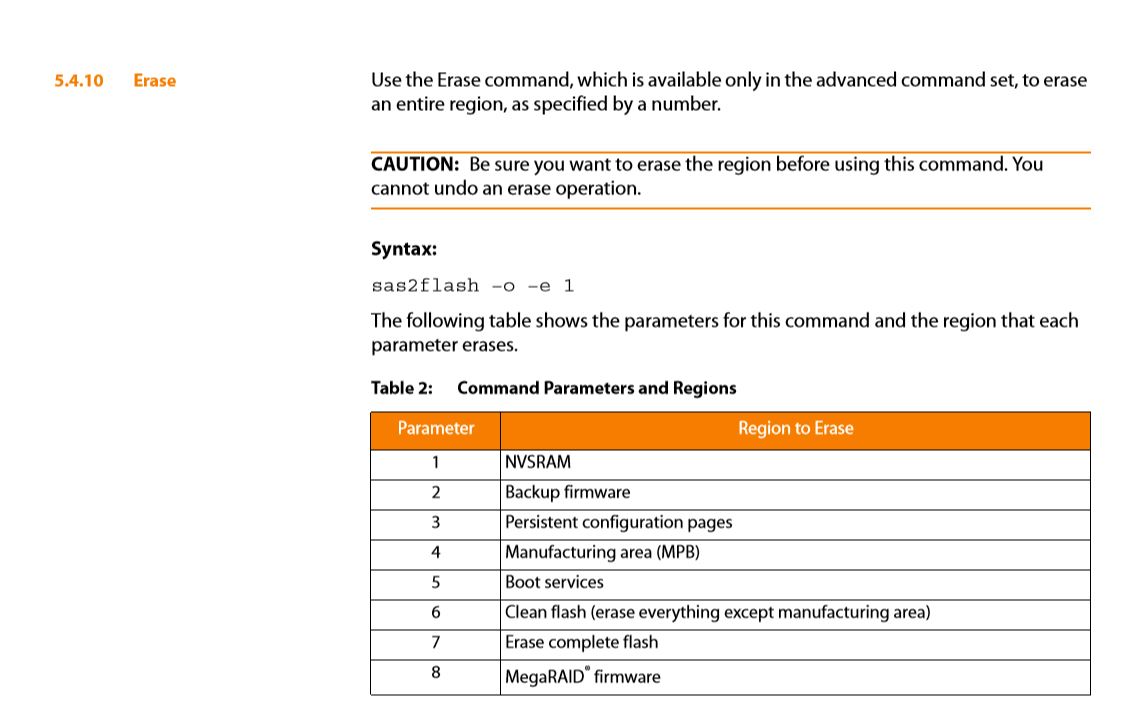
sas2flash -list - Remove the Bios with the erase command and the parameters 5 as documented in SAS2Flash_ReferenceGuide.pdf (screenshot 5) :
sas2flash -o -e 5 - Possibly also erase the controller flash memory (I hadn’t to do it) with the command:
sas2flash.efi -o -e 6 - Type again
sas2flash -listto verify the Bios Version now reads N/A - To load a new firmware, depending on the LSI card, type :
sas2flash.efi -o -f 9201-16i_it.binsas2flash.efi -o -f 2118it.bin
- To load the bios, type:
sas2flash.efi -o -b mptsas2.rom
Do this for each SLI card, one at a time.
Documentation:
- Sas2flash Use Guide
- UEFI Shell from tinaocore (EDK2)
- Branch UDK2018: under edk2/EdkShellBinPkg/FullShell/X64/
- A clear user guide for the commands available in the EFI shell
Screenshot 1: Secure Boot
Screenshot 2: Other OS
Screenshot 3: Save and Exit
Screenshot 4: Launch EFI Shell
Screenshot 5: Erase command for sas2flash
![]()
Leave a Reply