I just had this error message when trying to connect TuneBlade on my Airplay Yamaha: “There was a problem initializing audio capture. Exception from HRESULT 0x88890008”
I fixed it in 5 seconds by reconfiguring my playback device.
Click to Read MoreClick to Close
In the Systray, right the Speaker icon and select “Playback devices” in the menu. This is opening a “Sound” window.
On Windows 10, there is no entry “Playback devices”. Instead, click on the entry “Sounds”
In the tab “Playback” of this window, select the speaker currently used by the PC and click the button “Configure” at the bottom left.
Do reconfigure your playback device.
In my case, my playback device was reset to “Stereo” although it should have been 7.1 Surround. This usually happens after an upgrade of its Realtek Audio Drivers.
Since I found a piece of software to stream audio from my PC to multiple Airplay Devices synchronously, I wanted to find something equivalent for my Android mobile. Unfortunately, with most Apps and for YouTube’s video, either the audio stops when the application is minimized or the audio cannot be stream to multiple Airplay devices simultaneously. An easy solution exists but requires a rooted Android device and two Apps: AirAudio and AudioPocket.
Click to Read MoreClick to Close
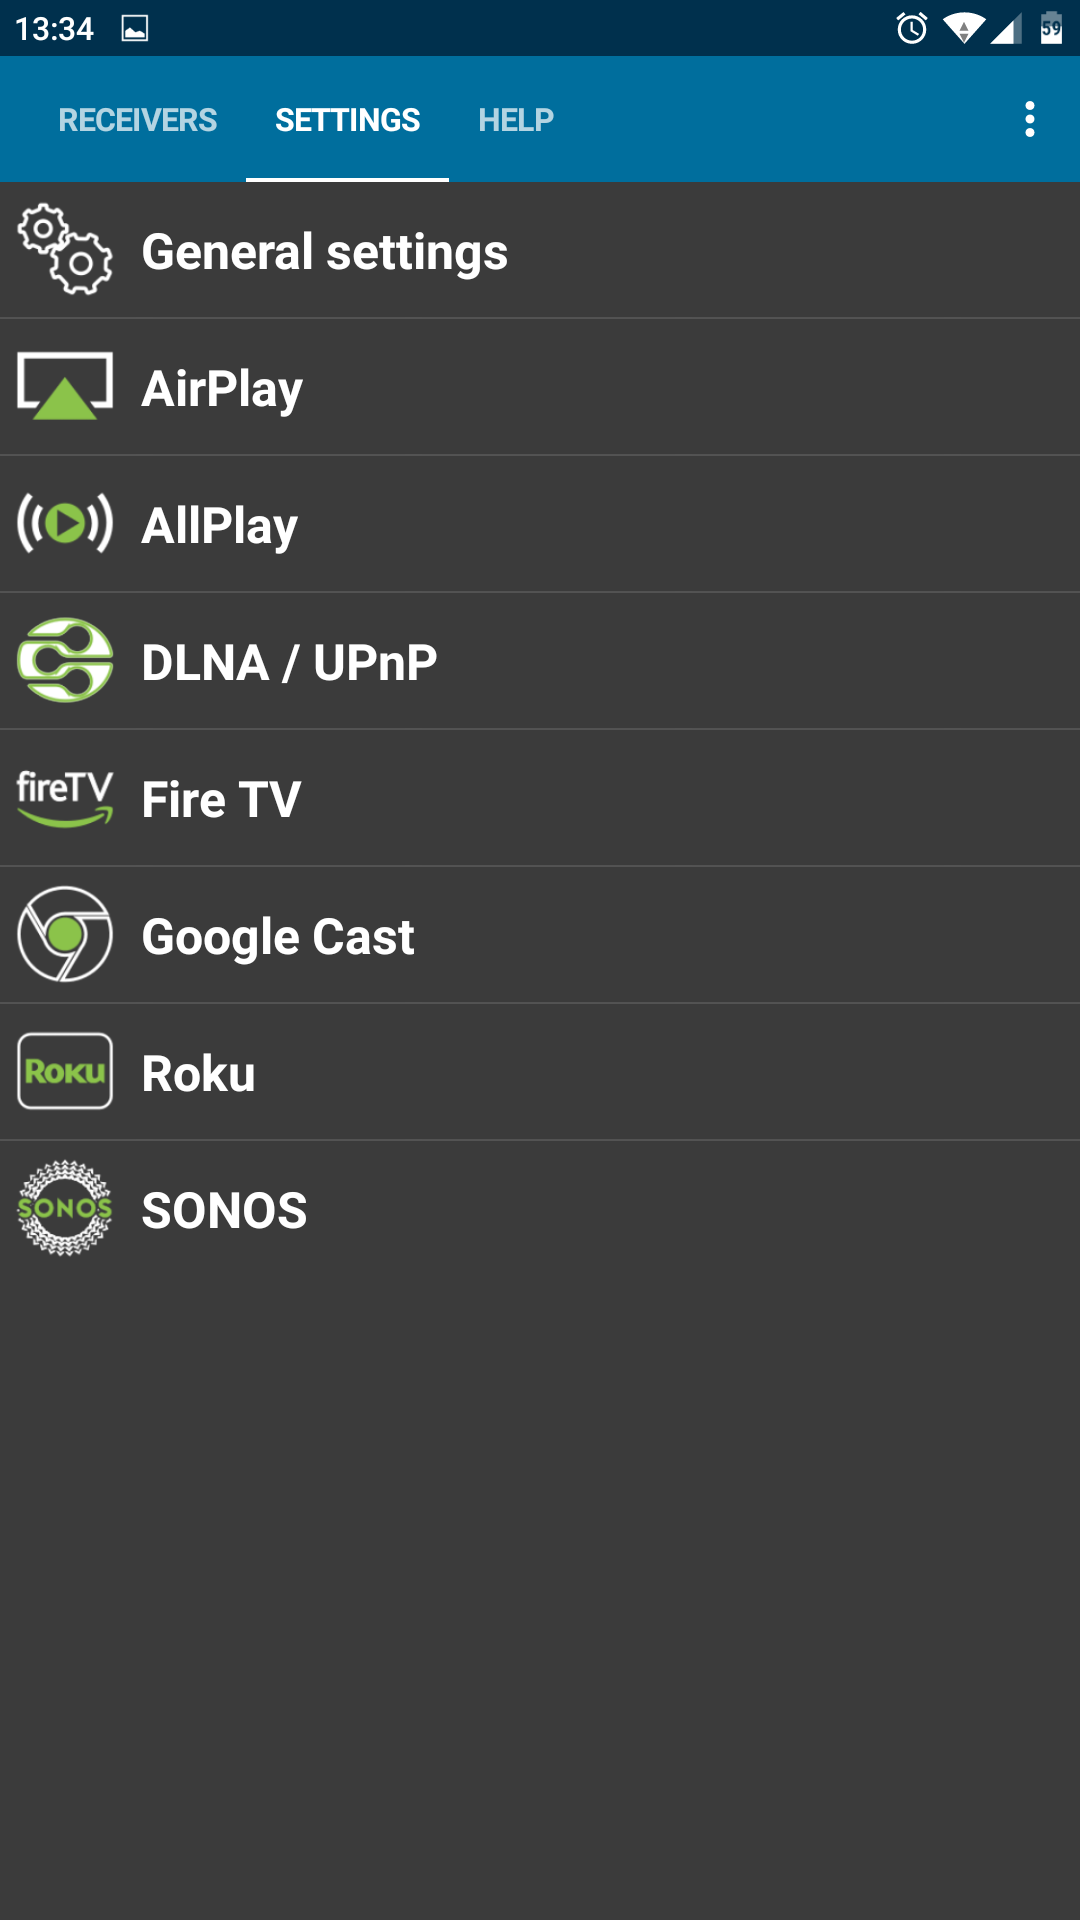
AirAudio is a really powerful audio streamer for Android than can steam all audio from any App to every receiver. Just like TuneBlade for PC, it redirect the sound to be played by the local speaker to a remote receiver… AirPlay, AllPlay, DLNA, Fite TV, GoogleCast, Roku and Sonos are all supported !!!
AirAudio Receivers
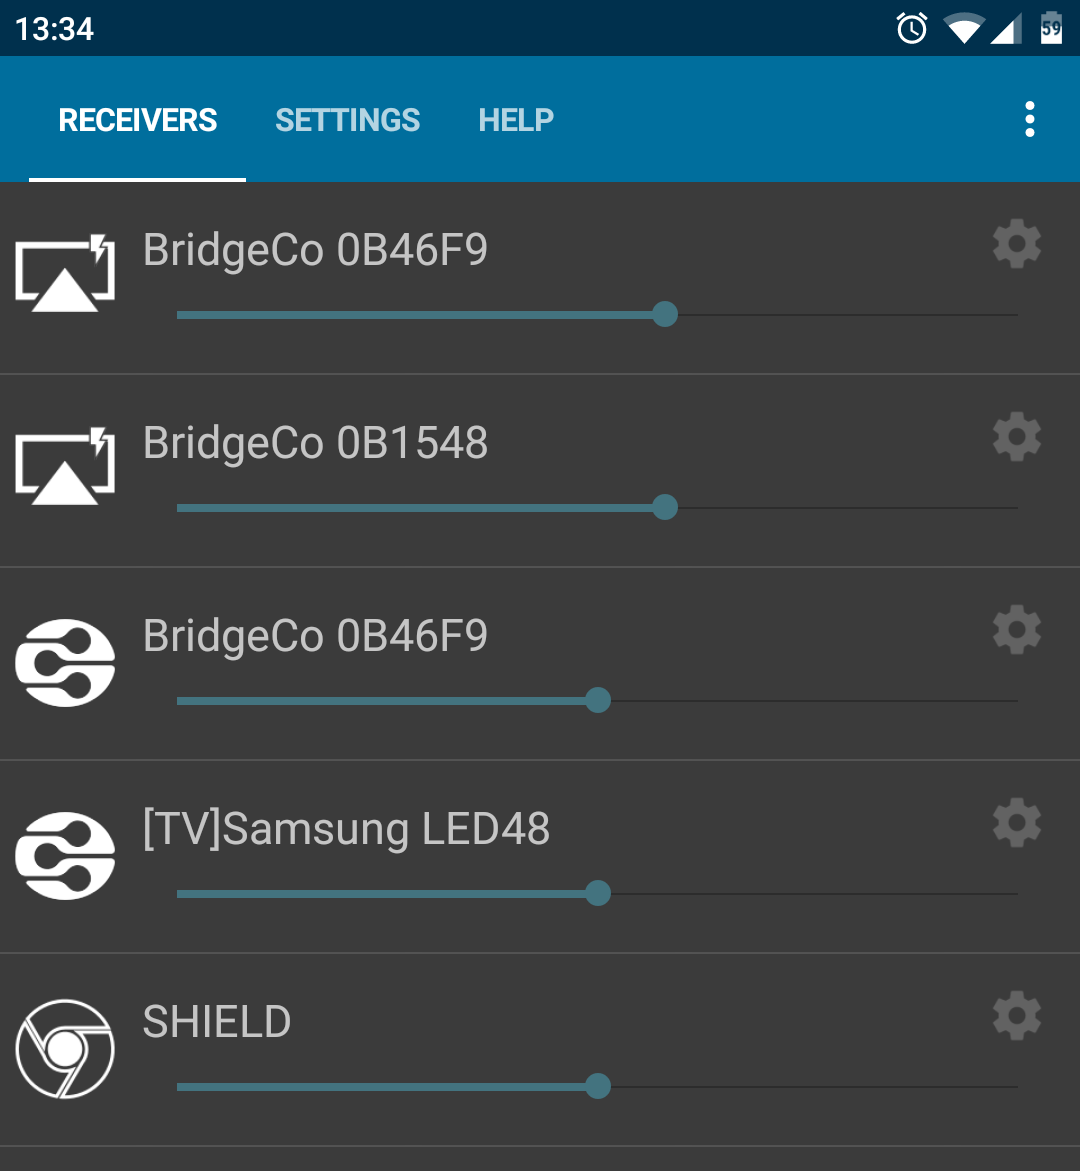
Once started, one can chose multiple target remote players:
AirAudio Players
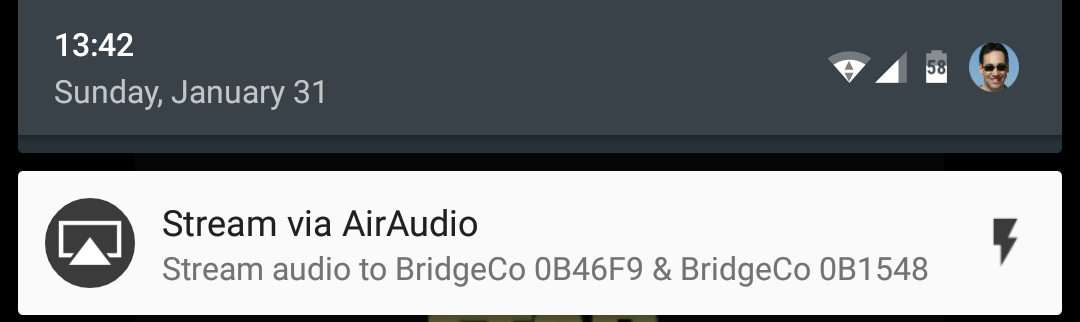
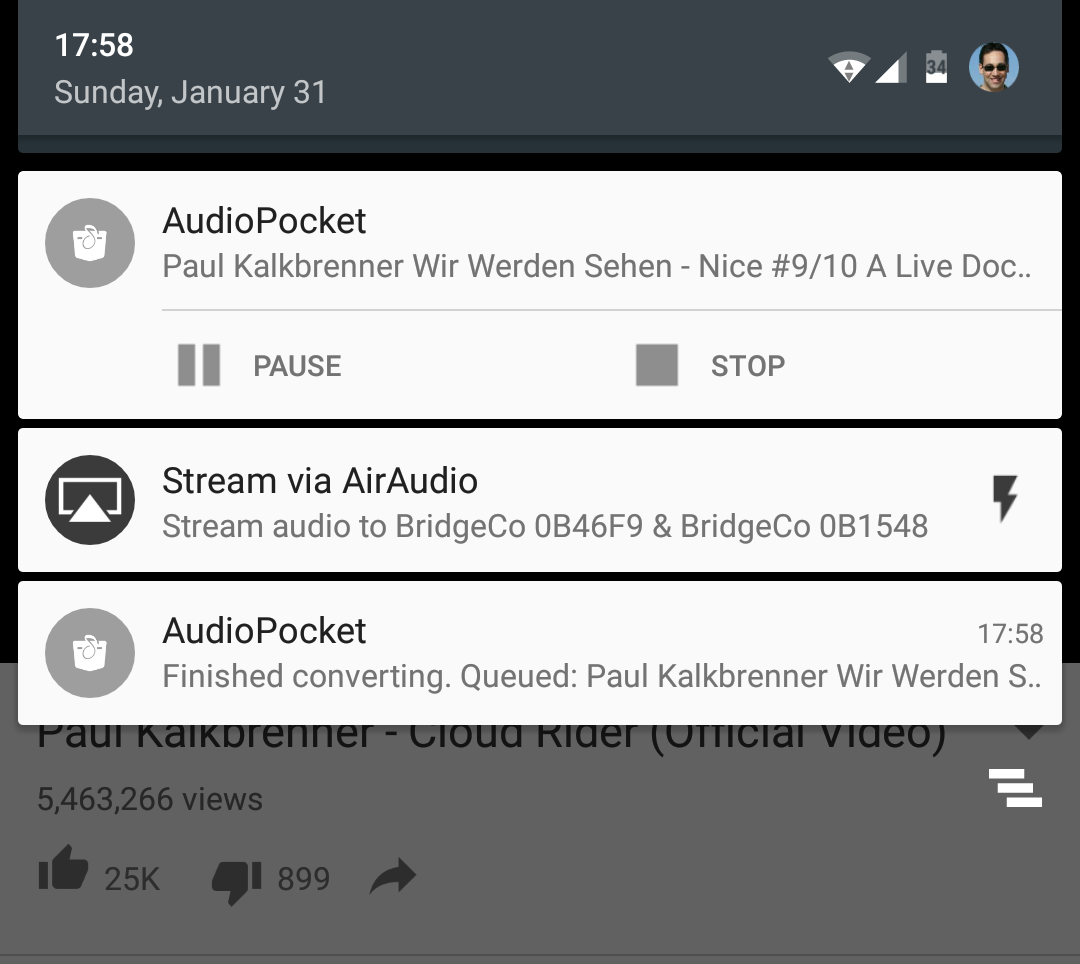
And as soon as you start to play sound on the mobile, you have an icon appearing in the menu bar to start casting.
AirAudio Cast
Selecting that icon, you can to start to preconfigured set of devices. As you can see bellow, I am streaming simultaneously to two AirPlay Devices.
AirAudio Menu
You will easily discover the other features 😉
Now, especially for YouTube’s video, you may want to hide the App playing the video/music. Unfortunately, especially for video, like the YouTube player, the App usually pauses if the it goes in the background. To solve that, you need an App able to play in the background. The best and easiest one I found is AudioPocket.
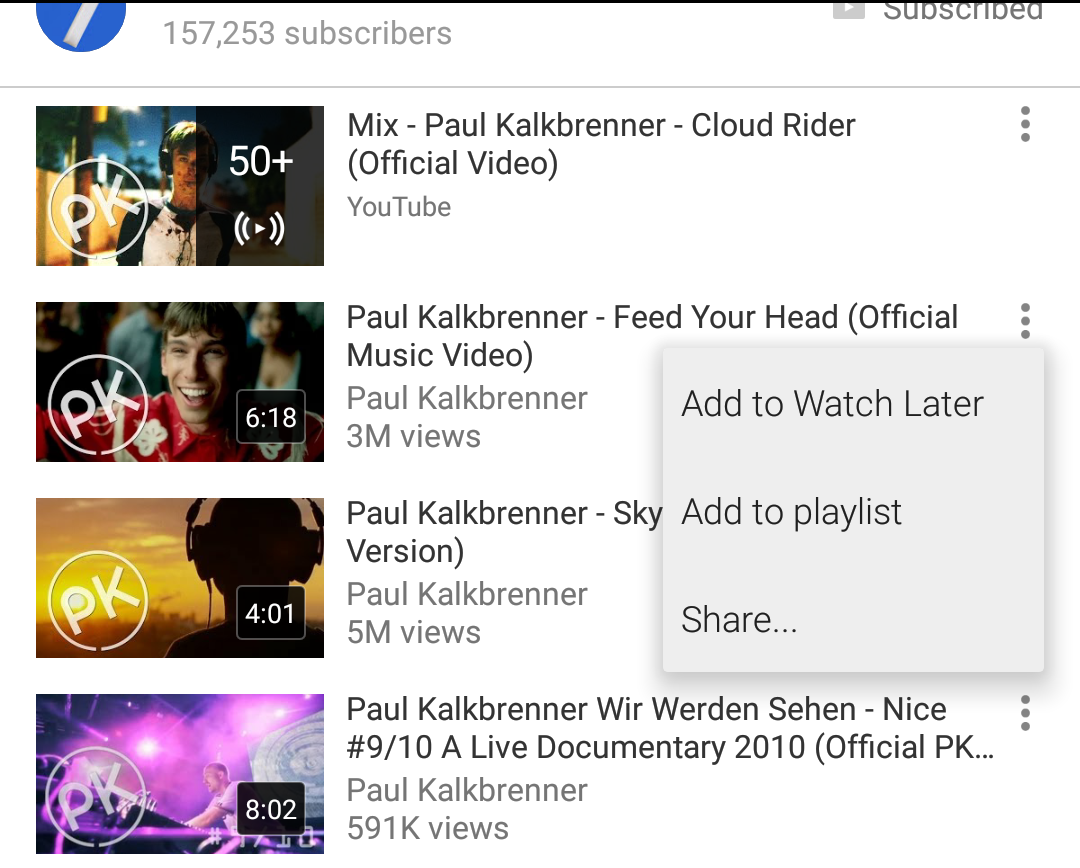
You can run AudioPocket and paste into it any valid url to star playing your YouTube video. But the easiest is to start YouTube, search for video and use the “Share…” menu to play the video with AudioPocket.
YouTube Share Menu
Notice: so far, it does not work with YouTube’s playlists (to be investigated as playlists are claimed to be supported)… It’s easy to know that you have selected a playlist as the “Share…” menu appears alone (no “Add to xxx” menu next to it):
YouTube Share PlayList
That being said, each video shared with AudioPocket is queued.
Once shared with AudioPocket, the video is played quite immediately and you can pause/stop it with AudioPocket’s menu appearing in the App bar:
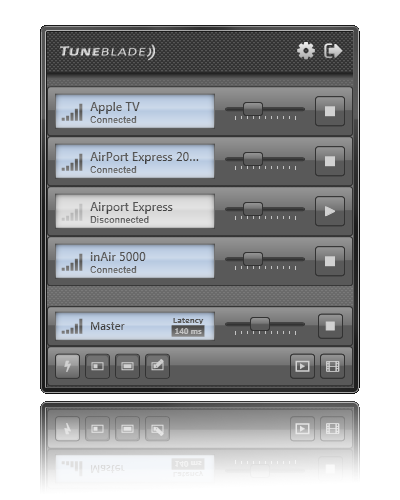
Sometimes, I want to play audio with my PC instead of my AudioStation (Synology) via my AirPlay Devices (Yamaha HTR-4067 and Philips Fidelio AD7000). I found TuneBlade to be the best cheap solution.
TuneBlade
Click to Read MoreClick to Close
A lot of details and info can be found here : http://tuneblade.com/blog/
I like it because:
It’s very simply to use
No need to change the current playback device of Windows.Simply press play on the AirPlay Devices detected by TuneBlade
It’s cheap (less than 9€)
It’s able to send the music synchronously on various distinct devices (Just like Synology’s AudioStation)
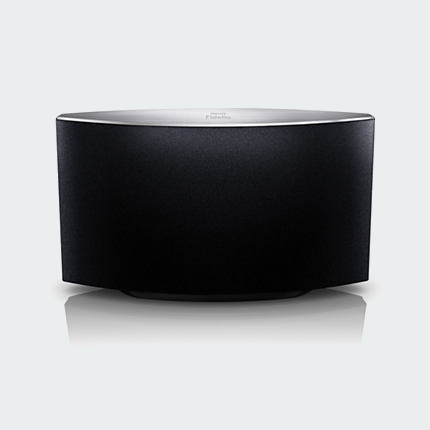
I just bought 3 x Philips Fidelio SoundAvia wireless speaker AD7000W/12 with AirPlay. This model is must cheaper than any other AirPlay device and fully compatible with my Synology DS209+ running the Audio Station of DSM 4.2.
Click to Read MoreClick to Close
Philips Fidelio AD7000W/12
I paid only 109€ (instead of the official price: 149€) for this device, which is reported as a good one (Look for reviews on the web). It’s especially much cheaper than any other devices except the Philips DS3800W/10. But this last one, which actually used to be more expansive than the AD7000W/12 in the past, is not as good although better designed. I took 3 AD7000W/12 (for the price of one single Soundlink Air, the cheapest Bose AirPlay device). I will use them respectively in the bathroom, in the kitchen and in my room.
It’s perfect for a Synology as there is not useless feature, like a docking for iStuff that don’t need, no remote control as I have my mobile phone, etc… So I paid only for what I really need: a basic AirPlay Speaker.
Take note that there is no need for an iPad, iPod or iPhone to configure the Philips Fidelio AD7000W/12. It’s presumed to be configurable auto-magically via WPS but I didn’t succeed to do so (I.e.: using the PBC – Push-Button Configuration – which is the WiFi setup button on the back of the device). Fortunately, it is really easy to configure the AD7000W/12 with a browser from any wireless client device such as a tablet, a laptop, a mobile phone, …
Notice: when unwrapping the device, on the connectors at the back of device, there is a sticker explaining that one has to push the physical WiFi setup button for 5 sec to configure the network for the first time. This could be confusing if you read next the Quick Guide. Indeed, this one explains two ways to connect the device to the WiFi router: a first method using WPS and a second method using an iStuff. In both cases, you have to press the physical WiFi setup button. But the mistake would be to press this button for 5 seconds when using the WPS method. It must only be pressed for 5 seconds if you want to use the second method. So, here is my experience:
Switch on the device. The button is on the back, close to the top, next to the Volume + and – buttons.
On the back too, there is a green led blinking rapidly in the middle of the WiFi setup button, at the bottom, on the right of the USB connector. Wait for 35 sec until it starts to blink slowly. The device is then ready to be configured.
To connect the AD7000W/12 to a WiFi router using a browser (Connect the devices one by one if you have several):
Press the WiFi setup button for 5 sec (= blinks 5 times). The led will then start to blink alternatively green and orange.
Soon after you should see, with your wireless client device, a new opened WiFi network named like Philips_Fidelio_AirPlay. Connect to that network.
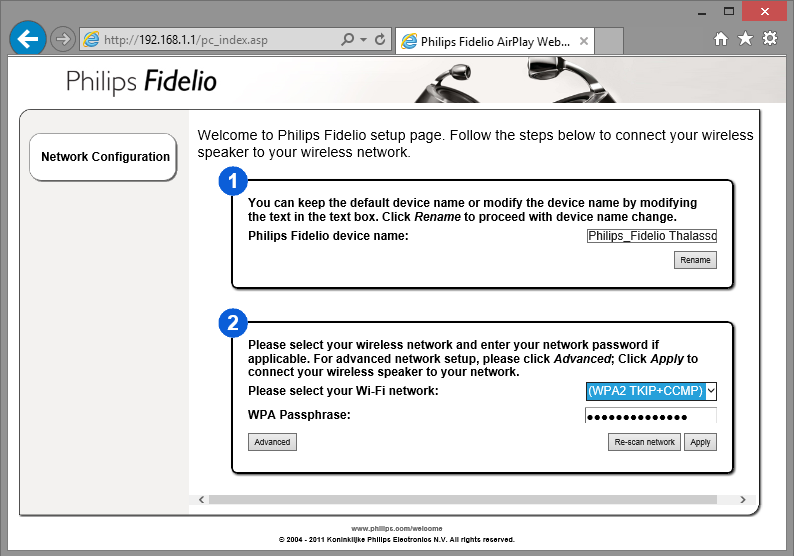
Open a browser and navigate to 192.168.1.1 to access the network configuration page of the AD7000W/12. If you are using a laptop, althoug configured to get an IP via DHCP, you could have to reconfigure it to use a fixed IP like 192.168.1.2, gateway 192.168.1.1, mask 255.255.255.0. I had to do even after I didn’t succeed with a simple “IPConfig /renew”. With a mobile and a tablet, it worked out of the box.
In the configuration page, edit the name of the device to make it unique and select the SSID of the WiFi network on which it will have to connect. It works fine with my network configured to use WPA2.
Type the Passphrase of the WiFi network and Apply the configuration.
The led will restart to blink rapidly in green.
As soon as device is connected on the selected WiFi network, it produces a clear “Beep” sound and the led stops blinking.
Philips Fidelio Configuration
To connect the device using WPS:
Press the WPS button on your WiFi router. It has better be configured to use WPA2
Press the WiFi setup button on your device (a simple click of less than 1 sec). The led will start to blink alternatively red, green and orange.
Wait for up to 2 minutes. The device should auto-magically connect on the WiFi router and produce a clear “Beep” sound once connected.
This second approach didn’t work for me ?!
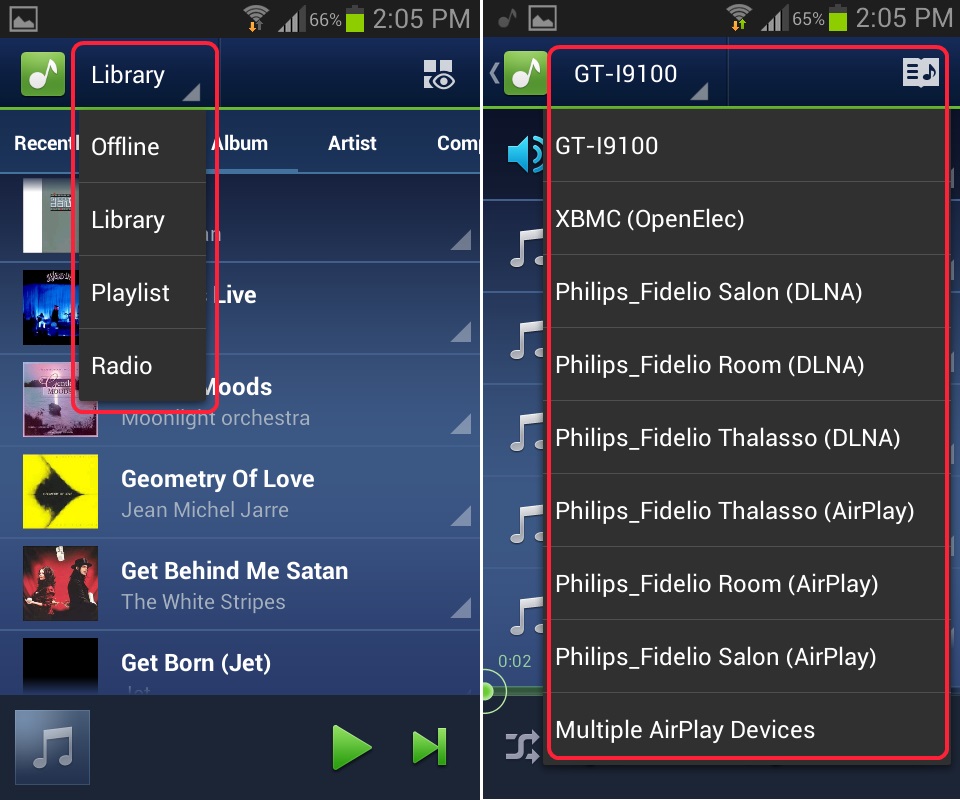
As soon as the Philips Fidelio AD7000W/12 is connected on the WiFi network, it becomes available as a target device for the Synology Audio Station (either in the Web UI or in the Apps for mobile). One can see targets like “XXX( DLNA)”, “XXX (AirPlay)” and “Multiple AirPlay Device” where XXX is the name you gave to the device (“Philips Fidelio ####” by default). All those targets work but you will possibly have to be patient for the music to arrive with DLNA targets (?). I takes a few seconds more than with AirPlay on my infra.
If you don’t want to see the speaker as both an AirPlay device and a DLNA device, you must tick “Do not Search for DLNA devices” in the “options” tab of your Audio Station’s settings.
Notice that the feature “Multiple AirPlay Device” only works if turned on from Audio Station “browser based”. It means that you must first select that target in the Audio Station’s web based UI. You will then be prompted to select which AirPlay devices must be used. Once this is done, you can use the “Multiple AirPlay Device” target also within the Audio Station Apps for tablets and mobiles. There is no support (today) to select via the mobile App which devices are part of the target “Multiple AirPlay Device”.
Notice also that selecting the target device is really easy on a mobile phone via the App. First select the music to be played in a library. Then, on the next screen you will be able to select the target:
Audio Station Apps
For an unknown reason, it’s not as obvious with the App on my tablet ? To select the target on my table I have indeed to open the settings of the App. This is really not convenient at all!
Notice finally that each device has its own queue. So you can then switch between target devices and manage their queues independently.