I got the following message when trying to install third parties packages on my Synology: “failed to install ‘…’. This package is not published by Synology Inc,
The solution is simply to Trust Any Publisher.
Click to Read MoreClick to Close
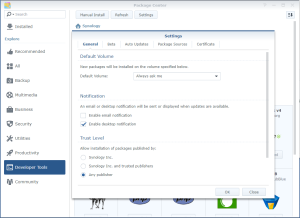
Go into the “Package Center” > Settings > General tab and select “Any Publisher” in the section “Trust Level”
Trust Any Publisher
After reinstalling my Synology and trying to access various modules, I got web pages displaying “the service is disabled now”. E.x.: for WordPress, phpMyAdmin, …
The solution was quite simple: Go into the “Package Center” and you should see that the modules are stopped. Start them 😉
‘homes’ link in /var/services is pointing at /volume1/@fake_home_link
open a ssh session as root,
do: rm homes
and: ln -s /volume1/homes homes
Access right to shared folders
admin has no access anymore to various shared folders. Ex.: /volume1/homes/admin
Go to DSM > Control Panel > User
Edit the ‘admin’ account and got the the ‘permissions’ tab
Reapply the access rights
Web Console.
Doesn’t open anymore… It must now be accessed under the web path /webman/3rdparty, via its url: http://hades:5050/webman/3rdparty/webconsole/wc.cgi.
I did a new package to start it automatically. See attachments at the bottom of this post. Once installed, open Web Console and change your password (default is “admin”) using the command: #users modify admin
JDownloader (does not start anymore)
Java Manager not installed anymore. It is replaced by the new Java package for a more convenient installation procedure.
Edit the file S99jdownloader.sh to replace “/volume1/@appstore/JavaManager/Java/bin/java” by “/usr/local/bin/java”
In that file also change the path to create the pid file into a folder where admin is granted write access !
Login into a ssh session and enter the root mode (sudo -i)
Execute “rm /var/run/S99jdownloader.pid”
Check that all files in /volume1/@appstore/jdownloader belong to ‘admin’
Exit the root mode
Execute “sh S99downloader.sh start”
Check the output in the nohup.out file
Filebot does not run anymore
Reinstall the “Unofficial Java Installer”
FileBot Node does not start anymore
Uninstall filebot and filebot-node
Uninstall node.js and java 8
Delete all the old scheduled tasks related to filebot
Delete the input and the output folders (where media files to be renamed are located)
Recreate empty input and output folders (as admin – via the File Station, not as root)
CTRL-F5 in the browser to fully refresh DSM
Install the unofficial java installer of RedNoah + node.js v4
Install filebot (version from Package Center) and filebot-node (the version filebot-node-0.2.0-B1-noarch of RedNoah)
If it does still not run, test it via a SSH
login as admin
DO NOT RUN ANYTHING AS ROOT. So, don’t execute: sudo -i
cd /var/packages/filebot-node/target/
./start
Check the errors returned by this command if any
Check also the logs: cat /var/log/messages
filebot-node is installed in /volume1/@appstore/filebot-node with
a sytmbolic link from /var/packages/filebot-node/target/ and
a symbolic link from /usr/local/filebot-node
filebot-node schedule a task to run its command /usr/local/filebot-node/task xxx where xxx is the id of a task defined into /volume1/@appstore/filebot-node/data/task/xxx.argsp
AcpiOnLan (DSM SSO login not working anymore)
the port to access DSM in admin mode (required to do a login via the page /webman/login.cgi) is not anymore stored in /etc/synoinfo.conf with the key secure_admin_port or admin_port respectively for http and https. AcpiOnLan was fetching the port in that file. Instead, AcpiOnLan must now fetches external_port_dsm_https or external_port_dsm_http
WordPress
After the update of WordPress, as usually, I had to save (although not changed) the current option selected in the “Settings” > “Permalink Settings” otherwise no page was accessible anymore via permalinks (as returned by google search).
The automated WordPress update failed to complete. I should have enabled ftp first. I did a manual upgrade.. But the problem was most probably with the owner of the files… (See next)
Upgrading plugins didn’t work either… But this problem was solved by executing, as root: chown -R http:http /volume1/web/wordpress
The 2x3TB disks of my DS713+ were full. Being lazy, I decided to expand the storage by migrating the disk to a new DS1815+ with more bays (instead of doing a full backup and restore on larger disks). It was a piece of cake!
Click to Read MoreClick to Close
Do first a backup of the configuration of your current Synology via Control Panel > Update & Restore menu > Configuration Backup tab > Back up configuration button
Move the disks to the new Synology, keeping the very same order (disk in bay n must go into the bay n of the new Synology).
Add a few other disks in the new Synology and create new Volumes
Boot the new Synology and wait for the beep.
Start the Synology Assistant, find your new Synology and click “Connect” on it.
Use the Migration mode, keeping all your files. NB.: you should download the latest DSM for your new Synology and use that local copy during the installation process instead of letting the installation process download that file itself.
Restore the Configuration backup on the new Synology
If you were using the web station and php, enable it. This settings was lost in my case: Control Panel > Web Services menu > Web Services tab > Enable Web Station option
Repair the packages one by one. Wait for each repair to be successful before repairing the next package otherwise you could be in troubles. Pay attention also that the behaviour of the UI can be weird when auto-refreshing after a repair. If clicking repair on a package, you see that the package repaired is not the one you clicked on (but one that was already repaired), close and reopen the Package Center. All my packages where successfully repaired (sometimes I had to skip one and retry later, IMO due to the dependencies…). Here are the packages I had to repair
Audio Station. everything kept as-is, including the user-defined radio
if music does not appear, go to Control Panel > Media Indexing and re-index the media files.
Download Station: didn’t lose anything from its download queue
Plex Media Server. I simply had to reenter my credentials which were expired
DNS Server: all settings/zones still defined. Access to all services from intranet and internet working fine
Maria DB: nothing lost. In particular my Worpress blog.
Media Server: ok
Video Station: all video and metadata accessible
Photo Station: all albums still there and ok
Python 3: I had to retry the repair but works fine
Java Manager: ok (used to install Java 7)
Surveillance Station: Licenses, settings, camera, recordings are all kept
Time Backup: I had to retry the repair but backup tasks are ok, as wel as the timeline itself.
Node.js
Other Packages:
My Custom packages were still there: iPKGui, AcpiOnLan, Mods (My Own Dsm Shorcuts), Unofficial Java Installer (Java 8)
Custom Package Sources are still defined too
Jdownloader was still installed and configured and I only had to restart it.
Settings were lost for FileBot Node. After reconfiguring FileBot Node, it was not working (unable to access its onw port) I had to uninstall it and reinstall (including FileBot). Reconfigured settings were however not lost…
WordPress was stopped. My blog was however well still accessible as I did reenable the Web Station
Synology’s DDNS Service
DDNS Service being linked to the old Synology, I had to go to https://account.synology.com/fr-fr/overview and unlink my DDNS name
Next, I went to Control Panel > External Access and did Edit my provider (Synology) to re-enabled the DDNS and re-introduced my login/password.
It took a few minutes before being again connected.
I finally moved a few Shared Folders to the new volumes by editing them via Control Panel > Shared Folder menu > Edit. I simply changed the location, picking the new Volume as a target. Attention, during the move, the Control Panel is not accessible anymore. If you need to access it, simply open a new browser 😉 (The only thing that cannot be done, is moving two Shared Folders simultaneously). Notice that the move can take ages as the new volume is probably still under validation (depends if you checked that option when you created the volume).