Tag: Google Assistant

  • JBL Link 20 and 300 having crunchy, crackling, static pop noise

    Since I am using a mesh network (based on TP-Link Deco M9 plus) I started to have more and more crackling noise on both my JBL Link 20 and 300, even if located very close to the repeaters. The only solution is to reset the JBL.

    Click to Read More

    It’s a very common issue, due to the “Wifi stability”, not only experienced with the TP-Link Deco M9 Plus (quich are actually quite good for their purpose) and even not only with the JBL (Read these posts).

    I have read a lot of posts on this issue and none could help. it has been useless to update the firmware, to open the devices and apply the tricks and tips found on the web, …

    The only trick, which work immediatly, is to reset the JBL and reconfigure it in Google Home. Next, it works like a charm.. for quite some time (months in my case)… but at the end, the crackling noise come back and you have to reset again.

    To reset the JBL Link 300, hold both the “Bluetooth” and the “Volume up” buttons for up to 20 seconds (until you see the “Mute” button becoming orange) as ilustrated on the video here after. Next wait until you the JBL has rebooted and open Google Home to reconfigure it.

    To reset the JBL Link 20, hold the “Mute” button for up to 10 sec until the Wifi led switch off. Next hold both the “Mute” and “Power” buttons for about 20 seconds (until it restarts) as ilustrated on the video here after. Next wait until you the JBL has rebooted and open Google Home to reconfigure it.

    Loading

  • How to add Rooms into several Home structures managed with Google Home

    Since I have defined several “home” structures in the App “Google Home”, I can only add new rooms in the last one created.

    Google Support told me that the only way to workaround that limitation was to delete all the homes, except the one to be completed, and re-create the others later.

    Click to Read More

    First, let me explain why I have created several home structure in the App “Google Home”: I wanted to grant my kids access on only a subset of the devices (lights, google home mini, chrome casts, blinds, …)

    So, I have created

    • a “Main” home with all the devices that I may access,
    • a “Kid 1” and a “Kid 2” to grant each kid access on his own devices (lights, blinds) and
    • a “Common” to grant everyone access to the common devices (TV, speakers, Google Home Mini).

    I have shared each “Kid” home with its owner and the “Common” home with everyone.

    Here is the standard way to add a room into a home when one has only one home (Thx to Thomas Ott):

    1. OPEN: Google Home (on a mobile device)
    2. CLICK: “Account” icon (lower right corner – looks like a person in a circle)
    3. CLICK: “Settings” (small gear)
    4. CLICK: The “Assistant” tab (between Personal info & Services)
    5. CLICK: “Home control”
    6. CLICK: “Rooms” tab (to the right of “Devices”)
    7. CLICK: The + button (lower right corner)
    8. PICK: An existing room name (or skip to Step 9)
    9. SCROLL: To the bottom of the screen
    10. CLICK: “Custom name”
    11. TYPE: The name of the new custom room
    12. PRESS: “OK”
    13. SELECT: One or more DEVICES by clicking on one or more checkboxes
    14. CLICK: Check Mark symbol at the upper right of the screen to save the new room & device(s)
    The advantage of grouping the devices into rooms is that you can simultaneously turn all of them on/off by saying the sentence:  “Hey, Google: Turn off(on) the lights in <the name of the room>”. If your Google Assistant in also assigned to that room, you can even skip the name of the room in that sentence.
    But since I have defined several homes, when I want too add new rooms in the home “Main”, they are news added into the home “Common”.
    I did contact the online support of Google to find how to do it properly. As always, they did their best to understand my specific case and suggest appropriate solutions. Unfortunately here, they could only suggest to delete all the homes except the “Main”, add next the missing rooms, and then recreate the other homes. It seems that there is indeed no “feature” to add rooms into a specific home for the moment (Can you believe that ???).
    Fortunately, I am hardheaded: I did search for an alternative to delete/recreate/reassign 10th of rooms/devices… and I found one. Using that workaround, I was able to create rooms in any of the existing homes.
    1. OPEN: Google Home (on a mobile device)
    2. CLICK: “Home” icon (lower left corner – looks like a house)
    3. SELECT: the home structure where you want to create a new room (at the top of the screen)
    4. SCROLL DOWN: to the very bottom of the screen. If you devices in a section “Linked to you – x devices not in home”, then go to §A here under – otherwise go to §B.

    A: if you have devices not yet assigned to any home, you can use it to create a new room into which that device will be automatically moved:

    1. CLICK: any not-unassigned device.
    2. CLICK: The “Add to a room” button (at the bottom of the screen)
    3. PICK: an existing “Home” where you want to create a new room
    4. CLICK: The “Next” button (lower right corner)
    5. CLICK: The “Move device” button (lower right corner)
    6. CLICK: “Add a custom room…” (scroll down the screen to find the “Create New” section) or any predefined name you would like to create
    7. CLICK: The “Next” button (lower right corner)
    8. EDIT: The name of the new room
    9. CLICK: “Continue” (lower right corner)

    You can loop on this § A to create one room for each device not yet assigned.

    B: if all your devices are already assigned to a home, use anyone to create a new room into which that device will be automatically moved and move the device back to the right room later.

    1. CLICK: any device already assigned to an existing room.
    2. CLICK: “Settings” (small gear in the upper right corner)
    3. CLICK:
      1. “Home” if you want to create a room in another home. Then go to step 3 of the §A here above
      2. “Room” if you want to create a room in current home. Then go to step 4 of this §B
    4. CLICK: “Add a custom room…” (scroll down the screen to find the “Create New” section) or any predefined name you would like to create
    5. EDIT: The name of the new room
    6. CLICK: “Save” (upper right corner)

    Once the new room created, the device being now assigned to that room, you must move it back to its original location (or loop first on this § B to create all the new required rooms).

    1. CLICK:
      1. “Home” if you want to move back the device into another home. Then go to §B.1.
      2. “Room” if you want to move back the device into another room of the same home. Then go to §B.2.

    B.1.:

    1. PICK: an existing “Home”
    2. CLICK: The “Next” button (lower right corner)
    3. CLICK: The “Move device” button (lower right corner)
    4. PICK: an existing “Room”
    5. CLICK: The “Next” button (lower right corner)

    B.2.:

    1. PICK: an existing “Room”
    2. CLICK: The “Save” button (upper right corner)
    Notice that you can empty rooms by moving the devices to other rooms. But a device can’t be removed from all rooms once it has be assigned once. This feature is also not supported…

    Loading

  • Amazing Broadlink Mini R3 with Google Home

    I have just configured a Broadlink Mini R3 to be used within Google Home’s scenario to control several devices. Works really like a charm !

    Click to Read More

    It’s just amazing that this little device can perfectly remote control my projection screen 7 meters away, the projector 2 meters away on the ceiling and the ampli which is in the room but not in sight.

    I bought 3 of them from China for 13€ each.

    Quick memo about how to configure them:

    • First step, install the App “ihc for EU” (special version compatible with GDPR for EU) to detect the device, assign it to the right room and add appliances (either from the library available out of the box or custom ones)
      • Attention: if you change later the room assigned to the RM mini 3 in the app, you loose all the appliances configured with it.
    • Next, configure some scenes to be used via Google Home. Their name will be used by Google Assistant.
    • Then, make the mini R3 accessible via your Google Assistant : Go to “Google Home” and “click Add” > “Setup a device” > “Works with Google”. There, link your “BroadLink Smart Home for EU” account with Google Home
    • Finally, use ‘in french’ : “Ok Google, active {le|la|l’} <xxx>” where <xxx> is the name of a scene and “le”, “la”, .. is optional

    Google Home Add Device
    Google Home Add Device

    Tip:

    • use “Ok Google, synchronise les appareils” to refresh the name of the scene in Google Home if you did rename them in the “ihc” app.
    • use scenario (“routines”) in Google Home to combine “IFTTT actions”, “scenes of other products like Philips Hue” and scenes from “Broadlink”.

    Using the “ihc” app, you can update the firmware: click on the RM mini > the three dot in the top-right corner > “Check for firmware updates”

    To configure an appliance, don’t hesitate to use one which does not work perfectly. At least, you will have all the related icons and be able to reconfigure them. Creating a “UserDefine” appliance, you won’t have many different icons available. Also, the configuration of  “UserDefine” appliance can’t be “backuped”. Not problem however to use “UserDefine” appliances in “scenes” to be called from Google Home.

    Once an appliance added, you can reconfigure the buttons: click on the appliance > the three dot in the top-right corner > Learn

    Don’t forget to backup the settings of your appliances once reconfigured!!! It’s the best ways to reuse them on other RM mini later: click on the appliance > the three dot in the top-right corner > Backup IR code sets

    Loading

  • Tips and tricks in French to use Philips Hue via Google Home

    Here is a list of a few tips & tricks to use the Bulbs of Philips Hue with a French Google Assistant.

    Click to Read More

    Important notice: based on my experience, Google Assistant is evolving fast (possibly learning). Meaning that at the beginning, only specific and correct sentences were supported.

    After some time, Google Assistant accept more flavor of those sentences.

    Synchronize Google Home and Philips Hue to see new Bubbles

    Prerequisite: link Google Home with your Philips Hue account.

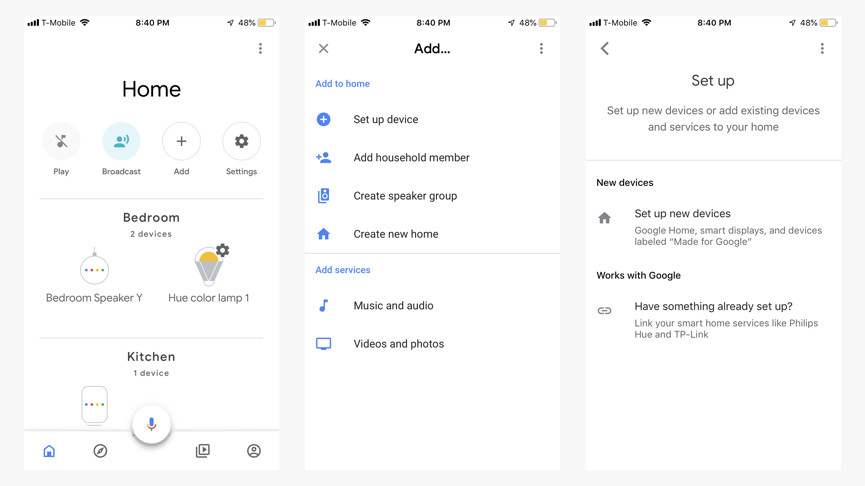
    Reminder: Open the “Google Home” App. In the top part of the screen, there are various icons under the name of your house: “Eteindre” (Off), “Allumer” (On), “Lire” (Play) , “Ajouter” (Add), “Paramètres” (Settings) …. Click on “Ajouter” (Add) >  “Configurer un appareil” > “Fonctionne avec Google”. This is opening a screen to manage the linked accounts. Philips Hue must be added.

    Assuming that you have already linked Google Home with your Philips Hue account, when you add bubbles via the Philips Hue App, they don’t appear immediately in Google Home. To force Google Home to sync with Philips Hue, say “Ok Google” or “Dis Google”. Then “Mets à jour les lumières”, “Mets à jour les lampes” or “Synchronise les appareils”.

    [04/2019] It’s quite weird but initially the following sentences didn’t work: “Mets à jour les appareils”, “Synchronise les lumières”, “Synchronise les lampes”. Google was answering that you have to use Google Home for that… But after a few weeks, it started to work. It was not the first time that I notice this kind of “progress” with various commands. It’s seems that there is a kind of learning curve for the Google Assistant !

    Turn on/off Philips Hue’s lights

    Initially, I was only able to tell:

    • “Allume/éteins (le) X”, where X is the name of a light (Ex.: “Spot 1”, “Spot de Klara” – Notice that the names of my lights are not prefixed with an definite article ‘the’. So I can say “Allume le spot 1” or “Allume spot 1”).
    • “Allume/éteins (le) X à x%”,  where x is the percentage or luminosity
    • “Allume/éteins les lumières (de/du) X”, where X is the name of a room, to turn on/off all the lights in that room (Ex.: “Chambre de Klara”, “Bureau” – Notice that the names of my rooms are not prefixed with an definite article ‘the’).
    • “Allume/éteins les lumières (de/du) X à x%”, where x is the percentage or luminosity
    • “Allume/éteins les lumières” to turn on/off all the lights in the current room (I.e.: the room where the Google Assistant is assigned)
    • “Allume/éteins les lumières à x%”, where x is the percentage or luminosity

    Now, a bit confusing as not 10% consistent:

    • “Allume”, is going to turn on all the devices in the room, not only the light. In my case it also turn on Nvidia Shield TV
    • “Éteins”, does not work
    • “Allume/Éteins tout” turn on/off all the lights in the current room (I.e.: the room where the Google Assistant is assigned)
    • “Allume/Éteins tout dans (le/la) X” where X is the name of a room, to turn on/off all the devices in the current room (I.e.: the room where the Google Assistant is assigned)

    I also tried to use the word “lampes” instead of “lumières” but this was not recognized. I discussed that issue with Google Support. They told me that this was possibly due to the fact that the name of some lights used to be “lampe XYZ”. I did rename my lamps but without success at that time. Now, weeks later, it works. I can tell “Allume/éteins les lumières …” or “Allume/éteins les lampes …”. So, my experience is that the overall experience is not always consistent.

    Use Philips Hue Scenario

    To start a scenario named X, use the sentence “Active X”. Ex.: “Active Color Loop”

    To stop it, use the sentence “Désactive X” or “Stop X”

    Turn off and on only some Bubbles in a room using Philips Hue Scenario

    With Google Home, it’s currently not possible to create several groups of Bubbles in a room. It’s also not possible to include a Bubble within several rooms (if you want to use fake rooms to group your bubbles). But as a trick, you can create a “Scenario” within the Philips Hue App (Scene) to turn off or on any subset of Bubbles.

    Open the Philips Hue App and tap the room containing the Bubbles to group. Once the room opened, tap “Nouveau Scénario” (New Scene).

    On the color picker (color or white disc), you see your lamps (a bubble or small circles with the amount of bubbles, one bubble or circle per type of lamp – color or white). Tap the circle representing several bubbles to access each bubble individually and define its rightness or its state on/off in the Scene. You can decide to have x lights on, y lights off and z lights dimmed to 50%.

    Name that new scene like “les lumières XYZ” (the lights XYZ). Once Google Home and Philips Hue synchronized, you will be able to tell “Ok Google”, “Active les lumières XYZ” (Activate the lights XYZ).

    Combine commands into a routines [03/2019]

    I did create routines to combine commands into a sequence, with sometimes delays between each commands. Ex.: to turn on all the devices to watch a movie, I simply say “Ok Google, allume le cinéma”. The routine is a set of individual commands to turn on the projector, turn on the console NVidia and open the projection screen: “active l’allumage du projecteur”, “allume shield”, “active l’ouverture d’écran”.

    “active l’allumage du projecteur” and “active l’ouverture d’écran” are two scénario define in my Broadlink account (to remote control devices via IR: See this note). As those are accessing scenario via services, we have to use the verb “active”.

    “allume shield” is a native command of Google Home. Indeed, no need to integrate any service to remote contro a NVidia Shield TV. But keep in mind that there are plenty of issues with remote controlling Shield: can open Netflix, but can’t start a movie. the volume is decreased each time you tell a command but is not restored to its initial level once the command executed, etc…

    Command Somfy blinds with Tahoma box [04/2019]

    In the past, I used to control blinds motorized with Somfy via voice commands thanks to the integration between Google Home and the Tahoma box via IFTTT.

    Now, thanks to the native integration of “Somfy Tahoma & Connexoon” services with Google Home, I could get rid of IFTTT to control the blinds.

    Here are the supported sentence once all devices are assigned to rooms in Google Home:

    • “Ok Google, ouvre/ferme X” – X being the name of a blind (“store” or “volet” in Tahoma)
    • “Ok Google, ouvre/ferme X à x %”

    X can have articles but Google Assistant will quickly learn that there are various flavor possible: “le volet du salon”, “le volet au salon”, “mon volet du salon”.

    To close all the blinds, I was only able to do it for sure with

    • “OK Google, ouvre/ferme tout” to close all blind in the home
    • “OK Google, ouvre/ferme tout dans X” to close all blinds in a room named X. Another way is to tell :” Ok Google, ouvrir X”. This is not a nice French sentence and seems a direct translation of the English version. Notice that if X = “Bureau”, you won’t be able to tell “Ok Google, ouvrir le Bureau”. To do that, the room must be named “le Bureau” instead of simple “Bureau”.

    Although the documentation of Tahoma pretends that we should be able to tell “OK Google, ouvre/ferme tous les volets” to close all the blinds in the current room (room where the Assistant is assigned), this does not work. Also notice that you may not open the door of the Garage due to Google security Policy applied on the integrated services. You may only do it via IFTTT !!!

    use several commands and/or routines together

    I discovered by accident that Google Home was supporting sentences combining several commands X, Y, Z …, simply by telling “Ok Google, X et Y et Z …”. Ex.:

    • “Ok Google, allume le cinéma et ferme tout dans le bureau” where “allume le cinéma” and “ferme tout dans le bureau” are two distinct routines.
    • “Ok Google, allume le cinéma et ferme tout dans le bureau et éteins tout” where “allume le cinéma” and “ferme tout dans le bureau” are two distinct routines.

    Loading

  • Call a php webpage from a IFTTT applet using Google Assistant

    I wanted to be able to wake up PC on my Lan using voice commands. To achieve that, I did implement a solution using Google Assistant, IFTTT and a php web page hosted on my NAS.

    Click to Read More

    Regarding IFTTT, you must have an account. Then,

    • Create a new applet,
    • Choose the service “Google Assistant”
      • Choose a trigger, ex.: “Say a phrase with a text ingredient”
      • Type a phrase in “What do you want to say?” such as “Wake up my PC $” ($ is the symbol to be used for the “ingredient”)
      • Type a phrase in “What do you want the Assistant to say in response?” such as “Ok, I will wake up $”
    • Choose next an action service “Webhooks” (to “make a web request”)
      • Type the url of your web page: http://<public Ip of your NAS>/<some path>/action.php?do=wakeup&param={{TextField}} ({{TextField}} will take the value of the ingredient)
      • Chose the “method”: GET
      • Chose the “content type”: text/plain

    Regarding the php web page (action.php), I had to do some fine tuning… So, I started with a page logging all information received from IFTTT:

    [php]</pre>
    <?php
    // https://gist.github.com/magnetikonline/650e30e485c0f91f2f40
    class DumpHTTPRequestToFile
    {
    public function execute($targetFile)
    {
    $boby = json_decode(file_get_contents(‘php://input’) , true);

    $data = sprintf("<h2><u>IFTTT call at %s on %s</u></h2><h3>Method:</h3>", date(‘h:i:s’) , date(‘d/m/Y’));
    $data .= sprintf("<blockquote>%s (%s): %s </blockquote><h3>HTTP headers:</h3><ul>", $_SERVER[‘REQUEST_METHOD’], $_SERVER[‘SERVER_PROTOCOL’], htmlentities($_SERVER[‘REQUEST_URI’]));
    foreach ($this->getHeaderList() as $name => $value)
    {
    $data .= "<li><b>" . $name . ‘</b>: ‘ . $value . "</li>";
    }

    $data .= "</ul><h3>Post:</h3><ul>";
    foreach ($_POST as $key => $value) $data .= "<li>" . $key . ‘=’ . $value . ‘</li>’;

    $bodyhtml = $this->jsonToTable($boby);
    $data .= "</ul><h3>Request body:</h3><blockquote>$bodyhtml</blockquote>";

    $action = trim(strtolower($_GET[‘action’]));
    $action = preg_replace(‘/^ *de +/’, ”, $action);
    $action = preg_replace(‘/^ *d *\’ +/’, ”, $action);

    $param = trim(strtolower($_GET[‘param’]));
    $param = preg_replace(‘/^ *de +/’, ”, $param);
    $param = preg_replace(‘/^ *d *\’ +/’, ”, $param);

    $data .= "<h3>Requested Action:</h3><blockquote>$action: $param</blockquote>";

    similar_text(strtolower($param) , "zeus", $percent);
    $data .= "Zeus: $percent %<br>";

    similar_text(strtolower($param) , "chaos", $percent);
    $data .= "Chaos: $percent %<br>";

    file_put_contents($targetFile, $data . file_get_contents($targetFile) . "\n");

    echo (nl2br($data));
    }

    private function getHeaderList()
    {
    $headerList = [];
    foreach ($_SERVER as $name => $value)
    {
    if (preg_match(‘/^HTTP_/’, $name))
    {
    // convert HTTP_HEADER_NAME to Header-Name
    $name = strtr(substr($name, 5) , ‘_’, ‘ ‘);
    $name = ucwords(strtolower($name));
    $name = strtr($name, ‘ ‘, ‘-‘);
    // add to list
    $headerList[$name] = $value;
    }
    }
    return $headerList;
    }

    private function jsonToTable($data)
    {
    $table = "<table class=’json-table’ width=’100%’>";
    foreach ($data as $key => $value)
    {
    $table .= "<tr valign=’top’>";
    if (!is_numeric($key))
    {
    $table .= "
    <td>
    <strong>" . $key . ":</strong>
    </td>
    <td>
    ";
    }
    else
    {
    $table .= "
    <td colspan=’2′>
    ";
    }
    if (is_object($value) || is_array($value))
    {
    $table .= jsonToTable($value);
    }
    else
    {
    $table .= $value;
    }
    $table .= "
    </td>
    </tr>
    ";
    }
    $table .= "</table>";
    return $table;
    }
    }

    (new DumpHTTPRequestToFile)->execute(‘./action.html’);

    ?>
    <pre>[/php]

    The log is stored in a html page “log.html”.

    Notes:

    • I notice that Google was not good at recognizing the name of my PC (IMO because I use French sentences). So I am using a php command “similar_text” to evaluate the “ingredient”. But this is really far from effective.
    • I tried to use a “POST” method instead of “Get” and a Content Type “application/json”, it works. But when I add a Body like {“token”:”mseries”,”command”: “<<<{{TextField}}>>>”, ”test”: “data”}, I don’t see it received by my php page 🙁
    • If Google Assistant does not call correcly IFTTT, look at you voice command history to be sure it understood you order: https://myactivity.google.com/myactivity?restrict=vaa&utm_source=help
    • If Google Assistant understood correctly your command, but IFTTT didn’t call your web page, look at your IFTTT activity: https://ifttt.com/activity

    A log for a call using a GET method will look like:

    IFTTT call at 11:32:29 on 25/09/2018

    Method: GET (HTTP/1.1): /ifttt/action.php?action=wakeup&param=CARROS

    HTTP headers:

    X-Newrelic-Transaction: PxQGUlECCwFRBVEEVQAAAlQTGlUDChAHHEAJVA1cAgMKA1gEVFNVUVUHFU1EAQACBV1UBlUTag==
    X-Newrelic-Id: VwAOU1RRGwAFUFZUAwQE
    Content-Type: text/plain
    Content-Length: 74
    Connection: close
    Host: olympe.letroye.be
    X-Real-Port: 55748
    X-Port: 80
    X-Real-Ip: 54.164.110.125
    X-Forwarded-By: 192.168.0.200

    Post:

    Request body:

    Requested Action: wakeup: CARROS

    Zeus: 20 %
    Chaos: 72.727272727273 %

    A log for a call using a POST method with application/json content-type will look like:

    IFTTT call at 11:41:14 on 25/09/2018

    Method: POST (HTTP/1.1): /ifttt/action.php?action=wakeup&param=Kaos

    HTTP headers:

    X-Newrelic-Id: VwAOU1RRGwAFUFZUAwQE
    Content-Type: application/json
    Content-Length: 77
    Connection: close
    Host: olympe.letroye.be
    X-Real-Port: 59892
    X-Port: 80
    X-Real-Ip: 54.211.16.53
    X-Forwarded-By: 192.168.0.200

    Post:

    Request body:

    Requested Action: wakeup: kaos

    Zeus: 25 %
    Chaos: 66.666666666667 %

    Loading