Tag: RAID

  • ‘Add Mirror…’ option is grayed out in Windows’ Disk Management

    How to ‘Add Mirror’ on a disk containing data when the option is grayed-out although you have another very similar disk available and empty? Check that your two disks are “Dynamic” and shrink the volume on the disk with data!

    Click to Read More

    I had a 2 TB disk with a unique volume (on one single partition), containing data.

    I did add a new 2 TB disk to be used as a mirror of the existing one. I went into the Disk Management tool to “add Mirror” but found that this option was not available. The menu was disabled:

    Add Mirror Grayed Out
    Add Mirror Grayed Out

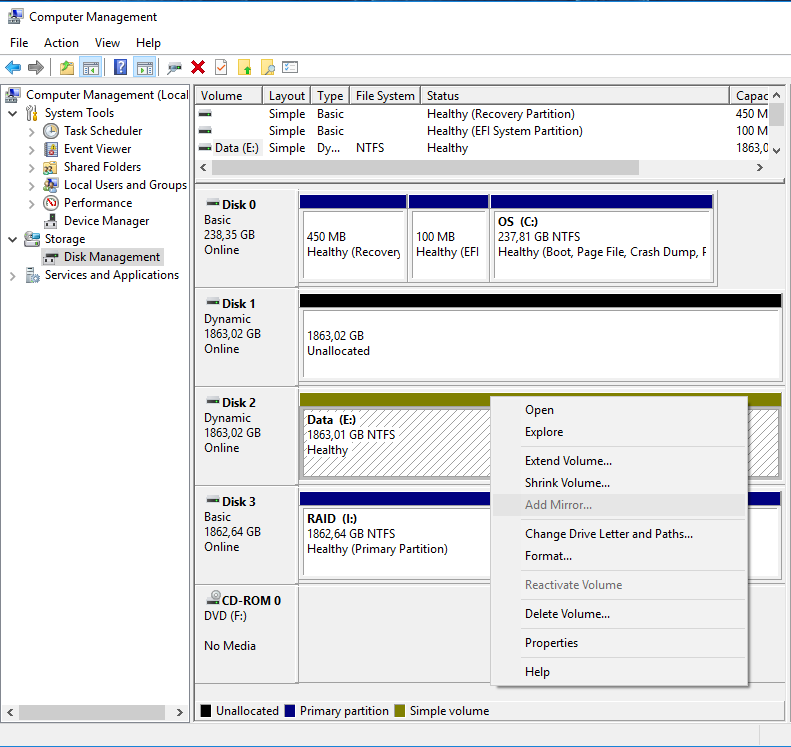
    First thing to check: the two disks to be used must be “Dynamic”. Right-click on “Disk x” to “Convert to Dynamic Disk …”.

    Next, to be able to create a mirror, the system needs some free space to create its own reserved partition on the disk. So, right-click on the Volume of the disk with data to “Shrink Volume…” (Try first with 1 Mb). Once the disk has been shrunk, the menu “Add Mirror…” becomes accessible.

    Add Mirror Enabled
    Add Mirror Enabled

    Et voilà.

    NB.:

    • It does not matter if the disks are MBR or GPT.
    • Once the volume shrunk, you will possibly have to reboot.
    • If you encounter an issue while adding a mirror, do a “Check Disk” (Properties > Tools > Check).
    • If you can really not get rid of the error “DiskPart has referenced an object which is not up-to-date.” although rebooting, do an “Extend Volume” of 1 MB! (Sound silly, I know…) and then “Add Mirror”.
    • In my case, while the disks were re-syncing, I did remove the mirror, did an “Extend Volume” to reuse the whole free space, and was still able to do an “Add Mirror”.
    • MS Partition & Volume Info here.

    Mirror using DiskPart

    • Run DiskPart in a cmd prompt started as Administrator
    • list disk
    • select disk x [x=disk containing the volume to be mirrored]
    • list volume
    • select volume x [x=volume to be mirrored]
    • add disk x [x=disk to be used for mirroring]

    Loading

  • Replacing RAID-F by T-RAID

    T-RAID (for Transparent RAID) is a new product of flexRAID. It comes as another option next to the existing product: RAID-F (RAID over File System). I did migrate from Raid-F to T-RAID months ago…

    T-RAID
    T-RAID

    Here is how I configure it now in order to get the best performances for my server and my own usage.

    Click to Read More

    Nice Features

    I love T-RAID. It has great features similar to RAID-F, e.g.:

    • Software Raid Array fully independent from the hardware.
      • If a physical controller die, no need to replace it with another identical one.
    • Support adding a disk with existing data into the Software Raid Array.
      • No need to add blank disk as required with hardware raid or with Windows Storage Server.
    • Survive to simultaneous failure of several drives.
    • Access each disk through a virtual disk or through a Pool offering a unique/global view on all the virtual disks.

    But it comes with its own advantages on RAID-F

    • It’s a native Real-Time protection without any drawback compared to “RAID-F RealTime” (E.g.: RAID-F in RT mode MUST be stopped gracefully before shutting down the machine)
    • Data on failing disks are still accessible in Read and Write mode! There is therefore no downtime during the “disk reconstruction” (Similar to hardware Raid)
    • It comes with interesting monitoring and notification tools (Performances, S.M.A.R.T, …)
    • It comes with Storage Accelerations.
      • Currently, a “Landing Zone”: use of a SSD as a temporary storage. Files copied into the array are dropped onto the SDD and transferred later, in background, to the array.
      • Soon, “SSD caching”.

    RAID Options

    Once Physical Drives “Registered as Pass-Through”, to be used as DRU or PPU, and added into a “RAID Configuration (defining hence an “Array”), one can set various options on that “Configuration”

    Options:

    • Auto Start Array=false. Because I don’t always turn on my PC to access the data stored in the T-RAID array. Bu also because I often change settings in my Configuration for testing purpose and changes may often not be applied if the array is already running…
    • Global Hot-Spare Rebuild=false. This is the recommended value as human interaction is preferred on automatic rebuild in case of disk failure
    • Read-Only Policy=Never. This is the default and authorize writing on all disks in the array, even on disks failing.
    • Scheduled Range Operation Size (in GB)=100. I didn’t fine-tune this default value yet (taking into account e.g. how much data can be validated per hours when the server is on). Actually, I turn my server on only a few times per month, to do massive backups. Once the backups completed, I start a complete Validation of the array and configure the system to shutdown on completion.
    • Statistics: File=true, RAID=true. I want indeed to monitor my system. But File Statistics requires a Job to be scheduled for the Storage!

    Performance Options:

    • Performance Profile=PERFORMANCE. Because my server is only on when I want to do backups, I don’t care about saving disks/energy. On the opposite, I care about performance and this profile provides indeed noticeable improvements at disk access speed level.
    • Concurrency Queuing (CQ) Depth=64, Salt=16. Salt is use in the algorithm managing “concurrency” within T-RAID.  System could experience lock overrides if the salt is too high and constant out of sync blocks if it is too low. The perfect values depends on the hardware… So, as long as “out of sync blocks” are reported during “Verify and Sync” tasks, increase the salt. But look into the “RAID Monitoring” tab for the graphic “Lock Override“, if the value is increasing drastically, lower the salt!
    • OS Caching=false. I don’t use this one as it doesn’t help to keep high performances when copying files larger than the amount of RAM, which is the case for me. In addition, the PERFORMANCE mode is not guarantee to be efficient with “OS Caching”=true when using multiple PPU, which is also the case for me.
    • Tagged Command Queuing (TCQ)=true, Depth=32. I am using this option to improve performances as it’s compatible with the PERFORMANCE mode while using multiple PPU. It allow up to 90% of source disk write speed.
    • Sequential Write Optimization (SWO)=true, Depth=8. I keep those default values.
    • Direct I/O=true. I also keep those default values.

    Storage Options:

    • Auto Storage Pooling Start=false, Delay=15. Notice that it’s recommended to never access the virtual disks directly (assigning them with a drive letter). Instead, using only the Pool add an extra visualization layer which makes hot-unplugging much less issue prone. But I often change settings in my Configuration for testing purpose and changes may often not be applied if the pool is already running…
    • Removable=false. This settings must be set on false on Windows Server 2012 Essentials.
    • Storage Pool Caching=META_DATA_ONLY, Max=310. I noticed that performances are much better when using this setting instead of File_AND_META_DATA for copy of large files, which is the case for me.
    • Sync Folder Last Modified Date=false. I would enable this only if I use a program tracking file modification date (Ex.: sync or backup daemon)
    • Thread Pool Size=32. I keep this default
    • Space Management Reserve (in GB)=50. I keep this default.
    • File Management Strategy=STRICT_FOLDER_PRIORITY. I want to keep all files together even if it’s not “energy optimal”. Indeed, in case of disaster, I will at least easily retrieve related files on disks still “alive”…
    • File System=NTFS, strict ACL Mode=false. I keep those defaults
    • Drive Letter or Folder Mount Point=V. This is the letter to be assigned to the Pool. It is shared to be accessible from other machine in my Intranet
    • Native NFS Support=false. I keep this default.
    • Volume Label: tRAID Storage Pool

    Advanced Operations

    • Storage Acceleration. I don’t use it so far as the write performances are good enough for me and anyway, I don’t keep my server up and running 24/7. So I want to know when I can switch it off (I.e.: when the transfers are really completed). Using the Storage Acceleration, the SSD used as Landing Zone would never be flushed in my case… I indeed only turn the server on when I want to backup huge amount of data…

    S.M.A.R.T

    • For each disks on a LSI SAS controller, I have to set an “Advanced Mapping”
      • Device Path Mapping: /dev/pdx where x is the disk id
      • DeviceType Mapping: sat
    • For each disks, I also enable SMART Monitoring (every 4 hours) except when disks are in standby.

    Notes

    • Write performances are a lot impacted by the performances of the PPU. The best disks should be used as PPU instead of DRU.
    • To increase Read Performances, the File Management Strategy has better be ROUN_ROBIN as it enables I/O parallelism.
    • Never Defrag or Chkdsk the “Pool Drive” or “Source (physical) Drives”. Defrag instead the “NZFS (Virtual) Drives”. That being said:
      • I really try to avoid doing a Defrag as so-far, I am not yet 100% convinced that, on my system, it does not results “blocks out of sync” (I.e.: requires a Verify&Sync). For that reason, I have disabled the automatic-daily-defrag; E.g.: Turn off the Windows Disk Defragmenter Schedule (See FlexRaid’s Wiki) or uncheck the automatic optimization on concerned drives in O&O Defrag. Pay attention that new NZFS disk appearing when the array start can be taken automatically into account by the defrag tool.
      • Defrag, if done, should never be executed on several disk simultaneously (See FlexRaid’s wiki).
      • If you do a Defrag, you better stop the Pool or at least imperatively disable “Storage Pool Caching”.
      • I didn’t succeed to do a Chkdsk on the “NZFS Drives” and had to bring the “Source Drives” online to repair them… Once repaired, a Verify&Sync is mandatory! (NB.: One thing to try is dis-engaging driver protection mode. asit blocks certain low level operations. Unfortunately, it’s not recommended to run disk tools on the transparent disks with driver protection dis-engaged).
    • When a Verify task fails, it provides the exact first and last byte failure as well as the amount of 4KB blocks. One can then start an “Range Specific Operation” to Verify&Sync the specified zone.
      • Notice that first/last position of failure is in Bytes while the “Range Specific Operation” can be in KB, MB, etc… 1KB = 1024B).
      • Notice also that the Verify&Sync updates complete blocks (4KB) and will therefore possible report different addresses (first byte of the updated block) than the Verify Task!

    Loading

  • SSD: Samsung 840 pro vs Kingston HyperX 3K

    I used to have a RAID 0 with two SSD Kingston HyperX 3K for my OS. The RAID 0 was managed by an on-board Sata III RAID controller of my Asus P9X79. I have replaced that array with a single SSD Samsung 840 pro. The difference is incredible.

    Click to Read More

    Samsung SSD 840 PRO – 128GB 2.5″ MLC Serial ATA 6Gb/s

    Single SSD Samsung 840 Pro
    Single SSD Samsung 840 Pro

    RAID 0 with 2 Kingston HyperX 3K SSD Series – 120 GB 2.5″ Serial ATA 6Gb/s

    Raid 0 with 2 SSD Kingston HyperX
    Raid 0 with 2 SSD Kingston HyperX

    I was not expecting such a difference between a RAID 0 of slower SSD and a single SSD. I am usually quite satisfied with the gain of performance when using disks in a RAID 0 array.

    It was only a nightmare to backup the OS from the 2 Kingston and restore it on the Samsung. Fortunately, I found a free tool to shrink the system partition: MiniTool Partition Wizard Home Edition 8.1.1.

    Loading

  • Promise FastTrak TX4660 issue when used with NVidia MediaShield Raid

    Building a new machine, I have experienced the lack of compatibility between the Sata RAID Controllers from the FastTrak TX Series and some on-board Sata RAID controllers 🙁

    Click to Read More

    I have 6 Sata II controllers on my Motherboard “Asus Striker II Formula“. They support RAID thanks to the NVidia MediaShield Storage Technology.

    Yesterday, I plugged into a PCI-e 16x port of this motherboard a Promise FastTrak TX4660 controller card with RAID support.

    Unfortunately, the initialization sequence of the FastTrak (during the boot sequence) kept  blocked forever on the message “Press <Ctrl-F> to enter FastBuild Utility”. I was  unable to either enter this utility pressing Ctrl-F or continue the boot sequence (and start  the OS). And although the PC didn’t look completely freezed, Ctrl-Alt-Delete was not responding either. Notice: I was using a PS2 keyboard, just to be sure… as some USB controllers are sometimes not initialized before the end of the boot sequence to make this one shorter.

    I quickly discovered that the FastTrak was passing successfully if I was disabling the RAID Support on the motherboard. But then, my PC was not able to start the OS as this one was installed on a RAID 0 array managed by the motherboard’s controllers.

    To make it clear: if I was restoring the “default settings” in the Bios (which does not enable the RAID support), then the FastTrack was passing successfully (or I could enter the utility pressing Ctrl-F). But as soon as I was re-enabling the Raid Support on the Sata Controller of my motherboard (and nothing else), the boot sequence stopped after the message mentioned above…

    This morning, I read that the Promise FastTrak is incompatible with some other Raid Controllers. I assumed I was in such a case. So, I started to hope that a Bios Update would possibly fix the incompatibility.

    1) I did first update the Bios of my Asus Striker II Formula from v1305 to v2402 (the latest) using the tool of Asus, the “EZ Flash 2” available in the BIOS itself, and the new firmware copied on a USB key. The update was a piece of cake…

    Unfortunately, it did not solve the problem 🙁

    2) I did next downgrade the Bios of my Promise FastTrak Tx4660 from v2.9.0.0039 (the latest) to v2.9.0.0037 (the previous one) using a Bootable USB Key created with a tool from BootDisk and the flash utility found on Promise.com

    And BINGO!!!

    The boot sequence completes now successfully with RAID enabled on the motherboard. Only notice that I see a black screen for 15s to 25s while the FastTrak scans for the drives…

    Loading

    ,