Tag: Synology

  • How to download playlists from YouTube using Synology

    It’s really easy to download playlists from YouTube with the Download Station of Synology. I do this to get locally new “No Copyright Music’s”, to be used later within my video’s.

    Click to Read More

    I am using the “Download Station” as it simply works, opposite to many free or paid software’s which pretend to work but usually fail (and are full of advertisements…)

    Bref… Assume that you want to get all the free music’s from the excellent YouTube Channel “VLOG No Copyright“:

    • Visit their “PLAYLISTS” in your Browser (All such channels have a tab “PLAYLISTS” as you can see in the screenshot bellow).
    • Right-click on the link “VIEW FULL PLAYLIST” of the desired playlist.
      • This is important: don’t use any URL from the “HOME” tab or from any tail representing a playlist (with the “PLAY ALL”). It would only download one video and not all the playlist. 
    • Select the menu “Copy link address”
      • The copied url should be like this : “https://www.youtube.com/playlist?list=xxxxxxxxxx”


    Now, go to your “Synology Download Station” and:

    • Click on the large blue sign “+“. It opens a window to create new download tasks.
    • Go to the tab “Enter URL“.
    • Paste there the URL of the playlist copied previously.
      • A subfolder with the name of the playlist will automatically  be created under the destination folder and the video will be saved in that subfolder
    • Select the option “Show Dialog to select…” if you when to download only some of the video’s. Otherwise you can unselect that option.
    • Click “Ok”.


    You should now see a line as illustrated here below, “waiting” to start:


    You have to wait until the Download Station has crawled across the whole playlist and found all the files to be downloaded… Then, you will see the list of music’s:


    During the download, you could see some failed tasks, with a status “Error”. It happens from time to time, but this is usually a temporary issue. Sort the list within the Download Station on the “Status” column and select all the “Error” . Then, right-click the list and select the menu “Resume”.


    Personally, as soon as the “music video’s” are downloaded, I extract the sound tracks and keep only those. There are many software to do this. But one of my favorite option is to use ffmpeg directly on the Synology (you have to install that package). Simply type this command in a console, in the download path were are saved the video’s: 

    for i in *.mp4; do ffmpeg -i "$i" -codec:a libmp3lame -q:a 0 -map a "${i%.*}.mp3"; done

    To process mp4 in all subfolders in the download path, I use the command:

    for d in *; do cd "$PWD/$d/"; for i in *.mp4; do ffmpeg -i "$i" -codec:a libmp3lame -q:a 0 -map a "${i%.*}.mp3"; done; cd ..; done


    If you are using Chrome, I can suggest some extensions to help in downloading Playlists..

    1. The extension “Copy Selected Links“. Using that one, you can copy the URL’s of all the playlists of a Channel, at once. Select the whole text under the tab PLAYLISTS (it will then appear highlighted in blue as illustrated on the screenshot here under). Next, right-click in an empty area and select the menu “Copy selected Links”.

    Now go into Notepad++, as we have to keep only the playlists. Paste the Clipboard into a new tab of Notepad++. Press CTRL-Home to come back to the top. Press CTRL-H to open the “Replace” window. Select “Regular Expression” at the bottom of that window and click the “Replace All” button once you have entered this into the field “Find What”:  .*watch.*\n (or .*watch.*\r\n if it does not work properly)

    Now, you have two options. If you have no more than 50 playlists, you can paste them directly into the Download Station via the button “+” and the tab “Enter URL” as explained previously. Otherwise, you have to save with all your URL’s into a .txt file (with Notepad++) and upload that file via the tab “Open a file” instead of the tab “Enter URL“. 


    2. The extension “Download Station” (or this version in Chrome Web Store) to more easily download the playlists. Same principle as above, but instead of right-clicking “View Full PlayList” to copy the playlist URL, you now have a extra menu “Synology download Station” (or Download with “Download Station”).


    Another trick, when available in the PLAYLISTS tab of a Channel: select and download the Playlists “Sorted by Mood” or “Sorted by Genre”. This will help you when you search for a particular type of music for your video. Ex.: with the Channel “Audio Library”:


    Adive: each time you add a playlist in the Download Station, check that the amount of new download tasks match with the amount of tracks in the playlist. Indeed, it happens that not all the video’s are added into the Download Station as it has limits(a total of max 2048 download tasks <= reason why you have to clean-up all downloaded tasks before downloading new long playlists. There is also a limit of 256 links per “file” uploaded and a limit for a playlist of “2048 – amount of current download tasks”).

    Don’t forget that for most “No Copyright Music’s”, you have to mention the author in your video’s or posts. Often, in YouTube, you have to click on “Show More” under the video to see the details of the license:

    The License is usually clear. Ex.:

    To find again later the video’s on YouTube and check the type of license, it’s important to keep:

    • The original name of the video when converting into mp3
    • The name of the playlist
    • The name of the channel

    To do so, the easiest is to add some metadata into the mp3 extracted with ffmpeg. Once downloaded by the “Download Station”, your video’s should be in subfolders which have the name of their playlists. And the filenames usually contain the Author, the name of the song and the name of the YouTube Channel. So, it’s easy to create the metadata. Ex.: the playlist “Dance & Electronic Music | Vlog No Copyright Music” of Vlog has been downloaded into a subfolder named “Dance & Electronic Music _ Vlog No Copyright Music” and the video’s are all named like “Artist- Title (Vlog No Copyright Music).mp4”

    So, to process that subfolder, I will use the command:

    for i in *.mp4; do playlist=${PWD##*/}; artist=${i% - *}; other=${i##* - }; title=${other% (Vlog*}; ffmpeg -i "$i" -codec:a libmp3lame -q:a 0 -map a -metadata artist="${artist}" -metadata title="${title}" -metadata album="Playlist: ${playlist}"  -metadata Publisher="From YouTube Channel: Vlog No Copyright" "${artist} - ${title}.mp3"; done

    As you can see, I am using the “Publisher” to store the Channels and the “album” for the playlist… This is a personal choice! (More details on ID3 tags and ffmpeg here)

    Regarding the pattern matching used in shell, it’s not always that simple and you will have to be creative… Just about the pattern matching:

    • variable2=${variable1%xyz*} => variable2 is the shortest left part of variable1 before a substring xyz.
    • variable2=${variable1%%xyz*} => variable2 is the longest left part of variable1 before a substring xyz.
    • variable2=${variable1#*xyz} => variable2 is the shortest right part of variable1 after a substring xyz.
    • variable2=${variable1##*xyz} => variable2 is the longest right part of variable1 after a substring xyz.
    • in xyz, x and z may be blanks (in my case, “xyz” was ” – “)

    As there are many duplicates in those playlists, I have written my own script to replace such duplicates by hardlinks (on my Synology). I can’t use jdupes or rmlint as those are doing “binary comparisons” and due to the conversion via ffmpeg, it doesn’t work. Instead, I search for duplicates based on the filename and size only (per channel, they are usually unique anyway). Here is my script for illustration purpose. It must be stored in an ANSI file (ex.: dedup.sh) and run with: sh dedup.sh go

    echo "Start looking for duplicates"

    find . -iname "*.mp3" -printf "%p ~ %f\n" | sort -f -k2 | uniq -Di -f1 > list.dup

    echo "Duplicates found"

    test="$1"
    previous=""
    previouspath=""
    skip=true
    while read p; do
    mp3name="${p#* ~ }"
    mp3path="${p%% ~ *}"
    if [[ "$mp3name" == "$previous" ]]; then
    mp3new="${mp3path%%.mp3}"
    node=$(ls -l "$mp3path" | grep -Po '^.{11}\s1\s.*$')
    if [[ "$node" == "" ]]; then
    echo " $mp3path is already a hardlink"
    else
    skip=false
    if [[ "$test" == "go" || "$test" == "test" ]]; then
    SIZE1=$(stat -c%s "$mp3path")
    SIZE2=$(stat -c%s "$previouspath")
    #Delta=$(awk "BEGIN{ printf \"%d\n\", sqrt((100 * ($SIZE2 - $SIZE1) / $SIZE1)^2)}")
    #if [[ $Delta > 1 ]]; then
    Delta=$(awk "BEGIN{ printf \"%d\n\", ($SIZE2 - $SIZE1)}")
    if [[ "$Delta" == "0" ]]; then
    mv "$mp3path" "$mp3new.old"
    ln "$previouspath" "$mp3path"
    echo " $mp3path now linked to original"
    else
    echo " $mp3path seems different from $previouspath"
    fi
    else
    echo " mv $mp3path $mp3new.old"
    echo " ln $previouspath $mp3path"
    fi
    fi
    else
    if [[ "$test" != "test" ]] || [[ "$skip" = true ]]; then
    previous=$mp3name
    previouspath=$mp3path
    echo "$mp3name has duplicate(s) (original in $mp3path)"
    else
    break
    fi
    fi
    done <list.dup


    Note: Facebook will possibly remove the audio from your video even if they is a “No Copyright Music”. When you get such a notification from FB, you can simply click to restore the audio if you did mention the Author in your post or video.

    Some YouTube Channels with “No Copyright Music’s”:


    Loading

    ,
  • Call a php webpage from a IFTTT applet using Google Assistant

    I wanted to be able to wake up PC on my Lan using voice commands. To achieve that, I did implement a solution using Google Assistant, IFTTT and a php web page hosted on my NAS.

    Click to Read More

    Regarding IFTTT, you must have an account. Then,

    • Create a new applet,
    • Choose the service “Google Assistant”
      • Choose a trigger, ex.: “Say a phrase with a text ingredient”
      • Type a phrase in “What do you want to say?” such as “Wake up my PC $” ($ is the symbol to be used for the “ingredient”)
      • Type a phrase in “What do you want the Assistant to say in response?” such as “Ok, I will wake up $”
    • Choose next an action service “Webhooks” (to “make a web request”)
      • Type the url of your web page: http://<public Ip of your NAS>/<some path>/action.php?do=wakeup&param={{TextField}} ({{TextField}} will take the value of the ingredient)
      • Chose the “method”: GET
      • Chose the “content type”: text/plain

    Regarding the php web page (action.php), I had to do some fine tuning… So, I started with a page logging all information received from IFTTT:

    [php]</pre>
    <?php
    // https://gist.github.com/magnetikonline/650e30e485c0f91f2f40
    class DumpHTTPRequestToFile
    {
    public function execute($targetFile)
    {
    $boby = json_decode(file_get_contents(‘php://input’) , true);

    $data = sprintf("<h2><u>IFTTT call at %s on %s</u></h2><h3>Method:</h3>", date(‘h:i:s’) , date(‘d/m/Y’));
    $data .= sprintf("<blockquote>%s (%s): %s </blockquote><h3>HTTP headers:</h3><ul>", $_SERVER[‘REQUEST_METHOD’], $_SERVER[‘SERVER_PROTOCOL’], htmlentities($_SERVER[‘REQUEST_URI’]));
    foreach ($this->getHeaderList() as $name => $value)
    {
    $data .= "<li><b>" . $name . ‘</b>: ‘ . $value . "</li>";
    }

    $data .= "</ul><h3>Post:</h3><ul>";
    foreach ($_POST as $key => $value) $data .= "<li>" . $key . ‘=’ . $value . ‘</li>’;

    $bodyhtml = $this->jsonToTable($boby);
    $data .= "</ul><h3>Request body:</h3><blockquote>$bodyhtml</blockquote>";

    $action = trim(strtolower($_GET[‘action’]));
    $action = preg_replace(‘/^ *de +/’, ”, $action);
    $action = preg_replace(‘/^ *d *\’ +/’, ”, $action);

    $param = trim(strtolower($_GET[‘param’]));
    $param = preg_replace(‘/^ *de +/’, ”, $param);
    $param = preg_replace(‘/^ *d *\’ +/’, ”, $param);

    $data .= "<h3>Requested Action:</h3><blockquote>$action: $param</blockquote>";

    similar_text(strtolower($param) , "zeus", $percent);
    $data .= "Zeus: $percent %<br>";

    similar_text(strtolower($param) , "chaos", $percent);
    $data .= "Chaos: $percent %<br>";

    file_put_contents($targetFile, $data . file_get_contents($targetFile) . "\n");

    echo (nl2br($data));
    }

    private function getHeaderList()
    {
    $headerList = [];
    foreach ($_SERVER as $name => $value)
    {
    if (preg_match(‘/^HTTP_/’, $name))
    {
    // convert HTTP_HEADER_NAME to Header-Name
    $name = strtr(substr($name, 5) , ‘_’, ‘ ‘);
    $name = ucwords(strtolower($name));
    $name = strtr($name, ‘ ‘, ‘-‘);
    // add to list
    $headerList[$name] = $value;
    }
    }
    return $headerList;
    }

    private function jsonToTable($data)
    {
    $table = "<table class=’json-table’ width=’100%’>";
    foreach ($data as $key => $value)
    {
    $table .= "<tr valign=’top’>";
    if (!is_numeric($key))
    {
    $table .= "
    <td>
    <strong>" . $key . ":</strong>
    </td>
    <td>
    ";
    }
    else
    {
    $table .= "
    <td colspan=’2′>
    ";
    }
    if (is_object($value) || is_array($value))
    {
    $table .= jsonToTable($value);
    }
    else
    {
    $table .= $value;
    }
    $table .= "
    </td>
    </tr>
    ";
    }
    $table .= "</table>";
    return $table;
    }
    }

    (new DumpHTTPRequestToFile)->execute(‘./action.html’);

    ?>
    <pre>[/php]

    The log is stored in a html page “log.html”.

    Notes:

    • I notice that Google was not good at recognizing the name of my PC (IMO because I use French sentences). So I am using a php command “similar_text” to evaluate the “ingredient”. But this is really far from effective.
    • I tried to use a “POST” method instead of “Get” and a Content Type “application/json”, it works. But when I add a Body like {“token”:”mseries”,”command”: “<<<{{TextField}}>>>”, ”test”: “data”}, I don’t see it received by my php page 🙁
    • If Google Assistant does not call correcly IFTTT, look at you voice command history to be sure it understood you order: https://myactivity.google.com/myactivity?restrict=vaa&utm_source=help
    • If Google Assistant understood correctly your command, but IFTTT didn’t call your web page, look at your IFTTT activity: https://ifttt.com/activity

    A log for a call using a GET method will look like:

    IFTTT call at 11:32:29 on 25/09/2018

    Method: GET (HTTP/1.1): /ifttt/action.php?action=wakeup&param=CARROS

    HTTP headers:

    X-Newrelic-Transaction: PxQGUlECCwFRBVEEVQAAAlQTGlUDChAHHEAJVA1cAgMKA1gEVFNVUVUHFU1EAQACBV1UBlUTag==
    X-Newrelic-Id: VwAOU1RRGwAFUFZUAwQE
    Content-Type: text/plain
    Content-Length: 74
    Connection: close
    Host: olympe.letroye.be
    X-Real-Port: 55748
    X-Port: 80
    X-Real-Ip: 54.164.110.125
    X-Forwarded-By: 192.168.0.200

    Post:

    Request body:

    Requested Action: wakeup: CARROS

    Zeus: 20 %
    Chaos: 72.727272727273 %

    A log for a call using a POST method with application/json content-type will look like:

    IFTTT call at 11:41:14 on 25/09/2018

    Method: POST (HTTP/1.1): /ifttt/action.php?action=wakeup&param=Kaos

    HTTP headers:

    X-Newrelic-Id: VwAOU1RRGwAFUFZUAwQE
    Content-Type: application/json
    Content-Length: 77
    Connection: close
    Host: olympe.letroye.be
    X-Real-Port: 59892
    X-Port: 80
    X-Real-Ip: 54.211.16.53
    X-Forwarded-By: 192.168.0.200

    Post:

    Request body:

    Requested Action: wakeup: kaos

    Zeus: 25 %
    Chaos: 66.666666666667 %

    Loading

  • Cannot access port 80 on my NAS from Internet

    From time to time, I can’t access any web page anymore on my NAS’ port 80 from the web. The solution is to reboot the my modem (BBOX2) or reset its internal firewall. It’s never an issue with my NAS (Synology DS1815+)

    Click to Read More

    When this issue occurs, I can still access web pages on specific port like Plex  (e.g.: on port 32000) or my NAS’ admin console on his own port (e.g.: on port 8080). Also the “Cloud Sync” service of my NAS is still  able to sync files with Google, DropBox and Hubic. Finally, JDownloader which is installed also installed on my NAS, is still able to download.

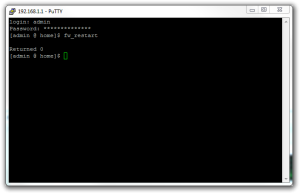
    To reboot my modem takes time but solve the problem. Another option is to reset the firewall:

    • open a telnet sessin on the modem,
    • log as ‘admin’ with your password (I did change mine. The default is possibly BGCVDSL2 or your MAC Address)
    • execute: fw_restart

    fw_restart BBOX2
    fw_restart BBOX2

    The problem comes from a NAT table full, most probably due to JDownloader or Cloud Sync. But I don’t know how to check which one is the culprit.

    Info about B-BOX-2 of Belgacom/Proximus: http://setuprouter.com/router/belgacom/b-box-2/

    Loading

  • A HTPC for 35€: Raspberry Pi + XBMC

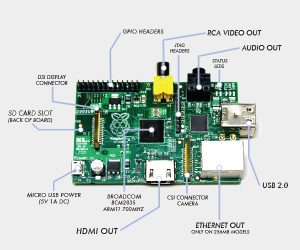
    Raspberry Pi Model B

    I have just received the “Raspberry Pi Model B” I ordered two weeks ago on “RS Components” website. It rocks !!!

    Within 30 minutes, I was watching on my HD TV a 1080p movies streamed from my NAS :p

    Click to Read More

    Mine is in a black case bought from RS components. I also bought there a power supply and a HDMI cable. The big advantage of using a Raspberry pi is that

    • It has a very low power consumption (about 1-2 watts at idle)
    • It is really small 85.60mm x 53.98mm x 17mm (invisible behind the TV)
    • It has a HDMI with Audio with CEC support (you can pilot XBMC on the Raspberry Pi with the TV remote control)
    • It comes with codec license for MPEG4 & H.264 (hardware accelerated)
    • Licenses can also be bought here to play back MPEG2 or VC1.
    • The Model B comes with 512MB Ram (Only 256 on the Model A)
    • It boots a Linux from a SD card (= silent) in about 50 seconds (depending on the distribution). There are 3 distributions of Linux with XBMC targeting the Raspberry Pi (see the wiki here). Some Install Guides:
    • A 2GB SD is enough, but I use a 16GB class 6, the only SD I had
    • There are 2 USB slots that I use for a keyboard and a mouse. That can be expanded with a USB hub (There is only one USB port on the Model A). A USB HDD can be plugged to add extra storage if required.
    • There is a 10/100Gbs Ethernet Port (No Ethernet port on the Model A) with supports of various power management wakeup features, including Magic Packet™, Wake-on LAN (WOL) and Link Status Change. UNFORTUNATELY, albeit Pi’s Lan chipset does support WOL, the Pi’s lack of power management (ACPI) means it doesn’t support this Lan chipset features 🙁
    • It does not need a fan cooler (= silent)
    • The Model B uses a standard power supply capable of supplying 5V 700ma (the Model A requires 5V 300ma)
    • The GPU is capable of 1Gpixel/s
    • It can be easily overclocked (and overvolted to increase stability) up to 1000MHz (without making the warranty void !). By default the Raspberry Pi runs as 700Mhz and is overclocked at 800Mhz by RaspBmc…
    • Overall real world performance is something like a 300MHz Pentium 2 with great graphic performances.
    As mentioned, I decided to install RaspBmc. It’s really straightforward [EDIT: RapsBmc is now deprecated and replaced by Osmc).
    1. Plug the SD card in a PC (I am using Windows 8 )
    2. Format the SD card, e.g. using a tools dedicated to SD/SDHC/SDXC like “SD Formatter“.
    3. Download the raspbmc installer (Not available anymore on the official webstite) and “run As Administrator” the setup.exe . It will automatically download an image and copy it to the SD card.
    4. Plug next the SD card in the Raspberry Pi, plug the HDMI cable on the TV (I didn’t test the RCA/Audio output), plug an Ethernet cable and plug the power supply. Select the right HDMI input on your TV and you should see the Raspberry PI display. It will configure itself (get an IP address from DHCP server, download the latest release/updates, etc…) and after about 20 minutes, it should start XBMC.
    5. In XBMC, go to the main menu > System > Lower submenu > System info and take note for your URL. You can also get there the MAC Address if you prefer like me to configure your DHCP server to assign a fix IP to the Raspberry PI (recommended to remote control XBMC or configure NFS access to Synology – reboot required).
    6. On your PC, run a Browser and type the IP address of the Raspberry PI to get access to the XBMC web control UI (on the port 80 configured by default in Raspbmc). It can be used to remote control XBMC.
    7. On your Android Phone, install the XBMC official Remote Control (Not available anymore) and configure it with the IP address of the Raspberry Pi with port 80 (this is the default of RaspBmc). There is neither a username nor a password defined by default in RaspBmc for accessing the Web Control UI (Another good remote for Android is Yatse Widget).
    8. On Synology, enable the “guest” account and grant read access on the shared folders “music”, “video” and “photo” (I still have to find where I can configure a username in raspbmc to access smb/nfs – I know I could at least do it on the smb/nfs sources configured in XBMC: protocol://user:pass@synoIP/sharename)
      • The default username is “pi” and the default password is “raspberry”, but for some reasons, adding such a user on the Synology with adhoc rights on the shares does not grant raspbmc access on those ?!
    9. On XBMC, add video, music and photo sources. I am not using “uPnP” as it does not support use of metadata stored next to the media files. Instead I am currently using smb.
    10. On XBMC, you can go to the menu “Programs” to get access to the RaspBmc settings.
    The Android Remote Control for XBMC works really fine, as well as controlling XBMC with the TV Remote, which makes this HTPC from far the greatest for that price: ~35€!
    A few notes:
    • WOL does not work because the lack for “power management” on Raspberry Pi. The only other way to “power on” the device remotely is to plug its power cable into a USB port on the TV (USB voltage is standardized at 5.0v, so you only have to check the max A supported by your TV). When you turn on the TV the pi powers on too. However, the Pi draws less power when turned on then many Tvs do when off, so there is really no reason to ever turn it off. Turning it off would not significantly reduce power consumption unless it is also unplugged.
      • So, don’t ever use the “Power Off” button of XBMC. The only way to restart the Raspberry Pi would be to unplug and plug back in the power supply.
      • Power over Ethernet (PoE) is not yet supported. Maybe in a future version of the Raspberry Pi.
    • In XBMC, go to the main menu > System > Lower submenu > Settings > Apparence > Region. Set e.g. the “Langue of the interface” or your language as “Preferred Language for audio” although you like to watch the movies in O.V.
    • In XBMC, go to the main menu > System > Lower submenu > Settings > Services > SMB Client. Change the name of the Workgroup to match your.
    • Login on the Raspberry Pi via SSH (using Putty, username “pi”, password “raspberry”. Note: “root” user is disabled by default on RaspBmc) and Raspbmc will prompt you to choose your keyboard layout – use the space bar to select a layout and Tab to move the cursor onto the Ok button. On the next screen, set your layout as the default one and wait until it’s “generated” (can be a long process). Continue the configuration with the selection of your region and country. Type “exit” to close the SSH session.
    • Raspbmc overclocks the Raspberry Pi to a safe clock frequency (from the default 700MHz to 800Mhz). Notice that a change of the clock frequency does not blow the OTP (Over Temperature Protection). It is overvolting that does this. Overclocking is therefore not making the warranty void while overvolting will permanently set a bit which invalidates the warranty. Overvolting will also reduce the lifespan.
      • Here is a tutorial to overclock the Raspberry Pi with RaspBmc via SSH
      • Here is a tutorial to overvolt the Raspberry Pi with RaspBmc via SSH
      • Here is a tutorial to do the same with the Raspbery config tool (if not using RaspBmc
      • And here are more details on possible values for the overclocking/overvolting.
    • With RaspBmc, there is no need to manually update the firmware (via SSH). This is done automatically by RaspBmc, insuring that the kernel is fully compatible.

    site: http://www.raspberrypi.org (Look at the quick-start-guide and the FAQ)

    RaspBmc: http://www.raspbmc.com (Look at the FAQ)

    XBMC for Raspberry: http://wiki.xbmc.org/index.php?title=Raspberry_Pi/FAQ

    buy: http://raspberrypi.rsdelivers.com/default.aspx?cl=1

    Loading

    ,