A Galaxy Tab S7 can be used out-of-the-box as second screen for a Windows 10 laptop or PC connected on the same Wifi. But what about using this tablet as additionnel screen for a PC connect via ethernet ? The solution is SuperDisplay. And it works for most Android Tablets…
Click to Read MoreClick to Close
You won’t be able to connect your Galaxy Tablet S7 as second screen with your windows PC, as explained here, if this one is not connected via Wifi.
It’s a pitty as using a tablet with a pen to do photo editing for example is really great.
The solution is simply to use an alternative “wireless display” solution such as “SuperDisplay”; install the App on your tablet and the related drivers on your PC, et voilà !
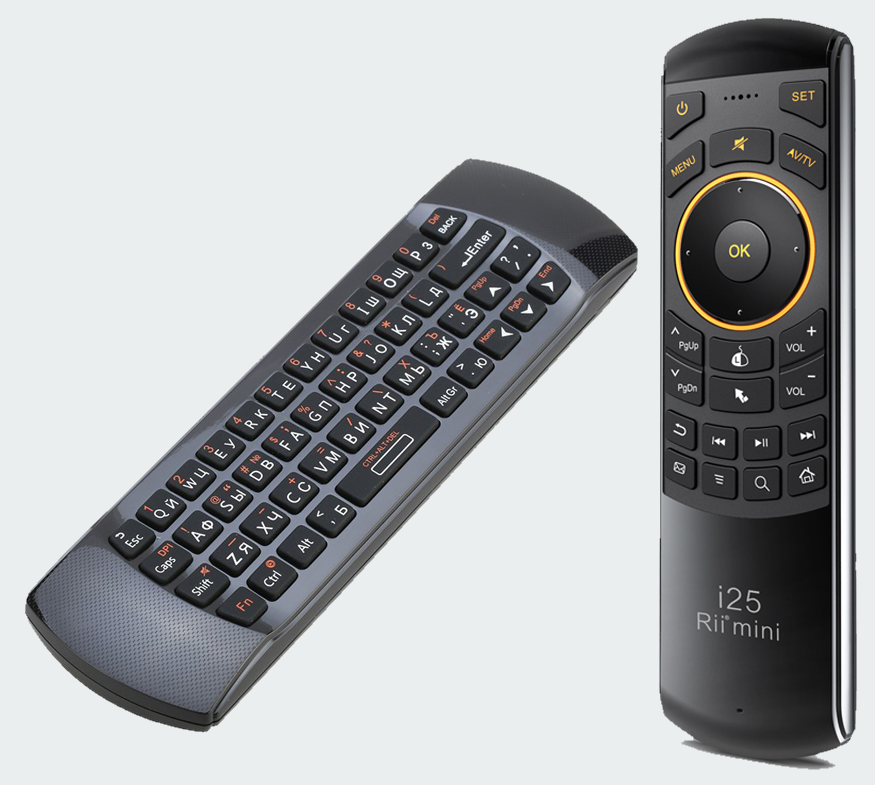
I just bought an Rii min i25 (< 35€) as an alternative for the NVidia Remote Controle (~50€). I am not disappointed !
Rii Mini i25
Click to Read MoreClick to Close
Although mine is not a model with audio (microphone and headphone), it’s clearly a great accessory to replace the native remote of the NVidia Shield TV. Notice that if it looks really nice, it’s not heavy. As a consequence, it does not feel robust in hand.
Remote NVidia Shield TV
I did test it with Plex, both on Windows 10 and on NVidia Shield TV. Everything is working out of the box, except the fast forward and fast rewind. Those two keys will probably need some remapping.
Both on Windows and NVidia, I did use the wireless keyboard successfully (including the FN keys: mute, Home, PgDn, PgUp, End, Del, Ctrl-Alt-Del), as well as the Air Mouse.
Regarding the Remote Control:
Volume + and – worked both on Windows and NVidia.
Power off only worked on Windows not on NVidia.
But it was switching off Netflix.
Search and Home worked on NVidia
To do a selection in Netflix on NVidia, I had to lock the mouse before clicking on OK!
Fast Forward (+10 sec) and Fast Rewind (-10 sec) work fine within Netflix but not in Plex.
I noticed in Netflix that the arrows (left/right) which could be used to move forward or backward in the scenes was “sometimes” not working…
I noticed that sometimes, the axes up/down and left/right appeared to be inverted. I did fix that by keeping the remote on the table, parallel to the screen, keyboard up (i.e. just in front of me), for 10 long seconds.
To scroll the page in Chrome, take the remote (keyboard down), move the mouse onto the background of the page (where there is no field) and press the “turn back arrow”. Move next the remote up and down.
To enter the search bar in Chrome, (keyboard down) simply press the “search key”. To exit the search bar (keyboard up), press the “Esc” key.
From installation perspective, there is nothing to do: just plug the receiver in a USB port and switch on the remote (Button On/Off, on the side, next to the micro USB Charging Port).
Using the air mouse is very convenient. The experience is very similar to using the remote pointer of Smart Samsung TVs (a smart remote with a large trackpad). NB.: if the mouse pointer is out of alignment with your wrist, simply lock it using the ‘Lock’ button, the one with an arrow icon:
As mentioned above, the keys can be reprogrammed by sending an IR signal from another remote whose the behavior must be copied.
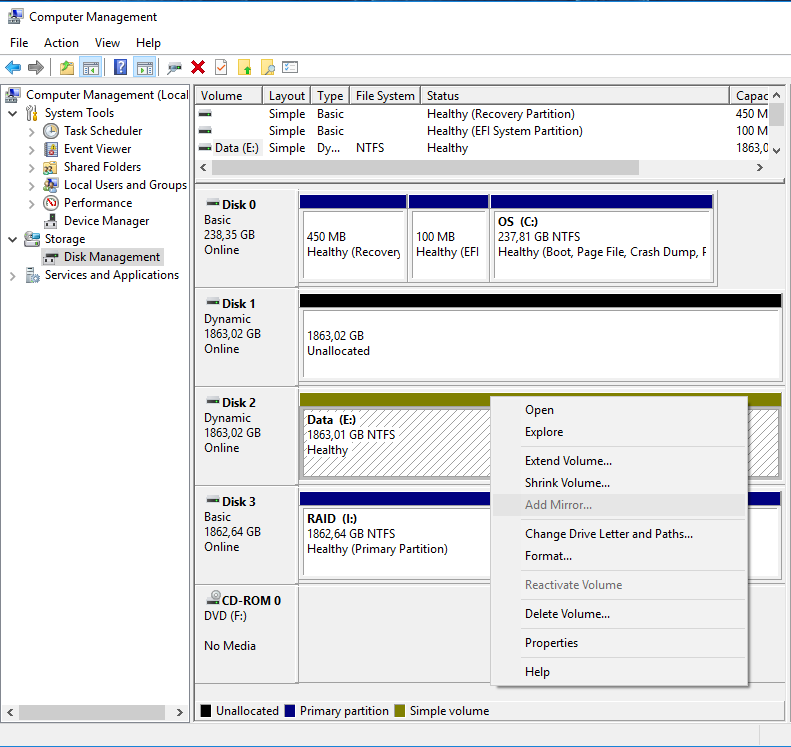
How to ‘Add Mirror’ on a disk containing data when the option is grayed-out although you have another very similar disk available and empty? Check that your two disks are “Dynamic” and shrink the volume on the disk with data!
Click to Read MoreClick to Close
I had a 2 TB disk with a unique volume (on one single partition), containing data.
I did add a new 2 TB disk to be used as a mirror of the existing one. I went into the Disk Management tool to “add Mirror” but found that this option was not available. The menu was disabled:
Add Mirror Grayed Out
First thing to check: the two disks to be used must be “Dynamic”. Right-click on “Disk x” to “Convert to Dynamic Disk …”.
Next, to be able to create a mirror, the system needs some free space to create its own reserved partition on the disk. So, right-click on the Volume of the disk with data to “Shrink Volume…” (Try first with 1 Mb). Once the disk has been shrunk, the menu “Add Mirror…” becomes accessible.
Add Mirror Enabled
Et voilà.
NB.:
It does not matter if the disks are MBR or GPT.
Once the volume shrunk, you will possibly have to reboot.
If you encounter an issue while adding a mirror, do a “Check Disk” (Properties > Tools > Check).
If you can really not get rid of the error “DiskPart has referenced an object which is not up-to-date.” although rebooting, do an “Extend Volume” of 1 MB! (Sound silly, I know…) and then “Add Mirror”.
In my case, while the disks were re-syncing, I did remove the mirror, did an “Extend Volume” to reuse the whole free space, and was still able to do an “Add Mirror”.
Recently, I noticed that my PC was waking up from sleep mode without me explicitly clicking the mouse, pressing a key on the keyboard or sending a magic packet…
I found this problem was due to an update of the Ethernet drivers which allowed any packet to wake up the computer…
Click to Read MoreClick to Close
This is a problem which comes back regularly when updating drivers. Each time, I wonder what’s wrong again. So, here are some tricks to find the cause.
First:
Put the computer at sleep and wait until it wakes up.
Next, look for the last device which turned on the PC:
Execute in a Dos prompt : powercfg -lastwake
C:\WINDOWS\system32>powercfg -lastwake
Wake History Count - 1
Wake History [0]
 Wake Source Count - 1
 Wake Source [0]
 Type: Device
 Instance Path: USB\VID_046D&PID_C52B\6&2b3c7d9c&0&3
 Friendly Name:
 Description: USB Composite Device
 Manufacturer: (Standard USB Host Controller)
Device 0xC52B is a USB Receiver for Wireless Mouse
Vendor 0x046D is Logitech Inc.
Go into the Device Manager, find that device and open its properties. In its “Power Management” tab, disallow the device to turn on the computer. If the option is not available, this device is not causing your issue.
If your PC has been waked up by the Ethernet Controller, it can be because any packet can wake it up. In the Power Management tab, tick the option “Only allow a magic packet to wake the computer”.
If this does not help:
Open the “Event Viewer” (eventvwr) > “Windows Logs” > “System”.
“Filter Current Log” on “Event Source” = Power-Troubleshooter to find which device did wake up your PC:
The system has returned from a low power state.
Sleep Time: 2016-12-24T09:40:11.549148000Z
Wake Time: 2016-12-24T09:41:07.347715900Z
Wake Source: Device -Intel(R) Ethernet Connection (2) I219-V
You can also look for the list of devices able to wake up the PC:
Type in a Dos Prompt: powercfg -devicequery wake_armed
Many tutorials explain how to reboot in Safe Mode. But they usually need you to already be in a Windows session for that. What if Windows doesn’t start well anymore and the usual F8 doesn’t work? Well, you can enable the classic Boot Menu via the Command Prompt of a Recovery Drive.
Click to Read MoreClick to Close
In my case, the Graphic Cards’ drivers were corrupted. So Windows was actually still booting but I couldn’t do anything as not having access to the UI. I had to restart in safe mode to remove those drivers and reinstall them. But without a UI, impossible to change Windows’s Startup Options…
Typing F8 during Windows boot didn’t gave me access to the Boot Menu as, since Windows 8, the boot so fast that there is no way to interrupt it anymore – except if you have enabled F8 explicitly, sacrificing a couple of seconds during startup. This can be done by opening an elevated Command Prompt and executing:
bcdedit /set {default} bootmenupolicy legacy
To undo this reopen the elevated Command Prompt and type:
bcdedit /set {default} bootmenupolicy standard
If F8 is not enabled, you can force Windows to present you the Boot Menu using a Recovery Drive (or USB Key):
If you don’t have a Recovery drive yet,
Go to another Windows 10 PC (a x64 if your PC is a X64, or x86 otherwise)
Search for “Recovery Drive” in the Windows Start Menu/Screen
And Select “Create a Recovery Drive” (No need to back up system files to the recovery drive).
Boot your other PC on that Key (depending on you BIOS, you can use F8, F12, … to access to Device Boot Menu. See a list here).
Select your Keyboard and enter the “Troubleshoot” Menu.
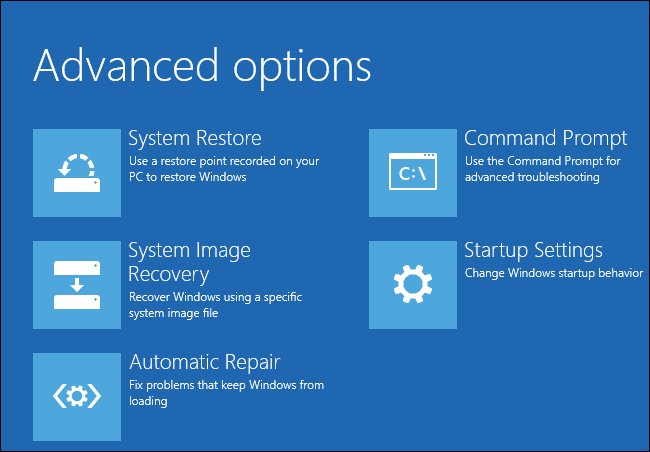
Enter next the “Advanced Options” Menu.
Notice that with this Windows Recovery Drive, you won’t have the “Startup Settings” menu in the “Advanced Options”. This one is only available when you reboot your PC with the “Advanced Startup” Options or when Windows failed to boot twice and enter the Repair mode automatically (NB.: You can obviously use that trick to access the Startup Settings and boot is Safe Mode: boot the PC and switch it off when Windows is starting).
Recovery Advanced Options with Startup Settings
So, no choice here but enter the “Command Prompt” menu
In there, type: bcdedit /set {bootmgr} displaybootmenu yes
Type next: exit
And shutdown completely before rebooting your PC.
You should now be prompted to select your OS. Press F8 there to access other Boot options 😉
Et voilà.
Once everything is back to normal with your Windows, run a command Prompt as Admin and disable the Boot Menu by typing:
I am a big fan of Windows’ search feature since Windows 7. So, I was really frustrated when searching stopped to work this morning on my Windows 10. Fortunately, I have been able to fix it easily by deleting a key of the registry.
Click to Read MoreClick to Close
Open a Run prompt by typing Win + R
Execute “Regedit” via that run Prompt
Open the Task Manager by typing Ctrl + Shift + Esc
In the Task Manager, open the tab “Details”
Kill all “Explorer.exe”
In “Regedit”, locate and delete the entry: HKEY_LOCAL_MACHINE\SOFTWARE\Microsoft\Windows\CurrentVersion\Explorer\FolderTypes\{ef87b4cb-f2ce-4785-8658-4ca6c63e38c6}\TopViews\{00000000-0000-0000-0000-000000000000}
In the Task Manager, open the menu File > Run new task, and type “Explorer”
Et voilà, the Search feature should now work fine again.