Tag: Windows 8

  • Boost Windows 8 Start-up Process

    Although I am running my OS on one of the fastest SSD (a Samsung Serie 840 Pro), I still have the feeling that the elapse time is much too long between the log-on and the moment when I have the hand on Windows. This is due to the Services and Applications run at start-up.

    There is fortunately solutions to  optimize your Start-up Process by delaying Applications and Services from starting up as soon as you log into your computer. Doing that, your computer becomes usable a lot faster.

    Click to Read More

    Delay the start-up of Applications

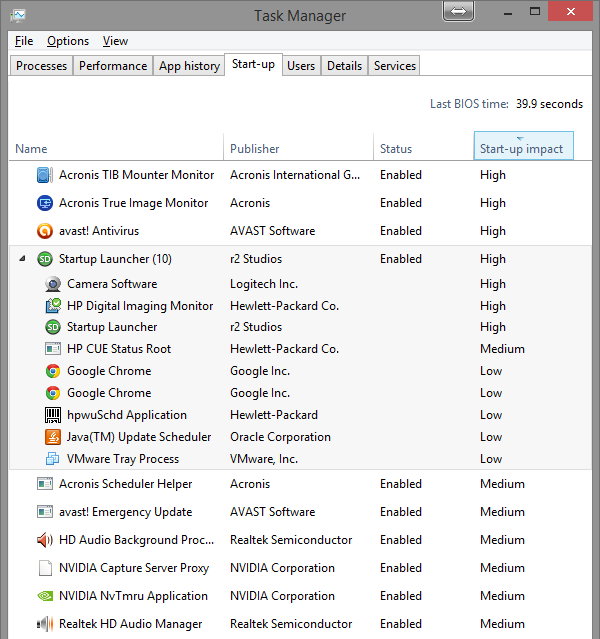
    You can have a look on the applications started with Windows in the Task Manager (CTRLSHIFTESC) > Tab “Start-up”.

    In that tab, you see which applications have an impact on the Start-up Process.There are several possible values:

    • High – the application uses more than 1000 millisecond of CPU time or more than 3MB of disk I/O
    • Medium – the application uses 300 to 1000 ms of CPU time or 300KB to 3MB of disk I/O
    • Low – the application uses less than 300 milliseconds of CPU time and less than 300KB of disk I/O
    • Not Measured – This could happen with some of the third party apps where windows is unable to determine the impact. An application like BootRacer (Free for non-commercial use) could be used to determine the impact.

    Next, install “Startup Delayer” from R2 Studios, a simple but very flexible application used to postpone the startup of applications. You can customize how much you want to delay them and in which order you want to start them. E.g.: as long as there is not enough CPU available. I did delay all the applications that are not critical IMO to use Windows. I.e.: I kept only Acronis (backup), Avast (Antivirus), Audio and Video managers. And all the other ones have been delayed. A simple Drag&Drop can be used to move an application from “Normal Startup” to “Delayed” or “Disabled”, or to reorder the delayed ones.

    Startup Delayer

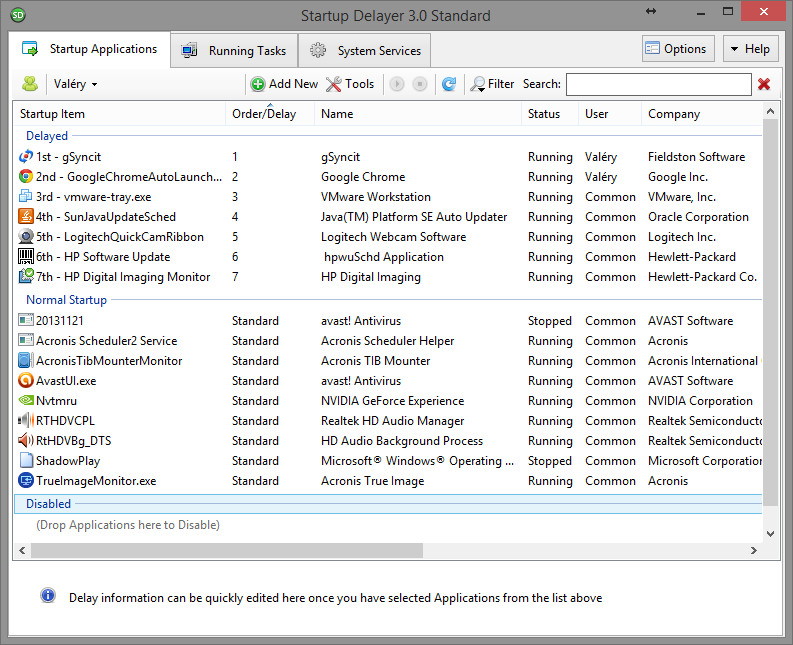
    In the screenshot of the Task Manager, all delayed applications appear grouped under “Startup Launcher”.

    Start-up Applications Delayed
    Start-up Applications Delayed

    A famous alternative to “Startup delayer” is “WinPatrol” but it does much more than just delaying start-up applications. And as always, I prefer simple applications that fit one single need than one big application trying to fit all needs…

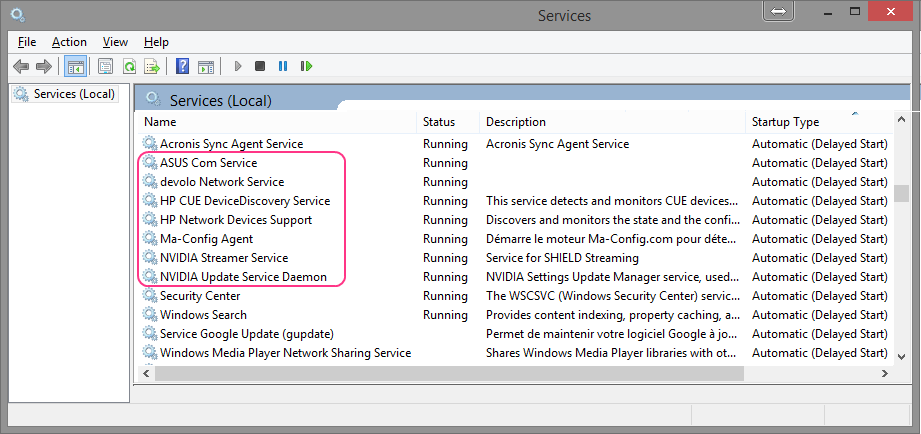
    Delay the start-up of Services

    Services starting up can be delayed via the Service Management console (Services.msc). Use the “Automatic (Delayed Start)” option:

    Services Delay
    Services Delay

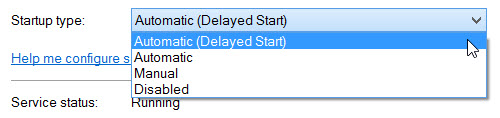
    Here are the services that I have delayed:

    Delayed Services
    Delayed Services

    Loading

  • Volume of my HTPC was extremely low

    Although the volume of Windows was still 100%, I recently had to push the volume of my surround system from 8 (as used usually) to 28 to ear the sound of movies and cartoons played on my HTPC.

    The problem was Windows 8 did (mysteriously) lost the configuration of the speakers. They used to be configured as 5.1 and appeared to be now configured in stereo.

    Click to Read More

    I recently tried to upgrade Media Browser from version 2 to version 3 on my HTPC. It was not a success because Media Browser 3 comes with a client part and a server part. If the server part is not running (locally on on the LAN), the client part can’t run either. And the server part might not run on my HTPC because it may only start if the windows shell starts (it’s not a Windows Service but a Startup Program instead) – shell that is not running on my HTPC as it has been replaced with Windows Media Center.

    After this trial, I did re-install Media Browser 2. Although I would be quite surprised if that would be true, this is maybe why the configuration of the speakers went back to “stereo” instead 5.1 ?!

    To check what was wrong, I had to close Windows Media Center using F4 (as not only it replaces the Windows shell, but it is also run without any “close” feature thanks to the option /mediamode).

    I did call the Task Manager (CTRL-Shift-Del) and run a new Task: Explorer, to get a Windows Shell. I was next able to check the Sound System Properties.

    1. Right-Click the “Speakers” icon in the systray.
    2. Select “Open Volume Mixer”.
    3. Click the “Speakers” icon in the “Device” column of the “Volume Mixer” window. This is going to open the “Speakers Properties” window

    The Speakers where configured in stereo. I did reconfigured them as 5.1.

    Next, in the “Enhancement” tab of the “Speakers Properties” window, I did re-enable the “Loudness Equalization” and “Speaker Fill”.

    Spearkers Enhancements
    Spearkers Enhancements

    I did next log-off and restart a session. The issue was solved.

    Loading

  • Laptop’s Wi-Fi off after Windows 8 Update

    My  laptop Sony Vaio VGN CR31 has just rebooted after a Windows Update. Before the reboot, I was still browsing internet via the wifi connection. But after the reboot, the WiFi was OFF(*) although the WiFi switch (on the left side of the latop) was ON.

    (*)  In the network connection panel, the Wi-Fi was showing “Wi-Fi (Off)”.

    I did run the Windows troubleshooting on the internet connection and network adapter.  All drivers were up to date and no issue were found.

    After various attempt to uninstall the latest updates, I found the solution:

    • Press :win: + C  to open Windows 8 Charms menu
    • Choose “Settings”,
    • Click “Change PC Settings” at the bottom.
    • Choose the “Wireless” section. There, you can see two (or three) toggles: Airplane Mode, Wireless Devicess (and possibly Bluetooth).

    Wi-Fi was also turned OFF! Toggling Wi-Fi back ON fixed my issue. No idea why the Windows Updates (or the reboot or ???) did change that settings ?!

    Loading

  • Control Windows 8 from Android: Win8 Controller

    Windows 8 Controller

    This software turns an android phone into a multitouch controller for windows 8. It’s however not free except the very basic features – those being enough to take control of the mouse and access the Start Screen and the Desktop.

    Click to Read More

    Win8 Controller comes with a client part to be installed on the Android, and a server part to be installed on the remote Windows 8 PC.  Using this software you control the remote PC as if it is a tablet.

    It works quite fine for most features:

    • Move the mouse
    • Click, double-click, right-click
    • Access the Start Screen, Swipe to the left or to the right (you have put your finger at the very bottom of the Android screen), Tap or Drag tiles, …
    • Use the keyboard of the Android

    I have the following issues:

    • I can’t switch to the Start Screen touching the Android screen with four (or five) fingers.
    • I loose control of the mouse as soon as the “Task Manager” is open on the remote PC and has the focus. I re-gain the control if I run another application which fakes the focus. However, I can’t close the “Task Manager” clicking its close button.
    • Win8 Controller doesn’t run as a service and I can’t use it as long as I am not logged on the remote PC with a user. This is mainly a blocking issue on my HTPC where I have replaced the Windows Shell with Media Center. Indeed, only services can run in the background if the Shell is not run.

    Details: http://www.win8controller.com/

    Download: http://www.win8controller.com/#&download

    Loading

  • Windows 8 Pro x86 and Media Center Pack on Acer Idea 510 – successful

    As the upgrade of my Acer iDea 510 with Windows 8 x64 and the MCE feature pack failed (See here) as well as using XBMCbuntun (See here), mainly due to issue with drivers, I have decided to give a try to Windows 8 x86.

    And now, the result is really great – the HD video is playing very well and standby mode is back! The only tricky part was to force the installation of Nvidia Video Drivers for Vista on Windows 8.

    Click to Read More

    First, I did install Windows 8 pro x86.

    Notice that during the installation, I did check the option to automatically activate Windows.

    Next, for the Software part: I did install the Media Center feature Pack:

    • On this page, request a free licence for this pack (Offer limited until 31 jan 2013).
    • On the Start Screen, type “add features” to select “Add Features to Windows 8”.
    • In the “Add Features to Windows 8” window, select “I already have a product key” and enter the free key got previously for the MCE pack.
    • Notice that once MCE installed, the “Add Features” is not available anymore in Windows…
    • Configure MCE

    After that, I didn’t experience the same issue (licence not valid for activation) as I did when testing Windows 8 x64. I means that I most probably skipped a step during the first time ? Possibly I did install the MCE pack before the activation of Windows ?!

    • Start a Windows Update and install Microsoft .Net 3.5 (required for the next step)
    • Install and configure the latest version of Media Browser (.Net 3.5 is a prerequisite)
    At that time, I noticed that MCE was reacting very slowly and not displaying smoothly movies… Just like during my tests with Windows 8 x64… To solve this, I really had to install video drivers specific for Acer iDea 510’s graphic card: a NVidia GeForce Go 7600.
    • Drivers for the GeForce Go 7600 compatible with Vista or Windows 7 should theoretically run fine on Windows 8. But unfortunately, the setup usually refuses to install those drivers because they don’t officially target this OS. It’s only due to information configured in the .inf file used by windows to install the drivers. It means that we can reconfigure those settings to become “compatible” with Windows 8.
      • Download the drivers (self-extracting exe named “18070_vista.exe”) and the adapted .inf file (named “nv_disp.inf”) separately from the bottom of this  page http://www.laptopvideo2go.com/drivers/vista/180.70/disclaimer/
      • Those are unofficial drivers and not WHQL certified.
      • Audio via HDMI is not supported by these version of the drivers. You need an older version (See replies bellow this post).
      • Once the drivers and the .inf file downloaded, extract the self-extracting package (exe file) and move nv_disp.inf into the extracted folder (“180.70_vista”).
      • Run the setup.exe and don’t be afraid if you see that it’s for Vista.
      • Once installed, reboot the system. You will clearly see the difference (the resolution will be much higher – 1920×1080 instead of 1024×768 – and MCE   runs now much faster).
    • The issue mentioned above does not exist anymore with Windows 8.1. For that version of Windows, a version 307.68 of the NVIDIA Drivers is downloaded automatically when updating the drivers. It works fine except that there is no sound via HDMI (although there is an option “Set up Digital Audio” in the NVIDIA control panel to enable it !). If you don’t have an optical connection and need the sound to go through HDMI, you will need to downgrade the drivers to 173.90. But that one comes with other issues, much more annoying… (See in the replies)
    • Install K-Lite codecs to be able to play HD movies (mkv)
    • Configure the codes to play French audio by default
      • Go to C:\Program Files\K-Lite Codec Pack\Tools and run CodecTweakTool.exe
      • Under configuration, select DirectShow Filter
        • Click Haali Media Splitter > Options tab > Languages > Audio Language Priority > enter “fre” (the three letters of French). Click Ok.
        • Click LAV Splitter > enter “fre” in both “Audio” and “Subtitle” and select “Only forced Subtitle”. Click Ok.
        • Click LAV Video Decoder. In Hardware Acceleration, select XDVA2 and check the two options H.264 and MPEG-2.
    • Disable UAC (reboot required to become effective)
    • Disable Firewall for private network
    • Enable Remote Desktop:
      • On the Start Screen type “system”, click on “Settings” and select “System” in the results.
      • Click on “Remote Settings”
      • Enable “Allow remote connections to this computer”
    • Configure the Speakers 5.1
      • Right click the speaker in the sys-tray and select “Playback Device”
      • At the bottom of the tab “Payback”, click on “Configure”
      • Select the second 5.1 in the list of “Audio Channels” (with 2 speakers on the back).
    • Create a new user with MCE instead of the windows shell
      • Create a new standard user “Media Center” without password
        • On the start screen, type “Create User” and select Settings
        • In the list of results, click on “Create Standard User Account”
        • Select “Add a new user in PC settings”
        • Under “Other Users”, click on “Add a User”
        • At the bottom of the page, click on “Sign in without a Microsoft Account”
        • At the bottom of the page, click on “Local Account”
        • Enter the name “Media Center”, nothing else (no password) and click Next.
      • Change the picture of the user “MediaCenter”
        • Go back to the Start Screen (Ctrl + Esc)
        • Click on your account in the top-right corner and select “MediaCenter”
        • Wait while Windows prepare the PC for this user.
        • Once on MediaCenter’s Start Screen, open IE and find a nice picture, right click on it and save it in the picture library.
        • Go back to the Start Screen and click on MediaCenter’s account in the top-right corner to select “Change Account Picture”
        • In “PC Settings/Personalize/Account Picture”, select Browse and pick the picture from the libraby
      • Possibly: enable Room Correction in the Speakers Properties\Enhancement… (microphone required )
      • Configure MCE Media Library and the Screen Saver
        • Run MCE
        • Go to the Tasks > Settings
        • Select Media Libraries and configure them
          • E.g.: Add the “Pictures” folder of the NAS. This one must be either public or the user “MediaCenter” must be granted access via the NAS user management UI.
        • Go back to Tasks > Settings
        • Select Pictures
        • Select Slide Show Screen Saver
          • Check that the option “Play my favorite pictures …” is enabled
          • Set the delay before starting the Screen Saver
          • Save
        • Select Favorite Pictures
          • Select Use All Pictures (Or anything more relevant)
      • Sign-out (Via the Start Screen, right click the account in the top-right corner, …)
      • Replace the Shell Explorer (explorer.exe) of MediaCenter with MCE (ehshell.exe)
        • Log in as an administrator
        • On the Start Screen of the administrator, type mmc and select mmc.exe in the list of results
        • Type Ctrl+M to Add a Snap-in
        • Select “Group Policy Object”
        • Click Add.
        • In the new window, click Browse
        • in the new window, open the “User” tab and select “MediaCenter”.
        • Then click Ok, Finish and Ok.
        • Back into mmc, select in the left pane: Console Root > Local Computer\MediaCenter Policy > User configuration > Administrative Templates > System
        • In the right pane, double-click on “Custom User Interface”
        • In the new window, check “enable”
        • Under the Options, type in the field “Interface file name”: %windir%\ehome\ehshell.exe /mediamode
        •  Switch to the user MediaCenter for testing purpose!

    Here is the list of MCE switches (most of them provided by Andrew Cherry and Missing Remote) that can be used as on the command line ehshell.exe

    • /nostartupanimation – disables the startup animation
    • /noshutdownui – removes the shutdown item from Tasks
    • /mediamode – start in “media only mode” with no minimize/close buttons (use F4 to quit MCE)
    • /widescreen – force widescreen mode
    • /directmedia:general – force full screen
    • /directmedia:video – force full screen and navigate to the video library 
    • /nochrome – launch windowed mode without the containing window
    • /playallmusic – Play all music at startup
    • /playfavmusic – Play favorite music at startup
    • /playfavslideshow – Play favorite slideshow at startup
    • /playfavslideshowwithmusic – Same as above with music
    • /playslideshow – Play all slideshows
    • /playslideshowwithmusic – Same as above with music
    • /screensaver – Start media center in screensaver mode
    • /configuress – Start media center at configuring screen saver menu

    Multiple switches can be enabled by entering multiple switches separated with a space in the target input.

    Finally, from the hardware point of view, notice that:

    • The remote control is working fine
    • WiFi and Ethernet connection are working fine
    • Ethernet NIC is configure to allow WOL
    • The front Digital Display is  recognized by Windows 8 but not displaying anything else that “Welcome To Aspire IDEA.
      • I did try to install the drivers from Acer web site (named “VFD Transcoder Driver 1.01.01.zip”) successfully, but it didn’t fix anything. I am not surprised as this display was already not working with Windows 7
    • Drivers are missing for the 2 Multimedia Video Controllers devices (See previous try with Windows 8 x64)
      • I did install the drivers from Acer web site (named “MPC718_install_V6_13_32_1026_Oscar.msi”) and those devices were recognized without any issue.
    • Standby mode works out of the box (nothing to fine tune in Windows) with the remote control.
      • I didn’t change the BIOS settings since my first try with Windows 8 x64.
    • Wake-up on Lan works out of the box (nothing to fine tune in Windows) if the shutdown was initiated from MCE (or XBMC – see here after). If the shutdown is done from the Start Screen, WOL does not work!!!
      • I didn’t change the BIOS settings since my first try with Windows 8 x64.
      • The difference in support for WOL or not depending on where the shutdown is initiated is explained here: In Windows 8, the default shutdown behavior puts the system into hybrid shutdown (S4) and all devices are put into D3. Remote Wake-On-LAN from hybrid shutdown (S4) or classic shutdown (S5) is unsupported.
      • Indeed, a boot after a default shutdown is fast. On the opposite, a boot after MCE/XBMC’s shutdown is clearly much slower.
      • As I don’t car about slow boot on this PC (which is usually in sleep mode anyway), I did disable the hybrid shutdown (S4) a.k.a “Fast Startup” :
        1. On the Start Scren type “Power” and select “Settings”.
        2. Click on “Change what the power buttons do” in the list of results.
        3. Click on “Change settings that are currently unavailable” if UAC is not disabled
        4. Uncheck “Turn on fast startup (recommended)”
        5. Select “Save Settings” and test a shutdown/WOL. It works !
    Notes:
    1. After booting the PC, windows automatically re-log in with the last account (if this one has a blank password)  (I didn’t configure that?!)
    2. The “Restart” feature doesn’t work. The PC shutdowns but does neither power off nor reboot… This seems to be due to the video drivers as the PC restarts fine with other drivers (but with those, the PC didn’t stay in standby mode. It was waking up immediately).
    3. XBMC 12 runs quite fine on Windows 8 pro too.
      • Sound 5.1 is supported as soon as Speakers are configured in 5.1 in Windows (The sound is really well improved compare to the sound provided by MCE…)
      • Watching movies and listening music from Synology using UPnp works very well (first time, indexing is required…)
      • Remote Control MCE is quite well supported too. A Hard Reset is required (pressing the power button on the Acer for a few seconds)
      • WOL works fine after either an Hibernate or a Power Off (Even without disabling “Fast Startup” in the “Power Options”).

    Loading

  • Change Windows Product Key before activation

    Here is two command lines to change a Windows product key (Vista,  7 or  8) and activate Windows. They must be executed in a Command Prompt “Run As Administrator”.

    1. To set a product key, run “slmgr.vbs -ipk <your product key>”
      • Ex.: slmgr.vbs -ipk 00000-00000-00000-00000-00000
    2. To activate windows after changing the key, run “slmgr.vbs -ato”

    Loading

  • Windows 8 Pro x64 and Media Center Pack on Acer Idea 510 – failed

    I have decided to upgrade my Acer iDea 510 with Windows 8 x64 and the MCE feature pack… As often I like trying to improve things which works quite well especially if there is a risk that it does not work as well after 😀

    And indeed, the result is great – the HD video does not play well anymore, Standby is not working. I have to find an alternative or go back to Windows 7 with MCE 🙁

    Click to Read More

    First, I did install Windows 8 pro x64. Most probably a double mistake as I guess I won’t find all required drivers for this Acer iDea under Windows 8 and even less for a x64 platform…

    Notice that during the installation, I did check the option to automatically activate Windows.

    Next, for the Software part: I did install the Media Center feature Pack:

    • On this page, request a free licence for this pack (Offer limited until 31 jan 2013).
    • On the Start Screen, type “add features” to select “Add Features to Windows 8”.
    • In the “Add Features to Windows 8” window, select “I already have a product key” and enter the free key got previously for the MCE pack.
    • Notice that once MCE installed, the “Add Features” is not available anymore in Windows…
    • Configure MCE

    After that, the first issue arrived: Windows 8 started to pretend its licence was not valid for an activation. I did try to retype my key without success (That was yesterday). However, today, after a reboot, it appeared that Windows 8 was again activated ?!

    • Start a Windows Update and install Microsoft .Net 3.5 (required for the next step)
    • Install and configure the latest version of Media Browser (which is the best free add-in I found to manage a video library (.Net 3.5 is a prerequisite)
    At that time, I noticed that MCE was reacting very slowly and not displaying smoothly movies… Maybe because the Media Browser service was indexing my content?
    • Install Win8Codecs for x64. (Usually, I don’t use a pack but will give a try to this one today).
    • Disable UAC (and reboot)
    • Disable Firewall for private network
    • Enable Remote Desktop:
      • On the Start Screen type “system”, click on “Settings” and select “System” in the results.
      • Click on “Remote Settings”
      • Enable “Allow remote connections to this computer”

    One day later,  MCE is still  very slowly and not fluent at all… 🙁 I may only presume that the problem is with the display drivers… When I try to navigate to play a movie, I can clearly ear the fan speed going crazy ?! The PC appears not capable of playing HD movies… it’s tooooo slow within MCE. The sound is ok but the display not at all… Also Media Player Home Cinema is not succeeding the play correctly HD movies… I think I will have to look for codecs with support for hardware acceleration and adhoc display drivers…

    Finally, from the hardware point of view:

    • The remote control is working fine
    • WiFi and Ethernet connection are working fine
    • Ethernet NIC is configure to allow WOL
    • The front Digital Display is  recognized by Windows 8 but not displaying anything else that “Welcome To Aspire IDEA).
    • Drivers are missing for 3 devices (PCI devices database available here – how to here – and Microsoft catalog to search drivers is available here).
      • 2 Multimedia Video Controllers with Device Instance Path “PCI VEN_14F1 DEV_5B7A SUBSYS_5B7914F1 REV_00\4 197A8245 0 08F0” and “PCI VEN_14F1 DEV_5B7A SUBSYS_071812AB REV_00\4 197A8245 0 00F0”. Those are the “TV Tuner Yuan MPC718 Hybrid HW encoder with FM”
        • I don’t care about those for now as they are most probably for TV input and I may not used them anyway. The signal is encoded by my TV provider which does not provide any decoding software)
      • Another one not identified but related to ACPI with a device path “ACPI\AWY0001\2 DABA3FF 1” and a hardware ID “ACPI\AWY0001”, I found it was used for the “Away Mode System” and required “Intel QRT Driver” (Quick Resume Technology).
        • the Intel QRT Driver 1.6 for Vista to be found on Acer Support site works fine. Once unzip in a folder of the PC, go to the Start Screen, type “Device Manager” and start this manager. Select the “Unknow Device” and update the driver selecting the folder above.
        • Wierd, on some sites, it’s said that this is an “NVidia Away mode” ? The setup for nForce should then deploy the required drivers… (To be validated)
        • Note for later purpose: Intel Driver Update Wizard available here.
    • The graphic card chipset Nvidia GeForce Go 7600 is recognize but the drivers installed are from Microsoft (Basic Display Adapter) and not specific ones… ?! The auto-detection wizard from NVIdia is here. It doesn’t find anything specific more appropriate than the MS Basic Display Driver… I did select myself GeForce, GeForce Go Serie 7 (notebook), GeForce 7600, Windows 8 64 bits; no result.
      • I did download manually the latest Vista drivers (03/09/2012) for GeForce Go 7600 from the Microsoft catalog, did unpack the cab, and did try to update the drivers with the option “Browse my computer” > “Let me pick from a list of device drivers on my computer” > “Have Disk” > pick the .inf from the cab. I found the drivers in the list but the setup failed because it was not for my OS :(. I tried with other drivers for Win7x64 (179.48). Bad luck too. I did try next to add the Hardware Device id of my card in the nvac.inf file (found in C:\NVIdiaWinVista64\179.48\IS\Display) and to pick this one… Or to use it via the Device Manager > Action > Add Legacy hardward > Add the hardware that I manually select > Display Adapter > Have Disk… Hopeless 🙁
      • I found a guy who forced drivers for Win7x64 on Win8x64 with signing disabled. I will possibly also try later his method for disabling driver signing at boot (to be tested… but the issue does not seem to be the signature):
        1. Windows Key + R
        2. Enter shutdown.exe /r /o /f /t 00
        3. Click the “OK” button
        4. System will restart to a “Choose an option” screen
        5. Select “Troubleshoot” from “Choose an option” screen
        6. Select “Advanced options” from “Troubleshoot” screen
        7. Select “Windows Startup Settings” from “Advanced options” screen
        8. Click “Restart” button
        9. System will restart to “Advanced Boot Options” screen
        10. Select “Disable Driver Signature Enforcement”
    • Sleep state was not enabled.
      • The command “Powercfg /a” reported that the Graphic card (drivers) where disabling the stand by state. I was expecting this as the drivers are not specific to the card and do not know how to manage its power state…
      • The command “Powercfg /a” also reported that “Hybrid Sleep” was not enabled because S3 was not available (to be checked in the BIOS).
      • To enable sleep state:
        • Restart and enter the Bios setup
          • Press Del at boot to enter the Bios setup
          • Go to the “Power Management Setup” tab
          • “ACPI Function” must be enabled
          • ACPI Suspend Type must be S1&S3
          • “Resume by PCI PME” must be enabled (wake up with remote control)
          • “Wake Up On Lan” must be enabled (for my purpose)
        • Back to Windows,
          • On the Start Screen, type “Power Plan”, click on “Settings” and select “Edit Power Plan” in the results.
          • Click “Change Advanced Power Settings”
          • Click “Change settings that are currently unavailable”
          • I don’t use WiFi, so I set “Power Saving Mode” = “Low Power Saving” under “Wireless Adapter Settings”
          • Under Sleep, I only see “Hibernate After”. I set 60 minutes
            • I should find how to configure the PC to see “Sleep after” and even possible “Allow Hybrid Sleep”. I will here after try to investigate this issue in details.
      • The command “Powercfg /energy” does an audit of the PC and reports all issues (like details on what prevent the sleep mode but also about what is consuming CPU, etc…):
        • Notice: the report is stored in C:\Windows\System32\enery-report.html. This file may not be opened within any browser as long as it’s in System32 (although I did disable UAC already). It must be first moved to, e.g., %USERPROFILE%\Desktop\
        • S1, S2, S3 are not supported although S1&S3 are now enabled in the Bios.
        • S4 is supported.
        • The USB devices do not enter the Selective Suspend state (this would not be blocking the PC for entering the sleep mode)
        • The drivers \FileSysem\srvnet is preventing the system to enter sleep.
          • It’s reported that this can be due to the network drivers not being up-to-date
          • But this does the trick if you don’t want to share the content (media) of the PC
            1. On the Start Screen, type “Advanced Sharing”, Click “Settings” and Select the “Manage Advanced Sharing Settings”
            2. Collapse the “Private” section and Expand the “All networks” section
            3. Click on “Choose media streaming options” under “All Networks\Media Sharing”
            4. Click on “Block All”
            5. Run again the energy audit (possibly reboot if the problem persist, especially if you tried the next tip!)
          • This is NOT doing the trick: edit the current Power Plan to “Allow the computer to sleep” under the node “Multimedia settings” > “When sharing media”.
        • Its finally clearly stated that the PC may not enter the sleep mode due to the Microsoft Basic Display Driver which has disabled S1 and S2 sleep states.
      • Powercfg -energy -output %USERPROFILE%\Desktop\Energy_Report.html could be used to automatically store the file in the right location
      • To see if there is still anything preventing the PC to enter the sleep mode, type the command “Powercfg /requests”. You should see “None” for every category.
      • If after a reboot, your still have the same issue with \FileSystem\srvnet, try to override it with the command “Powercfg -requestsoverride driver \filesystem\srvnet system”
        • To undo this command, type “Powercfg -requestsoverride driver \filesystem\srvnet”
      • Now, the remaining issue to enter the S3 sleep state is the Microsoft Basic Display Driver, which is for sure also responsible for the performance issue in MCE. Based on tries done previously to force Win7x64 drivers for the NVidia GeForce Go 7600, I think I won’t succeed is using Windows 8 on this Acer iDea 510 🙁
    References:
    • http://www.windowsitpro.com/article/windows8/sleep-disabled-graphics-card-144468
    • http://mingersoft.com/blog/2011/12/why-wont-windows-automatically-sleep/
    • http://iboyd.net/index.php/2010/05/16/windows-7-power-management-fixing-pc-insomnia/
    • http://www.eightforums.com/tutorials/9695-driver-install-device-manager-windows-8-a.html
    Selective Suspend State: this one can be enable or disable on the USB node while editing the Power Plan (in the Power Options).
    A USB device driver can send a message to windows telling it to idle the device.  This puts the device in a low-power state (the suspend state).  When a USB device is suspended, windows does not wait for it to respond before entering a sleep or hibernate mode.  If you disable this feature, the system will simply return a failure to the driver when the driver attempts to enter suspend state.  If the driver complies with Microsoft guidelines, it will simply retry the idle request at every expiration of its idle timer.
    • S1: All processor caches are flushed, and the CPU(s) stops executing instructions. Power to the CPU(s) and RAM is maintained; devices that do not indicate they must remain on may be powered down.
    • S2: CPU powered off. Dirty cache is flushed to RAM.
    • S3: Commonly referred to as Standby, Sleep, or Suspend to RAM. RAM remains powered
    • S4: Hibernation or Suspend to Disk. All content of main memory is saved to non-volatile memory such as a hard drive, and is powered down.
    • To be continued…

    Loading

  • Remote connection to Windows 8 with a Windows Live account

    I was trying to remotely connect from a Windows 7 to a Windows 8 where I was still logged with my Windows Live account. As I am still quite new to the use of Windows Live accounts, I was unsure about what to provide as credentials.

    For sure, to remotely connect on Windows 8 with a Windows Live account, it’s the related emails that must be typed in the Remote Desktop’s login prompt.

    Click to Read More

    I was hesitating because, although the account name is the Windows Live email, the “user” folder name is only the name part of this email.

    While checking which credentials to provide, I found by accident a way to get access to the logon screen of the remote machine, where the user currently logged appears => no need to remember the account name at all in this case :).

    1. I did run the command “mstsc -v:<machine name>
    2. I did use another account: “<machine name>\administrator” without password (I don’t know it anyway).
      • The Domain initially displayed was: MicrosoftAccount
    3. I did accept the certificate of the remote PC
    4. I was next presented with an error message: “The username or password is incorrect” on logon screen of the remote machine. I did click OK.
    5. I did click on “Switch user“, the left arrow on the top-left side.
    6. And finally, I did select my Windows Live Account displayed as currently logged…

    To connect directly with a Windows Live account:

    1. Run the command “mstsc -v:<machine name>
    2. Select Use another accountand type your Windows Live email as a user name.
      • The domain displayed will be the one of your email.
    3. Et voilà

    Notice: I was able to remotely connect to Windows 8 because the Firewall was off. Otherwise I would have had to enable Remote Desktop as an “allowed apps”.

    1. On the Start Screen, type “Firewall” and select Settings to find it.
    2. Run Windows Firewall.
    3. click Allow an app or feature through Windows Firewall.
    4. Click Change settings if enabled (You might be asked for an admin password or to confirm your choice).
    5. Under Allowed apps and features, select the check box next to Remote Desktop, and then use the check boxes in the columns to select the network types you want to allow communication on (should be private for your intranet).
    6. Et voilà.

    Loading

  • Access Synology from Windows 8 with a Windows Live ID

    Since I did upgrade my PC from Windows 7 to Windows 8 and did start to use my Microsoft account (Windows Live ID) to sign in, I am prompted for credentials when I try to  access shared folders on my Synology, although I did create an account with the same name on the NAS. The Credential Manager (formerly known as Windows Vault) is the solution!

    Click to Read More

    First, to be sure that I did create an  account with the same name as my Windows Live Id on the Synology, I did check the name of that Live Id in C:\Users. It was the very same.

    However, that’s not the name sent by Windows 8 to the NAS.

    I could provide valid credentials but I don’t want to do that at each access. And unfortunately,  the old good “Remember my credentials” checkbox seems to be gone in Windows 8. But the feature behind this option (Windows Vault) is still available.

    1. If you are not on the Start Screen, type “Ctrl-Esc”
    2. Once on the Start Screen, type “Control” and select the search result “Control Panel”.
    3. In the “Control Panel” search box, type “Credential” and select the search result “Credential Manager” (This one is the feature formerly known as Windows Vault).
    4. Select the “Windows Credentials” button.
    5. Now, select “Add a Windows Credential.”
    6. In the view that opens, type in the hostname of your NAS or its network address
    7. Provide the user name and password that you want to use to connect on the NAS instead of your Windows Live ID.
    Et voilà!


    Loading

    ,
  • Fresh re-install of Windows 7 before upgrading to Windows 8 Pro for less than 15€

    As you really should know, if you bought a computer with Windows 7 home premium or above between June 2, 2012 and January 31, 2013, you can buy the upgrade to Windows 8 pro for about 15€!!! And actually, it works also for older Windows 7 PC as far as you mention that you bought it recently…

    Here is the link to get the Promo Code

    However, just like me, you most probably don’t want to upgrade your PC with all the crap currently installed on it. Instead, you want to upgrade from a fresh install of Windows 7. But unfortunately, you don’t have the setup media to re-install Windows 7 SP1 🙁

    No problem! The official ISO’s (English versions) from Microsoft are available here.

    Click to Read More

    Reinstal you PC with the adequate ISO and upgrade next to Windows 8 using the Upgrade Assistant – providing your Promo Code to pay the lowest price (Payment with Paypal is available). No need to install any Windows updates for Windows 7 before starting the upgrade to windows 8. But when upgrading to Windows 8 choose the option “keep nothing” to have a cleanest installation.

    Finally, after the installation, delete the “windows.old” folder using the Disk Clean-up utility:

    1. Right click your System Drive and select properties
    2. Start the Disk Clean-up Utility (button next to the pie chart).
    3. Click “Clean-up system files” (Disk Clean-up will restart itself)
    4. Select now “Previous Windows Installation(s)” in the list of files to delete (This option was not available before step 3).
    5. Click “Ok” and confirm the “Delete Files”

    Et voilà!

    Loading