It took me quite some hours to be able to use my Aeotec Z-Stick Gen5 (ZW090) key within my Docker image of openHAB, running on a Raspberry Pi 4 (with a Raspberry Pi OS). Here are all the tips I used.
Click to Read More
First, before plugging the controller in your RPI, configure it to see the Serial Ports. Connect onto your RPI within a SSH Console (ex.: via Putty) and type the command:
sudo raspi-config
Use “5 interfacing Options” > “P6 Serial” > “Yes” > “Ok”
And now reboot.
Next, back into a SSH conscole, check what USB devices already exists with the command:
lsusb
Bus 002 Device 001: ID 1d6b:0003 Linux Foundation 3.0 root hub
Bus 001 Device 002: ID 2109:3431 VIA Labs, Inc. Hub
Bus 001 Device 001: ID 1d6b:0002 Linux Foundation 2.0 root hub
And flush the kernel and boot logs:
sudo dmesg -c >> ~/dmesg-`date +%d%m%Y`.log
Then, plug your Z-Wave Controller USB Key in a USB Port and check that it’s detected and mounted properly:
lsusb
Bus 002 Device 001: ID 1d6b:0003 Linux Foundation 3.0 root hub
Bus 001 Device 009: ID 0658:0200 Sigma Designs, Inc. Aeotec Z-Stick Gen5 (ZW090) - UZB
Bus 001 Device 002: ID 2109:3431 VIA Labs, Inc. Hub
Bus 001 Device 001: ID 1d6b:0002 Linux Foundation 2.0 root hub
dmesg
[ 3124.779069] usb 1-1.4: new full-speed USB device number 9 using xhci_hcd
[ 3124.919928] usb 1-1.4: New USB device found, idVendor=0658, idProduct=0200, bcdDevice= 0.00
[ 3124.919942] usb 1-1.4: New USB device strings: Mfr=0, Product=0, SerialNumber=1
[ 3124.919953] usb 1-1.4: SerialNumber: 32303136-3131-3033-3030-303031383932
[ 3124.926704] cdc_acm 1-1.4:1.0: ttyACM0: USB ACM device
“lsusb” should show you a new device. Ex.: Aeotec Z-Stick Gen5 (ZW090) – UZB.
And “dmesg” must should you the mount point: cdc_acm 1-1.4:1.0: ttyACM0: USB ACM device.
If you don’t see the mount point, then you possibly have a device not supported by the RPI 4. It seems that it is the case with the old Aeotec “Z-Stick Gen5”. “New Z-Stick Gen5” and “Z-Stick Gen5+” should however be compatible. But there is a trick: plug your key on the RPI 4 via a USB HUB (2.0 or 3.0).
I presume that the Docker Image is already up and running. If not, install it.
sudo useradd -r -s /sbin/nologin openhab
usermod -a -G openhab pi
mkdir /opt/openhab
mkdir /opt/openhab/conf
mkdir /opt/openhab/userdata
mkdir /opt/openhab/addons
chown -R openhab:openhab /opt/openhab
Check the id of the user openhab with:
id openhab
uid=999(openhab) gid=994(openhab) groups=994(openhab)
Grant access on the Serial Port for the user ‘openhab’:
sudo chmod 777 /dev/ttyACM0
sudo chown openhab /dev/ttyACM0
And use the uid and gid found above in the following command, setting the ttyA* found previously and specifying the version to be used:
docker run –name openhab –net=host –device=/dev/ttyACM0 -v /etc/localtime:/etc/localtime:ro -v /etc/timezone:/etc/timezone:ro -v /opt/openhab/conf:/openhab/conf -v /opt/openhab/userdata:/openhab/userdata -v /opt/openhab/addons:/openhab/addons -d -e USER_ID=<uid> -e GROUP_ID=<gid> –restart=always openhab/openhab:latest
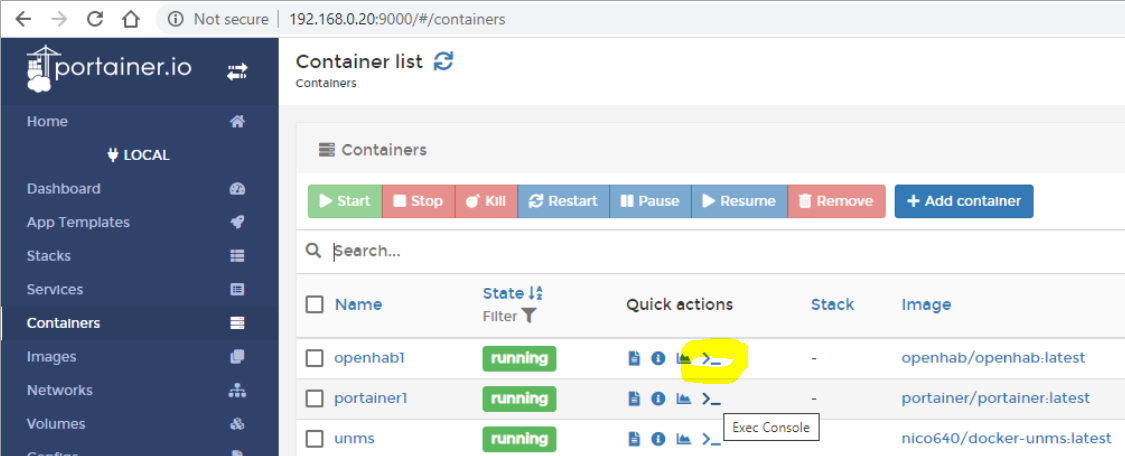
Now, using Portainer (because it’s easy), open a console within openhab… Portainer is not yet installed ? Do it with:
docker run -d -p 9000:9000 -p 8000:8000 –name portainer1 –restart always -v /var/run/docker.sock:/var/run/docker.sock -v portainer:/data portainer/portainer:latest
Go to the page http://<Your RPI IP>:9000, open the Containers and click on the “Exec Console” icon of ‘openhab’ container:
Grant the same accesses inside the image than on the RPI:
sudo chmod 777 /dev/ttyACM0
sudo chown openhab /dev/ttyACM0
chown -R openhab:openhab /opt/openhab
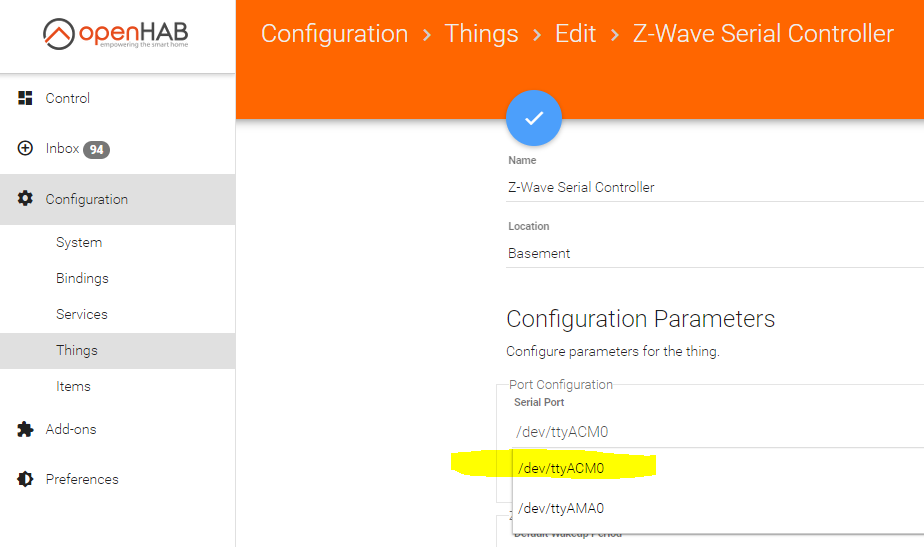
Now restart the ‘openhab’ container (with the icon Restart 😉 ). It will take some minutes to be available. But once you can get into it, go to the Things and configure the Controller to use the Serial Port ttyACM0:
Et voilà
![]()
Leave a Reply