Tag: Plex

  • Sync Plex Movies from Synology onto Unraid

    I am managing my movies with Plex. It is installed both on my Synology NAS, which is running  24/7, and on my Unraid Server, that I turn on only for backup purpose.

    I am usually adding new movies first on my Synology. I copy them later onto my Unraid Server. To do so, I am using rsync.

    Click to Read More

    ATTENTION: this is only to sync the files, not the metadata.


    In each Plex, I have two libraries: Movies and Series TV

    On Synology, each library includes two folders:

    • Movies includes /volume1/plex/Movies and /volume1/plex/new Movies
    • Series TV includes /volume1/plex/Series and /volume1/plex/new Series 

    On Unraid, each library includes only one folder:

    • Movies includes /mnt/user/Movies
    • Series TV includes /mnt/user/Series

    On Unraid, I have two shares Movies and Series to access respectively mnt/user/Movies and /mnt/user/Series.

    On the Synology NAS, I have mounted the shares of the Unraid Server as CIFS Shared Folder:

    • /<Unraid Server>/Movies on /volume1/mount/Movies
    • /<Unraid Server>/Series on /volume1/mount/Series

    Each time I have a new movie or serie, I copy it onto my Synology, respectively into /volume1/plex/new Movies or /volume1/plex/new Series.

    All movies and series are first renamed using filebot. This is a guarantee that all are well uniquely identified with the title, year, resolution, season, episode, encoding, etc, … According to Plex best practices, each movie is in its own folder.

    Once I have a few new media, I turn on my Unraid Server and launch the following script in a SSH console (using Putty) on the Synology:

    #!/bin/bash

    if grep -qs '/volume1/mount/Series ' /proc/mounts
    then
    rsync --ignore-existing -h -v -r -P -t /volume1/plex/New\ Series/ /volume1/mount/Series/
    else
    echo "Cannot sync new Series as Zeus is not mounted on /mount/Series"
    fi

    if grep -qs '/volume1/mount/Movies ' /proc/mounts
    then
    rsync --ignore-existing -h -v -r -P -t /volume1/plex/New\ Movies/ /volume1/mount/Movies/
    else
    echo "Cannot sync new Movies as Zeus is not mounted on /mount/Movies"
    fi

    Next, on Synology, I move all movies and series respectively from /volume1/plex/new Movies and /volume1/plex/new Series into /volume1/plex/Movies or /volume1/plex/Series (*)

    Than, to be sure I don’t have the same movie twice on the Unraid Server (with distinct encoding or resolution), I run this command in a SSH console on Unraid:

    find /mnt/user/Movies -type f -iname '*.mkv' -printf '%h\n'|sort|uniq -c | awk '$1 > 1'^C

    It does not work for the Series as each folder (season) contains obviously several episodes…


    This is only syncing the files! There is no easy way to sync also the metadata between the two Plex.

    But voilà….


    (*) Doing so, the fine tunings done in Plex, when the movie was under </new Movie>, are not lost. Temporarily, the movie will appear as “deleted” in Plex. Above all, do not “Empty Trash” ! Soon (depending on how many movies you moved), it will be “available” again. I did test that trick explicitly:

    1. Take a new movie:

    2. Open it:

    3. Check that path (here under, it is under /New Movies):

    4. Edit some info for testing purpose (here under, the “Original Title”):

    5. Change also the poster:

    5. Using Windows Explorer or the File Station, move the folder of the movie into its new location. The movie will appear very soon as unavailable:

    6. Open it:

    7.  Wait… Soon it will become again available:

    8. Check now the path (here under, it is now under /Movies):

    9. As you can see, the chosen cover is still there. And editing the details, you would see that the original title is still “DEMO MOVE FOLDER within Plex”.

    Loading

  • Create a Plex Media Player with a Raspberry 4

    I used to run Rasplex on a RPI 2 to play movies from my Plex Media Server. Unfortunately Rasplex has not been updated to run on a RPI 4. Here is how to build PMP for RPI 4.

    Click to Read More

    Install an OS on your RPI 4

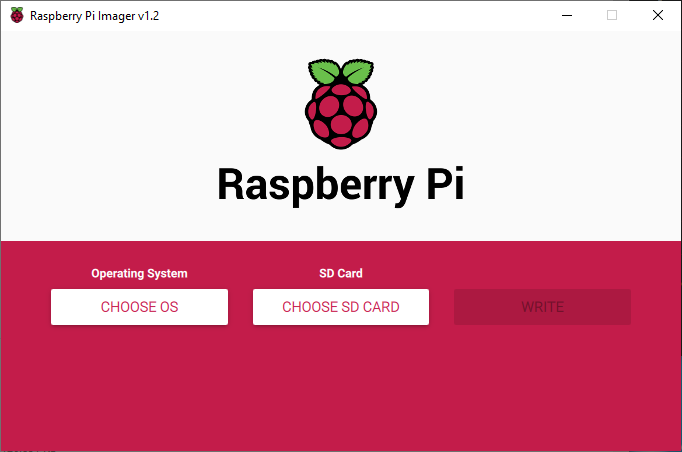
    1. Download the “Raspberry Pi Imager” here.
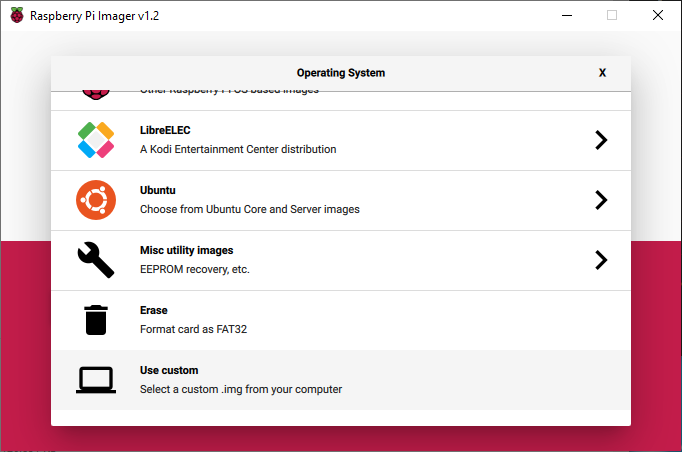
    2. Download next the “Raspberry Pi OS (32-bit) with desktop” here (the 64-bit is still only in beta. See here). Unzip the file.
      • This is the smallest image (no extra softwares) with a Desktop (mandatory to display the Plex Media Player GUI)
    3. Install and Run the “Raspberry Pi Imager” to setup the “Raspberry Pi OS” on a micro-SD card.
      • Click on “Choose OS”

      • Select “Use Custom”

      • Pick the .img file “YYYY-MM-DD-raspios-buster-armhf.img” unzipped from the “Raspberry Pi OS (32-bit) with desktop” image.
      • Next Click “Choose SD” and “Write”.
      • Once the operation completed, install the micro-SD in your RPI 4 and turn it on. The Raspberry Pi Desktop will appear after some automatic reboots. Follow the setup of the Welcome screen. Steps are:
        • Setup the Country (use Page up and Page down in the Country Combo to scroll faster)
        • Change the Password of the user ‘pi’. ATTENTION: the keyboard layout is most probably not the right one. Untick the “Hide characters” option to check what you type!
        • Set Up Screen
        • Select Wireless Network (You can skip this step if the RPI is connected via ethernet). Again, untick the “Hide characters” option to check what you type!
        • Update Software
        • Click “Restart” on the last step “Setup Complete”

    Configure your OS

    Open a “Terminal” :

    First, type this command in the Terminal to check your IP address:

    ifconfig

    Type next this command to configure the os:

    sudo raspi-config

    Among other:

    • Configure your keyboard if required via “4 Localisation Options” > “change keyboard layout”
      • If your keyboard is not in the list, use the Generic 100x-Key PC corresponding to your layout. Look the picture of this wiki page for more details.
      • You can possibly also find more info about your keyboard here.
    • Enable SSH via “5 Interfacing Options” > “P2 SSH”
    • Give at least 512MB or more to your GPU via “7 Advanced Options” > “Memory Split” (I did set 512. Using 1024 result in a black screen after reboot)
    • I gave the whole micro-SD card storage for the OS via “7 Advanced Options” > A1 Expand File System”
    • I set the audio output on the HDMI port via “7 Advanced Options” > A4 Audio”
    • NB.: I don’t use the 4Kp60 HDMI, but it can be configured via “7 Advanced Options” > AA Pi 4 Video Output”
    • Finally, reboot to be sure that it still work.
      • If you have an issue, wait for 3 minutes and proceed with the next step here under.


    You can now open a SSH console from your PC (E.g: using PuTTY) to connect on the IP address found previously and login with the user ‘pi’ and the password you introduced during the installation.

    You will possibly get a PuTTY Security Alert because of the ssh key fingerprint… Accept if you are sure that you are connecting safely to your RPI.

    If it seems that your RPI didn’t reboot properly and you are not able to connect using SSH after a moment, they you probably have to redo to whole setup from scratch and try other configuration options within raspi-config

    If it seems that your RPI didn’t reboot properly and you are able to connect via SSH, redo the configuration with the command sudo raspi-config (try to reset the “Memory Split” to 64 if you did change it).

    If you want to be sure that your OS is up-to-date, with the very latest fixes, type the following commands:

    sudo apt-get update
    sudo apt-get full-upgrade

    And finally disable the screen sleep with the command

    sudo sed -i 's/#xserver-command=X.*/xserver-command=X -s 0 dpms/g' /etc/lightdm/lightdm.conf

    Build PMP for your RPI 4

    Use now the SSH console (to be able to copy/paste from here) to execute this:

    sudo apt-get install -y autoconf automake libtool libharfbuzz-dev libfreetype6-dev libfontconfig1-dev libx11-dev libxrandr-dev libvdpau-dev libva-dev mesa-common-dev libegl1-mesa-dev yasm libasound2-dev libpulse-dev libuchardet-dev zlib1g-dev libfribidi-dev git libgnutls28-dev libgl1-mesa-dev libsdl2-dev cmake python3 python python-minimal git mpv libmpv-dev

    Then these 3 commands:

    wget https://github.com/koendv/qt5-opengl-raspberrypi/releases/download/v5.12.5-1/qt5-opengl-dev_5.12.5_armhf.deb 
    sudo apt-get install -y ./qt5-opengl-dev_5.12.5_armhf.deb
    rm qt5-opengl-dev_5.12.5_armhf.deb

    And finally these:

    mkdir ~/pmp
    cd ~/pmp
    git clone git://github.com/plexinc/plex-media-player
    cd plex-media-player/
    mkdir build
    cd build
    cmake -DCMAKE_BUILD_TYPE=Debug -DQTROOT=/usr/lib/qt5.12/ -DCMAKE_INSTALL_PREFIX=/usr/local/ ..
    make -j4
    sudo make install

    Now, PMP can be run. Go back to the Raspberry Pi Desktop, and type this command in a Terminal:

    plexmediaplayer --fullscreen --tv &

    In my case, the option ‘tv’ is not convenient (I can’t see enough on the screen)…

    You will have to Sign In via the link page of Plex.tv and next configure Plex Media Player.

    Configure PMP to launch at boot

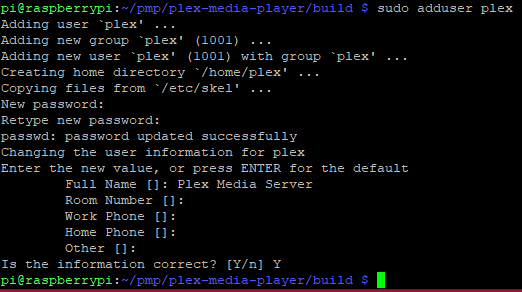
    Back into you SSH Console, on your PC, create a new user ‘plex’ with a password:

    sudo adduser plex
    sudo adduser --disabled-password plex
    sudo passwd -d plex

    Login as ‘plex’ in your RPI desktop to run once PMP via a Terminal (Without this step, it will not be displayed full screen after an autologin):

    plexmediaplayer --fullscreen --tv &

    Configure the user ‘plex’ to autologin with a desktop session named ‘plex’:

    sudo sed -i 's/#*user-session=.*/user-session=plex/g' /etc/lightdm/lightdm.conf
    sudo sed -i 's/#*autologin-user=.*/autologin-user=plex/g' /etc/lightdm/lightdm.conf
    sudo sed -i 's/#*autologin-user-timeout=.*/autologin-user-timeout=delay/g' /etc/lightdm/lightdm.conf

    Create the ‘plex’ desktop:

    sudo nano /usr/share/xsessions/plex.desktop

    and paste into it:

    [Desktop Entry]Name=Plex
    Comment=Plex Media Player
    Exec=/usr/local/bin/plexmediaplayer
    Icon=
    Type=Application

    And now reboot ! (It can take 3 long minutes !!):

    sudo reboot

    If there is a configuration issue with the desktop, edit the config via a SSH console and restart lightDM (the Desktop Manager):

    sudo service lightdm restart

    Tips: I had no issue with getting Plex Media Player in fullscreen but here are notes in case I would have to resize it:

    sudo apt-get install -y xdotool
    export DISPLAY=':0.0'
    xdotool search --onlyvisible --maxdepth 1 ""
    xdotool windowmove {window_id} {posx} {posy} windowsize {window_num} {sizex} {sizey}


    This is based on a post of Stueh on Plex forum (see here)


    If you did configure Plex Media Player on a PC Screen and move next on TV Screen, it will most probably not fit that screen et the resolution will possibly not be correct. In that case, here is how I proceed:

    • Log on your RPI using any SSH console on your mobile or Tablet (I presume that your PC is not next to your TV). I am using “RaspController” on Android
    • Edit the desktop to force an error. Hence, you will fallback on the default Desktop. Type in you SSL console : sudo nano /usr/shared/xsession/plex.desktop
      • Ex.: modify this line to define an invalid path: Exec=xxx/usr/local/bin/plexmediaplayer
    • Now, restart LightDM
      • Either type this in your SSH console: sudo service lightdm restart
      • Or CTRL-ALT-Backspace on the keyboard of your RPI.
    • You will get an error message because ‘xxx/usr/local/bin/plexmediaplayer’ does not exist and next get a prompt to login.
    • Login as ‘pi’ 
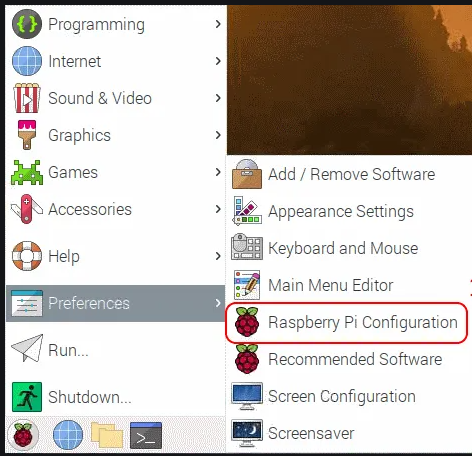
    • Now, open the Start menu > Preferences > Raspberry Pi Configuration > Display (or Interfaces). If you don’t see the ‘Start menu’ because it is out of the screen, press the ‘Windows’ key on your Keyboard.

    • Next, change the resolution to fit the limitation of your TV:
      • 480p = DVD, old TV 720 x 480 pixels, format 16/9.
      • 720p = HD Ready, 1280 x 720 pixels, format 16/9.
      • 1080p = Full HD, 1920 x 1080 pixels, format 16/9.
      • 2160p, UHDTV1, 3840 x 2160 pixels, format 16/9 (a.ka. UHD-4K or 4K).
      • 4320p, UHDTV2, 7680 x 4320 pixels, format 16/9 (a.k.a UHD-8K or 8K).
    • Then, open Plex Media Player (Start Menu > …) and configure it in TV mode. If it does not fit the TV Screen, reduce the resolution.
    • Finally, log off (or restrat lightDM with CTRL-ALT-BACKSPACE) and login as ‘plex’ to also run Plex Media Player and be sure it’s also well configured.
    • Ho, yes, sure: edit again the plex.desktop to remove the xxx in the path of the EXEC setting and reboot.

    Voilà

    Loading

  • Plex Server not found after Synology update to DSM 1.10.1.4602

    After updating DSM on my Synology, Plex Media Player was not able to find the Plex Server running there.

    Plex Server Not Found

    Click to Read More

    Plex Server was clearly running as I was able to connect via http://<My Synology>:32400/web/index.html

    But it was not responding to any request to display Libraries or to play any Movies… To solve this, I had to :

    1. Stop the package Plex via the DSM Package Center
    2. Log in my NAS as an administrator, in a SSH console, via Putty and enter root mode.
    3. Find Plex process still running via the command: ps -gaceux | grep plex
      1. This command displayed: plex 13150 0.2 0.2 677640 17832 ? Sl Dec17 7:41 Plex Media Server
    4. Kill plex’s remaining process: kill -9 13150
    5. Possibly do also delete the Plex’s Plugin Service as done here.
    6. Start the package Plex via the DSM Package Center

    Et voilà.

    IMO, the problem was that I didn’t stop properly Plex Package before updating my DSM. The Plex instance running at that time apparently didn’t completely shutdown. But it was not really running fine anymore either. Unfortunately, that instance was preventing a new one to start (as it was still using the port 32400).

    Loading

  • Plex Media Server not matching/downloading metadata anymore

    Since a few days, My Plex Media Server, hosted on my Synology, was not able to match movies anymore. And when matching movies manually, it was sometimes downloading the covers but never the metadata. Deleting the Service plugin solved the problem.

    Click to Read More

    I read that IPV6 could be the cause of such a problem, and that turning it off on the Synloloy was the solution. I tried that but without success.

    Was solved my problem was to:

    1. Stop Plex via the DSM’s Package Manager
    2. Log in my NAS as an administrator, in a SSH console, via Putty and enter root mode.
    3. Enter Plex’s Plugin folder using a command like: cd /volume1/Plex/Library/Application\ Support/Plex\ Media\ Server/Plug-ins/
    4. Delete the service plugin:  rm -R Services.bundle
    5. Restart Plex via the DSM’s Package Manager

    Loading

  • Smart Apps don’t run, update or install anymore on Samsung TV

    Yesterday, I discovered that Plex, DS Video and a few other Apps didn’t run anymore on my Samsung Smart TV. I was also unable to install new Apps. After looking for solutions, I finally decided to reset the TV. It solved the problem.

    Click to Read More

    Most of the Apps installed (except Youtube and Netflix) refused to start. Trying to start an App only resulted in a spinning wheel… spinning for minutes… the TV finally exiting the Smart Hub without having opened the App.

    I tried to uninstall some of the Apps and reinstall them next. But it appeared that it was impossible to install any new or previously installed Apps.

    I was also unable to update installed Apps although an update was available.

    However, network connection was fine (I did use the diagnostic menu of the TV to check it).

    Finally, I decided to reinitialize the TV, also using the diagnostic menu. During the reconfiguration, the TV got an update of its system. After the reconfiguration, all preinstalled Apps appeared to work fine. And I was also able to install new Apps and run them.

    NB.: Maybe updating the TV system without doing a full reset would have been enough to solve the problem…

    Loading

  • Projector losing Raspberry Pi 2’s HDMI signal

    When I am watching a movie played with RasPlex (on my Raspberry Pi 2), it happens from time to time (possibly several times during a movie) that my projector loses the HDMI signal. The signal comes back quite immediately but this is a real annoyance. I solved the problem by boosting the HDMI signal in Raspberry Pi 2’s config file.

    Click to Read More

    I had no issue when playing a movie with my PC or with my ChromeCast, both of them being however connected on the same home cinema amplifier (a Yamaha HTR-4067) as the Raspberry PI 2 and, from there, on the projector (a Benq W1070+) via a long HDMI cable.

    The problem became especially unsupportable with 3D movies as not only the signal was lost, but also the projector was coming back in 2D mode. So, I had to set it back in 3D when the signal was recovered.

    It was sometimes mentioned on various blogs or forums that the problem could have been with the HDMI cable, with the power supply of the Raspberry Pi 2, with the HDMI port of the amplifier, … But I found the true solution here: boost the HDMI signal in the config file of the Raspberry Pi 2.

    While already being in the config file to solve the problem, I took the opportunity to also overclock a bit the Raspberry as documented here. And finally, as I noticed that there was no specific memory size set for the GPU on my Raspberry, which has 1Gb Ram, if fixed that too. It seems to me that the config file used by RasPlex is not fully optimized for the Raspberry Pi 2.

    To edit the “config.txt” file, I simply put the SD card of the Raspberry Pi 2 into my Windows PC and opened that file with Notepad++ (it’s located on the root of the card). I ended with a config file like this one (changes are in bold):

    #########################################################################
    # This file is part of OpenELEC – http://www.openelec.tv
    # Copyright (C) 2009-2012 Stephan Raue (stephan@openelec.tv)
    # Inspired and partly copied from:
    # http://youresuchageek.blogspot.fr/2012/09/howto-raspberry-pi-openelec-on.html
    #
    # This Program is free software; you can redistribute it and/or modify
    # it under the terms of the GNU General Public License as published by
    # the Free Software Foundation; either version 2, or (at your option)
    # any later version.
    #
    # This Program is distributed in the hope that it will be useful,
    # but WITHOUT ANY WARRANTY; without even the implied warranty of
    # MERCHANTABILITY or FITNESS FOR A PARTICULAR PURPOSE. See the
    # GNU General Public License for more details.
    #
    # You should have received a copy of the GNU General Public License
    # along with OpenELEC.tv; see the file COPYING. If not, write to
    # the Free Software Foundation, 51 Franklin Street, Suite 500, Boston, MA 02110, USA.
    # http://www.gnu.org/copyleft/gpl.html
    #################################################################
    # Bootloader configuration – config.txt
    #################################################################

    #################################################################
    # Memory (System/GPU configuration )
    #################################################################

    # default GPU memory split (do not change if you do not know what you are doing)
    gpu_mem=128

    # SDRAM size based GPU memory split, uncomment and setup to override ‘gpu_mem’
    gpu_mem_256=64
    gpu_mem_512=128
    gpu_mem_1024=256

    #################################################################
    # Overclocking settings
    # WARNING: Do not change/enable if you do not know what you are doing!
    # The System may become unstable or you can have data corruption or
    # you can loose your warranty if you set wrong settings
    #
    # please read: http://elinux.org/RPi_config.txt#Overclocking_configuration
    #################################################################

    # Overclock mode settings.
    #
    # default recommended values are: arm_freq | core_freq | sdram_freq | over_voltage
    # no overclocking : 700 | 250 | 400 | 0
    # mode ‘Modest’ : 800 | 300 | 400 | 0
    # mode ‘Medium’ : 900 | 333 | 450 | 2
    # mode ‘High’ : 950 | 450 | 450 | 6
    # mode ‘Turbo’ : 1000 | 500 | 500 | 6

    #arm_freq=900
    core_freq=500
    sdram_freq=500
    over_voltage=2

    # set to ‘force_turbo=1’ to disable dynamic overclocking (you can lose your warranty!)
    force_turbo=0

    # If you have any data corruption using Turbo Mode and overclocking
    # try with this setting uncommented
    # If this still fails, try to use Medium mode without “over_voltage=2”
    # If it ultimately keeps failing, forget about this until it gets fixed
    # Use a more conservative mode that will works fine in any cases:
    # initial_turbo=30

    #################################################################
    # Overscan settings
    #################################################################

    # Make display smaller to stop text spilling off the screen
    # see also http://www.raspberrypi.org/phpBB3/viewtopic.php?f=67&t=15700
    # overscan_scale=1
    # disable_overscan=1

    # Adapt overscan values to your needs
    # overscan_left=57
    # overscan_right=59
    # overscan_top=20
    # overscan_bottom=20

    #################################################################
    # various settings see also: http://elinux.org/RPi_config.txt
    #################################################################

    # Force HDMI even if unplugged or powered off
    # hdmi_force_hotplug=1

    # Uncomment to force a console size. By default it will be display’s size minus
    # overscan.
    # framebuffer_width=1280
    # framebuffer_height=720

    # Uncomment to force a specific HDMI mode (this will force VGA).
    # hdmi_group=1
    # hdmi_mode=1

    # Uncomment to force an HDMI mode rather than DVI. This can make audio work in
    # DMT (computer monitor) modes.
    # hdmi_drive=2

    # Uncomment to increase signal to HDMI, if you have interference, blanking, or
    # no display. Max value = 7
    config_hdmi_boost=4

    # Uncomment for composite PAL
    # sdtv_mode=2

    # Uncomment to overclock the ARM. 700 MHz is the default.
    # arm_freq=800

    #################################################################
    # License keys to enable GPU hardware decoding for various codecs
    # to obtain keys visit the shop at http://www.raspberrypi.com
    #################################################################

    # decode_MPG2=0x00000000
    # decode_WVC1=0x00000000
    # decode_DTS=0x00000000
    # decode_DDP=0x00000000

    #################################################################
    #
    # >>>>>>>> RasPlex default settings override <<<<<<<<<
    #
    #################################################################

    hdmi_force_hotplug=1
    hdmi_drive=2
    gpu_mem_256=64
    gpu_mem_512=256
    gpu_mem_1024=256
    dtoverlay=lirc-rpi
    #################################################################
    # End of default configuration
    # all values below this line were inserted from config.txt.bk (your old config)
    # and can be merged with the above values
    #################################################################

    Loading

  • Play a movie on multiple devices via WiFi-Direct

    When going to travel for hours by car with my kids, I usually copy some cartoons on their tablets before leaving. A question which arose recently was: how to play a movie from one tablet on the others, while there is no network in the car. Answer: using BubbleUPnP and Wifi-Direct.

    Click to Read More


    The question arose as I forgot once to copy cartoons on one of the tablets. Being in the car, I had no Wi-Fi network to connect the devices (no wireless router). And I didn’t want to use a mobile data connection as, being in a foreign country, the cost would have been excessive. So I had to find another solution.

    Looking on internet how to share media or files between two devices without Wi-Fi access point, I found that the modern way to go was: wifi-direct.

    Connecting devices via wifi-direct was easy as natively supported by Android, as well as iOS (one can find many how-to on internet). But next, how to access the media on other devices was more tricky.

    Usually, on mobile devices, I am using:

    • Plex connected via internet to play media from my NAS.
    • Plex to play media synced locally on the device.
    • Plex to play media synced on another device with Plex «advertised» on the LAN, by that device, as a server (see settings of Plex on the mobile device).
    • Archos Video to play media available locally (internal or external strorage) or via FTP, SMB shares or UPnP.
    • Possibly MX Player to play media while directly browsing the storage of the device.

    I also used to play media via UPnP with MediaHouse as, just like Plex and Archos Video, it is managing libraries of movies with metadata automatically fetched from internet. But that was before getting support for UPnP within Archos Video.

    As Archos Video and Plex are IMO, the very best apps to manage libraries of movies, my hope was to use them. Unfortunately, none of them was able to access media on the other devices using Wi-Fi direct… Plex didn’t see the Plex servers running on the other devices, and Archos Video didn’t even display any menu to access media via network. I think that none of them was aware there was actually a network (WLAN Direct).

    As I read that UPnP over Wi-Fi direct was very well supported (it’s now a standard), I thought that a solution could be to use an upnp server/client. My favorite being BubbleUPnP, I gave it a try. And good news, it works like a charm. I was able to play the same cartoon simultaneously on three devices without any hiccup (with MX Video as a player).

    That being said, I wrote to the developer of Archos Video and on the Plex forum to ask if playing video with their app via wifi Direct was actually supported (with a trick) or would be soon or later…

    Loading

  • Parental Control for Plex on Synology

    Many years ago, Parental Control was already a native feature of my previously favorite Media Library Manager: Media Browser – reason why, since I am using Plex (mainly because Plex Media Server runs on my Synology), the lack of efficient support for such Control has been really frustrating. A solution has fortunately been developed by iSh0w, early in 2014, as a plugin named “L0ck”. This plugin is now really pretty mature!

    NB.: two days after this post, Plex released native Parental Control as part of their new Plex Home feature… But this is not yet available for Samsung so L0ck still makes sense for me.

    [EDIT 12/2015] Later in 2015, a new version of Plex for Samsung has been released, which support user accounts (and hence, Parental Control).

    Click to Read More

    The only solution currently suggested by Plex to prevent Kids watching inadequate content is to create dedicated Plex Accounts for the kids and only share with those accounts the adequate content. This is totally inconvenient, especially when sharing the same player device such as a TV or a Tablet. Indeed, parents may not forget to “disconnect” the device from their account. Next, kids need to be able to connect with a login/password, which is far from easy for the youngest ones. Definitively, Plex is missing a a true Parental Control!

    L0ck plugin for Plex, although(*) not yet the very best solution, should be loved by the thousands of users who voted for such a feature!

    (*) You have to re-Lock the libraries before quitting your Plex Client. Libraries are not automatically re-locked after x hours or when Plex Client is restarted… Also, when unlocked, libraries are visible for all the Plex Clients, possibly for other devices that would start Plex! Next, the plugin is unl0cking/l0cking all the Controlled libraries at once (If there is a trick to protect distinct subsets of libraries with distinct passwords, I didn’t find it yet). Finally, restarting the Plex Client is usually required… But still, this is better than nothing or much better than Plex’s suggested approach.

    Here is how to install this plugin for Plex on Synology:

    1. Disable the “authentication on local networks” on your Plex Media Server (if enabled)
      1. Go to your Plex Server Administration page http://<YourSynology>:32400/web/index.html#!/settings/server
      2. Click on the entry “Connect”
      3. Click on the button “Show Advanced
      4. Disable “Require authentication on local networks”
    2. Go to the “L0ck” page to download the Plugin customized to lock/unlock some of your Libraries with a password
      1. Type the local IP (LAN) of your Synology
      2. Click “Search For Section(s)!
      3. Select the section(s) you would like control access to.
      4. Enter next Password. Ex.: 4 digits
      5. And click on “Generate Plugin!
      6. Finally click on “Download plugin!” on download a zip with your customized plugin (This is not working with all browsers! Use Chrome).
    3. Deploy the plugin into Plex’s plugin folder after customization for Synology
      1. Unzip the archive downloaded at step 2..F into a temp folder
      2. Open within notepad++ the file <YourTemp>\L0ck.bundle\Contents\Resources\l0ck_support\l0ck.sh
      3. Search and Replace “/var/lib/plexmediaserver” with “/volume1/Plex” and Save the file.
      4. Open next the file <YourTemp>\L0ck.bundle\Contents\Resources\l0ck_support\unl0ck.sh
      5. Search and Replace “/var/lib/plexmediaserver” with “/volume1/Plex” and Save the file.
      6. NB.: No need to change the __init__.py as mentioned on L0ck’s webpage.
      7. Finally Move the folder L0ck.bundle into the hidden Shared folder \\<YourSynology>\Plex\Library\Application Support\Plex Media Server\Plug-ins\
    4. Grant access for plex onto the plugin
      1. Open a Telnet console onto your Synology
        1. Run “telnet” from Windows
        2. Type: open <YourSynology>
      2. Login as ‘root’ with your admin password
      3.  Execute the following commands
        1. cd /volume1/Plex/Library/Application\ Support/Plex\ Media\ Server/Plug-ins
        2. chown -R plex:users L0ck.bundle
        3. cd L0ck.bundle/Contents/Resources/l0ck_support
        4. chmod a+x l0ck.sh
        5. chmod a+x unl0ck.sh
        6. chmod a+x sqlite3
    5. Re-enable the “authentication on local networks” on your Plex Media Server (if it was enabled)
    6. Restart now your Plex Clients and go to the “Channels” where you should see the L0ck” Icon:

    L0ck Plugin
    L0ck Plugin

    Et voilà 😉

    NB 1: By default, the libraries to be “controlled” are all unlocked. So, enter the plugin and L0ck them.

    NB 2: The display is not the same within Plex Home Theater and Plex Web Client. E.g.: in the Plex Home Theater (for Windows), you see both the icon “L0ck” and “Unl0ck”. In the Plex Web Client, instead, you see only the “L0ck” icon. In the Plex Home Theater, when you click on “L0ck”, nothing seems to happen while in the Plex Web Client, you see an “Locked” icon replacing the “Lock” icon. But you will quickly find your path…

    NB 3: Once your have clicked on “L0ck”, you have to restart your Plex Home Theater or refresh your browser if using Plex Web Client. On the opposite, with Plex for Samsung, I don’t have to quit and restart Plex after Unl0cking/L0cking my libraries, even if e.g. unl0cking via the Web Client…

    NB 4: To Unlock the libraries with the Plex Web Client (where the “unl0ck” icon is missing), go to the “Channels” page and enter the “L0ck” channel. Then type your password in the Search box and simply hit “enter”.

    NB 5: Once a movie started from an unl0cked Controlled library, the libraries can be rel0cked immediately. This is not stopping the movie as you could see when playing a movie within Plex Home Theater and re-locking the libraries via a Web Plex Client. So, based on that finding, I have customized the L0ck plugin to add a new button: “Short Unlock“. This one unl0cks the libraries for 2 minute and then re-locks them automatically. If you are interested in such a feature, you can simply add the following line in unlo0ck.sh, before the last line (with “exit;”):

    [shell](sleep 120 ; sh ./l0ck.sh) &amp;amp;amp;amp;[/shell]

    I have submitted this idea to the creator of the plugin (See here). So far, adding a new button does not offer the best user experience with the Plex Web Client due to some technical limitation…

    For additional Info: read the FAQ.

    On Synology, L0ck plugin’s log file is named “com.plexapp.plugins.l0ckunl0ck.log” and located in \\<YourSynology>\Plex\Library\Application Support\Plex Media Server\Logs\PMS Plugin Logs. It has better be opened with notepad++.

    Here is the thread about the release version of the plugin. And here is the thread about the development of the plugin…

    Loading

  • Plex Server on Synology DS713+: Cannot load M3U8: 404 not found

    When trying to watch a movie streamed by the Plex Server of my DS713+, I used to get an error “Cannot load M3U8: 404 not found” (only on mobile devices or within a browser). This was due to a wrong “temp” directory configured (out-of-the-box) for transcoding purpose.

    Click to Read More

    Watching movies was working fine with the Plex Theater on my PC.

    I had the error message “Cannot load M3U8: 404 not found” only when trying to play movies within Chrome (on a PC or on a tablet).

    I read on the web that this error could be due to the NAS struggling with transcoding the movie (which is done or not depending on the client’s spec). Plex clearly states that one needs a dual-core NAS to be able to do transcoding. But I have a DS713+. So it should have been fine

    I also read that Plex Theater (on Windows) does not need any transcoding. As it was working fine, I definitively though there should be something wrong with the configuration  of the transcoding…

    I did look at the logs of Plex Server (in \\<MyNas>\plex\Library\Application Support\Plex Media Server\Logs) and found that error:

    [code]ERROR – Exception handled: boost::filesystem::temp_directory_path: Not a directory: “/volume1/Plex/tmp_transcoding”[/code]

    Checking directly on the NAS via telnet, I found that the right path should have been /volume1/Plex/Library/tmp_transcoding (Notice: “Plex” starts here with a upper case although the related shared folder accessible via SMB starts with lower case!!!)

    So, I did force that correct value via the Plex server web interface > Settings > Transcoder > Show Advanced Settings > Transcoder temporary directory.

    And BINGO !!!

    Loading