Month: December 2014

  • Script to automate IPKG installation on Synology

    Installing ipkg is not difficult, but I hate to do it manually each time I (re)install a Synology… So, here attached is a script to install it automatically.

    [EDIT] ipkg is not maintained anymore. Many packages do not run anymore with the most recent DSM. So, use opkg instead.

    Click to Read More

    First Installation:

    1. Copy on your NAS the script attached at the bottom of this post (Ex.: into \\<YourSyno>\web\admin as used for the illustration here after).
    2. Connect as root on your NAS (Ex.: via telnet using the command ‘telnet <YourSyno>’, the login ‘root’ and the password of your ‘admin’ account – see more details here).
    3. Execute the script (Ex.: use the command ‘sh /volume1/web/admin/installipkg.sh’)
    4. Check which processor your have on your NAS and select the right option accordingly. The script will show you the cpu found using ‘cpuinfo’. But you can double-check here (NB.: I have a DS713+ which is currently not listed. I didn’t test ipkg for the other versions).
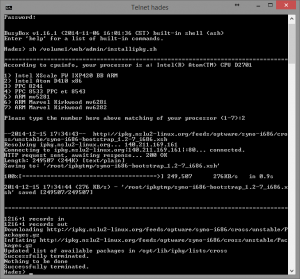
    Automatic Installation of Ipkg
    Automatic Installation of Ipkg

    You can now use ipkg directly in a shell or via the (really) great UI named “IpkgGUI”. This one is available as a Community Package from cphub.net. Add “https://www.cphub.net” as a Package Source in the Package Center’s settings pane and install IpkgGUI.
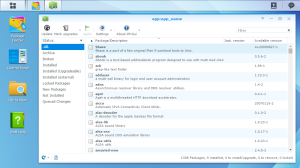
    Ipkg GUI
    Ipkg GUI

    Re-installation/upgrade:

    If ipkg is already installed, the script will remove it automatically and reboot the NAS before proceeding further with the installation (A reboot takes a bit more than one minute to shutdown and a bit more than two minutes to restart on my DS 713+). After the reboot, thanks to a script inserted into /etc/rc.local, the setup will continue automatically.
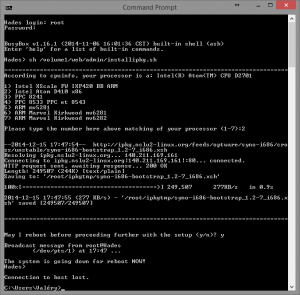
    Automatic Installation of Ipkg With Reboot
    Automatic Installation of Ipkg With Reboot

    Installation status:

    (After the reboot, reconnect to the NAS). You can now check the status of the setup in its log, using the command: cat /root/ipkg.log. The output should looks like this:

    [code]
    
    [Mon Dec 15 17:34:44 CET 2014] Installing IPKG...
    Optware Bootstrap for syno-i686.
    Extracting archive... please wait
    bootstrap/
    bootstrap/bootstrap.sh
    bootstrap/ipkg-opt.ipk
    bootstrap/ipkg.sh
    bootstrap/optware-bootstrap.ipk
    bootstrap/wget.ipk
    Creating temporary ipkg repository...
    Installing optware-bootstrap package...
    Unpacking optware-bootstrap.ipk...Done.
    Configuring optware-bootstrap.ipk...Done.
    Installing ipkg...
    Unpacking ipkg-opt.ipk...Done.
    Configuring ipkg-opt.ipk...Done.
    Removing temporary ipkg repository...
    Installing wget...
    Installing wget (1.12-2) to root...
    Installing wget (1.12-2) to root...
    Installing wget (1.12-2) to root...
    Installing wget (1.12-2) to root...
    Installing wget (1.12-2) to root...
    Installing wget (1.12-2) to root...
    Installing wget (1.12-2) to root...
    Installing wget (1.12-2) to root...
    Installing wget (1.12-2) to root...
    Configuring wget
    Successfully terminated.
    Creating /opt/etc/ipkg/cross-feed.conf...
    Setup complete.
    
    [/code]

    Notice: after the setup of ipkg, this one is upgraded and updated once automatically.

    PS.: If you don’t choose the right version of the boostrap, the installation of ipkg will fail. While trying to run it, you could see errors like “line 1: syntax error: unexpected word (expecting “)”)“. Try to install the right package. The script should delete the previous installation and install the new one as explained above.

    Loading

  • Shell Script for Synology not working

    You become crazy because after hours of trials and errors, your brand new (and probably first) shell script still complains about “syntax error: unexpected “fi” (expecting “then”)”, “syntax error: unexpected “fi” (expecting “then”)” or “syntax error: unexpected word (expecting “in”)”, … The problem is probably with the EOL.

    Click to Read More

    The problem could indeed be that you are editing your script with a Windows Text Editor… In such a case, you have to convert the Windows EOL (End Of Line character) into the Linux equivalent.

    Edit your script with Notepad++ and use the menu “Edit”  > “EOL Conversion” > “Unix/OSX Format”. Then save your script and try again…

    You may also have to use the ANSI encoding with the menu “Encoding” > “Convert to ANSI”

    Loading

    ,
  • Intel NUC : no more audio via HDMI after Windows Update

    I got an automatic Windows Update yesterday on my Intel NUC D54250WYK. After the reboot, I discovered that I had no “HDMI audio device” anymore, but only the “Headphone audio device”. Re-installing “Realtek Audio Drivers” didn’t solve the problem. The trick is to uninstall and re-install both the Audio Drivers AND the Graphics Drivers!

    Click to Read More

    Indeed, the connection to the TV being made through HDMI, the audio connection is managed via the Graphic Drivers.

    Get both Audio and Graphic Drivers from the Intel Download site (I.e.: “Audio: Realtek ALC Audio Driver for Intel® NUC” and “Graphics: Intel® HD Graphics Driver for Intel® NUC”).

    Et voilà.

    Loading

  • Add Custom URL Shortcuts into Synology’s DSM Start Menu or on DSM’s Desktop

    I did post a feature request on Synology forum to get support for custom shortcuts on the DSM’s desktop. But as I found a trick to do it myself, I have implemented a small .Net application to automate the configuration part. I named it “Mods – My Own DSM Shortcuts”.

    Click to Read More

    The trick is to create a Dummy Package which will, as any package, add a shortcut for itself into the Synology’s Start menu… This is a Dummy Package as it does nothing else (no installation of an actual application)..

    You can find the source code of my App as well as binaries for windows here https://mods.codeplex.com/. Read the documentation for additional information, including how to create such a Dummy Package manually (E.g.: you don’t have Windows)…

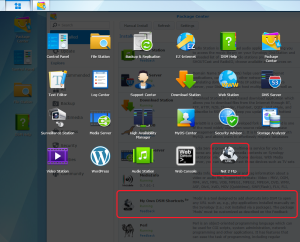
    On the screenshot here after, you can see both the Dummy Package “My Own DSM Shortcuts” installed via the “Package Center” and the Custom Shortcut that was created to open Net2Ftp – a php website I installed manually on my NAS (I.e.: copied into the webstation).

    My Own DSM Shortcuts
    My Own DSM Shortcuts

    Loading

  • A Smart TV Running Plex, DS Video and more…

    It was time to replace my old TV… But having become addicted to Plex (on my NUC), I really wanted my new TV to be a Smart one, able to run smoothly the Plex App, with native support for most codecs, to avoid transcoding, as well as 3D and a universal remote control. After a lot of research I have chosen the UE48H6500.

    Smartv TV Samsung UE48H6500
    Smartv TV Samsung UE48H6500

    Click to Read More

    I finally found a TV not too expensive (<700€) but matching perfectly all my requirements!

    Features are available in attachment… Here are some notes:

    • It’s large but not too much (fit in my living room: 48″ = 121 cm).
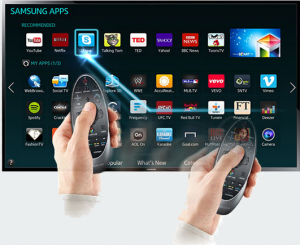
    • It runs both “Plex” and “DS Video” that are great apps to play movies stored on a Synology NAS. Those Apps are available in the category “Videos”. But there are really much more Apps than those.
    • With its Quad Core Processor, the menus (including Plex) are very reactive. That’s the point I was the most afraid of… But I am really not disappointed.
    • It supports really many many formats (Plex has therefore never to transcode any movie and can easily run with a “lower profile” Synology) – see the User Guide for details:
      • Video format:*.avi, *.mkv, *.asf, *.wmv, *.mp4, *.mov, *.3gp, *.vro, *.mpg, *.mpeg, *.ts, *.tp, *.trp, *.mov, *.flv, *.vob, *.svi, *.m2ts, *.mts, *.divx, *.webm
      • Audio format: *.mp3, *.m4a, *.mpa, *.aac, *.flac, *.ogg, *.wma, *.wav, *.mid, *.midi, *.ape, *.aif, *.aiff, *.m4a
      • Image format: *.jpg, *.jpeg 15360×8640, *.png 4096×4096, *.bmp 4096×4096, *.mpo 15360×8640
    • With its IR repeater, it can remote control the TV Decoder of my Provider (Belgacom) and as it’s own TV Guide (I.e. an EPG) which is really running smoother than to Belgacom’s Guide. The only drawback is that one has to use the Provider’s default sort order of the channel. It can actually be changed, but it requires some tricking.
    • With the HDMI ARC (Audio Return Channel), no need to switch between audio sources anymore on my Sound Bar (TV Decoder, NUC or TV/plex).
    • Once named adequately (e.g.: with H-SBS in the name), 3D movies are automatically played as such by Plex on the TV.
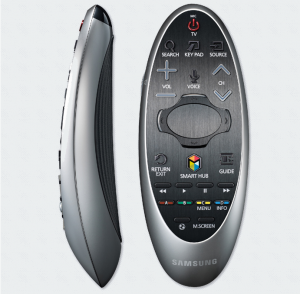
    • A really great Smart Remote Control with a touchpad and motion control. I love it ! Small, it fits perfectly in one hand and works really like a charm both to control the TV Decoder and Plex. Also, using the control as a pointer (based on motion control) to pick entries in menu, etc… is so user-friendly!
    • The TV runs also a decent Web Browser that works:
      • It’s not the fastest one but it displays fine most web sites (Google, MSN, Facebook, …)
      • One can scroll easily within pages using the Smart Control’s “OK button” (which is actually a touchpad), simply sliding the finger on that “touchpad/button”. This is very convenient to read pages!!
      • It’s also very easy to type text/urls/… pointing letters on the onscreen-keyboard with the Smart Control
      • And it supports Flash animations.
    • One can connect a Wireless Keyboard to make typing even more comfortable. I am using a Logitech Wireless Touch Keyboard K400 and it works seamlessly.
    Samsung Smart Control
    Samsung Smart Control

    Tips and tricks:

    • One thing I have been looking for was how to delete Apps installed in the Smart Hub. One simply has to select an Apps and press ‘OK’ for a few seconds on the Smart Control. It opens a menu with useful actions. To learn more about playing within the Smart Hub, this video is really great.
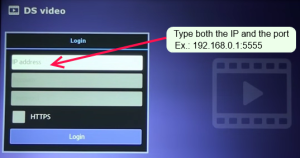
    • Another stupid thing I didn’t find immediately: how to specify a specific port within the “DS Video” App to connect on my Synology NAS. Indeed, as long as my Synology’s DSM was configured to run on its default port (I.e.: 5000), there was no need to specify this port in the “DS Video” App (One only had to enter the IP of the NAS and credentials). But once I did reconfigure my DSM to run on another port, “DS Video” didn’t succeed to connect to the NAS anymore. There is no field to type a port in “DS Video” App’s connection pane. The trick (stupid and obvious) was to type the port in the IP field. E.g.: 192.168.0.1:5555
    Port Configuration Within DS Video
    Port Configuration Within DS Video

    Loading

    ,