I wanted a simple web client to access my mobiles and tablets from my PC. I found and adopted Mobizen.
Click to Read MoreClick to Close
From a feature perspective, I was simply looking for something similar to the Google Chrome Remote Desktop or the Microsoft Remote Desktop but, if possible, without the need to install anything on the PC; i.e.: a purely web client mirroring an Android screen .
I did test first AirDroid which is great, advanced, quite complete from a feature perspective. But first, it’s a bit too complex to “simply” remote access Android and next requires to install.
I tried next Mobizen. This one is not as complete as AirDroid which comes with its own interface to access SMS, calls, files, photos, videos, contact, …, without the need to use the full remote access (mirroring the screen). But some of the missing features in Mobizen are already available in Beta.
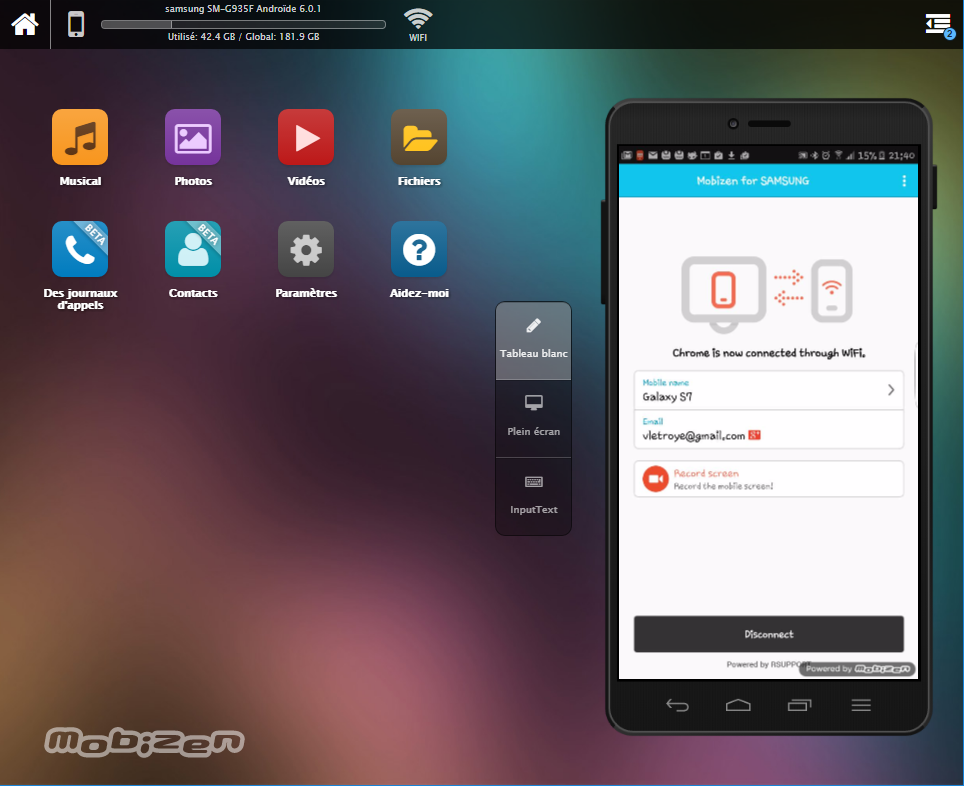
Here is what the remote access to my Galaxy S7, from Chrome, looks like.
Mobizen Remote Web Access
It requires an App on the Mobile: Mobizen mirroring. Nb.:A dedicated version exist for Samsung.
Next to that, I am also using TeamViewer, which is great as the same product can be used in both direction. I.e.: with the TeamViewer “host” App for Android, PC’s can remotely access mobiles and tablets. And with the TeamViewer “for remote control” App for Android, mobiles and tablet can remotely access PC’s.
This is an update of a old post written for DSM 4 and 5: how to use the native Notification Mechanism of Synology to sent custom notifications. It’s now tested on my DS1815+ with DSM 6.0.
Click to Read MoreClick to Close
First, define the Notifications to be sent:
Open a dos command prompt, and execute: telnet <YourSynoHostname>
As an alternative, I am using the free telnet client “Putty” to open SSH Console.
Login as administrator
Once connected via telnet, enter the root mode with the command ‘sudo -i’, using here also the password of your administrator
Execute next: cd /usr/syno/synoman/webman/texts/
Execute: ls
Now you see a list of folders for each language supported by your Synology. You must at least defined your custom notifications in the ‘enu’ version and next the version that match your language.
Copy the file with the definition of the existing notifications in a shared folder to edit it easily: cp enu/mails /volume1/web/
I presume here that the web station is enabled, otherwise, copy the file ‘mails’ in any other shared folder.
As an alternative, you can use the Package “Config File Editor” to edit “/usr/syno/synoman/webman/texts/enu/mails”
Edit now this file ‘mails’ (e.g.: with notepad++: \\<yourSynoHostname>\web\mails)
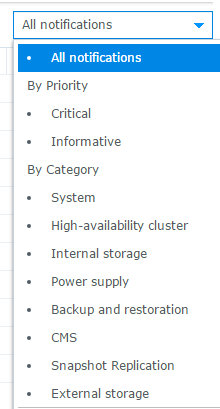
Add your new custom “tags” at the end of the file with an adequate definition (see bellow for an example). You must specify a Title, a Subject, the text, and a Category with its priority. The category is used to group the Notifications in the DSM > Control Panel > Notification > Advanced Tab. For each Category, specify one of the possible values with a “Priority”, separated by a coma. The priority is used to filter the notifications in the “Advanced” tab (Look at existing tags in the file for illustration):
Possible values for “Category”
Backup/Restore: group under ‘Backup and Restoration’ in the “Advanced” tab
CMS
External Storage
HA: grouped under ‘High-availability cluster’
AHA: not displayed in the “Advanced” tab but related to External Storage
Storage: grouped under ‘Internal Storage’
USB Copy: not displayed in the “Advanced” tab but related to External Storage
Power System: grouped under ‘Power supply’
System
PerfEvent: not displayed in the “Advanced” tab but related to System
Possible values for “Priority”
Important: displayed as Critical
(no value): displayed as Informative
Synology Notifications
Save your changes (E.g.: back to the telnet console, execute: cp /volume1/web/mails enu/mails)
Examples:
[MySqlBkpError]
Category: Backup/Restore,Important
Title: Database backup failed
Subject: Database backup on %HOSTNAME% has failed
Dear User,
Database backup on %HOSTNAME% has failed.
[MySqlBkpOK]
Category: Backup/Restore
Title: Database backup completed
Subject: Database backup on %HOSTNAME% has succeeded
Dear User,
Database backup on %HOSTNAME% has successfully completed.
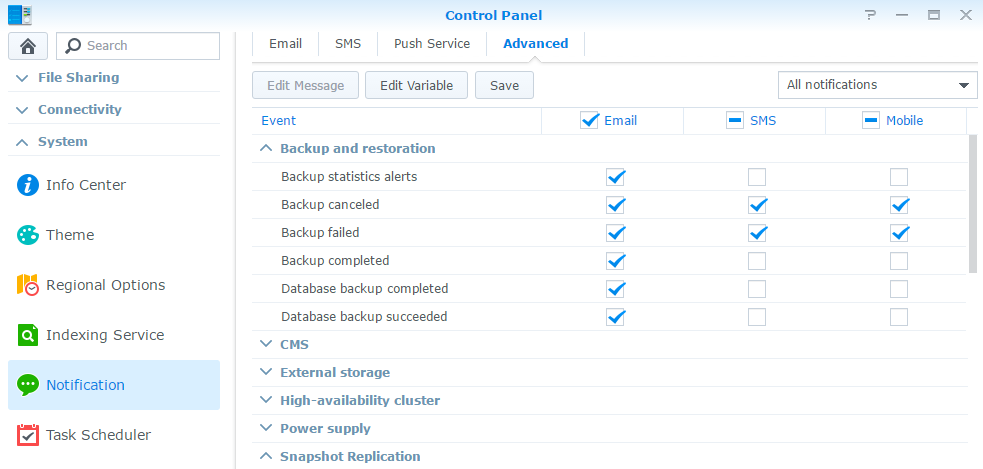
Next, define how to sent those custom Notifications if and only if they are in a Category which does not appear in the “Advanced” tab of the “Control Panel” > “Notifications” pane > “Advanced” tab (Ex.: the categoryPerfEvent). It’s indeed via that Tab that you should to enable the desired delivery modes: “email”, “sms”, …. which is obviously only possible for Notifications in a Category which is displayed.
Go back to the telnet console and execute: cp /usr/syno/etc/notification/notification_filter.settings /volume1/web/
As an alternative, you can use the Package “Config File Editor” to edit “/usr/syno/etc/notification/notification_filter.settings”
Edit the file ‘notification_filter.settings’ (E.g. with notepad++)
At the end of that file, insert a configuration line for each custom tag, specifying how the notification must be sent (Look at the other line for illustrations). Possible delivery mode are:
mail
sms
mobile
cms: this is the native popup notification mechanism of DSM, enabled by default for all notifications
Copy the file back to its original location: cp /volume1/web/notification_filter.settings /usr/syno/etc/
Examples:
MySqlBkpOK=”mail”
MySqlBkpError=”mail”
Now, reboot your Synology
It seems that in the past, I was able to apply my changes in those files without a reboot. But while testing this trick on DSM 6.x, I didn’t find how to do it without a reboot.
Finally, modify your script to sent your notifications:
Edit your script (E.g. with notepad++).
Add where required the following command: /usr/syno/bin/synonotify <YourCustomTag>
Save your changes.
In the example here after, I sent notifications depending on the success or failure of the previous command:
if [ $? -eq 0 ]
then /usr/syno/bin/synonotify MySqlBkpOK
else /usr/syno/bin/synonotify MySqlBkpError
fi
Finally, check that the “Notifications” are enabled on your Synology and tick options like emails, SMS, … for the new tags if required:
In your DSM, go to “Control Panel” > “Notification” > “E-Mail”
Tick the option “Enable e-mail notifications”.
Complete all the fields in that tab. At least: SMTP server, SMTP port, SMTP authentication and Primary email.
Send also a test mail from this tab to verify your settings.
Go next to the “Advanced” tab
Tick the “E-mail” option (and possibly others) for the new tags which appear now in the list.
If the tags do not appear, close and reopen the control panel. restart your DSM!
The tags appear with their Title under their Category
Notifications Configuration
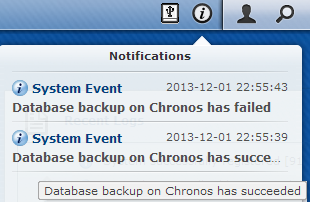
And here are the outcomes: a popup message and an email
Pay attention that the tags are case sensitive ! Also backup the changes you made in the file ‘mails’ and ‘notification_category’ as they will be overwritten for sure when you will update the DSM… Finally, delete the files ‘mails’ and ‘notification_category’ from your web folder…
Notice: the user EConceptApplications suggested on Synology Forum to use a script as here under to automatically reinsert the notifications
grep -q “MySqlBkpOK” /usr/syno/etc/notification/notification_filter.settings
if [ $? -ne 0 ]
then
Notice: a reader, k13tas, suggested that it was much easier to reuse an existing notification tag and customize its text via Control Panel > Notification > Advanced. Indeed, those changes are not lost after a DSM update.
Notice: a reader, Rusmin, posted here that he found how to pass parameters to be used in the notification message, via a hash json string. In his sample, one passes the value “value1” via a variable named %VAR1%. The value can obviously come from any variable of your shell script. Ex.: $PPID, $MyVariable, $$, etc…