First, connect your Smart Meter to a power supply on 5V 1A (Notice: I had frequent reboot and connection issues with one of mine. Using a power supply of 2A solved the problem)
Then, connect on the Wifi network created by the Smart Meter
Accept to connect this time on that network
Go to you phone settings > About Phone > Status Information, to check it’s new IP
Connect to the host “1” on that IP. So here, 192.164.4.1
In the Configuration section, “type” the SSID of your WIFI. NB: I have been struggling with that part until I typed manually the SSID in both text fields “SSID” and “SSID1”. Before that, the authentication probably always failed and I had to reconnect on the Wifi of the Smart Meter to try again that config.
I suggest to not configure anything else at this stage here (MQTT stuff, WaterMeter Value, WaterMeter Factor). You can do it later. Also, if you intend to use a DHCP server, do not fill the IP details. Just press “Save”
You will see this page. Wait for 30 seconds for the Smart Meter to restart and connect to your local network.
You can confirm check, in the Wifi connection settings page of your mobile, that the network SSIS “SmartGateways xxxxx” does not reappear. If it does, it means your Smart Meter failed to connect to your local network. Go back to 192.168.4.1
If you succeeded in connecting into your local network, you will have to authenticate in the Smart Meter using the login “admin” and the password “smartgateways” on the port 82
You can now change the login & password or set your parameters like the current value from your water meter and its factor (litter per pulse)
StorJ is a great solution to backup a Synology NAS with HyperBackup and probably the cheapest (Even if for a less than 1TB I prefer the “native” Synology C2 Storage). But how to browse your backup and recover only a few files? The solution: mount the StorJ’s S3 Bucket on your PC with Mountain Duck (As a Virtual Disk) and use HyperBackup Explorer to browse that “Local Backup” !
Expand to Read More…
Synology’s HyperBackup Explorer can only browse a local backup or a Synology C2 Storage. It means that, when using a third party S3, you would have to download your full backup locally to be able to retrieve just a few files… (Which cost 7$/TB with StorJ).
Indeed, the actual files (images, video, documents, …) can’t be browsed within a HyperBackup image with a simple S3 explorer (like the free “S3 Browser” or “CyberDuck”). You only find “bucket” parts…
Fortunately, with third party S3 like StorJ (pronounced “Storage”), you can mount the Bucket as a local Virtual Disk on your PC… And then use HyperBackup Explorer. This is great as you easily navigate also the timeline (version) of your files…
First, as I discovered on DrFrankenstrien’s Tech Stuff, here is how to create a StorJ S3 Bucket (you can start a StorJ account with 25GB free for 30 days):
Confirm your subscription (Attention: the verification email arrived in Gmail’s Spam !!!)
Now select the “PERSONAL” account
Enter your “Name”, choose “Backup & Recovery” and click “Continue”
Click “Start Free Trial”
And finally “Activate Free Trial”
Ok, now that you have an account, you have to create a “Project” with a “Bucket” where you will upload “Objects” from your Synology:
In my case, a default “My Sotrj Project” has been created automatically. My first step was therefore to click on “Set a Passphrase”
I selected to type my own passphrase (it will be requested each time one connect into StorJ’s Dashboard)
Once the passphrase enters, the next step is to “Create a Bucket”, here named “demostorj4synology”, with the default retention settings applies during the upload (I will let Hyper Backup manager the versioning)
You are now nearly ready to upload Objects…
Now, you have to prepare an API Key and get a Secret Key, which will be used to configured the connection on your Synology
Type an “Name” for this access and select the access type “S3 Credential”. In my case I grant “Full Access” (I.e. HyperBackup will be able to Read/Write/List/Delete).
Once “Access” created, you will have to download or at least copy the “Access Key”, the “Secret Key” and the “Endpoint” in a secure place (not to be shared, obviously) !
Voilà, your are now ready to go to your Synology and configure Hyper Backup. First step: create a new “Backup” of “Folders and Packages”
You have to scroll down in the next screen to select “S3 Storage”
Now:
Select “Custom Server URL” as “S3 Server”
Copy the “endpoint” you got when creating an “Access Key” as Server address
Select v4 as Signature Version
Keep Request Style as is
Enter your Access Key (Here is mine as I will delete it anyway after this demo)
Enter your Secret Key
If your Endpoint, Access Key and Secret Key are corrects, you should see your Bucket available as bucket name.
You can now select Folders to be included in your backup as well as Synology Packages (attention that some packages will also include all the files, such as the Web Station that includes the shared folder “web” – or Synology Drive Server that includes the shared folder “homes”)
Configure your Backup as you wish, regarding schedule and retention:
Now that the backup is running, it’s time to look how to mount that backup as a Virtual Disk on your PC, to be able to browse it with HyperBackup Explorer. A free solution exist but is not for beginners: rClone
There are a few user friendly tools available for those not confortable with command prompts and scripts… The cheapest is “Mountain Duck“. It’s the one I am using. Here is how to configure it. To make it easier, in the “Preferences”, you can enable the “Storj DCS” profile
So, now, add a connection
In, the popup windows:
Select ‘Sotrj DCS’ (or ‘Amazon S3’ if you didn’t enable that profile) for the connection
Enter a Label. Ex.: StorJ
in Server, type the Endpoint of StorJ,if not yet displayed (would be the case is you select “Amazon S3” as profile)
Enter your “Access Key” (uncheck the box Anonymous login)
Enter your “Secret Key”
Other parameters are just fine, but you can force the Driver Letter is you prefer…
Just in case you used the “Amazon S3” profile, the labels are different, but the config is the very same:
Now, you should see a Disk R: mounted on your PC, exposing the Bucket from your StorJ S3.
In order to monitor your Servers and Services, nothing better than phpServerMonitor running in a container on Synology.
Expand to Read More…
The container phpServerMonitor of scavin will do the trick (It’s possibly not the most up-to-date, but is works fine). You will only need a MySQL database hosted on your Synology.
phpServerMonitor looks like this:
First, install “MariaDB 10” (the default alternative to MySQL commonly used on Synology)
Then, open MariaDB10, enable a port (Ex: the default 3306) and apply this change
If it’s not yet done, install phpMyAdmin (not explained here)
Launch it with your administrator account (Select MariaDB10 as Server)
Create a DB named, for example, “servermon”:
On that new DB, add a new user account:
Type a user name, for example “servermon”, select a strong password (take note of it) and tick the option “Check all” Global privileges for the moment. Once phpServerMonitor installed and configured, you will only keep the “Data” access rights !
Launch the “Container Manager” on your Synology and in the Registry, search for scavin/phpservermonitor and download that image.
Once downloaded, configure and run it. The only config required is
mapping a port (Ex.: 4080) of the Synology on container’s port 80 (443 won’t work) and
removing the environment variable PHP_MD5 !!!
Now, navigate to http://<Your Synology Address>:<Port mapped> and click “Let’s GO”
Complete the required info in the configuration screen:
the Application base url should be completed automatically with : http://Your Synology IP:<Port mapped>
type the IP of your Synology as “database host” and the port enabled in MariaDB10 as “database port “
introduce new the name of database created previously, as well as the name and the password of the user added onto that DB.
Click on “Save Configuration” and if “MariaDB” was accessible, you should see this:
Click once more on “Save Configuration” and here you are:
“Go to your Monitor” to add Servers and Services. More info in the official website of phpServerMonitor 😉
Haaa, don’t forget to remove “Structure” and “Administration” rights for the user “servermon” on the DB “servermon” and all access rights at global level (if any):
In order to monitor your internet connection and confirm that it’s stable, day and night, nothing better than a Speed Test Tracker running in a container on Synology.
Expand to Read More…
The Speedtest Tracker of Henry Whitaker will do the trick. It’s based on Ookla’s Speedtest Cli from which it records recurrently the results.
It looks like this:
It’s quite easy to install and run into a container of DSM 7.x. First, install the “Container Manager”:
Then, register the image of henrywhitaker3/speedtest-tracker:
Next, create a new container with that image and enable auto-start (here, this container wont’ be exposed via the Web Station)
Finally, in the next tab:
Map a port of your Synology (Ex.: 7080) onto the port 80 of the container (and/or possibly 443).
Map a shared folder of your Synology (Ex.: /docker/Ookla) onto the folder /config of the container.
Scrolling down in that tab, add an environment variable “OOKLA_EULA_GDPR” with the value “true”.
If you don’t do it, the container will fail to run (it will stop automatically after one or two minutes) and you will find the following message in the Log of the container:
Once the configuration done, you can run the container. Wait for a few minutes before opening the Speedtest Tracker. Once the container up, you should see this in the Logs of the container:
You can now open the Speedtest Tracker (using http(s)://<your NAS IP>:<port configured>) and configure the scheduler to run a test on a regular basis. For that purpose, go to the “Settings” menu . Here under, the pattern ***** is used to run every minute(as per this site).
The default speedtest server in use does not support such a high pace.. It will soon stop and you will see these messages in the Logs:
The follow-up schedule can be use to run every 10 minutes: */10 * * * *
You can possibly look for other speedtest, using this URL : https://www.speedtest.net/api/js/servers?engine=js&https_functional=true&limit=100&search=YOURLOCATION
Use the ID of a server found via that URL in the Settings of the Speedtest Checker…
There are much more settings and other options to configure the container, but this minimal setup runs fine… And you will soon see if your internet connection is stable or not:
I have 1TB of videos and photos stored on Google Photos. As nowadays, the only export option is Takeout, as explained here, it’s a real pain in the ass to download all of them…
Fortunately, one option of Takeout, is to get a copy in your Google Drive. And then, you can easily download all your exported data using the free JDownloader as it support “Google Drive” 🙂
Expand to Read More…
First, take notes that the export from Google Photo to Google Drive will consume space. If you have 1TB of photos and videos, your need 1TB free on your Google Drive account !!! This is THE big limitation of this solution….
But assuming that you have enough free space, then GO: open Takeout and create a new Export that includes Google Photo (or anything else you want to export):
Click on Next Step, where you will be able to choose Google Drive as destination. I would suggest also to select 50 GB as File size.
Now, you have to wait until the export is ready. You will receive an email
Once notified that your export is ready, go and check in your Google Drive (Do with with Chrome). You should find a folder “Takeout” that contains all the zip file exported from Google Photo :
Install the Chrome Extension named “EditThisCookie” (available here on the Chrome Web Store) and Export the cookie of Google Drive (it will be copied into the clipboard).
Now, open JDownload, go to the Settings > Account Manager and Add the Hoster “drive.google.com”, pasting the cookie exported into the clipboard (The name is not important).
Once this new Hoster saved, you should now see this:
To avoid that this cookie expires, clear all cookies in Chrome (CTRL-Shift-Del). If you access Google Drive later, it will send you a new cookie but won’t expires the previous one (deleted).
Now, keeping JDownloader opened (to grap the links when you copy them into your clipboard), go to Google Drive and Copy the Links one by, using the menu (tree vertical dots) > Share > Copy Link
Each time you copy a link, it should be captured by JDownloader (it’s an option enabled by default) and you can start download the file.
In case you get an error on the downloads, go back to the “Account Manager”. The cookie possibly expired (Right Click > Refresh it to be sure). You have to redo the operation and then “Force Download Start” on the files to resume the downloads…
If you have a green screen when watching records of Synology Surveillance Station on your mobile phone, or tablet, and are using H.264 compression, then simply disable the “H.264 hardware decoding”.
Expand to Read More…
Do you see something like this on your mobile ?
Open the “DS Cam” App, click on the “three horizontal lines” top-left icon, and then on the gear icon:
Pairing Aqara device (Zibgee) with Homey can sometimes be frustrating. And it’s actually the same with other Hubs… Here is my trick : keep the device awake by pressing shortly on the button every 5 sec.
Click to Read MoreClick to Close
Usually, to pair an Aqara device (Zigbee) with your hub, you need to press the reset button until it starts flashing (usually 5 or 8 seconds depending on the model). However, often, nothing happens, and your hub will report that the pairing failed, even though you were close to the hub and made sure there were no Bluetooth devices communicating in the nearby area.
In such cases, after the reset (explained above), press and release immediately the reset button once every 5 seconds. This will keep the device awake and maximize the chance of a successful pairing.
Notice: Aqara devices are built by Lumi United Technology. Lumi is also producing the devices of Xiaomi. So, this trick is valid for most of them (and most ZigBee devices on battery)
This is probably a dirty trick, but it works. All my emails are passed through a gmail intermediary mailbox, where Spams are deleted and remaining emails are forwared to my OVH mailbox.
Click to Read MoreClick to Close
As partially explained here, I used to have a mailbox “MyUser@MyDomain” in a MX Plan of OVH to store all my emails and an email address “MyAddress@MyDomain” which was a redirection to a gmail mailbox “MyUser@gmail.com” (People are sending me emails only on “MyAddress@MyDomain”).
All emails passed to “MyUser@gmail.com” are filtered (antispam), forwarded into my mailbox “MyUser@MyDomain” and archived at gmail (so a “backup” is kept there).
My Outlook used to be configured with IMAP to fetch emails from “MyUser@MyDomain” and SMTP to sent emails “From: MyAddress@MyDomain”
Unfortunately, mailboxes of MX Plan at OVH are limited to 5GB. So, I decided to migrate my mailbox “MyUser@MyDomain” to a “Mail Pro” account at OVH.
First, while doing so, very important, I had to define the domain as “non-authoritative” in the “Mail Pro” account !!! Otherwise, the “Redirections” defined in the MX Plan won’t work anymore.
Next, I configured my new Mail Pro account in Outlook (NB.: this account, migrated from the MX Plan, still has the same name: “MyUser@MyDomain”). Unfortunately, once this Mail Pro account configured in Outlook, I couldn’t sent email “From: MyAddress@MyDomain” anymore. The reason is that “Mail Pro” does not know “MyAddress@MyDomain” which is defined in the MX Plan. Sending emails via the account “MyUser@MyDomain” but “From: MyAddress@MyDomain” is therefore considered as Spoofing by Mail Pro (NB.: it’s not the case within a MX Plan).
If you don’t care about the gmail antispam filtering anymore, then you can simply:
Delete the Redirection “MyAddress@MyDomain” from the MX Plan.
Wait for 30 sec, to be sure the delete is executed.
Create an Alias “MyAddress@MyDomain” in your Mail Pro (it will fail if the delete is not yet executed. If this occurs, retry)
To, instead, keep the mechanism above in place:
Create a new mailbox in the MX Plan, with simply 50MB, going to be used only to send emails via SMTP: “MyMail@MyDomain”
Configure Outlook:
To use “MyAddress@MyDomain” as “From”
IMAP with the account of Mail Pro (“MyUser@MyDomain”)
SMTP with the account of MX Plan (“MyMail@MyDomain”)
It results into this schema:
Disclaimer: an SME from the community OVH reports that not only OVH is sometimes blocking outgoing emails without notifications (as those are considered as Spams, but also Gmail is rejecting many incoming emails with unclear explanation for most standard users. As a consequence, some/many (?) emails could be “silently lost” with the mechanism above….
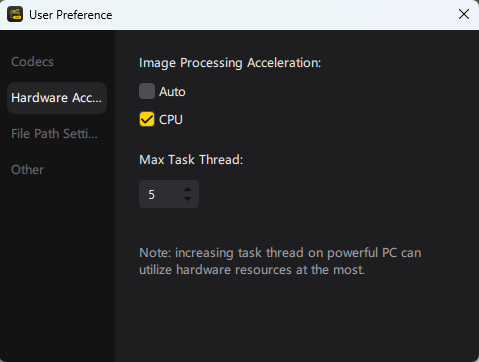
After upgrading to the version 4.9.1, from Insta360 Studio started to crash immediately after pressing the export button. A downgrade to 4.8.4 didn’t solve the issue. But using “CPU” instead of “Auto” as “Image Processing Acceleration” did the trick !
Click to Read MoreClick to Close
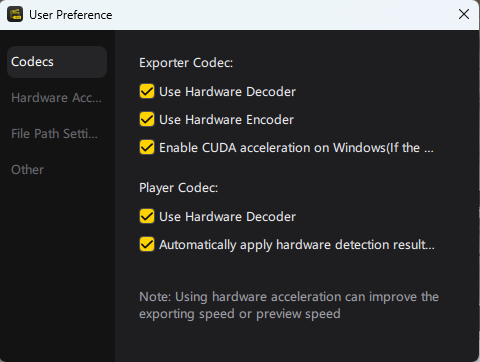
I was expecting an issue with the Codecs and so I did first untick all the options enabled by default in related tab of the User Preference
But that didn’t help. So I tried next to set “CPU” instead of “Auto” for “Image Processing Acceleration” in the Hardware Acceleration tab. And it solved the problem.
I didn’t find any information on that flag on Insta360 forum…
NB: the error message from Insta360 when trying to export the video was something like : Error Code 1024
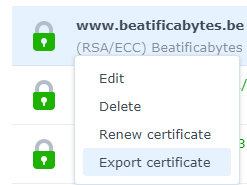
After exporting all my certificates from an old NAS to a new one, I realized that they were not renewed automatically anymore. Trying to renew them manually via the DMS UI (Control Panel > Security > Certificate), a zip file with a CSR file (Certificate Signing Request) and a Key file, was downloaded. I had no idea how to proceed with these, so I investigated why the automatic renewal was not working as on the old NAS. The reason was the lack of “renew.json” file on the new NAS.
Click to Read MoreClick to Close
Before starting, I strongly advice to export all the certificates, one by one, using the DSM UI (Control Panel > Security > Certificate) !!!
Connected on the NAS via SSH, I tried first to renew the certificates with the command: /usr/syno/sbin/syno-letsencrypt renew-all
Looking into /var/log/messages, I noticed that syno-letsencrypt was complaining about a missing renew.json file :
syno-letsencrypt[19750]: syno-letsencrypt.cpp:489 can not find renew.json. [No such file or directory][/usr/syno/etc/certificate/_archive/XXXXXX]
NB.: To get more details, the verbose version of the renewal can be useful: /usr/syno/sbin/syno-letsencrypt renew-all -vv
On Synology, there is one folder /usr/syno/etc/certificate/_archive/XXXXXX per certificate, where XXXXXX is the ID of the certificate. It is assumed to contain these files: cert.pem, chain.pem, fullchain.pem, privkey.pem and renew.json. And indeed, there was no file renew.json, in the folder XXXXXX
So, on the old NAS, I looked for the folder AAAAAA containing the same certificate as in XXXXXX (once imported on another NAS, the certificate gets a new unique ID ). Check the file /usr/syno/etc/certificate/_archive/INFO to identify the ID of the certificate.
Once the folder AAAAAA identified, read the file renew.json which looks like this:
BBBBBB is the folder containing your letsencrypt user account, stored in the file /usr/syno/etc/letsencrypt/account/BBBBBB/info.json (Notice: there can be several accounts if you used different contact emails for your various certificates).
Look on the new NAS for the folder ZZZZZZ equivalent to BBBBBB (comparing the info.json files).
Once AAAAAA and BBBBBB determined, I did create a file /usr/syno/etc/certificate/_archive/XXXXXX/renew.json on the new NAS, containing:
And finally, I could run successfully the renewal: /usr/syno/sbin/syno-letsencrypt renew-all -vv
To update only one certificate (for testing purpose, it’s safer than renew-all), use the folder name XXXXX of the certificate : /usr/syno/sbin/syno-letsencrypt renew -c XXXXXX -vv
Here attached, find a script created by ChatGPT to help in generating the renew.json files (Copy and run it into /usr/syno/etc/certificate/_archive/)