I just discovered that I was not able to access my NAS anymore from internet. The problem was that I did re-enabled the Wifi by accident on my Vdsl modem.
Click to Read MoreClick to Close
Tthe DHCP server gave unfortunately the first free IP of the IPv4 pool to “an unknown Wifi device” instead of assigning this IP to my router as it used to be the case in the past. Port Forwarding from internet to my router, defined using that first IP, couldn’t work anymore.
I just did assign a static IP to my router in the Vdsl modem’s DHCP server settings (and re-disabled the WiFi). I did reboot next the router.
A real pain in: out of the box, it is impossible to use an Azerty physical keyboard with a NVidia Shield TV console… You need an app for that! I am personally using the “External Keyboard Helper Pro”.
I noticed that between 50GB and 100Gb of my Internet Quota was consumed per day since two weeks. After investigation, I found it was due to the Cloud Sync service of my Synology Nas “looping” infinitely.
Click to Read MoreClick to Close
The first step was to identify the device downloading some many Gb per day.
I did enable the logging service on my router and turn on the logging of its firewall for all outgoing connections.
I did export the log of the firewall into notepad++, cleaned up a bit the log to keep the source and destination IP only.
I did copy that into Excel and created a pivot table to see which source was doing many connection and onto which external IP (eliminating known destinations as the DNS of google 8.8.8.8 and 8.8.4.4, the Synology’s KeepAlive service 118.163.30.162, Broadcast 192.168.0.255, …) I saw that most connections were onto 172.217.16.193, 172.217.21.202, 172.217.22.42, … from my NAS.
Using a IP who IS service, I found that 172.217 belongs to Google. Why was my NAS connection to Google ? I did look all the packages installed on my NAS and “tilt”: Cloud Sync was configured to sync two google accounts… Having a quick look into the current status of Cloud Sync, I noticed it was “syncing” 1 file… apparently for ever.
I did connect on my NAS via Telnet and looked into /var/log/cloudsync/daemon.log
In there, I found that cloud sync was logging, in a loop, errors like:
Dec 10 11:19:26 [ERROR] gd-pull-event-by-list-handler.cpp(89): ListDirectory: ListRemoteSubitems failed (retrying) [-1000] User rate limit exceeded
Dec 10 11:19:26 [ERROR] gd-transport.cpp(2195): error reason: [rateLimitExceeded].
Dec 10 11:19:26 [ERROR] gd-transport.cpp(2196): error message: [Rate Limit Exceeded].
Dec 10 11:19:26 [ERROR] gd-transport.cpp(2238): Hit rate limitation.
Dec 10 11:19:26 [ERROR] gd-transport.cpp(3082): [-1000] User rate limit exceeded. URL=’https://www.googleapis.com/drive/v2/files?fields=nextLink%2Citems%28id%2Ctitle%2CmimeType%2CfileSize%2CmodifiedDate%2Cmd5Checksum%2CdownloadUrl%2CalternateLink%2Cparents%28id%29%2Clabels%28trashed%29%29&q=trashed%20%3D%20false%20and%20%271QmcGFz7PI0P_0TUlaAJkNfzWRw%27%20in%20parents’
I will look into a solution to this issue and temporarily unlinked the Google Drive account from Coud Sync…
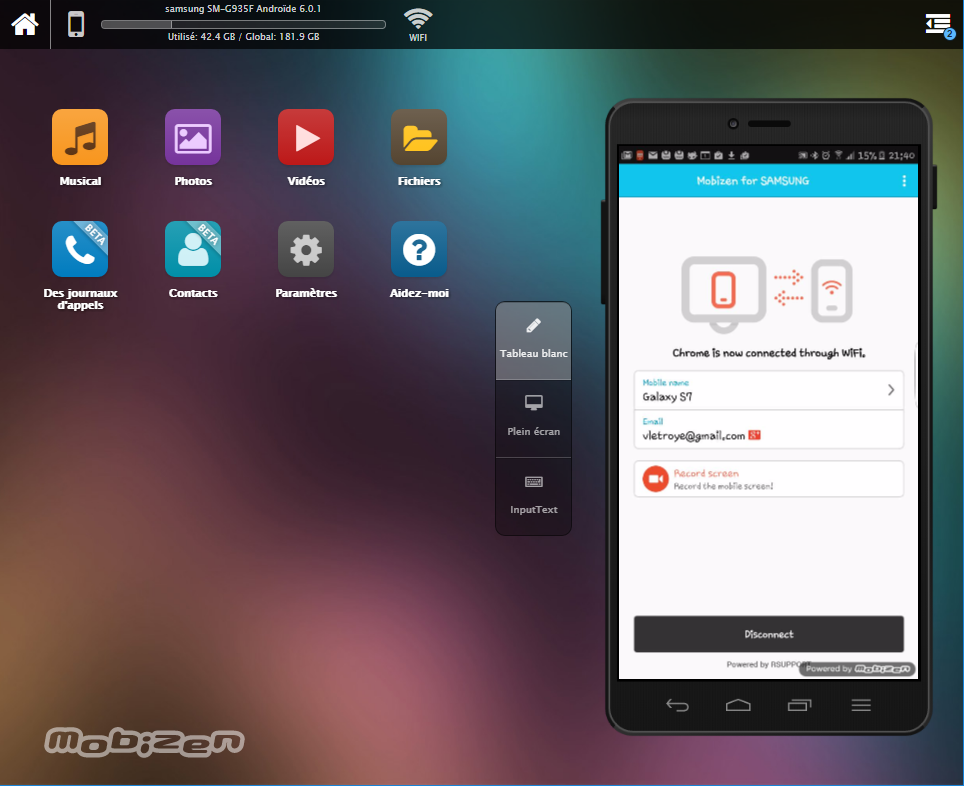
I wanted a simple web client to access my mobiles and tablets from my PC. I found and adopted Mobizen.
Click to Read MoreClick to Close
From a feature perspective, I was simply looking for something similar to the Google Chrome Remote Desktop or the Microsoft Remote Desktop but, if possible, without the need to install anything on the PC; i.e.: a purely web client mirroring an Android screen .
I did test first AirDroid which is great, advanced, quite complete from a feature perspective. But first, it’s a bit too complex to “simply” remote access Android and next requires to install.
I tried next Mobizen. This one is not as complete as AirDroid which comes with its own interface to access SMS, calls, files, photos, videos, contact, …, without the need to use the full remote access (mirroring the screen). But some of the missing features in Mobizen are already available in Beta.
Here is what the remote access to my Galaxy S7, from Chrome, looks like.
Mobizen Remote Web Access
It requires an App on the Mobile: Mobizen mirroring. Nb.:A dedicated version exist for Samsung.
Next to that, I am also using TeamViewer, which is great as the same product can be used in both direction. I.e.: with the TeamViewer “host” App for Android, PC’s can remotely access mobiles and tablets. And with the TeamViewer “for remote control” App for Android, mobiles and tablet can remotely access PC’s.
This is an update of a old post written for DSM 4 and 5: how to use the native Notification Mechanism of Synology to sent custom notifications. It’s now tested on my DS1815+ with DSM 6.0.
Click to Read MoreClick to Close
First, define the Notifications to be sent:
Open a dos command prompt, and execute: telnet <YourSynoHostname>
As an alternative, I am using the free telnet client “Putty” to open SSH Console.
Login as administrator
Once connected via telnet, enter the root mode with the command ‘sudo -i’, using here also the password of your administrator
Execute next: cd /usr/syno/synoman/webman/texts/
Execute: ls
Now you see a list of folders for each language supported by your Synology. You must at least defined your custom notifications in the ‘enu’ version and next the version that match your language.
Copy the file with the definition of the existing notifications in a shared folder to edit it easily: cp enu/mails /volume1/web/
I presume here that the web station is enabled, otherwise, copy the file ‘mails’ in any other shared folder.
As an alternative, you can use the Package “Config File Editor” to edit “/usr/syno/synoman/webman/texts/enu/mails”
Edit now this file ‘mails’ (e.g.: with notepad++: \\<yourSynoHostname>\web\mails)
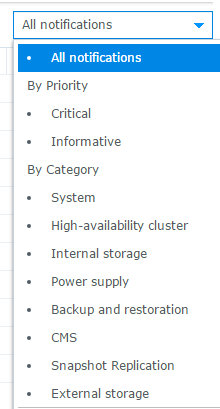
Add your new custom “tags” at the end of the file with an adequate definition (see bellow for an example). You must specify a Title, a Subject, the text, and a Category with its priority. The category is used to group the Notifications in the DSM > Control Panel > Notification > Advanced Tab. For each Category, specify one of the possible values with a “Priority”, separated by a coma. The priority is used to filter the notifications in the “Advanced” tab (Look at existing tags in the file for illustration):
Possible values for “Category”
Backup/Restore: group under ‘Backup and Restoration’ in the “Advanced” tab
CMS
External Storage
HA: grouped under ‘High-availability cluster’
AHA: not displayed in the “Advanced” tab but related to External Storage
Storage: grouped under ‘Internal Storage’
USB Copy: not displayed in the “Advanced” tab but related to External Storage
Power System: grouped under ‘Power supply’
System
PerfEvent: not displayed in the “Advanced” tab but related to System
Possible values for “Priority”
Important: displayed as Critical
(no value): displayed as Informative
Synology Notifications
Save your changes (E.g.: back to the telnet console, execute: cp /volume1/web/mails enu/mails)
Examples:
[MySqlBkpError]
Category: Backup/Restore,Important
Title: Database backup failed
Subject: Database backup on %HOSTNAME% has failed
Dear User,
Database backup on %HOSTNAME% has failed.
[MySqlBkpOK]
Category: Backup/Restore
Title: Database backup completed
Subject: Database backup on %HOSTNAME% has succeeded
Dear User,
Database backup on %HOSTNAME% has successfully completed.
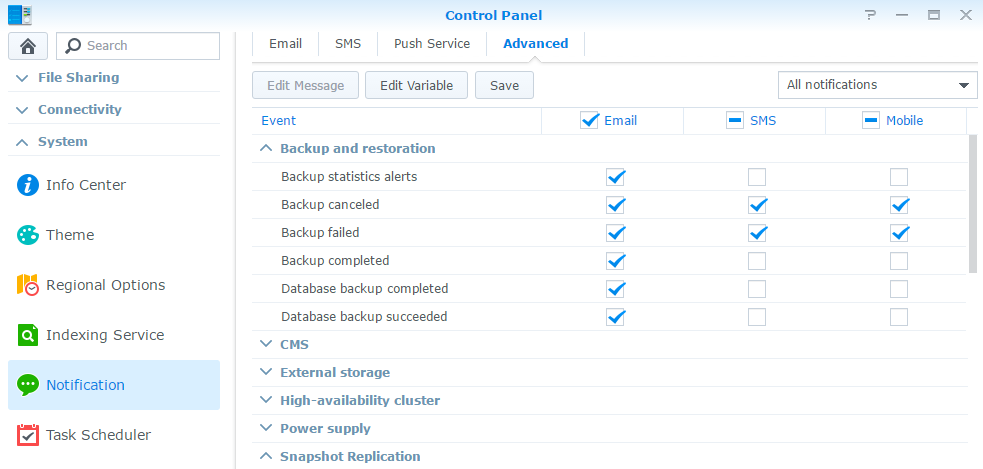
Next, define how to sent those custom Notifications if and only if they are in a Category which does not appear in the “Advanced” tab of the “Control Panel” > “Notifications” pane > “Advanced” tab (Ex.: the categoryPerfEvent). It’s indeed via that Tab that you should to enable the desired delivery modes: “email”, “sms”, …. which is obviously only possible for Notifications in a Category which is displayed.
Go back to the telnet console and execute: cp /usr/syno/etc/notification/notification_filter.settings /volume1/web/
As an alternative, you can use the Package “Config File Editor” to edit “/usr/syno/etc/notification/notification_filter.settings”
Edit the file ‘notification_filter.settings’ (E.g. with notepad++)
At the end of that file, insert a configuration line for each custom tag, specifying how the notification must be sent (Look at the other line for illustrations). Possible delivery mode are:
mail
sms
mobile
cms: this is the native popup notification mechanism of DSM, enabled by default for all notifications
Copy the file back to its original location: cp /volume1/web/notification_filter.settings /usr/syno/etc/
Examples:
MySqlBkpOK=”mail”
MySqlBkpError=”mail”
Now, reboot your Synology
It seems that in the past, I was able to apply my changes in those files without a reboot. But while testing this trick on DSM 6.x, I didn’t find how to do it without a reboot.
Finally, modify your script to sent your notifications:
Edit your script (E.g. with notepad++).
Add where required the following command: /usr/syno/bin/synonotify <YourCustomTag>
Save your changes.
In the example here after, I sent notifications depending on the success or failure of the previous command:
if [ $? -eq 0 ]
then /usr/syno/bin/synonotify MySqlBkpOK
else /usr/syno/bin/synonotify MySqlBkpError
fi
Finally, check that the “Notifications” are enabled on your Synology and tick options like emails, SMS, … for the new tags if required:
In your DSM, go to “Control Panel” > “Notification” > “E-Mail”
Tick the option “Enable e-mail notifications”.
Complete all the fields in that tab. At least: SMTP server, SMTP port, SMTP authentication and Primary email.
Send also a test mail from this tab to verify your settings.
Go next to the “Advanced” tab
Tick the “E-mail” option (and possibly others) for the new tags which appear now in the list.
If the tags do not appear, close and reopen the control panel. restart your DSM!
The tags appear with their Title under their Category
Notifications Configuration
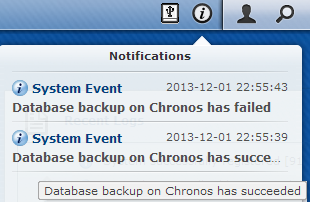
And here are the outcomes: a popup message and an email
Pay attention that the tags are case sensitive ! Also backup the changes you made in the file ‘mails’ and ‘notification_category’ as they will be overwritten for sure when you will update the DSM… Finally, delete the files ‘mails’ and ‘notification_category’ from your web folder…
Notice: the user EConceptApplications suggested on Synology Forum to use a script as here under to automatically reinsert the notifications
grep -q “MySqlBkpOK” /usr/syno/etc/notification/notification_filter.settings
if [ $? -ne 0 ]
then
Notice: a reader, k13tas, suggested that it was much easier to reuse an existing notification tag and customize its text via Control Panel > Notification > Advanced. Indeed, those changes are not lost after a DSM update.
Notice: a reader, Rusmin, posted here that he found how to pass parameters to be used in the notification message, via a hash json string. In his sample, one passes the value “value1” via a variable named %VAR1%. The value can obviously come from any variable of your shell script. Ex.: $PPID, $MyVariable, $$, etc…
By default, MX player doesn’t support ac3 audio due to licensing issue. Using a custom codec solves this.
Click to Read MoreClick to Close
Don’t download and install the «NEON Codec 1.8.9 for Android 6+» usually suggested for MX player in order to support AC3 (available on Google play as «MX Player Codec for ARMv7 NEON CPUs»).
Instead, download the custom codec for arm v7 neon 1.8.6 (available here). Unzip that file, open MX Player, click on the menu …, go to settings > decoder. Scroll down to the very bottom and select Custom Codec. There, pick the file libffmpeg.mx.so.neon.1.8.6 you have just unzipped.
MX Player will next restart. You can now try a video with ac3 codec. Ex.: download a sample from here.
Since a few week, I have issues when trying to access devices or services in my LAN via domain names defined within my local DNS Server. The problem was due to AVAST’s “Secure DNS” feature (recently enabled unmindfully).
Click to Read MoreClick to Close
I have defined a Master Zone for BeatificaBytes.be in my DNS Server (hosted on my Synology). It’s pointing on my NAS itself. Doing so, I can access my blog from my LAN just as from Internet. Without that Master Zone, a ping on BeatificaBytes.be would return the internet IP of my modem. And I can’t use that IP to access my NAS (hosting my blog) from within my LAN.
In that Master Zone, I have defined a A record for www, to forward www.BeatificaBytes.be onto the local IP of my blog.
I have also a few other Master Zones defined to access various devices…
Since a few weeks, I was not able to ping any devices anymore and my blog was only accessible on BeatificaBytes.be but not anymore on www.BeatificaBytes.be.
I spent hours to reconfigure my DNS Server, testing all the various settings, without success. I have never executed so many ipconfig /flushdns, ipconfig /release, ipconfig /renew, ipconfig /all, ping www.BeatificaBytes.be and nslookup www.BeatificaBytes.be 😀
I have finally figured out that the problem was with AVAST. It has a feature named “Secure DNS” which protects yourself against “DNS hijacking”. DNS hijacking redirects you from the site you want to visit, to one that looks just like it. Secure DNS ensures the site you’re visiting is real.
So, Avast was preventing me to access my blog on an IP which was not the one of my real “domain name” registered on Internet. But as I only defined the fully qualified “www.BeatificaBytes.be” within my Internet Provider’s DNS Settings, I was still able to access my blog locally on “BeatificaBytes.be” (This has been a lot disturbing my investigation).
It’s really the first time since 1996 that I curse Avast !
Since a few weeks, WordPress is really slow when I access it from my LAN with it’s domain name http://beatificabytes.be
The problem was with the name resolution on my PC.
Click to Read MoreClick to Close
My blog is hosted on my NAS, that I usually accessed via its netbios name or via its local IP address. But to make it easier for me, I also defined a domain ‘beatificabytes.be’ on my NAS’ DNS Server, with a A Records for www, pointing on the IP of the NAS.
So, I can access my blog locally with either the domain name ‘beatificabytes.be’ (if I am lazy) or with the fully qualified name ‘www.beatificabytes.be’.
The problem is that the actual URL of my blog, defined in WordPress’ settings, is ‘www.beatificabytes.be’. So, many pages of the blog are referencing scripts and images hosted on on that address ‘www.beatificabytes.be’.
And, a few weeks ago, for some unclear reason, my PC started to fail to access my NAS via the url ‘www.beatificabytes.be’. I was only able to access it with its netbios name, its IP or the domain name ‘beatificabytes.be’ (without www).
The reason was an issue with the name resolution on my PC (I thought it was an issue with the “DNS” Server but it was actually due to Avast’s feature ‘Secure DNS’).
Therefore, each page trying to load resources from www.beatificabytes.be was getting timeouts, making the rendering very slow (without any visual notification!)…
I did fix the name resolution issue and I can now access again my blog ‘full speed’.
Conclusion, open the Debug window of your browser to look at possible network or script errors 😉
Although I did upgrade some parts of my old PC Chaos, built end of December 2012, it’s suffering of his age. I have various issues with the power management, the USB ports, the sound, … So, I have decided to migrate its OS to a new hardware using Acronis Universal Restore.
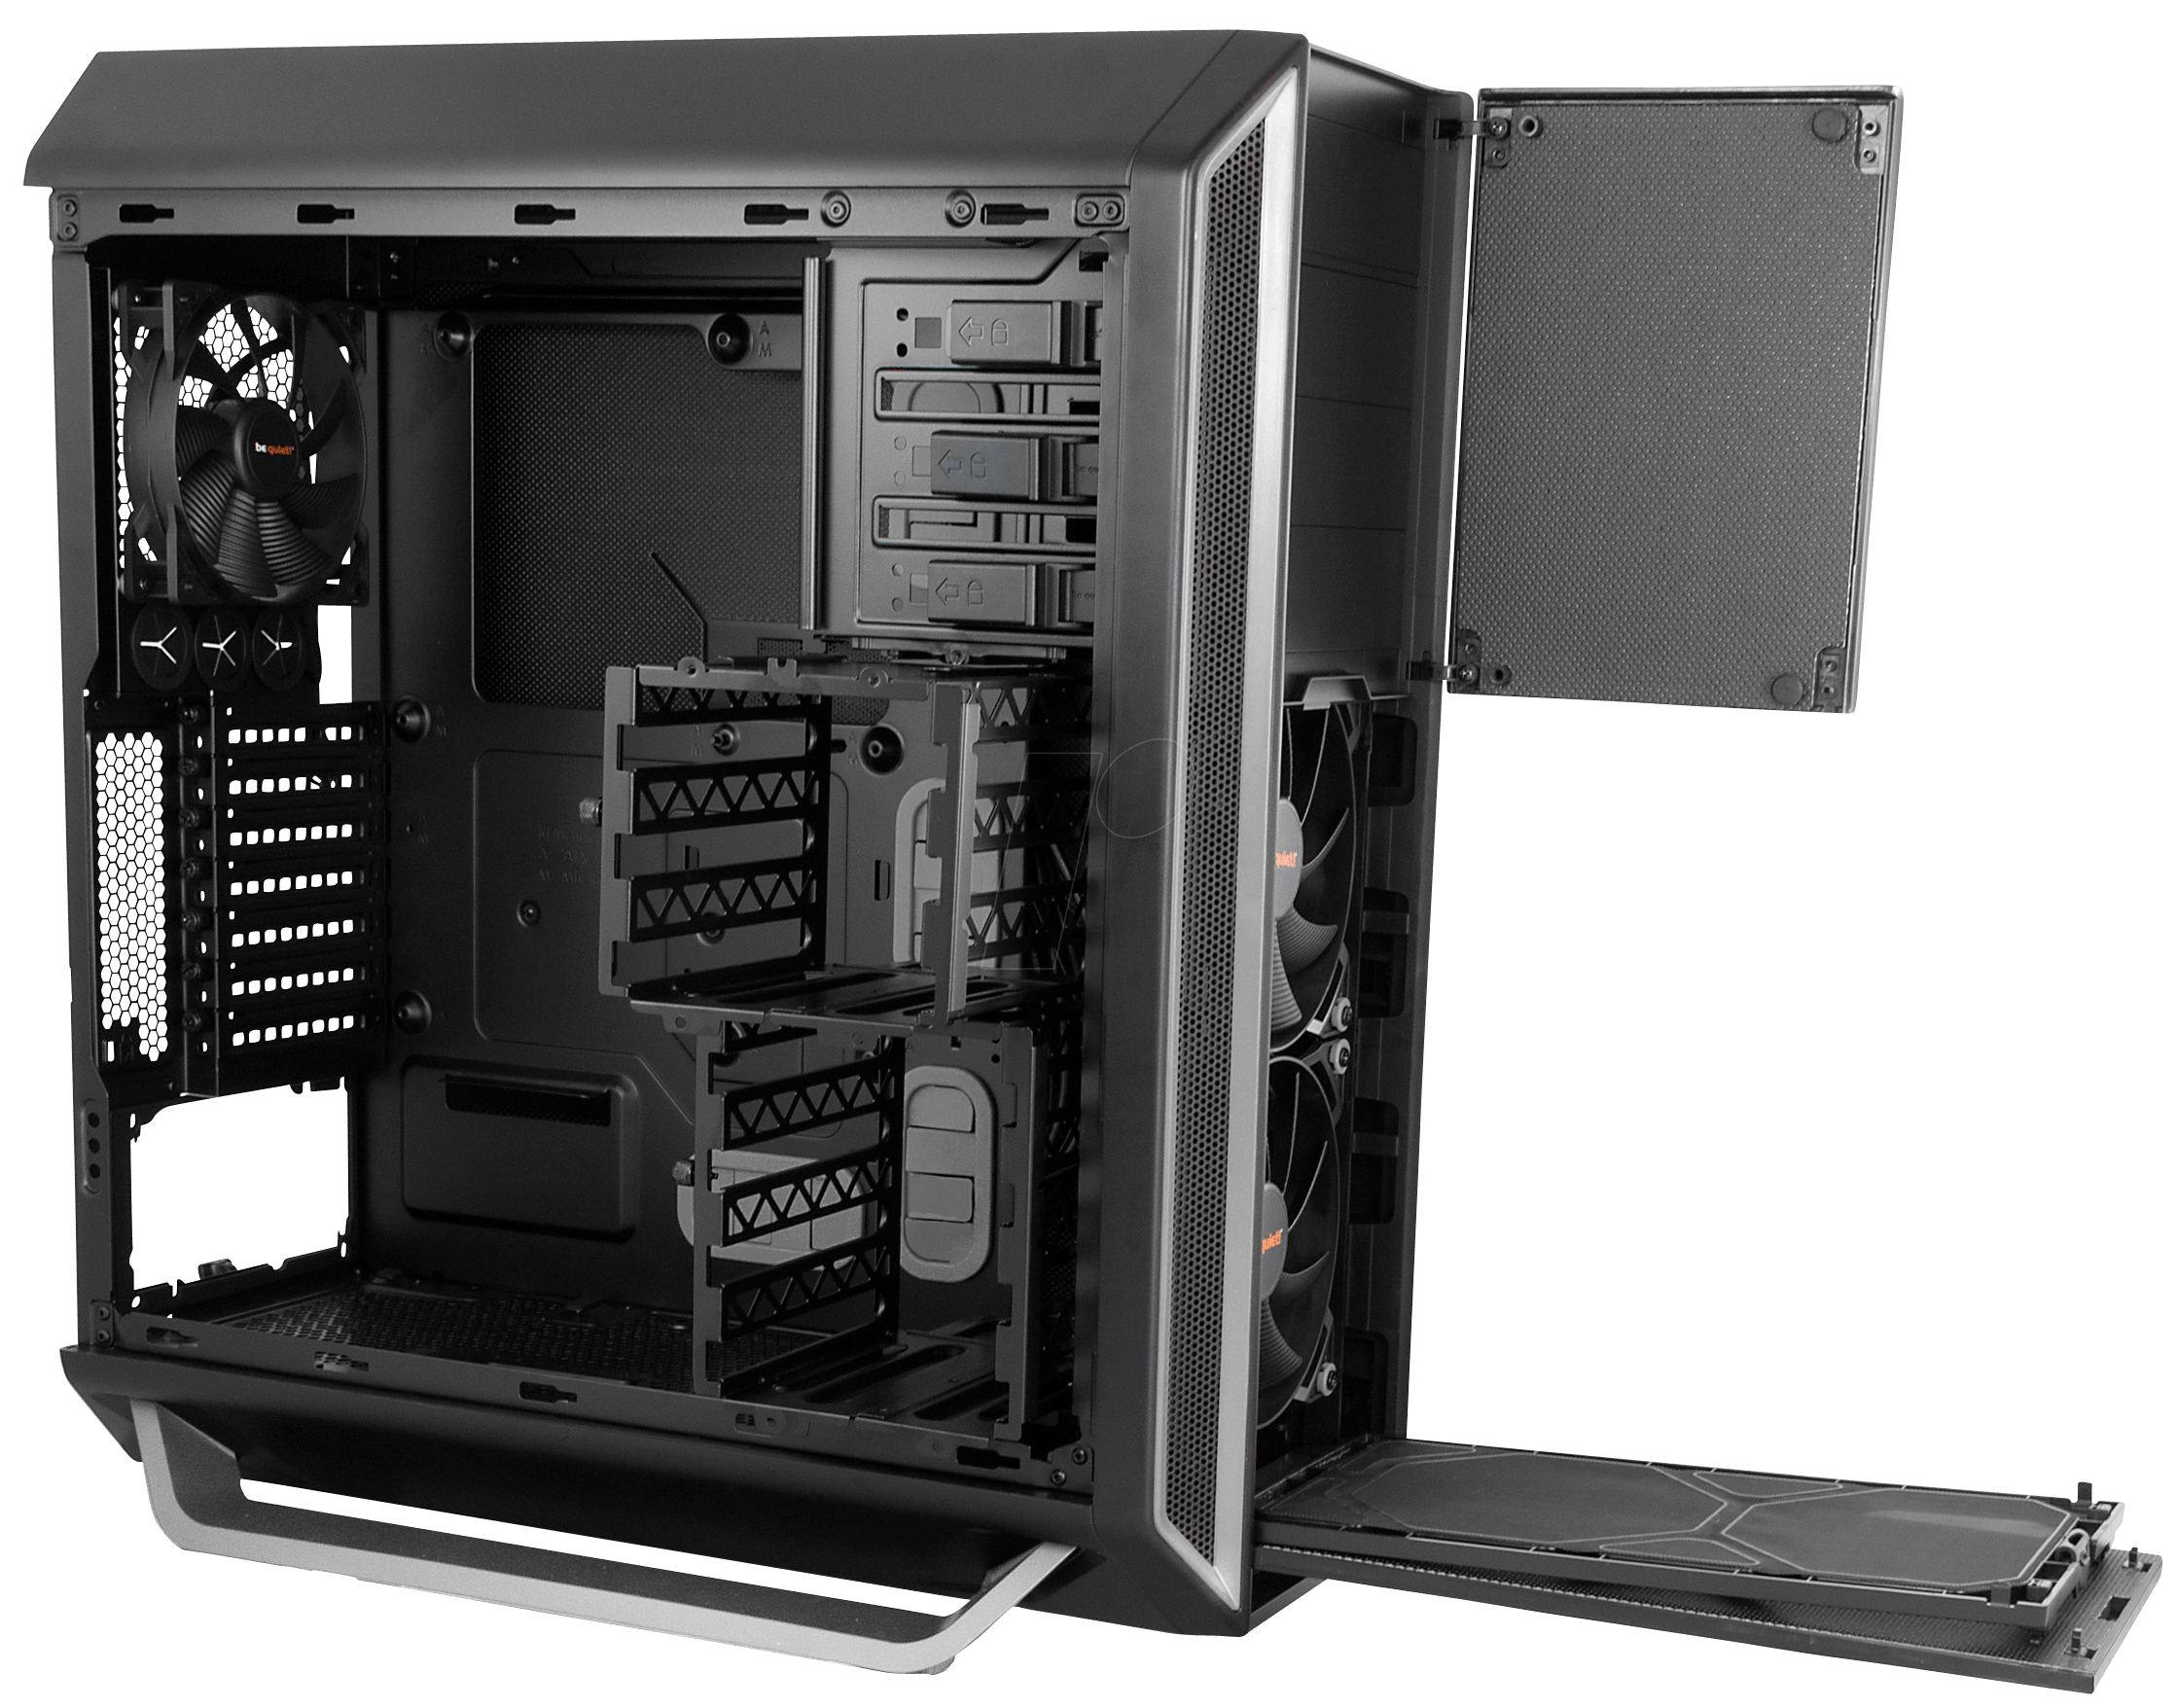
1 x case Be Quiet! Silent Base 800 High End ATX Tower PC (BG002).
Performing slightly better than the Be Quiet! Dark Rock Pro3 (BK019) according to various reviews, but more expensive.
1 x PSU Corsair HX850i (850W) 80 Plus Platinum
A bit less performing than the Be Quiet! Dark Power Pro 11, but cheaper, guarantee twice longer (10 years), with manual and temperature-controlled fans, Semi-passive, consuming 0.00 W when Off and coming with Flat cables.
The choice between this one and the Corsair RM850i was very hard has the second one is nearly as efficient (although it’s only Gold) but ~18% cheaper. The HX comes however with 2 more connectors…
Don’t do the same mistake as I did. Air is suck into the PSU. Mount the PSU with the fan sucking the air from the bottom of the tower (if possible) instead of sucking air from inside the tower.
2 x PCI Carte with 5 external USB 3.0 Ports and 1 internal USB 3.0 connector Inateck
2 x Icy Dock Trayless 3.5” SATA HDD Mobile Rack for 5.25 bay TurboSwap MB171SP-B with a fan cooler
To use SSD into those Racks, I use an Icy Dock MB982SP-1S 2.5” to 3.5” Full Metal SATA HDD and SSD Converter.