Author: vletroye

  • Cannot make my IMDB watchlist public?

    Each time I try to change my IMDB watchlist from “private” to “public”, it seems to be changed but comes back to “private” once I click on “Done”.

    This is a bug in the IMDB interface. There is fortunately a workaround: after changing the status of the list, add a movie in that list before clicking on “Done”.

    This bug is reported here.

    Loading

  • “Page not Found” in WordPress after Upgrade

    I got “Page Not Found” on any permalink clicked in my blog after doing:

    • an upgrade of the Synology’s WordPress package from 3.4 to 3.5.
    • and an upgrade all my Plugins.

    The problem was in the URL rewriting configured in the .htaccess.

    Click to Read More

    The easiest solution is to reset the “Default” common settings for the Permalink via the WordPress Dashboard. This will reset the .htaccess.

    1. Go into the DashBoard > Settings > Permalinks.
    2. Select “Default” in the “common settings”
    3. “Save Changes”

    Possibly set back next your favorite settings (such as “Post name” in my case).

    Voilà.

    Here is for information purpose the content of the .htaccess once fixed:

    [bash] # BEGIN WordPress

    RewriteEngine On
    RewriteBase /wordpress/
    RewriteRule ^index\.php$ – [L] RewriteCond %{REQUEST_FILENAME} !-f
    RewriteCond %{REQUEST_FILENAME} !-d
    RewriteRule . /wordpress/index.php [L]

    # END WordPress
    [/bash]

    Loading

  • Connect a Logitech Elite Keyboard on a generic Bluetooth dongle

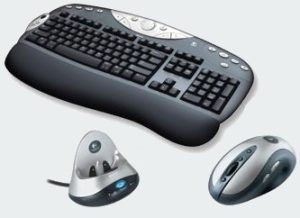
    I am still using the Logitech Elite Bluetooth Keyboard I bought years ago. It was sold in a bundle with a Bluetooth Optical Mouse MX900 and a Bluetooth Hub. That Hub also served as a cradle to charge the Mouse.

    Logitech Elite Keyboard And MX900 Mouse
    Logitech Elite Keyboard, MX900 Mouse and Bluetooth Hub

    Since I don’t user the Mouse anymore and don’t need therefore the Cradle to recharge it, I thought I could get rid of it if I could connect the Keyboard on a Generic Bluetooth dongle or even better: on my onboard Bluetooth.

    Click to Read More

    Actually, I don’t use the MX900 mouse anymore since the Cradle does not recharge it anymore. I think the “contacts” are dead. This seems to be a quite common issue.

    And since my Asus P9X79 Pro MB comes with an onboard Bluetooth, I thought that I could completely get rid of the Logitech Hub which has its own power supply, a usb connector and a PS/2 connector… i.e.: too many cables :/

    This is well supported by Logitech as explained in their Bluetooth FAQ. Here is how to proceed on Windows 8:

    1. The Bluetooth must already be installed. The default “drivers” (Bluetooth stack) from Microsoft will work fine.
    2. Right-click the Bluetooth icon in the system tray and select “Add a Bluetooth device.”
    3. Click “Add a device” on top of the Devices list.
    4. While the Wizard is searching for new devices press the “Connect” button behind the Keyboard (The small white button next to the battery compartment). A generic Keyboard will appear in the list. It will only be displayed as a Logitech Elite Keyboard once installed.
    5. Once the keyboard detected and added, Windows will prompt you to type a passkey on the Keyboard. You must end by pressing ‘Enter’ to validate the passkey.
    6. Now, you have to disallow Windows to turn off the Bluetooth while entering the sleep mode otherwise the Bluetooth keyboard will appear “Offline” when you wake up the computer.
      1. Right-Click the Bluetooth icon in the system stray and select “Open Settings”
      2. Open the “Hardware” tab in the “Bluetooth Settings” pane
      3. Select your Bluetooth dongle (or onboard emitter) and click on the “Properties” button to open the “Bluetooth Properties” pane
      4. Click on “Change settings”. You will see a new tab “Power Management”
      5. Open this “Power Management” tab and deselect “Allow the computer to turn off this device to save power”.
    7. The computer may have to be rebooted if the keyboard is not immediately enabled.

    The only drawback is that I won’t be able to use the keyboard at boot time (e.g.: to enter the bios) or in safe mode. To support that, the Logitech Bluetooth Hub came with a PS/2 connector.

    Loading

  • Fix Wi-Fi issue on Fuhu Nabi 2

    As I mentioned in a comment on this post, I was suddenly not able anymore to turn on the Wi-Fi of my Nabi 2. But it was easy to solve 🙂

    Click to Read More

    The situation when the problem occurred was this one:

    • My Nabi 2 is a UK version
    • The Product Version of my Nabi was 1.9.37 before rooting the device and installing the Gapps and it was still that version when the problem occurred.
    • I was using TWRP 2.2.2.1 as my Nabi 2 is suffering the Touch Screen Calibration issue with any next version.

    I have been reading many threads about that issue, mainly starting from this one. And I finally concluded that the only solution was to re-install the stock firmware, upgrade next to the latest Product Version and retry to root and install Gapps. It worked like a charm :p

    The easiest to do that is to use the Nabi Lab v2. It’s so well done and clear that the details provided here after are actually useless.

    1. If your PC is not ready (has the drivers) anymore to connect on the Nabi,  use first the menu 1.
    2. Use next the menu 3 to restore the stock firmware.
      • After this, my device was still running the Product Version 1.9.37 and all the original applications from Fuhu were back.
      • Most of the applications I installed from Google Play had disappeared but not all ?! I was expecting all of them to be swiped out…
    3. Reboot the device and go to the Settings > About tablet > Update to get the very latest Product Version.
      • In my case it moved from 1.9.37 to 2.0. I read somewhere that this one includes a fix or improvement related to Wi-Fi.. Good :p
    4. Back to Nabi Lab, use the menu 4 to root the device
      • I didn’t use the menu 1 to install TWRP, root the device and install Gapps because I wanted to keep the TWRP 2.2.2.1 proved to fit my Nabi regarding it’s Touch Screen Calibration issue.
    5. Finally, use the menu 3 to install Gapps.
    Et voilà. Wi-Fi is working and my Nabi is still rooted and has access to Google Play.
    Notice:
    • I did try to install TWRP 2.5.0.0 for Nabi 2 but I was still experiencing the Touch Screen Calibration Issue.
    • I did try also next “TWRP 2.3.3.0 for Nabi versions prior 1.9.37 (UK, …)” available with Nabi Lab v2 and it appeared to works fine on my Nabi! Great 🙂
    • What is still not great with the Nabi 2: there is no native support to move applications from internal to external SD. It’s well known that not all applications can be moved (Ex.: those with Widgets currently in use, …). But they could offer something to move the others like use of “simlinks” for each moved .apk..

    Loading

  • IE requests the root “/” of the website at the same time as any other page

    I have been reported that for 5 customers out of 10000, each time their Internet Explorer does GET a page (including a simple **blank** html page), it also requests next the root “/” of the website (i.e.: the “homepage”). This has been making me going nuts.

    Click to Read More

    This problem occurs when browsing any page of any site on internet as well as any page in any one of our business sites. So, it is absolutely not related the well known issues such as an image with an empty “src”, the use of the “base” tag, … Also, it occurs only when browsing with IE and not with Chrome, Firefox, …

    This is a major issue as far as our business sites are concerned as the first call to any page of our sites is consuming an authentication “ticket”. Once this ticket is consumed, it is not available anymore for subsequent calls made within the same session. And because it happens that the ticket is consumed by the call to the root instead of the call to the page actually browsed, the business applications sometimes fail.

    I already experienced such a weird behavior with Add-Ons aimed at “page rating”, “survey”, … Such Add-Ons are not always considered as “malwares” and therefore not reported by antivirus, etc..

    Unfortunately, the faulty PCs (where the problem occurs) do no have any such Add-Ons. They are also 100% “malware free”… Using TCPView from SysInternals, we have confirmed that the unwanted GET is done by IE and not by another process. Using WireShark, we have also confirmed that this GET is not done by IE due to an “http 302” (redirect) or any other similar reasons, that there is no suspicious proxy used during the communication, etc….

    Using Process Explorer, we have listed all the dlls loaded by IE both on a “faulty” PC and on a “normal” PC (where the problem does not occur). The purpose was to detect possible “third party” dll. But they all appeared to be from Microsoft. We noticed however one dll loaded on the faulty PC which was not reported on the “normal” PC: msrating.dll,  the interal “Internet Ratings and Local User Management” dll from Microsoft.

    Tilt! The purpose of this one sounds like the Add-Ons I mentioned above…

    As this dll is loaded by the IE’s “Content Advisor”, I have disabled this feature via “Tools-> Internet Options-> Content Tab” and the problem is now gone from all faulty PCs! Gotcha :p

    Also,  If I enable the “Content Advisor” on a “normal” PC, the problem occurs there too… confirming that this feature is the culprit.

    Finally, note that the access to the “Content Advisor” was protected by a user password  on one of the “faulty” PC and I had to hack it as explained here: http://www.wikihow.com/Remove-Content-Advisor-Password-in-Internet-Explorer.

    Loading

  • Laptop’s Wi-Fi off after Windows 8 Update

    My  laptop Sony Vaio VGN CR31 has just rebooted after a Windows Update. Before the reboot, I was still browsing internet via the wifi connection. But after the reboot, the WiFi was OFF(*) although the WiFi switch (on the left side of the latop) was ON.

    (*)  In the network connection panel, the Wi-Fi was showing “Wi-Fi (Off)”.

    I did run the Windows troubleshooting on the internet connection and network adapter.  All drivers were up to date and no issue were found.

    After various attempt to uninstall the latest updates, I found the solution:

    • Press :win: + C  to open Windows 8 Charms menu
    • Choose “Settings”,
    • Click “Change PC Settings” at the bottom.
    • Choose the “Wireless” section. There, you can see two (or three) toggles: Airplane Mode, Wireless Devicess (and possibly Bluetooth).

    Wi-Fi was also turned OFF! Toggling Wi-Fi back ON fixed my issue. No idea why the Windows Updates (or the reboot or ???) did change that settings ?!

    Loading

  • Create a Shared Folder and Set permissions in C#

    Here is my code to share a folder, remove that share and set permissions using the System.Management library in C#.

    Click to Read More

    [csharp] using System;
    using System.ComponentModel;
    using System.IO;
    using System.Management;
    using System.Reflection;
    using System.Security.Principal;
    namespace Fortis.Framework.Services.Config
    {
    internal static class ManagementHelper
    {

    internal enum MethodStatus : uint
    {
    [Description("Operation succeeded")] Success = 0,
    [Description("Access denied")] AccessDenied = 2,
    [Description("Unknown failure")] UnknownFailure = 8,
    [Description("Invalid name")] InvalidName = 9,
    [Description("Invalid level")] InvalidLevel = 10,
    [Description("Invalid parameter")] InvalidParameter = 21,
    [Description("Duplicate share")] DuplicateShare = 22,
    [Description("Redirected path")] RedirectedPath = 23,
    [Description("Unknown device or directory")] UnknownDevice = 24,
    [Description("Net name not found")] NetNameNotFound = 25
    }

    internal enum ShareType : uint
    {
    [Description("Disk Drive")] DiskDrive = 0x0,
    [Description("Print Queue")] PrintQueue = 0x1,
    [Description("Device")] Device = 0x2,
    [Description("IPC")] IPC = 0x3,
    [Description("Disk Drive Admin")] DiskDriveAdmin = 0x80000000,
    [Description("Print Queue Admin")] PrintQueueAdmin = 0x80000001,
    [Description("Device Admin")] DeviceAdmin = 0x80000002,
    [Description("IPC Admin")] IpcAdmin = 0x80000003
    }

    internal enum ControlFlags : uint
    {
    SE_OWNER_DEFAULTED = 0x1, //Indicates an SD with a default owner security identifier (SID). Use this bit to find all of the objects that have default owner permissions set.
    SE_GROUP_DEFAULTED = 0x2, //Indicates an SD with a default group SID. Use this bit to find all of the objects that have default group permissions set.
    SE_DACL_PRESENT = 0x4, //Indicates an SD that has a DACL. If this flag is not set, or if this flag is set and the DACL is NULL, the SD allows full access to everyone.
    SE_DACL_DEFAULTED = 0x8, //Indicates an SD with a default DACL. For example, if an object creator does not specify a DACL, the object receives the default DACL from the access token of the creator. This flag can affect how the system treats the DACL, with respect to access control entry (ACE) inheritance. The system ignores this flag if the SE_DACL_PRESENT flag is not set.
    SE_SACL_PRESENT = 0x10, //Indicates an SD that has a system access control list (SACL).
    SE_SACL_DEFAULTED = 0x20, //Indicates an SD with a default SACL. For example, if an object creator does not specify an SACL, the object receives the default SACL from the access token of the creator. This flag can affect how the system treats the SACL, with respect to ACE inheritance. The system ignores this flag if the SE_SACL_PRESENT flag is not set.
    SE_DACL_AUTO_INHERIT_REQ = 0x100, //Requests that the provider for the object protected by the SD automatically propagate the DACL to existing child objects. If the provider supports automatic inheritance, the DACL is propagated to any existing child objects, and the SE_DACL_AUTO_INHERITED bit in the SD of the parent and child objects is set.
    SE_SACL_AUTO_INHERIT_REQ = 0x200, //Requests that the provider for the object protected by the SD automatically propagate the SACL to existing child objects. If the provider supports automatic inheritance, the SACL is propagated to any existing child objects, and the SE_SACL_AUTO_INHERITED bit in the SDs of the parent object and child objects is set.
    SE_DACL_AUTO_INHERITED = 0x400, //Indicates an SD in which the DACL is set up to support automatic propagation of inheritable ACEs to existing child objects. The system sets this bit when it performs the automatic inheritance algorithm for the object and its existing child objects. This bit is not set in SDs for Windows NT versions 4.0 and earlier, which do not support automatic propagation of inheritable ACEs.
    SE_SACL_AUTO_INHERITED = 0x800, //Indicates an SD in which the SACL is set up to support automatic propagation of inheritable ACEs to existing child objects. The system sets this bit when it performs the automatic inheritance algorithm for the object and its existing child objects. This bit is not set in SDs for Windows NT versions 4.0 and earlier, which do not support automatic propagation of inheritable ACEs.
    SE_DACL_PROTECTED = 0x1000, //Prevents the DACL of an SD from being modified by inheritable ACEs.
    SE_SACL_PROTECTED = 0x2000, //Prevents the SACL of an SD from being modified by inheritable ACEs.
    SE_SELF_RELATIVE = 0x8000, //Indicates an SD in self-relative format with all the security information in a contiguous block of memory. If this flag is not set, the SD is in absolute format. For more information, see Absolute and Self-Relative Security Descriptors.
    }

    internal enum FileAccessMask : uint
    {
    FILE_READ_DATA = 0x1, //Grants the right to read data from the file.
    FILE_WRITE_DATA = 0x2, //Grants the right to write data to the file.
    FILE_APPEND_DATA = 0x4, //Grants the right to append data to the file.
    FILE_READ_EA = 0x8, //Grants the right to read extended attributes.
    FILE_WRITE_EA = 0x10, //Grants the right to write extended attributes.
    FILE_EXECUTE = 0x20, //Grants the right to execute a file.
    FILE_DELETE_CHILD = 0x40,//Grants the right to delete a directory and all the files it contains (its children), even if the files are read-only.
    FILE_READ_ATTRIBUTES = 0x80, //Grants the right to read file attributes.
    FILE_WRITE_ATTRIBUTES = 0x100, //Grants the right to change file attributes.
    DELETE = 0x10000, //Grants delete access.
    READ_CONTROL = 0x20000, //Grants read access to the security descriptor and owner.
    WRITE_DAC = 0x40000,//Grants write access to the discretionary access control list (ACL).
    WRITE_OWNER = 0x80000,//Assigns the write owner.
    SYNCHRONIZE = 0x100000,//Synchronizes access and allows a process to wait for an object to enter the signaled state.
    }

    internal enum FolderAccessMask : uint
    {
    FILE_LIST_DIRECTORY = 0x1, //Grants the right to list the contents of the directory.
    FILE_ADD_FILE = 0x2, //Grants the right to create a file in the directory.
    FILE_ADD_SUBDIRECTORY = 0x4, //Grants the right to create a subdirectory.
    FILE_READ_EA = 0x8, //Grants the right to read extended attributes.
    FILE_WRITE_EA = 0x10, //Grants the right to write extended attributes.
    FILE_TRAVERSE = 0x20, //Grants the right to traverse the directory.
    FILE_DELETE_CHILD = 0x40,//Grants the right to delete a directory and all the files it contains (its children), even if the files are read-only.
    FILE_READ_ATTRIBUTES = 0x80, //Grants the right to read folder attributes.
    FILE_WRITE_ATTRIBUTES = 0x100, //Grants the right to change folder attributes.
    DELETE = 0x10000, //Grants delete access.
    READ_CONTROL = 0x20000, //Grants read access to the security descriptor and owner.
    WRITE_DAC = 0x40000,//Grants write access to the discretionary access control list (ACL).
    WRITE_OWNER = 0x80000,//Assigns the write owner.
    SYNCHRONIZE = 0x100000,//Synchronizes access and allows a process to wait for an object to enter the signaled state.
    }

    internal const uint FolderAccessFullControl = (uint)
    (FolderAccessMask.FILE_LIST_DIRECTORY | FolderAccessMask.FILE_ADD_FILE |
    FolderAccessMask.FILE_TRAVERSE | FolderAccessMask.FILE_ADD_SUBDIRECTORY |
    FolderAccessMask.FILE_READ_EA | FolderAccessMask.FILE_WRITE_EA |
    FolderAccessMask.FILE_DELETE_CHILD | FolderAccessMask.FILE_READ_ATTRIBUTES |
    FolderAccessMask.FILE_WRITE_ATTRIBUTES | FolderAccessMask.DELETE |
    FolderAccessMask.WRITE_DAC | FolderAccessMask.READ_CONTROL |
    FolderAccessMask.WRITE_OWNER | FolderAccessMask.SYNCHRONIZE);

    internal enum AceFlags : uint
    {
    OBJECT_INHERIT_ACE = 0x1, //Noncontainer child objects inherit the ACE as an effective ACE. For child objects that are containers, the ACE is inherited as an inherit-only ACE unless the NO_PROPAGATE_INHERIT_ACE bit flag is also set.
    CONTAINER_INHERIT_ACE = 0x2, //Child objects that are containers, such as directories, inherit the ACE as an effective ACE. The inherited ACE is inheritable unless the NO_PROPAGATE_INHERIT_ACE bit flag is also set.
    NO_PROPAGATE_INHERIT_ACE = 0x4, //If the ACE is inherited by a child object, the system clears the OBJECT_INHERIT_ACE and CONTAINER_INHERIT_ACE flags in the inherited ACE. This prevents the ACE from being inherited by subsequent generations of objects.
    INHERIT_ONLY_ACE = 0x8, //Indicates an inherit-only ACE which does not control access to the object to which it is attached. If this flag is not set, the ACE is an effective ACE which controls access to the object to which it is attached. Both effective and inherit-only ACEs can be inherited depending on the state of the other inheritance flags.
    INHERITED_ACE = 0x10, //The system sets this bit when it propagates an inherited ACE to a child object.
    SUCCESSFUL_ACCESS_ACE_FLAG = 0x40, //Used with system-audit ACEs in an SACL to generate audit messages for successful access attempts.
    FAILED_ACCESS_ACE_FLAG = 0x80 //Used with system-audit ACEs in an SACL to generate audit messages for failed access attempts.
    }

    internal enum AceType : uint
    {
    Access_Allowed = 0,
    Access_Denied = 1,
    Audit = 2
    }

    internal static string GetDescription(this Enum value)
    {
    FieldInfo fi = value.GetType().GetField(value.ToString());

    DescriptionAttribute[] attributes =
    (DescriptionAttribute[])fi.GetCustomAttributes(
    typeof(DescriptionAttribute), false);

    if (attributes != null && attributes.Length > 0)
    return attributes[0].Description;
    else
    return value.ToString();
    }

    /// <summary>
    /// Add a Share on a folder.
    /// </summary>
    /// <param name="folderPath">Path of the folder to be shared.</param>
    /// <param name="shareName">Name to be given to the share.</param>
    /// <param name="description">Description to be set on the share.</param>
    /// <param name="securityDescriptor">Security to be set on the share, including username and access rights.</param>
    /// <remarks>The folder is created if it does not yet exist.</remarks>
    internal static void AddSharedFolder(string folderPath,
    string shareName, string description,
    ManagementObject securityDescriptor)
    {
    try
    {
    // Create the folder if required
    var folder = new DirectoryInfo(folderPath);
    if (!folder.Exists) folder.Create();

    // Create a ManagementClass object
    ManagementClass managementClass = new ManagementClass("Win32_Share");

    // Create ManagementBaseObjects for in and out parameters
    ManagementBaseObject inParams =
    managementClass.GetMethodParameters("Create");
    ManagementBaseObject outParams;

    // Set the input parameters
    inParams["Description"] = description;
    inParams["Name"] = shareName;
    inParams["Path"] = folderPath;
    inParams["Type"] = ShareType.DiskDrive;
    //inParams["MaximumAllowed"] = 20;
    inParams["Password"] = null;
    inParams["Access"] = securityDescriptor;

    // Invoke the "create" method on the ManagementClass object
    outParams = managementClass.InvokeMethod("Create", inParams, null);

    // Check the result
    var result =
    GetMethodStatus(outParams.Properties["ReturnValue"].Value);
    Console.WriteLine("Create Share: " + result.GetDescription());
    }
    catch (Exception ex)
    {
    Console.WriteLine("Error: " + ex.Message);
    }
    }

    /// <summary>
    /// Get security settings required to grant access rights on Files of Folders to a user account.
    /// </summary>
    /// <param name="domain">Domain of the User account</param>
    /// <param name="username">Name of the User account.</param>
    /// <param name="accessMask">Requested Access Rights.</param>
    /// <returns>A security Descriptor with the requested access right for the provided user account.</returns>
    internal static ManagementObject GetSecurityDescriptor(string domain, string username, object accessMask)
    {
    var everyoneAccount = new NTAccount(domain, username);
    var sid = everyoneAccount.Translate(typeof(SecurityIdentifier)) as SecurityIdentifier;
    var sidArray = new byte[sid.BinaryLength];
    sid.GetBinaryForm(sidArray, 0);

    ManagementObject everyone = new ManagementClass("Win32_Trustee");
    everyone["Domain"] = domain;
    everyone["Name"] = username;
    everyone["SID"] = sidArray;

    ManagementObject dacl = new ManagementClass("Win32_Ace");
    dacl["AccessMask"] = accessMask;
    dacl["AceFlags"] = AceFlags.OBJECT_INHERIT_ACE | AceFlags.CONTAINER_INHERIT_ACE;
    dacl["AceType"] = AceType.Access_Allowed;
    dacl["Trustee"] = everyone;

    ManagementObject securityDescriptor = new ManagementClass("Win32_SecurityDescriptor");
    securityDescriptor["ControlFlags"] = ControlFlags.SE_DACL_PRESENT;
    securityDescriptor["DACL"] = new object[] { dacl };
    return securityDescriptor;
    }

    /// <summary>
    /// Delete a Share.
    /// </summary>
    /// <param name="shareName">The name of the share to be deleted.</param>
    internal static void RemoveSharedFolder(string shareName)
    {
    try
    {
    // Create a ManagementClass object
    ManagementClass managementClass = new ManagementClass("Win32_Share");

    // Get all existing shares and find the one to be deleted
    ManagementObjectCollection shares = managementClass.GetInstances();
    foreach (ManagementObject share in shares)
    {
    if (Convert.ToString(share["Name"]).Equals(shareName, StringComparison.InvariantCultureIgnoreCase))
    {
    // Invoke the "delete" method on the Share object
    var outParams = share.InvokeMethod("Delete", new object[] { });

    // Check the Result
    var result = GetMethodStatus(outParams);
    Console.WriteLine("Delete Share: " + result.GetDescription());

    break;
    }
    }
    }
    catch (Exception ex)
    {
    Console.WriteLine("Error: " + ex.Message);
    }
    }

    private static MethodStatus GetMethodStatus(object outParams)
    {
    MethodStatus result = MethodStatus.UnknownFailure;
    Enum.TryParse<MethodStatus>(Convert.ToString(outParams), out result);
    return result;
    }
    }
    }
    [/csharp]

    And here is a code sample I am using:

    [csharp] var path = @"C:\Users\Public\Documents\SomeFolder";

    var folder = new DirectoryInfo(path);
    if (!folder.Exists) folder.Create();

    ManagementHelper.RemoveSharedFolder("MyShare");

    // Get the security Descriptor
    ManagementObject securityDescriptor = ManagementHelper.GetSecurityDescriptor(null, "everyone", ManagementHelper.FolderAccessFullControl);

    // Create the Share
    ManagementHelper.AddSharedFolder(path, "MyShare", "My Shared Folder", securityDescriptor);
    [/csharp]

    Loading

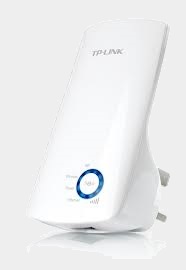
  • TP-LINK 300Mbps Wireless N Range Extender: TL-WA850RE

    TP-LINK Wireless N Range Extender TL-WA850RE
    TP-LINK Wireless N Range Extender TL-WA850RE

    Finally a Wireless Range Extender which is as nice as cheap and easy to configure!

    Click to Read More

    My wifi router is on the first floor and wifi connections from both the ground floor and the second floor are really poor due to the large concrete slab between each floor.

    I didn’t want to pay (a lot) for a new wifi routers which would offer much more features than actually required, have useless Ethernet ports (switch), be large and ugly/inappropriate in the landscape, …

    So, I decided to give a try to the nice and discrete TL-WA850RE sold for 38€.

    The connection with my Buffalo WZR-HP-G300NH was straightforward and went seamlessly.

    1. Plug the TL-WA850RE in a electrical outlet close to the wifi router to be extended
    2. On a laptop, open the pane to select a Wifi Network and pick the “TP-LINK_Extender_xxxxxx network”
    3. Start a browser and navigate to “http://tplinkextender.net”. It’s the url of the embedded administration website.
    4. Log in using the username ‘admin’ and password ‘admin’
    5. Follow the wizard to configure the TP-LINK Range Extender as described in the Quick Installation Guide. PAY ATTENTION: you have to disable your popup blocker or allow that website. Otherwise, the final status windows will be blocked and the process won’t complete.
    6. Once the wizard completed, go to the router configuration website and look for the IP assigned to the TP-Link device (on the WOL page of my Buffalo, I found it’s IP for the hostname = *). The best would be to assign a fix IP to the TP-Link’s Mac Address!
    7. Restart a Browser and navigate to the TP-Link’s IP address.
    8. Back to the TP-Link administration website, change the default username/password via System Tools > Password.
    9. Now, the device can be unplugged and moved into a electrical outlet of a room where the wifi signal is currently poor.

    There is a DHCP server embedded in the device as well as some other basic wireless features (relate to security, statistics…) that I won’t use as far as everything is managed by/on my Buffalo.

    So far, the TP-Link works really well to extend the range of my Buffalo 🙂

    The only “issue” is the blue leds shining too much in the dark which prevent me to sleep in my room if I use the repeater there 🙁

    TP-Link: http://www.tp-link.com/en/products/details/?model=TL-WA850RE

    Loading

  • Upgrade firmware of Buffalo WZR-HP-G300NH

    Buffalo WZR-HP-G300NH v1
    Buffalo WZR-HP-G300NH v1

    I have upgraded the firmware of my Buffalo WZR-HP-G300NH (v1) with the latest version of dd-wrt… seamlessly !

    Click to Read More

    My Buffalo bought end of 2010 was pre-installed with a version of dd-wrt (a.k.a the “Pro” firmware of Buffalo which was installed by default as of the second half of 2010 instead of their ‘friendly’ firmware).

    1. In the dd-wrt router database, I have searched for WZR-HP-G300H and found it was supported by v24-preSP2.
    2. I went to the file server where dd-wrt firmwares v24-preSP2 are available.
    3. On that file server, I went to the more recent sub-folder (/2013/02-11-2013-r20675) and looked for the folder “buffalo_wzr-hp-g300nh” and fetched the firmware “wzr-hp-g300nh-dd-wrt-webupgrade-MULTI.bin” (The other one “buffalo_to_ddwrt_webflash-MULTI.bin” is to upgrade from the Buffalo ‘Friendly’ firmware – which used to be installed by default before the second half of 2010).
    4. Using my laptop connected via wifi, I went to the “firmware update” page of my Buffalo, via its web interface menu “Administration > Firmware Upgrade”.
    5. I chose “don’t reset”  after flashing, selected the firmware downloaded previously on my laptop and clicked “Upgrade”. It took quite a few minutes.
    6. Next, the countdown being completed, I have refreshed my browser and the new interface appeared. The previous one was red with “Buffalo” displayed on top. The new one is mainly black/blue and yellow without Buffalo displayed anymore.

    Everything was still working fine immediately after the upgrade, without any lost of settings. I.e. mainly (from my point of view):

    • The Buffalo IP address, which was a custom one, didn’t change.
    • The Port Forwarding where still configured in NAT/QoS > Port Forwarding.
    • The wol addresses where still available in Administration > Wol.
    • The Static Leases of the DHCP Server where still configured in Services > Services.

    dd-wrt wiki for WZR-HP-G300NH : http://www.dd-wrt.com/wiki/index.php/Buffalo_WZR-HP-G300NH

    Buffalo : http://www.buffalotech.com/products/wireless/single-band-wireless-routers/airstation-highpower-n300-gigabit-dd-wrt-wireless-router

    Loading

  • A HTPC for 35€: Raspberry Pi + XBMC

    Raspberry Pi Model B

    I have just received the “Raspberry Pi Model B” I ordered two weeks ago on “RS Components” website. It rocks !!!

    Within 30 minutes, I was watching on my HD TV a 1080p movies streamed from my NAS :p

    Click to Read More

    Mine is in a black case bought from RS components. I also bought there a power supply and a HDMI cable. The big advantage of using a Raspberry pi is that

    • It has a very low power consumption (about 1-2 watts at idle)
    • It is really small 85.60mm x 53.98mm x 17mm (invisible behind the TV)
    • It has a HDMI with Audio with CEC support (you can pilot XBMC on the Raspberry Pi with the TV remote control)
    • It comes with codec license for MPEG4 & H.264 (hardware accelerated)
    • Licenses can also be bought here to play back MPEG2 or VC1.
    • The Model B comes with 512MB Ram (Only 256 on the Model A)
    • It boots a Linux from a SD card (= silent) in about 50 seconds (depending on the distribution). There are 3 distributions of Linux with XBMC targeting the Raspberry Pi (see the wiki here). Some Install Guides:
    • A 2GB SD is enough, but I use a 16GB class 6, the only SD I had
    • There are 2 USB slots that I use for a keyboard and a mouse. That can be expanded with a USB hub (There is only one USB port on the Model A). A USB HDD can be plugged to add extra storage if required.
    • There is a 10/100Gbs Ethernet Port (No Ethernet port on the Model A) with supports of various power management wakeup features, including Magic Packet™, Wake-on LAN (WOL) and Link Status Change. UNFORTUNATELY, albeit Pi’s Lan chipset does support WOL, the Pi’s lack of power management (ACPI) means it doesn’t support this Lan chipset features 🙁
    • It does not need a fan cooler (= silent)
    • The Model B uses a standard power supply capable of supplying 5V 700ma (the Model A requires 5V 300ma)
    • The GPU is capable of 1Gpixel/s
    • It can be easily overclocked (and overvolted to increase stability) up to 1000MHz (without making the warranty void !). By default the Raspberry Pi runs as 700Mhz and is overclocked at 800Mhz by RaspBmc…
    • Overall real world performance is something like a 300MHz Pentium 2 with great graphic performances.
    As mentioned, I decided to install RaspBmc. It’s really straightforward [EDIT: RapsBmc is now deprecated and replaced by Osmc).
    1. Plug the SD card in a PC (I am using Windows 8 )
    2. Format the SD card, e.g. using a tools dedicated to SD/SDHC/SDXC like “SD Formatter“.
    3. Download the raspbmc installer (Not available anymore on the official webstite) and “run As Administrator” the setup.exe . It will automatically download an image and copy it to the SD card.
    4. Plug next the SD card in the Raspberry Pi, plug the HDMI cable on the TV (I didn’t test the RCA/Audio output), plug an Ethernet cable and plug the power supply. Select the right HDMI input on your TV and you should see the Raspberry PI display. It will configure itself (get an IP address from DHCP server, download the latest release/updates, etc…) and after about 20 minutes, it should start XBMC.
    5. In XBMC, go to the main menu > System > Lower submenu > System info and take note for your URL. You can also get there the MAC Address if you prefer like me to configure your DHCP server to assign a fix IP to the Raspberry PI (recommended to remote control XBMC or configure NFS access to Synology – reboot required).
    6. On your PC, run a Browser and type the IP address of the Raspberry PI to get access to the XBMC web control UI (on the port 80 configured by default in Raspbmc). It can be used to remote control XBMC.
    7. On your Android Phone, install the XBMC official Remote Control (Not available anymore) and configure it with the IP address of the Raspberry Pi with port 80 (this is the default of RaspBmc). There is neither a username nor a password defined by default in RaspBmc for accessing the Web Control UI (Another good remote for Android is Yatse Widget).
    8. On Synology, enable the “guest” account and grant read access on the shared folders “music”, “video” and “photo” (I still have to find where I can configure a username in raspbmc to access smb/nfs – I know I could at least do it on the smb/nfs sources configured in XBMC: protocol://user:pass@synoIP/sharename)
      • The default username is “pi” and the default password is “raspberry”, but for some reasons, adding such a user on the Synology with adhoc rights on the shares does not grant raspbmc access on those ?!
    9. On XBMC, add video, music and photo sources. I am not using “uPnP” as it does not support use of metadata stored next to the media files. Instead I am currently using smb.
    10. On XBMC, you can go to the menu “Programs” to get access to the RaspBmc settings.
    The Android Remote Control for XBMC works really fine, as well as controlling XBMC with the TV Remote, which makes this HTPC from far the greatest for that price: ~35€!
    A few notes:
    • WOL does not work because the lack for “power management” on Raspberry Pi. The only other way to “power on” the device remotely is to plug its power cable into a USB port on the TV (USB voltage is standardized at 5.0v, so you only have to check the max A supported by your TV). When you turn on the TV the pi powers on too. However, the Pi draws less power when turned on then many Tvs do when off, so there is really no reason to ever turn it off. Turning it off would not significantly reduce power consumption unless it is also unplugged.
      • So, don’t ever use the “Power Off” button of XBMC. The only way to restart the Raspberry Pi would be to unplug and plug back in the power supply.
      • Power over Ethernet (PoE) is not yet supported. Maybe in a future version of the Raspberry Pi.
    • In XBMC, go to the main menu > System > Lower submenu > Settings > Apparence > Region. Set e.g. the “Langue of the interface” or your language as “Preferred Language for audio” although you like to watch the movies in O.V.
    • In XBMC, go to the main menu > System > Lower submenu > Settings > Services > SMB Client. Change the name of the Workgroup to match your.
    • Login on the Raspberry Pi via SSH (using Putty, username “pi”, password “raspberry”. Note: “root” user is disabled by default on RaspBmc) and Raspbmc will prompt you to choose your keyboard layout – use the space bar to select a layout and Tab to move the cursor onto the Ok button. On the next screen, set your layout as the default one and wait until it’s “generated” (can be a long process). Continue the configuration with the selection of your region and country. Type “exit” to close the SSH session.
    • Raspbmc overclocks the Raspberry Pi to a safe clock frequency (from the default 700MHz to 800Mhz). Notice that a change of the clock frequency does not blow the OTP (Over Temperature Protection). It is overvolting that does this. Overclocking is therefore not making the warranty void while overvolting will permanently set a bit which invalidates the warranty. Overvolting will also reduce the lifespan.
      • Here is a tutorial to overclock the Raspberry Pi with RaspBmc via SSH
      • Here is a tutorial to overvolt the Raspberry Pi with RaspBmc via SSH
      • Here is a tutorial to do the same with the Raspbery config tool (if not using RaspBmc
      • And here are more details on possible values for the overclocking/overvolting.
    • With RaspBmc, there is no need to manually update the firmware (via SSH). This is done automatically by RaspBmc, insuring that the kernel is fully compatible.

    site: http://www.raspberrypi.org (Look at the quick-start-guide and the FAQ)

    RaspBmc: http://www.raspbmc.com (Look at the FAQ)

    XBMC for Raspberry: http://wiki.xbmc.org/index.php?title=Raspberry_Pi/FAQ

    buy: http://raspberrypi.rsdelivers.com/default.aspx?cl=1

    Loading

    ,