Category: Raspberry Pi

  • Install Z-Stick & ConBee II on RPI/Openhabian

    Here is how to configure properly an Aeotec Z-Stick Gen5 and a Conbee II stick on a RPI 4 installed with Openhabian (running OpenHab 3)

    Click to Read More

    First, be sure that openhabian can access the serial ports. The easiest is to configure that via openhabian-config > System Settings > Serial Port:

    sudo openhabian-config 

    You can also do it with raspi-config > Interfacing Options > Serial :

    sudo apt-get install raspi-config
    sudo raspi-config

    > Would you like a login shell accessible over serial? → No
    > Would you like the serial port hardware to be enabled? → Yes


    Next, check that the sticks are well plugged with the command:

    lsusb

    You should see something like

    Bus 002 Device 001: ID 1d6b:0003 Linux Foundation 3.0 root hub
    Bus 001 Device 011: ID 1cf1:0030 Dresden Elektronik ZigBee gateway [ConBee II]
    Bus 001 Device 005: ID 0658:0200 Sigma Designs, Inc. Aeotec Z-Stick Gen5 (ZW090) – UZB
    Bus 001 Device 002: ID 2109:3431 VIA Labs, Inc. Hub
    Bus 001 Device 001: ID 1d6b:0002 Linux Foundation 2.0 root hub

    In order to always have the USB sticks mounted on the same “port”, instead of being assigned once on /dev/ttyACM0, once on /dev/ttyACM1, … create a UDEV Rule file:

    sudo nano /etc/udev/rules.d/99-usb-serial.rules

    Type the following, using the ID of the USB sticks found above, in this file:

    SUBSYSTEM==”tty”, ATTRS{idVendor}==”0658“, ATTRS{idProduct}==”0200“, SYMLINK+=”ttyUSB-ZWave”, GROUP=”dialout”, MODE=”0666″
    SUBSYSTEM==”tty”, ATTRS{idVendor}==”1cf1“, ATTRS{idProduct}==”0030“, SYMLINK+=”ttyUSB-ZigBee”, GROUP=”dialout”, MODE=”0666″

    If you didn’t prepare openhabian for ZigBee via sudo openhabian-config > System Settings > Serial Port, grant the following access for openhab :

    sudo adduser openhab dialout
    sudo adduser openhab tty

    Now, reboot (sudo reboot) and test if symlink was created with the command :

    ls /dev/tty*

    You should see

    /dev/ttyUSB-ZigBee
    /dev/ttyUSB-ZWave

    Add edit openhab config file to add the symlinks to the PATH variable for Java (NB: for openhab 2, the file is namge openhab2 !!):

    sudo nano /etc/default/openhab

    Search the line with EXTRA_JAVE_OPTS and modify accordingly to complete the parameter ‘Dgnu.io.rxtx.SerialPorts’:

    EXTRA_JAVA_OPTS=”-Xms192m -Xmx320m -Dgnu.io.rxtx.SerialPorts=/dev/ttyUSB-ZWave:/dev/ttyUSB-ZigBee

    Now, reboot again (sudo reboot) and install Phoscon, the application to manage the ZigBee devices. The easiest is to install it (on port 8081 as recommended) via openhabian-config > Optional Components > deCONZ:

    sudo openhabian-config

    You can also look here on the phoscon website for a manual setup

    If you have a RPI 4B, also update the WiringPI like this:

    cd /tmp
    wget https://project-downloads.drogon.net/wiringpi-latest.deb
    sudo dpkg -i wiringpi-latest.deb

    You can now open phoscon to login and search for ZigBee devices on http://<your RPI IP>:8081

    If after a reboot, this UI is not available, then enable manually the service:

    sudo systemctl enable deconz

    If you want to change the port of Phoscon, edit the parameter ‘http-port’ in this file:

    sudo nano /lib/systemd/system/deconz.service


    Finally, install the following addons (Bindings) in OpenHab :

    • “Dresden Elektronik deCONZ Binding”
    • “Z-Wave Binding”

    The ConBee gateway will be detected automatically by OpenHab and appear twice in the ‘Inbox’: once as Deconz and once as Hue (indeed, it emulates a Philips Hue Bridge). If it was not detected automatically, open the Phoscon UI > Gateway > Advanced (Gear Icon at the bottom of the page) and CLick on “Authenticat App”. Then add the Thing manually into OpenHab using the Scan button of:

    OpenHab UI > Administration > Parameters > Things > + (Add Thing) > Dresden Elektronik deCONZ Binding


    The Zwave gateway will only appear if you add it explicitly into OpenHab:

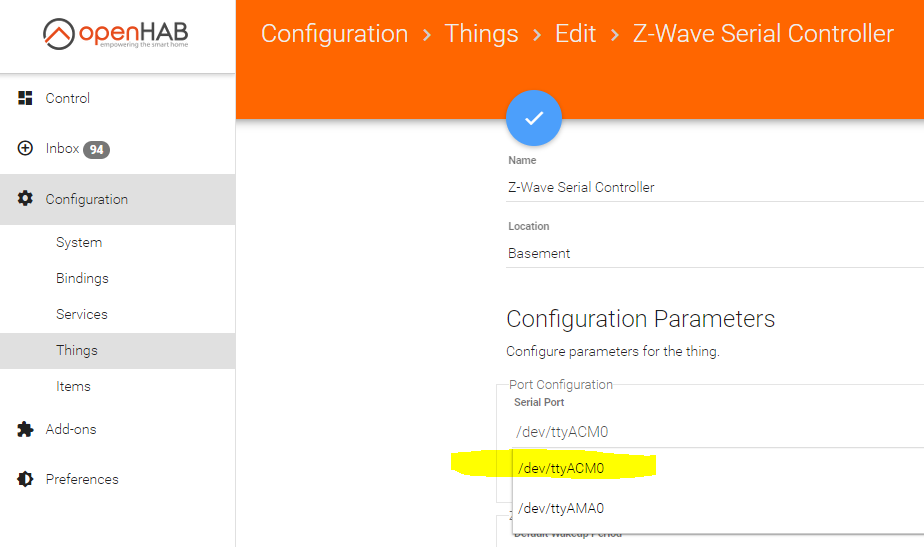
    OpenHab UI > Administration > Parameters > Things > + (Add Thing) > Z-Wave Binding > Z-Wave Serial Controller

    In the field Serial Port, type manually ‘/dev/ttyUSB-ZWave’ (without the quotes) and click ‘Create Thing’

    Wait for about 10 seconds and the gateway will soon become online.

    Et voilà.

    Loading

  • RPI 4/Openhabian into an Argon One Case


    If you installed Openhabian onto an RPI hosted into an Argon Once Case, here is how to configure the Argon One.

    Click to Read More

    Install the scripts to manage to Argon One’s features:

    sudo curl https://download.argon40.com/argon1.sh | bash

    Configure the fan cooler, for example depending on the temperature, with the command:

    sudo argonone-config

    Select the option 2 and type 10 for 55 °C, 55 for 60 °C and 100 for 65 °C, meaning that the fan speed will by 10% at 55 °C, etc…


    In order to configure the Argon One to turn on automatically after a power failure, you have first to enable the i2C. The easiest is to do it with the raspi-config command, which can be installed with:

    sudo apt-get install raspi-config

    Then run it:

    sudo raspi-config

    And go to the menu “Interface option”, and select the entry “I2C” to enable the loading of the I2C kernel module.

    Now you can check that it works with the command:

    i2cdetect -y 1

    And finally set the Power-On feature with the command:

    i2cset -y 1 0x01a 0xfe


    Now, you can press the power button of the Argon One :

    • twice to reboot
    • +3 sec to shutdown and power off
    • +5 sec to force the shutdown


    Et voilà

    Loading

  • Xiamo Aqara and Openhab on Raspberry Pi

    A few notes on using Xiaomi Aqara Sensors and Switches with Openhab 3.

    Click to Read More

    I am using a Zigbee USB key Conbee II from Dresen Eletronik.

    It is plugged into the Raspberry Pi with a USB cable extension to put it away from the other keys used on this RPi, like my Sigma Z-Wave controller.

    I am sing OpenHab 3 (previously OpenHab 2).

    Opposite to the Sigma Z-Wave USB key, there is not mount issue after a reboot due to the usb port id increasing… (See also a solution in French).

    I am using the Phoscon App to connect and manage devices via the Conbee II key. The App is accessible on the http port 80 of the Raspberry.

    To connect a new Xiaomi Aqara device,

    1. “Add a Sensor” or a “Add a Switch” within Phoscon. Pick the type “Other”.
    2. Press the reset button for 5 sec. The blue led should turn on and start blinking after 5 sec. Release the button immediately when it starts blinking. The led will then turn on for 2 or 3 sec and then blink 3 times. It means that the connection is established.
    3. A few second later, the device will appear in Phoscon.

    To get the Things into Openhab, Add the Binding “Dresen Eletronik DeCONZ Binding” and “Scan” for devices.

    I am using with success:

    • Multi Sensors : with values for Temperature, Humidity and Pressure
    • Door and Window Sensors: with Status Opened / Closed
    • A Cube : with events Pushed (various direction), Rotation, Shacked
    • Wireless Mini Switch : One Button Control with 4 events: Single Press, Double Press, Long Press and Long Press Release


    Notice: 

    • after a few month using the Door Sensors on my Garage Door, it stopped to send events… The problem was that the captor part was attached on a metal upright which ended to be magnetized by the magnet part moving around…

    Loading

  • USB ports used by openHab’s Z-Wave Controller change after each reboot on RPI

    Usually, USB keys get assigned a new port such as /dev/ttyACM0, /dev/ttyACM1, etc…, each time they are unplugged and replugged into the RPI or if the RPI reboots. A solution consists in making these ports permanent via symlinks.

    Click to Read More

    This “feature” is a problem as the specified device may not be recognized anymore by configured softwares, like the Z-Wave Binding or openHab.

    See a definitive solution here: make serial USB ports persistent via symlinks.

    Loading

  • How to remote access MySQL on openHabian (RPI 4)

    I wanted to use phpMyAdmin on a Synology to access a MySQL running on a RPI with openHabian. Here is my how-to:

    Click to Read More

    First connect on your openHabian using a ssh console.

    Obviously, you need MySQL to be installed and configured:

    sudo apt update

    sudo apt upgrade

    sudo apt install mariadb-server

    sudo mysql_secure_installation

    Then, double check that MySQL is running and listening on port 3306
    netstat -plantu | grep 3306

    If nothing is displayed by this command, MySQL is not listening on the port 3306.

    Enter MySQL as root with the command:

    sudo mysql -uroot -p

    Check the port used by MySQL

    SHOW GLOBAL VARIABLES LIKE ‘PORT’;

    Then, type the following MySQL commands to create an account and a database, and grant both local and remote access for this account on the database:

    CREATE USER ‘<YourAccount>’@’localhost’ IDENTIFIED BY ‘<YourPassword>’;

    CREATE DATABASE <YourDatabase>;

    GRANT ALL PRIVILEGES ON <YourDatabase>.* TO ‘<YourAccount>’@’localhost’;

    GRANT ALL PRIVILEGES ON *.* to ‘<YourAccount>’@’169.254.0.%’ identified by ‘<YourAccountPassword>’ WITH GRANT OPTION;

    FLUSH PRIVILEGES;

    Here above, I do grant access from all machines in my local network with ‘169.254.0.%’. One can restrict access to one machine with its specific address, such as : ‘169.254.0.200’

    Now, edit 50-server.cnf and configure MySQL to not listen anymore on its local IP only (simply comment the line bind-address) :

    sudo nano /etc/mysql/mariadb.conf.d/50-server.cnf

    # Instead of skip-networking the default is now to listen only on
    # localhost which is more compatible and is not less secure.
    #bind-address = 127.0.0.1

    Finally, restart MySQL for the changes above to be applied:

    sudo service mysqld restart

    You can now edit the config of phpMyAdmin to access the MySQL on your RPI. If it is running on Synology, look here.

    Loading

  • Install Java 8 SDK and OpenHab 2 on Raspberry Pi Desktop for RPI 4

    I wanted to install OpenHab 2 on my RPI 4 which is running the latest Raspberry Pi Desktop. But I was missing Java 8 which is a prerequisite and unfortunately not available anymore as a stable version, for Debian 10, due to a security issue.

    Click to Read More

    First, here is the version of Raspberry Pi Desktop I have:

    $ cat /etc/os-release
    PRETTY_NAME="Raspbian GNU/Linux 10 (buster)"
    NAME="Raspbian GNU/Linux"
    VERSION_ID="10"
    VERSION="10 (buster)"
    VERSION_CODENAME=buster
    ID=raspbian
    ID_LIKE=debian
    HOME_URL="http://www.raspbian.org/"
    SUPPORT_URL="http://www.raspbian.org/RaspbianForums"
    BUG_REPORT_URL="http://www.raspbian.org/RaspbianBugs"

    Trying to install Java 8 SDK was resulting in errors like:

    $ sudo apt-get install openjdk-8-jdk
    Reading package lists... Done
    Building dependency tree
    Reading state information... Done
    E: Unable to locate package

    Or like:

    Reading package lists... Done
    Building dependency tree
    Reading state information... Done
    Package openjdk-8-jdk is not available, but is referred to by another package.
    This may mean that the package is missing, has been obsoleted, or
    is only available from another source
    However the following packages replace it:
    openjdk-8-jdk-headless
    E: Package 'openjdk-8-jdk' has no installation candidate

    My Package sources were:

    deb http://ftp.debian.org/debian/ buster main contrib non-free
    deb http://security.debian.org/ buster/updates main contrib non-free
    deb http://ftp.debian.org/debian/ buster-updates main contrib non-free

    The solution was to add a new source with the ‘unstable’ arm-hf packages in /etc/apt/sources.list.d/raspi.list (‘sid’ is the codename for unstable):

    $ echo 'deb http://ftp.debian.org/debian sid main' | sudo tee -a /etc/apt/sources.list.d/

    Next, do:

    $ sudo apt-get update
    $ sudo apt install gcc-8-base
    $ sudo apt-get install openjdk-8-jdk

    NB.: without installing gcc-8-base, you would get an error like this :

    Reading package lists... Done
    Building dependency tree
    Reading state information... Done
    Some packages could not be installed. This may mean that you have
    requested an impossible situation or if you are using the unstable
    distribution that some required packages have not yet been created
    or been moved out of Incoming.
    The following information may help to resolve the situation:

    The following packages have unmet dependencies:
    libc6-dev : Breaks: libgcc-8-dev (< 8.4.0-2~) but 8.3.0-6+rpi1 is to be installed
    E: Error, pkgProblemResolver::Resolve generated breaks, this may be caused by held packages.


    Now, you can install OpenHab 2:

    $ wget -qO - 'https://bintray.com/user/downloadSubjectPublicKey?username=openhab' | sudo apt-key add -
    $ sudo apt-get install apt-transport-https
    $ echo 'deb https://dl.bintray.com/openhab/apt-repo2 stable main' | sudo tee /etc/apt/sources.list.d/openhab2.list
    $ sudo apt-get update

    If you get an error like this one:

    E: The repository 'https://openhab.jfrog.io/openhab/openhab-linuxpkg unstable Release' is not signed.
    N: Updating from such a repository can't be done securely, and is therefore disabled by default.
    N: See apt-secure(8) manpage for repository creation and user configuration details.

    Then do:

    $ echo 'deb [trusted=yes] https://dl.bintray.com/openhab/apt-repo2 stable main' | sudo tee /etc/apt/sources.list.d/openhab2.list

    Finally, do:

    $ sudo apt-get install openhab2
    $ sudo apt-get install openhab2-addons
    $ sudo systemctl daemon-reload
    $ sudo systemctl enable openhab2.service
    $ sudo adduser openhab dialout
    $ sudo adduser openhab tty

    Edit /etc/default/openhab2 to add access for Java to the serial ports (ex.:for Zwave keys)

    $ nano /etc/default/openhab2 

    EXTRA_JAVA_OPTS="-Dgnu.io.rxtx.SerialPorts=/dev/ttyUSB0:/dev/ttyS0:/dev/ttyS2:/dev/ttyACM0:/dev/ttyAMA0"

    It should output:

    openhab2.service - openHAB 2 - empowering the smart home
    Loaded: loaded (/usr/lib/systemd/system/openhab2.service; disabled; vendor preset: enabled)
    Active: active (running) since Wed 2020-07-15 21:57:07 BST; 28min ago
    Docs: https://www.openhab.org/docs/
    https://community.openhab.org
    Main PID: 26101 (java)
    Tasks: 101 (limit: 4915)
    Memory: 212.3M
    CGroup: /system.slice/openhab2.service
    └─26101 /usr/bin/java -Dopenhab.home=/usr/share/openhab2 -Dopenhab.conf=/etc/openhab2 -Dopenhab.runtime=/usr/share/openhab2/runtime -Dopenhab.userdata=/var/lib/openhab2 -Dopenhab.logdir=/var/log/openhab2 -Dfelix.cm.dir=/var/li

    Jul 15 21:57:07 Helios systemd[1]: Started openHAB 2 - empowering the smart home.


    As far as I am concerned, I share via smb the various folders

    Edit /etc/samba/smb.conf

    $ sudo nano /etc/samba/smb.conf

    [openHAB2-userdata]comment=openHAB2 userdata
    path=/var/lib/openhab2
    browseable=Yes
    writeable=Yes
    only guest=no
    public=no
    create mask=0777
    directory mask=0777

    [openHAB2-conf]comment=openHAB2 site configuration
    path=/etc/openhab2
    browseable=Yes
    writeable=Yes
    only guest=no
    public=no
    create mask=0777
    directory mask=0777

    [openHAB2-logs]comment=openHAB2 logs
    path=/var/log/openhab2
    browseable=Yes
    writeable=Yes
    only guest=no
    public=no
    create mask=0777
    directory mask=0777

    [openHAB2-backups]comment=oepnHAB2 backups
    path=/var/lib/openhab2/backups
    browseable=Yes
    writeable=Yes
    only guest=no
    public=no
    create mask=0777
    directory mask=0777

    Restart the Samba service:

    $ sudo systemctl restart smbd.service


    Start openHab with:

    $ sudo systemctl start openhab2.service
    $ sudo systemctl status openhab2.service

    It can take 15′ to be initialized, but soon you should be able to access openHab on your RPI on port 8080!


    Do a backup with:

    $ sudo ./usr/share/openhab2/runtime/bin/backup

    Restore a backup with:

    $ sudo systemctl stop openhab2.service
    $ sudo ./usr/share/openhab2/runtime/bin/restore /var/lib/openhab2/backups/openhab2-backup-....
    $ sudo systemctl start openhab2.service

    It will take long minutes to restart!


    More details about installing openHAb on Linux on the official page.

    Et voilà!

    Loading

  • Use a Z-Wave Controller USB Key with openHAB in Docker on a RPI 4

    It took me quite some hours to be able to use my Aeotec Z-Stick Gen5 (ZW090) key within my Docker image of openHAB, running on a Raspberry Pi 4 (with a Raspberry Pi OS). Here are all the tips I used.

    Click to Read More

    First, before plugging the controller  in your RPI, configure it to see the Serial Ports. Connect onto your RPI within a SSH Console (ex.: via Putty)  and type the command:

    sudo raspi-config

    Use “5 interfacing Options” > “P6 Serial” > “Yes” > “Ok”

    And now reboot.

    Next, back into a SSH conscole, check what USB devices already exists with the command:

    lsusb

    Bus 002 Device 001: ID 1d6b:0003 Linux Foundation 3.0 root hub
    Bus 001 Device 002: ID 2109:3431 VIA Labs, Inc. Hub
    Bus 001 Device 001: ID 1d6b:0002 Linux Foundation 2.0 root hub

    And flush the kernel and boot logs:

    sudo dmesg -c >> ~/dmesg-`date +%d%m%Y`.log

    Then, plug your Z-Wave Controller USB Key in a USB Port and check that it’s detected and mounted properly:

    lsusb

    Bus 002 Device 001: ID 1d6b:0003 Linux Foundation 3.0 root hub
    Bus 001 Device 009: ID 0658:0200 Sigma Designs, Inc. Aeotec Z-Stick Gen5 (ZW090) - UZB
    Bus 001 Device 002: ID 2109:3431 VIA Labs, Inc. Hub
    Bus 001 Device 001: ID 1d6b:0002 Linux Foundation 2.0 root hub

    dmesg

    [ 3124.779069] usb 1-1.4: new full-speed USB device number 9 using xhci_hcd
    [ 3124.919928] usb 1-1.4: New USB device found, idVendor=0658, idProduct=0200, bcdDevice= 0.00
    [ 3124.919942] usb 1-1.4: New USB device strings: Mfr=0, Product=0, SerialNumber=1
    [ 3124.919953] usb 1-1.4: SerialNumber: 32303136-3131-3033-3030-303031383932
    [ 3124.926704] cdc_acm 1-1.4:1.0: ttyACM0: USB ACM device


    “lsusb” should show you a new device. Ex.: Aeotec Z-Stick Gen5 (ZW090) – UZB.

    And “dmesg” must should you the mount point: cdc_acm 1-1.4:1.0: ttyACM0: USB ACM device.

    If you don’t see the mount point, then you possibly have a device not supported by the RPI 4. It seems that it is the case with the old Aeotec “Z-Stick Gen5”. “New Z-Stick Gen5” and “Z-Stick Gen5+” should however be compatible. But there is a trick: plug your key on the RPI 4 via a USB HUB (2.0 or 3.0).

    I presume that the Docker Image is already up and running. If not, install it.

    sudo useradd -r -s /sbin/nologin openhab
    usermod -a -G openhab pi
    mkdir /opt/openhab
    mkdir /opt/openhab/conf
    mkdir /opt/openhab/userdata
    mkdir /opt/openhab/addons
    chown -R openhab:openhab /opt/openhab

    Check the id of the user openhab with:

    id openhab

    uid=999(openhab) gid=994(openhab) groups=994(openhab)

    Grant access on the Serial Port for the user ‘openhab’:

    sudo chmod 777 /dev/ttyACM0
    sudo chown openhab /dev/ttyACM0

    And use the uid and gid found above in the following command, setting the ttyA* found previously and specifying the version to be used:

    docker run –name openhab –net=host –device=/dev/ttyACM0 -v /etc/localtime:/etc/localtime:ro -v /etc/timezone:/etc/timezone:ro -v /opt/openhab/conf:/openhab/conf -v /opt/openhab/userdata:/openhab/userdata -v /opt/openhab/addons:/openhab/addons -d -e USER_ID=<uid> -e GROUP_ID=<gid> –restart=always openhab/openhab:latest


    Now, using Portainer (because it’s easy), open a console within openhab… Portainer is not yet installed ? Do it with:

    docker run -d -p 9000:9000 -p 8000:8000 –name portainer1 –restart always -v /var/run/docker.sock:/var/run/docker.sock -v portainer:/data portainer/portainer:latest

    Go to the page http://<Your RPI IP>:9000, open the Containers and click on the “Exec Console” icon of ‘openhab’ container:

    Grant the same accesses inside the image than on the RPI:

    sudo chmod 777 /dev/ttyACM0
    sudo chown openhab /dev/ttyACM0

    chown -R openhab:openhab /opt/openhab

    Now restart the ‘openhab’ container (with the icon Restart 😉 ). It will take some minutes to be available. But once you can get into it, go to the Things and configure the Controller to use the Serial Port ttyACM0:


    Et voilà

    Loading

  • Raspberry Pi’s SD card full ?

    Trying to update one of my Raspberry Pi Desktop, I see messages pretending that there is not enough free space ? 

    Click to Read More

    I saw that my Pi was full when I tried to update it with

    sudo apt-get update && sudo apt-get upgrade -y

     Error writing to output file - write (28: No space left on device)

    I could also see that there was no free storage anymore as the system was unable to allocate the swap file:

    systemctl status dphys-swapfile.service

    dphys-swapfile.service - dphys-swapfile - set up, mount/unmount, and delete a swap file
    Loaded: loaded (/lib/systemd/system/dphys-swapfile.service; enabled; vendor preset: enabled)
    Active: failed (Result: exit-code) since Sun 2020-06-28 12:35:15 BST; 4min 21s ago
    [...]Jun 28 12:35:15 helios dphys-swapfile[327]: want /var/swap=100MByte, restricting to 50% of remaining disk size: 0MBytes
    Jun 28 12:35:15 helios systemd[1]: Failed to start dphys-swapfile - set up, mount/unmount, and delete a swap file.

    And indeed, the swap file was 0B:

    free -h

          total   used   free   shared  buff/cache  available
    Mem: 3.8Gi 285Mi 2.7Gi 11Mi    886Mi       3.4Gi
    Swap: 0B      0B     0B

    Start to investigate with:

    sudo df -h

    Filesystem      Size  Used Avail Use% Mounted on
    /dev/root 29G 29G 0 100% /
    devtmpfs 1.8G 0 1.8G 0% /dev
    tmpfs 2.0G 0 2.0G 0% /dev/shm

    Or use the version for Inode which won’t include the mounted drives

    sudo df -i

    Filesystem Inodes  IUsed  IFree   IUse% Mounted on
    /dev/root 1895552 328167 1567385 18% /
    devtmpfs 117763 409 117354 1% /dev
    tmpfs 183811 1 183810 1% /dev/shm

    Check, in the output of those commands, that the size of the root partition (/dev/root) is close the the size of your SD (Here above, I have IUsed =~ 32G). If it is not the case, enlarge it with:

    sudo raspi-config

    7 Advanced Options > A1 Expand Filesystem 

    (reboot)

    If the size of the root partition is maximum, then investigate to find the very large stuff with:

    sudo du -xh / | grep -P “G\t”

    1,2G /opt/openhab/userdata
    1,2G /opt/openhab
    1,2G /opt
    1,3G /usr
    11G /var/lib/docker
    11G /var/lib
    11G /var
    16G /mnt/backup
    16G /mnt
    29G /

    To only have the size of the first level folders, use:

    sudo du -xh –max-depth=1 / | grep -P “G\t”

    1.2G /opt
    1.3G /usr
    11G /var
    16G /mnt
    29G /

    Check, in the output of that command, if there as any folder or file which could be cleaned-up.

    You can also us this to navigate into your SD:

    sudo mount –bind /  /mnt
    sudo ncdu -x /mnt

    -- /mnt ------------------------
    15,1 GiB [##########] /mnt
    10,6 GiB [###### ] /var
    1,3 GiB [ ] /usr
    1,2 GiB [ ] /opt
    415,3 MiB [ ] /home
    353,3 MiB [ ] /lib
    9,3 MiB [ ] /bin

    You can navigate in this table (with keys up and down) and open folders (press enter) to see the details of their content. Exit this table by pressing “q”.

    If by any accident, you don’t succeed to delete a large file or folder (especially if located under /media or /mnt), check that it’s not on a mounted drive. Auto-mount are usually in /etc/fstab and may only be :

    cat /etc/fstab

    You can umount all at once with

    sudo umount -a -t cifs -l


    Regarding packages, You can cleanup some space with:

    sudo apt-get autoremove

    sudo rm -R /var/cache/

    sudo mkdir -p /var/cache/apt/archives/partial
    sudo touch /var/cache/apt/archives/lock
    sudo chmod 640 /var/cache/apt/archives/lock
    sudo apt-get clean


    If you are using docker,

    you can check the space consumed with:

    sudo du -sh /var/lib/docker/overlay2

    docker system df

    you can cleanup some space with:

    docker system prune -a -f

    docker system prune –all –volumes –force

    docker volume rm $(docker volume ls -qf dangling=true)


    If using GitLab, you can cleanup some space with:

    sudo gitlab-ctl registry-garbage-collect


    Other useful commands:

    sudo find / -type f -size +500M -exec ls -lh {} \;

    sudo touch /forcefsck ; sudo reboot

    sudo resize2fs /dev/mmcblk0p2 ; sudo reboot

    After reboot check the resize status with:

    systemctl status resize2fs_once.service

    If you see the error “Failed to start LSB: Resize the root filesystem to fill partition”, you can disable the resize2fs with:

    sudo systemctl disable resize2fs_once


    What was the issue in my own case: my remote folder for backup was not mounted anymore on /mnt/backup but the backup script run and stored a 16Gb file into the local folder /mnt/backup. I have been able to delete the local backup by commenting the related shared folder in /ect/stab, rebooting and then deleting /mnt/backup.

    Et voilà!

    Loading

  • Run Raspberry Pi Desktop 4 in VMWare

    Instead of testings new softwares or configs on my actual RPI, I do it in a VM Machine. Much easier to rollback if I do a mistake. There are many videos on YouTube to explain how to install the Raspberry Pi Desktop in VMWare.

    Click to Read More

    The ISO image of Raspberry Pi Desktop is available here.

    I did create an VM, as illustrated here, with:

    • 4GB Memory
    • 32GB Hard Disk(SCSI)
    • USB 3 .1
    • And everything else “by default”
      • 1 processor
      • NAT Network Adapter

    I did:

    • a “Graphical Install” of the Raspberry Pi Desktop
    • enable SSH
    • keep the password “raspberry” for the user pi (with auto-login enabled)
    • configure the keyboard for me (Belgian – Azerty)
    • configure to location as Brussels/Belgium
    • install the VMWare-Tools (screen resolution maximized automatically)
    • Create an icon “Desktop Update” to update the packages via: sudo apt-get update && sudo apt-get upgrade -y

    And here attached in the resulting VM (a 4.5GB zip file). Download it, unzip and double click the file “Raspberry Pi 4.vmx” to open the VM into your VMWare Workstation.

    Et voilà.

    Loading

  • Create a Plex Media Player with a Raspberry 4

    I used to run Rasplex on a RPI 2 to play movies from my Plex Media Server. Unfortunately Rasplex has not been updated to run on a RPI 4. Here is how to build PMP for RPI 4.

    Click to Read More

    Install an OS on your RPI 4

    1. Download the “Raspberry Pi Imager” here.
    2. Download next the “Raspberry Pi OS (32-bit) with desktop” here (the 64-bit is still only in beta. See here). Unzip the file.
      • This is the smallest image (no extra softwares) with a Desktop (mandatory to display the Plex Media Player GUI)
    3. Install and Run the “Raspberry Pi Imager” to setup the “Raspberry Pi OS” on a micro-SD card.
      • Click on “Choose OS”

      • Select “Use Custom”

      • Pick the .img file “YYYY-MM-DD-raspios-buster-armhf.img” unzipped from the “Raspberry Pi OS (32-bit) with desktop” image.
      • Next Click “Choose SD” and “Write”.
      • Once the operation completed, install the micro-SD in your RPI 4 and turn it on. The Raspberry Pi Desktop will appear after some automatic reboots. Follow the setup of the Welcome screen. Steps are:
        • Setup the Country (use Page up and Page down in the Country Combo to scroll faster)
        • Change the Password of the user ‘pi’. ATTENTION: the keyboard layout is most probably not the right one. Untick the “Hide characters” option to check what you type!
        • Set Up Screen
        • Select Wireless Network (You can skip this step if the RPI is connected via ethernet). Again, untick the “Hide characters” option to check what you type!
        • Update Software
        • Click “Restart” on the last step “Setup Complete”

    Configure your OS

    Open a “Terminal” :

    First, type this command in the Terminal to check your IP address:

    ifconfig

    Type next this command to configure the os:

    sudo raspi-config

    Among other:

    • Configure your keyboard if required via “4 Localisation Options” > “change keyboard layout”
      • If your keyboard is not in the list, use the Generic 100x-Key PC corresponding to your layout. Look the picture of this wiki page for more details.
      • You can possibly also find more info about your keyboard here.
    • Enable SSH via “5 Interfacing Options” > “P2 SSH”
    • Give at least 512MB or more to your GPU via “7 Advanced Options” > “Memory Split” (I did set 512. Using 1024 result in a black screen after reboot)
    • I gave the whole micro-SD card storage for the OS via “7 Advanced Options” > A1 Expand File System”
    • I set the audio output on the HDMI port via “7 Advanced Options” > A4 Audio”
    • NB.: I don’t use the 4Kp60 HDMI, but it can be configured via “7 Advanced Options” > AA Pi 4 Video Output”
    • Finally, reboot to be sure that it still work.
      • If you have an issue, wait for 3 minutes and proceed with the next step here under.


    You can now open a SSH console from your PC (E.g: using PuTTY) to connect on the IP address found previously and login with the user ‘pi’ and the password you introduced during the installation.

    You will possibly get a PuTTY Security Alert because of the ssh key fingerprint… Accept if you are sure that you are connecting safely to your RPI.

    If it seems that your RPI didn’t reboot properly and you are not able to connect using SSH after a moment, they you probably have to redo to whole setup from scratch and try other configuration options within raspi-config

    If it seems that your RPI didn’t reboot properly and you are able to connect via SSH, redo the configuration with the command sudo raspi-config (try to reset the “Memory Split” to 64 if you did change it).

    If you want to be sure that your OS is up-to-date, with the very latest fixes, type the following commands:

    sudo apt-get update
    sudo apt-get full-upgrade

    And finally disable the screen sleep with the command

    sudo sed -i 's/#xserver-command=X.*/xserver-command=X -s 0 dpms/g' /etc/lightdm/lightdm.conf

    Build PMP for your RPI 4

    Use now the SSH console (to be able to copy/paste from here) to execute this:

    sudo apt-get install -y autoconf automake libtool libharfbuzz-dev libfreetype6-dev libfontconfig1-dev libx11-dev libxrandr-dev libvdpau-dev libva-dev mesa-common-dev libegl1-mesa-dev yasm libasound2-dev libpulse-dev libuchardet-dev zlib1g-dev libfribidi-dev git libgnutls28-dev libgl1-mesa-dev libsdl2-dev cmake python3 python python-minimal git mpv libmpv-dev

    Then these 3 commands:

    wget https://github.com/koendv/qt5-opengl-raspberrypi/releases/download/v5.12.5-1/qt5-opengl-dev_5.12.5_armhf.deb 
    sudo apt-get install -y ./qt5-opengl-dev_5.12.5_armhf.deb
    rm qt5-opengl-dev_5.12.5_armhf.deb

    And finally these:

    mkdir ~/pmp
    cd ~/pmp
    git clone git://github.com/plexinc/plex-media-player
    cd plex-media-player/
    mkdir build
    cd build
    cmake -DCMAKE_BUILD_TYPE=Debug -DQTROOT=/usr/lib/qt5.12/ -DCMAKE_INSTALL_PREFIX=/usr/local/ ..
    make -j4
    sudo make install

    Now, PMP can be run. Go back to the Raspberry Pi Desktop, and type this command in a Terminal:

    plexmediaplayer --fullscreen --tv &

    In my case, the option ‘tv’ is not convenient (I can’t see enough on the screen)…

    You will have to Sign In via the link page of Plex.tv and next configure Plex Media Player.

    Configure PMP to launch at boot

    Back into you SSH Console, on your PC, create a new user ‘plex’ with a password:

    sudo adduser plex
    sudo adduser --disabled-password plex
    sudo passwd -d plex

    Login as ‘plex’ in your RPI desktop to run once PMP via a Terminal (Without this step, it will not be displayed full screen after an autologin):

    plexmediaplayer --fullscreen --tv &

    Configure the user ‘plex’ to autologin with a desktop session named ‘plex’:

    sudo sed -i 's/#*user-session=.*/user-session=plex/g' /etc/lightdm/lightdm.conf
    sudo sed -i 's/#*autologin-user=.*/autologin-user=plex/g' /etc/lightdm/lightdm.conf
    sudo sed -i 's/#*autologin-user-timeout=.*/autologin-user-timeout=delay/g' /etc/lightdm/lightdm.conf

    Create the ‘plex’ desktop:

    sudo nano /usr/share/xsessions/plex.desktop

    and paste into it:

    [Desktop Entry]Name=Plex
    Comment=Plex Media Player
    Exec=/usr/local/bin/plexmediaplayer
    Icon=
    Type=Application

    And now reboot ! (It can take 3 long minutes !!):

    sudo reboot

    If there is a configuration issue with the desktop, edit the config via a SSH console and restart lightDM (the Desktop Manager):

    sudo service lightdm restart

    Tips: I had no issue with getting Plex Media Player in fullscreen but here are notes in case I would have to resize it:

    sudo apt-get install -y xdotool
    export DISPLAY=':0.0'
    xdotool search --onlyvisible --maxdepth 1 ""
    xdotool windowmove {window_id} {posx} {posy} windowsize {window_num} {sizex} {sizey}


    This is based on a post of Stueh on Plex forum (see here)


    If you did configure Plex Media Player on a PC Screen and move next on TV Screen, it will most probably not fit that screen et the resolution will possibly not be correct. In that case, here is how I proceed:

    • Log on your RPI using any SSH console on your mobile or Tablet (I presume that your PC is not next to your TV). I am using “RaspController” on Android
    • Edit the desktop to force an error. Hence, you will fallback on the default Desktop. Type in you SSL console : sudo nano /usr/shared/xsession/plex.desktop
      • Ex.: modify this line to define an invalid path: Exec=xxx/usr/local/bin/plexmediaplayer
    • Now, restart LightDM
      • Either type this in your SSH console: sudo service lightdm restart
      • Or CTRL-ALT-Backspace on the keyboard of your RPI.
    • You will get an error message because ‘xxx/usr/local/bin/plexmediaplayer’ does not exist and next get a prompt to login.
    • Login as ‘pi’ 
    • Now, open the Start menu > Preferences > Raspberry Pi Configuration > Display (or Interfaces). If you don’t see the ‘Start menu’ because it is out of the screen, press the ‘Windows’ key on your Keyboard.

    • Next, change the resolution to fit the limitation of your TV:
      • 480p = DVD, old TV 720 x 480 pixels, format 16/9.
      • 720p = HD Ready, 1280 x 720 pixels, format 16/9.
      • 1080p = Full HD, 1920 x 1080 pixels, format 16/9.
      • 2160p, UHDTV1, 3840 x 2160 pixels, format 16/9 (a.ka. UHD-4K or 4K).
      • 4320p, UHDTV2, 7680 x 4320 pixels, format 16/9 (a.k.a UHD-8K or 8K).
    • Then, open Plex Media Player (Start Menu > …) and configure it in TV mode. If it does not fit the TV Screen, reduce the resolution.
    • Finally, log off (or restrat lightDM with CTRL-ALT-BACKSPACE) and login as ‘plex’ to also run Plex Media Player and be sure it’s also well configured.
    • Ho, yes, sure: edit again the plex.desktop to remove the xxx in the path of the EXEC setting and reboot.

    Voilà

    Loading