Category: Synology

  • Send Custom (email) Notifications from scripts running on a Synology

    I use a custom script on my Synology DS209+ (DSM 4.2) DS713+ (DSM 5.1) to backup the databases and was recently asked how to notify the administrator about the success or the failure of that script. The easiest solution is to use the native Notification mechanism of the DSM. It notifies not only by email but also with popup messages, SMS, Skype, etc….

    If you are using DSM 6.x, look at the new version of this post, located here.

    Click to Read More

    First, create the texts for the Notifications to be sent:

    1. Open a dos command prompt
    2. Execute: telnet <YourSynoHostname>
    3. Login as ‘root’
    4. Use the password of your Administrator
    5. Execute: cd /usr/syno/synoman/webman/texts/
    6. Execute: ls
    7. Now you see a list of folders for each language supported by your Synology. Assuming that your DSM is configured to run in English (the default), we will use here after the folder ‘enu’ (but read the notice at the end of this post if you want to configure Notifications for another language)
    8. Execute: cp enu/mails /volume1/web/
      1. I presume here that the web station is enabled, otherwise, copy the file ‘mails’ in any other shared folder.
      2. This file contains the Notification messages used by the Synology.
    9. Open now this file ‘mails’ with notepad++: \\<yourSynoHostname>\web\mails
    10. Add two new “tags” at the end of the file. E.g.: “MySqlBkpError” and “MySqlBkpOK” (see bellow for details to possibly be used for those tags)
    11. Save the changes.
    12. Back to the telnet console, execute: cp /volume1/web/mails enu/mails
    [MySqlBkpError] Category: Backup/Restore,Important
    Title: Database backup failed
    Subject: Database backup on %HOSTNAME% has failed

    Dear User,

    Database backup on %HOSTNAME% has failed.

    [MySqlBkpOK] Category: Backup/Restore
    Title: Database backup succeeded
    Subject: Database backup on %HOSTNAME% has succeeded

    Dear User,

    Database backup on %HOSTNAME% has successfully completed.

    Next, complete your script to notify the Administrator about the Success or Failure of its last action:

    1. Edit your script with notepad++ once it has been copied in a shared folder of your Synology as made here above with the file ‘mails’.
    2. After the action to be reported, add the code here bellow.
    3. Save your changes and copy the file back to its original location

    if [ $? -eq 0 ] then /usr/syno/bin/synonotify MySqlBkpOK
    else /usr/syno/bin/synonotify MySqlBkpError
    fi

    Now, define those custom Notifications to let them appear in the “Advanced” tab of the “Control Panel” > “Notifications” pane where you will be able to enable “email”, “sms”, … for them.

    1. Go back to the telnet console and execute: cp enu/notification_category /volume1/web/
      1. If you want to define those notifications for another language, used the adequate folder instead of ‘enu’.
      2. Notice that I presume you are still in the path set previously, i.e.: /usr/syno/synoman/webman/texts/
    2. Edit the file ‘notification_category’ with notepad++
    3. Look for the following definition in that file: {“group”:”Backup/Restore”,”name”:”NetBkpS3OK”,”title”:”Amazon S3 backup completed”}
    4. Insert the following definition next to it (don’t forget the coma), save the changes and copy the file back to its original location: cp /volume1/web/notification_category enu/notification_category

    ,{“group”:”Backup/Restore”,”name”:”MySqlBkpOK”,”title”:”Database Backup completed”},{“group”:”Backup/Restore”,”name”:”MySqlBkpError”,”title”:”Database Backup failed”}

    Finally, check that the “Notifications” are enabled on your Synology and tick options like emails, SMS, … for the new tags:

    1. In your DSM, go to “Control Panel” > “Notification” > “E-Mail”
    2. Tick the option “Enable e-mail notifications”.
    3. Complete all the fields in that tab. At least: SMTP server, SMTP port, SMTP authentication and Primary email.
    4. Send also a test mail from this tab to verify your settings.
    5. Go next to the “Advanced” tab
    6. Tick the “E-mail” option (and possibly others) for the two new tags which appear now in the list.
      1. If the tags do not appear, close and reopen the control panel.
      2. The tags appear with their title “Database Backup completed” and “Database Backup failed”

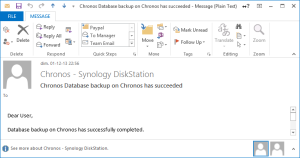
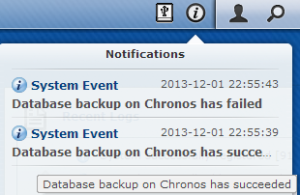
    And here are the outcomes: a popup message and an email

    Database Backup Email
    Database Backup Email
    Database Backup Custom Notification
    Database Backup Custom Notification

    Pay attention that the tags are case sensitive ! Also backup the changes you made in the file ‘mails’ and ‘notification_category’ as they will be overwritten for sure when you will update the DSM… Finally, delete the files ‘mails’ and ‘notification_category’ from your web folder…

    Notice: to declare Notifications for other languages, you will apply the tips here above in the files under your own language folder. A reader, Kasak, kindly reported however that he had to declare the ‘tags’ not only in the ‘mails’ file under the folder of his language (E.g.: ‘fre’), but also under the English (enu) folder.

    Notice: as reported by another reader, Pieter Hooftman, you will see your notifications in Control Panel > Notifications > Advanced tab if and only if you filter them on “All Notifications”. If you need to filter your custom notifications, you have to add it into each section of the file “notification_category” (there is one section per filter). Concretely, look for each occurrence of {“group”:”Backup/Restore”,”name”:”NetBkpS3OK” and insert your in front.

    Notice: as reported by k13tas, it’s much easier to reuse an existing notification and customize its text via Control Panel > Notification > Advanced. Indeed, customized text are not lost after a DSM update. That being said, once a custom notification added in the file “notification_category”, you can also customize its text. Once this is done, the notification will always be available to be used with /usr/syno/bin/synonotify, even after a DSM update, although not visible anymore in the Advanced tab – which is far from ideal.

    As creating manually custom notifications is far from ideal, please vote for my feature request on Synology’s forumhttp://forum.synology.com/enu/viewtopic.php?f=3&t=92727

    Loading

  • Synology surveillance station: Internet Explorer has stopped working

    Since two days, each time I open a Preview, a Live View or the Timeline in my Surveillance Station, IE crashes. Presuming it could due to the Synology ActiveX used by those features, I have removed that one. And Bingo, it’s fixed.

    Click to Read More

    No idea how that ActiveX has been corrupted, but here it how to remove it.

    1. Press AltX to open the Tools menu
    2. Select “Manage Add-ons”
    3. In Add-on Types, keep “Toolbars and Extensions” selected
    4. Scroll down to find the extension “SS3Object Control”. Select it.
    5. In the bottom pane, click on “More information”
    6. You have now a popup window “More information” with a “Remove” button at the very bottom. Click that button.
    7. Reopen Surveillance Station. The ActiveX will be re-installed. But now, the problem is gone…

    Loading

  • Access Synology from Windows 8 with a Windows Live ID

    Since I did upgrade my PC from Windows 7 to Windows 8 and did start to use my Microsoft account (Windows Live ID) to sign in, I am prompted for credentials when I try to  access shared folders on my Synology, although I did create an account with the same name on the NAS. The Credential Manager (formerly known as Windows Vault) is the solution!

    Click to Read More

    First, to be sure that I did create an  account with the same name as my Windows Live Id on the Synology, I did check the name of that Live Id in C:\Users. It was the very same.

    However, that’s not the name sent by Windows 8 to the NAS.

    I could provide valid credentials but I don’t want to do that at each access. And unfortunately,  the old good “Remember my credentials” checkbox seems to be gone in Windows 8. But the feature behind this option (Windows Vault) is still available.

    1. If you are not on the Start Screen, type “Ctrl-Esc”
    2. Once on the Start Screen, type “Control” and select the search result “Control Panel”.
    3. In the “Control Panel” search box, type “Credential” and select the search result “Credential Manager” (This one is the feature formerly known as Windows Vault).
    4. Select the “Windows Credentials” button.
    5. Now, select “Add a Windows Credential.”
    6. In the view that opens, type in the hostname of your NAS or its network address
    7. Provide the user name and password that you want to use to connect on the NAS instead of your Windows Live ID.
    Et voilà!


    Loading

    ,
  • From WordPress 3.3 to 3.4 on Synology: Almost YAUN !!

    No! I don’t mean “Yet Another Unix Nerd”!!!

    But upgrading WordPress from 3.3 to 3.4 on my DS209+ was almost “Yet Another Upgrade Nightmare” 🙂

    Click to Read More

    Upgrading a package for Synology is usually really a piece of cake. Unfortunately, the upgrade package for WordPress caused me difficulties.

    First issue: MySQL password

    The setup failed quite immediately after downloading, complaining that there was possibly an issue with the MySQL password. After some investigation, it appeared to me that :

    • the DSM Package Center is running as Synology’s “root” user and
    • the setup of WordPress was trying to access MySql with that account but without any password.
    I found on Synology’s Forum that “Current wordpress package requires an default mysql account root with empty password to create database successfully. If you have set mysql root password before, please install phpMyAdmin to reset the password first.

    And unfortunately (although quite normal), I did set a password for the MySql “root” user in the past… So, as suggested in the message above, I did reset MySql root password to blank.

    • Go to phpMyAdmin, opened the “Users” tab and clicked “Edit Privileges” for the user “root” with Host=localhost.
    • In the “Edit Privileges” dialog box, scroll down to the “Change Password” area and select “No Password” before clicking “Go”.
    • Finally, back to the “Users” page, click “Create PHP code” to apply the change. At that moment, phpMyAdmin could prompt you to re-enter your credentials (root with a blank password).

    I did next restart the update of the WordPress which finally completed fine. But…

    Next issue: Page Not Found

    My Blog was not reachable anymore after the upgrade ? Damned… WordPress was imply disabled… I had to click “Start” next to the WordPress Package in the DSM Package Center 😆

    And finally, my home page appeared… I went immediately to the administration dashboard where I discovered that the setup was actually not yet complete. In this dashboard, I found a message asking me to click a button to upgrade the database. Fortunately, nothing wrong occurred during this upgrade 🙂

    Last issue: This is somewhat embarrassing, isn’t it?

    Although the home page appeared correctly, I was not able to open anything else: no post, no “custom” pages, no categories, … For each of them, I got the WordPress’ “Page Not Found”… All the permalinks appeared somewhat “corrupted”… No idea why.

    Fortunately (bis ter et repetita), fixing this issue was not difficult. I simply had to re-enforce the right Permalinks structure.

    • Go back to the administration dashboard and select the menu “Permalinks” under “Settings”.
    • Check that “your” structure of Permalinks is still selected and did click “Save Changes” (Even if you didn’t change the structure).

    And miracle! Everything went back to normal. I didn’t lose any customization or plugins except my custom smilies from \web\wordpress\wp-includes\images\smilies (fortunately backuped),…

    YASU!!

    No! I Don’t mean “Yet Another System Utility”!!! But “Yet Another Successful Update” 😆

    Loading

    ,
  • Schedule a Backup of all your MySQL databases on Synology

    It would be a good idea to schedule a daily backup of all the MySQL databases on your Synology. Those will indeed be wiped out if by accident, you have to reset your NAS (reinstall the firmware), ex.: if you lose a disk in your RAID 0.

    That can be done using a shell script and a cron job as described here after.

    How to Backup

    First, create a user with a local-read-only access on the databases. We will indeed have to let its password in the script, endangering the security. Using a local-read-only user will mitigate the risks.

    1. Go to the web administration interface (DSM) of your NAS.
    2. Install phpMYAdmin via the “Package Center” if not yet done.
    3. Open phpMyAdmin via the “Start Menu” (“Main Menu”).
      1. I am using the login ‘root’ with the password of Syno’s ‘admin’ user
    4. Open the “Users” tab in phpMyAdmin
    5. Click “Add User” (bellow the list of existing users)
    6. Enter the User Name. Ex.: backup
    7. Select “localhost” as an Host.
    8. Enter a password. Ex.: mysql
    9. Keep “none” as “Database for user”
    10. Grant the user with Global privileges: Select (in Data) and Reload, Show Databases and Lock Tables (in Administration)
    11. Click “Add User” at the botton of the page

    Next, create a shell scripts in a Shared Folder of the NAS (Ex.: \volume1\backup\backupMySql.sh). Working in a Shared Folder will make it easier for you to copy/open later the backups from your PC). Don’t forget to create a “Unix” file, either using the touch command in a Console or saving a file As a “Unix shell script” within Notepad++. Notice that a script created with NotePad++ and saved on the Shared Folder will belong to the user account accessing that Shared Folder (Most probably your Windows Account if like me you simply created a user on your NAS with the same login and password). A script created with “touch” in a Console will belong to the user accessing the NAS via telnet/SSH (Most probably the “root” account).

    [shell]#!/bin/sh
    #
    DIR=/volume1/backup/sqlbackup/
    DATESTAMP=$(date +%Y%m%d%H%M%S)
    DB_USER=backup
    DB_PASS=mysql
    
    # create backup dir if it does not exist
    mkdir -p ${DIR}
    
    # remove backups older than $DAYS_KEEP
    #DAYS_KEEP=30
    #find ${DIR}* -mtime +$DAYS_KEEP -exec rm -f {} \; 2> /dev/null
    
    # remove all backups except the $KEEP latest
    KEEP=5
    BACKUPS=`find ${DIR} -name 'mysqldump-*.gz' | wc -l | sed 's/\ //g'`
    while [ $BACKUPS -ge $KEEP ]
    do
      ls -tr1 ${DIR}mysqldump-*.gz | head -n 1 | xargs rm -f
      BACKUPS=`expr $BACKUPS - 1`
    done
    
    #
    # create backups securely
    #umask 006
    
    # dump all the databases in a gzip file
    FILENAME=${DIR}mysqldump-${DATESTAMP}.gz
    /usr/syno/mysql/bin/mysqldump --user=$DB_USER --password=$DB_PASS --opt --all-databases --flush-logs | gzip >> $FILENAME
    [/shell]
    

    NB: Since DSM 6.0, “/usr/syno/mysql/bin/mysqldump” has been moved to “/bin/mysqldump” !!!

    Possibly, type the following command in a Console (telnet/SSH) to set the user ‘root’ as owner of the script:

    [shell]chown root /volume1/backup/backupMySql.sh[/shell]

    IMPORTANT notice: I used to have “-u DB_USER” (with a blank space in between) in my script above and -“p$DB_USER” (without a blank) instead of –user and –password. But a reader (Fredy) reported that the script was not running fine for him unless removing the blank. As per documentation of mysqldump’s user parameter and password parameter, there should be a blank after -u but not after -p. However, samples on the web usually illustrate the use of mysqldump with “-uroot”. So, I decided to use the more explicit notation “–user=” and “–password=”. I did test this notation with a wrong username or password and the resulting dump is indeed empty. With the correct username and password, it works fine.

    Since DSM 4.2, the Task Scheduler can be used to run the script on a daily basis.

    1. Go to the Start Menu
    2. Open the Control Panel
    3. In the “Application Settings”, open the Task Scheduler
    4. Select “Create a User-Defined Script”
    5. Type a name for that “Task:”
    6. Keep the “User:” root
    7. In the “Run Command” pane, type:
      sh /volume1/backup/backupMySql.sh

    Don’t forget the “sh” in front of your command, otherwise, it does not work (although the sample provided by Synology is missing it ?!)

    If you don’t use the Task Scheduler, you can add a Cron Job to execute the script, e.g. every day at 0:01. Open a Console (Telnet/SSH) and type:

    [shell]echo "1       0       *       *       *       root    sh /volume1/backup/backupMySql.sh" >> /etc/crontab[/shell]

    FYI, a cron line syntax is “mm hh dd MMM DDD user task” where:

    • mm is the minute (0..59)
    • hh is the hour (0..23)
    • dd is the day in the month (1..31)
    • MMM is the month (jan, feb, … or 1..12)
    • DDD is the day in the week (sun, mon, … or 0..7 where 0 and 7 beeing both sunday)

    The following values can also be used:

    • * : a every unit (0, 1, 2, 3, 4…)
    • 5,8 : at unit 5 et 8
    • 2-5 : units 2 to 5 (2, 3, 4, 5)
    • */3 : every 3 units (0, 3, 6, 9…)
    • 10-20/3 : every 3 units, from 10th to 20th (10, 13, 16, 19)

    So, the script will start every day at 0:01h

    Finally, you must restart the cron daemon to activate the new job. To find the process id and send a SIGHUP signal to this one, type the following command line in a Console (Telnet/SSH):

    [shell]ps | grep crond | grep -v grep | awk '{print$1}' | xargs -t kill -HUP[/shell]

    It should display “Kill -HUP xxxx” where xxx is the pid of the cron daemon.

    Added on 03/01/2013

    Attention: if you copy paste the command to restart the cron daemon from this page into the telnet console, some symbols will be wiped out: the ‘{ and ‘ around print$1… you have to type them manually…

    Attention: if you upgrade the version of DSM, the changes made in the cron script are lost (at least, it’s what I have noticed after updating last month…). Reason why I recommend to use the new “Task Scheduler” feature available since DSM 4.2.

    Tip to edit the cron script: you can use the package “Config File Editor” available here. Once installed, you can access it via the Main Menu. Then, you have to edit the file named “Config File Editor” and add the following line:

    /etc/crontab,crontab

    Once this line is added and saved, … I don’t remember how to force the change to be taken into account :/. But restarting the DiskStation is enough 😀

    Finally, back into the Config File Editor, select the ‘crontab’ entry and modify this script, save your changes and restart the cron daemon.

    Tip to restart the cron daemon: you can use the package “MODS Web Console” available here. To install it, go to the Package Center and add the following url via the Settings > Package Sources : https://www.beatificabytes.be/sspks. Once this url added, go to the tab “Community” and click Install on the “MODS Web Console” icon.

    Run the Web Console via the Main Menu, log in with “admin”/”admin” (The defaults values if not changed) and type:

    synoservice --restart crond

    Added on 01/12/2013

    If you want a lazy solution to notify the Administrator about the success or failure of the backup, you can use the ‘synonotify’ command (See details here). A more advanced solution would be to configure the “Mail Server” and use its ‘sendmail’ command:  /volume1/@appstore/MailServer/sbin/sendmail…

    Added on 08/01/2017

    mysqldump has moved

    • DSM 6.0 : /usr/syno/mysql/bin/mysqldump
    • MariaDB 5: /volume1/@appstore/MariaDB/usr/bin/mysqldump
      MariaDB 10: /volume1/@appstore/MariaDB10/usr/local/mariadb10/bin/mysqldump

How to Restore

To do a full restore, simply:

  1. Copy the archive (.gz) you plan to restore on your local PC
  2. Go to “phpyMyAdmin” > “Import” > “Chose File” (next to Browse your computer).
  3. Select the .gz file to be restored
  4. Press “Go” at the bottom of the page (no need to change any settings)

Pay attention: this is a complete restore, I.e.: all databases are dropped and recreated from scratch.

If you want to be able to restore a subset of your databases you better have to change the script to backup specific databases instead of –all-database.

If you want to restore only one table ‘mytable’ from the backup ‘mysqldump-datetime.gz’:

  1. Unzip first the archive: gunzip mysqldump-datetime.gz
  2. Then extract the part that restore the desired table with this command: sed -n -e ‘/DROP TABLE.*mytable/,/UNLOCK TABLES;/p’ mysqldump-datetime > mytabledump

Download the script here.

Loading

  • Touch your scripts! Don’t be lazy…

    I have just created a new shell script for my NAS. But its behavior is really weird. It seems that concatenating strings is actually overwriting them. Ex.:

    #!/bin/bash
    A=abcd
    B=12
    echo $A$B
    

    results in: 12cd

    Click to read more

    Also, redirecting any output into a file results in a new folder and an new empty file, both with a weird name. Ex.:

    [shell] DIR=/volume1/sharedFolder/
    FILENAME=${DIR}outputFile
    echo Hello World &amp;gt; $FILENAME
    [/shell]

    results in a file named “outputFile” and a folder named “” ( beeing displayed as ‘dots’ in Windows Explorer!). Both are well located under /volume1/sharedFolder/ and visible in Windows Explorer. However the folder does not appear when executing ‘ls -la’ in a console on the NAS (only the file appears) and the only way to delete this folder is to execute ‘rm -R /volume1/sharedFolder’ in the console.

    I quickly realized that this behavior was a consequence of creating the file on a Shared Folder of the NAS using the Windows Explorer’s contextual menu “New”>”Text Document”… Creating an empty file with the command “touch” directly in a console on the NAS does not suffer the same issues.

    There is indeed at least one difference that I know between the file format of Unix and DOS: the return character which is 0x0A in Unix, while it is 0x0A, 0x0D in DOS (a.k.a /n in Unix and /r/n in DOS)

    I realized that this was the issue because each empty line in the script was resulting in an error: “: not founde x:”, x being the line number. Meaning that the “empty lines” were actually not empty (due to the /r).

    Notice that the magic “touch” only works because I use next Notepad++ to edit the file. Indeed, this great freeware preserve the Unix file format while NotePad, WordPad, etc…, do not.

    I did use the Windows Explorer’s contextual menu to create the empty file because I was too lazy to create a new file with notepad++ and browse next for the target subfolder on the NAS where I had to save it 🙁

    Otherwise, with the “Save As” of NotePad++, I would have been able to pick the right format: “Unix Script File” 🙂

    Loading

  • Buffalo + DD-WRT: Disable “Cross Site Action detected”

    I have so many devices and services on my LAN that I can’t remember all their Urls: IP Camera, VDSL modem, Network Printer, Router, File Server, Backup Server, VMWare Server, NAS, Blog, etc… So, I did create an administration page (php) on my NAS to list them with their intranet or internet address depending on the variable $_SERVER[‘SERVER_NAME’].

    Unfortunately, when clicking on the link to my Router’s web interface (a Buffalo WZR-HP-G300NH with DD-WRT v24SP2), this one returns the message “Cross Site Action detected”.

    As the purpose is not for me to copy the Url manually, I did look how to disable this protection on the Buffalo and here is the tip: Click to read more

    1. Run a telnet or ssh console
    2. Log on as ‘root’ even if you changed the default username via the web interface (the default password is ‘admin’ but I hope you did change it).
    3. And type the following commands:
    • nvram set no_crossdetect=1
    • nvram commit

    That’s it.

    P.S.: more information on SSH/Telnet and the CLI here.

    Loading

  • Edit WordPress sources on Synology via the shared folder “web”

    Although all Plugins’ files can be edited directly within WordPress, you may sometimes prefer to open them with your favorite editor. Also, you could desire to edit some sources of WordPress…

    And if it is quite easy to find the files to be modified under the share folder “web” (\\<SynologyHostname>\web), you will quickly notice that you may not save any change…

    This is simply because the folder ‘wordpress’ and its content (on Synology) belong by default to the user “nobody”. Click to read the solution

    To save your changes, you will first have to change the owner:

    • Check that Telnet is enabled on your Synology (Start Menu/Control Panel => Terminal)
    • Start the command (in a MS-Dos prompt): Telnet <SynologyHostname>
    • Log in with the root account and its password (same password as the Synology “admin” account)
    • Go to the physical folder associated to the shared folder “web”: cd /volume1/web/
    • Take ownership of WordPress’s whole content: chown -R <YourAccount> wordpress

    For sure, <YourAccount> must exist on Synology, be the same as your windows account (I.e.: same name and same password) and have privileges on the folder “web”. Otherwise, create such an account (Synology’s Start Menu/Control Panel => User) and don’t forget to grant him Read/Write access on “web” (Via the Synology User’s tab “Privileges Setup”)

    Once your changes saved, never forget to give back the ownership to “nobody”(*) otherwise WordPress won’t be able to update its plugins, themes, etc… automatically anymore.

    (*) Indeed, by default and for security reasons, the httpd demon of apache runs with the account “nobody”. All folders/files created by httpd (a.o.: during the installation of WordPress) belong therefore to “nobody”. All changes executed by https (e.g.: files editing) are executed with the credentials of “nobody”…

    Loading

    ,
  • WordPress on Synology accessible with both a Netbios name and Domain name

    When I have decided to install the package WordPress on my Synology, it was intended to be used as a basic “Knowledge Management Software” as I explained here.

    One of my requirement was however not covered out of the box by this solution: WordPress on Synology might only be configured to be accessible with one domain name.

    Click to read why

    Concretely:

    • Either with the Netbios name of the NAS, accessible from the Intranet only(my home network).
    • Or with the DNS name associated with your public IP, accessible from the Internet only (*) in my case.

    (*) Indeed, my DNS name is associated with the IP of my VDSL modem (my “public” IP). And although all http requests are forwarded to my NAS when they come from Internet, they are not when they come from my Intranet (So far, I didn’t find how to enable the Port Forwarding for this traffic and don’t even know if it’s possible with my modem; a Sagem Fast 3464):  If I browse my DNS name from my Intranet, I get the administration page of the modem.

    [EDIT] Now, when I browse my DNS name, I don’t get the Administration page of my Modem anymore but a message “Your internet connection is up, please close your browser and restart it again”. This is something configured by my Internet Provider in their own DNS Servers.

    Fortunately, there is an easy solution:

    Click to read the solution

    ==> Install the WordPress’ plugin “MultiDomain” and configure it to support “several domains”: a first one being simply my Netbios name and another one being your DNS name.

    This configuration has to be done in the file “config.php”, either with the “WordPress Plugins Editor” or with your favorite editor; the file can be accessed via the system shared drive “web” of Synology: \\<SynologyHostname>\web\wordpress\wp-content\plugins\multidomain\config.php). If you do it with your own editor, read this post about file access rights.

    That solution is from far easier than any advanced manual .htaccess customization and more effective than any other multi-site/multi-domain plugin I found 😉

    [EDIT] I have finally decided to access my blog only with its fully qualified domain name and never with its Netbios name anymore, including from my Intranet. So, I had to solve the access issue when using a domain name within my Intranet. I use the DNS Server of my Synology for that purpose.

    Loading

    ,
  • WordPress on my Synology!

    This first post to proudly announce that I finally decided to install the WordPress Package on my Synology, a DS209+ with DSM 4.1, and start to blog.

    Nothing could have been easier than installing this package… Click to read more

    • Log on your Synology as an administrator
    • Open the “Package Center” via the “Start Menu”
    • Go to the “Available” tab
    • Click “Install” on the package “WordPress”.

    The setup wizard will prompt you to get the root’s password in order to create a mysql database. By default, the Synology has no password configured to access mysql with the ‘root’ account. So I decided to configure one, using “phpMyAdmin”:

    • Open “phpMyAdmin” via the “Start Menu”

    If “phpMyAdmin” is not available in this menu:

    • Go back to the “Package Center”
    • Go to the “Available” tab
    • Click Install on the package “phpMyAdmin”

    Once “phpMyAdmin” open:

    • select the tab “Users”
    • for each “root” entry (one per host), click on “Edit Privileges”
    • scroll down in the “Privileges” window and change the password

    Use the “root” account and its new password to complete the setup of WordPress. The only other information required to configure WordPress on your Synology is a title and a tagline for your blog 🙂

    You can now access your blog on http://YourSynology/wordpress.

    In a next post, I will explain how to easily access your blog from both intranet and internet, i.e.: using either your Synology netbios name  (hostname) or DNS name (domain name).

    Loading

    ,
  • Tags


    Acer iDea 510 AirPlay Android Backup DD-WRT DNS DS209+ DS713+ DS1815+ FlexRaid Galaxy Galaxy S2 Galaxy S7 Google Assistant Google Home HTPC Kies MCE MySQL Nabi 2 Nvidia TV Shield One Plus One OnePlus One OpenHab Outlook Philips Hue Plex RAID Raspberry PI Remote Desktop Root Access Samsung Scripts Synology Team Build Visual Studio VMWare Wi-Fi Windows Windows 8 Windows 8.1 Windows 10 Windows Server 2012 XBMC Xpenology

    Categories


    Recent Posts