I use a custom script on my Synology DS209+ (DSM 4.2) DS713+ (DSM 5.1) to backup the databases and was recently asked how to notify the administrator about the success or the failure of that script. The easiest solution is to use the native Notification mechanism of the DSM. It notifies not only by email but also with popup messages, SMS, Skype, etc….
If you are using DSM 6.x, look at the new version of this post, located here.
Click to Read More
First, create the texts for the Notifications to be sent:
- Open a dos command prompt
- Execute: telnet <YourSynoHostname>
- Login as ‘root’
- Use the password of your Administrator
- Execute: cd /usr/syno/synoman/webman/texts/
- Execute: ls
- Now you see a list of folders for each language supported by your Synology. Assuming that your DSM is configured to run in English (the default), we will use here after the folder ‘enu’ (but read the notice at the end of this post if you want to configure Notifications for another language)
- Execute: cp enu/mails /volume1/web/
- I presume here that the web station is enabled, otherwise, copy the file ‘mails’ in any other shared folder.
- This file contains the Notification messages used by the Synology.
- Open now this file ‘mails’ with notepad++: \\<yourSynoHostname>\web\mails
- Add two new “tags” at the end of the file. E.g.: “MySqlBkpError” and “MySqlBkpOK” (see bellow for details to possibly be used for those tags)
- Save the changes.
- Back to the telnet console, execute: cp /volume1/web/mails enu/mails
Title: Database backup failed
Subject: Database backup on %HOSTNAME% has failed
Dear User,
Database backup on %HOSTNAME% has failed.
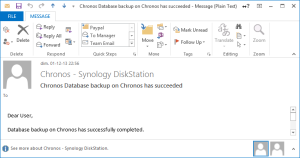
Title: Database backup succeeded
Subject: Database backup on %HOSTNAME% has succeeded
Dear User,
Database backup on %HOSTNAME% has successfully completed.
Next, complete your script to notify the Administrator about the Success or Failure of its last action:
- Edit your script with notepad++ once it has been copied in a shared folder of your Synology as made here above with the file ‘mails’.
- After the action to be reported, add the code here bellow.
- Save your changes and copy the file back to its original location
if [ $? -eq 0 ]
then /usr/syno/bin/synonotify MySqlBkpOK
else /usr/syno/bin/synonotify MySqlBkpError
fi
Now, define those custom Notifications to let them appear in the “Advanced” tab of the “Control Panel” > “Notifications” pane where you will be able to enable “email”, “sms”, … for them.
- Go back to the telnet console and execute: cp enu/notification_category /volume1/web/
- If you want to define those notifications for another language, used the adequate folder instead of ‘enu’.
- Notice that I presume you are still in the path set previously, i.e.: /usr/syno/synoman/webman/texts/
- Edit the file ‘notification_category’ with notepad++
- Look for the following definition in that file: {“group”:”Backup/Restore”,”name”:”NetBkpS3OK”,”title”:”Amazon S3 backup completed”}
- Insert the following definition next to it (don’t forget the coma), save the changes and copy the file back to its original location: cp /volume1/web/notification_category enu/notification_category
,{“group”:”Backup/Restore”,”name”:”MySqlBkpOK”,”title”:”Database Backup completed”},{“group”:”Backup/Restore”,”name”:”MySqlBkpError”,”title”:”Database Backup failed”}
Finally, check that the “Notifications” are enabled on your Synology and tick options like emails, SMS, … for the new tags:
- In your DSM, go to “Control Panel” > “Notification” > “E-Mail”
- Tick the option “Enable e-mail notifications”.
- Complete all the fields in that tab. At least: SMTP server, SMTP port, SMTP authentication and Primary email.
- Send also a test mail from this tab to verify your settings.
- Go next to the “Advanced” tab
- Tick the “E-mail” option (and possibly others) for the two new tags which appear now in the list.
- If the tags do not appear, close and reopen the control panel.
- The tags appear with their title “Database Backup completed” and “Database Backup failed”
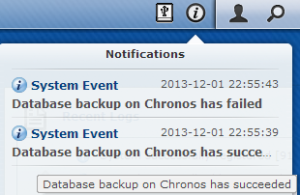
And here are the outcomes: a popup message and an email


Pay attention that the tags are case sensitive ! Also backup the changes you made in the file ‘mails’ and ‘notification_category’ as they will be overwritten for sure when you will update the DSM… Finally, delete the files ‘mails’ and ‘notification_category’ from your web folder…
Notice: to declare Notifications for other languages, you will apply the tips here above in the files under your own language folder. A reader, Kasak, kindly reported however that he had to declare the ‘tags’ not only in the ‘mails’ file under the folder of his language (E.g.: ‘fre’), but also under the English (enu) folder.
Notice: as reported by another reader, Pieter Hooftman, you will see your notifications in Control Panel > Notifications > Advanced tab if and only if you filter them on “All Notifications”. If you need to filter your custom notifications, you have to add it into each section of the file “notification_category” (there is one section per filter). Concretely, look for each occurrence of {“group”:”Backup/Restore”,”name”:”NetBkpS3OK” and insert your in front.
Notice: as reported by k13tas, it’s much easier to reuse an existing notification and customize its text via Control Panel > Notification > Advanced. Indeed, customized text are not lost after a DSM update. That being said, once a custom notification added in the file “notification_category”, you can also customize its text. Once this is done, the notification will always be available to be used with /usr/syno/bin/synonotify, even after a DSM update, although not visible anymore in the Advanced tab – which is far from ideal.
As creating manually custom notifications is far from ideal, please vote for my feature request on Synology’s forum: http://forum.synology.com/enu/viewtopic.php?f=3&t=92727
![]()
Leave a Reply