This is an update of a old post written for DSM 4 and 5: how to use the native Notification Mechanism of Synology to sent custom notifications. It’s now tested on my DS1815+ with DSM 6.0.
Click to Read More
First, define the Notifications to be sent:
- Open a dos command prompt, and execute: telnet <YourSynoHostname>
- As an alternative, I am using the free telnet client “Putty” to open SSH Console.
- Login as administrator
- Once connected via telnet, enter the root mode with the command ‘sudo -i’, using here also the password of your administrator
- Execute next: cd /usr/syno/synoman/webman/texts/
- Execute: ls
- Now you see a list of folders for each language supported by your Synology. You must at least defined your custom notifications in the ‘enu’ version and next the version that match your language.
- Copy the file with the definition of the existing notifications in a shared folder to edit it easily: cp enu/mails /volume1/web/
- I presume here that the web station is enabled, otherwise, copy the file ‘mails’ in any other shared folder.
- As an alternative, you can use the Package “Config File Editor” to edit “/usr/syno/synoman/webman/texts/enu/mails”
- Edit now this file ‘mails’ (e.g.: with notepad++: \\<yourSynoHostname>\web\mails)
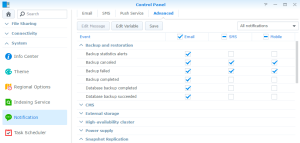
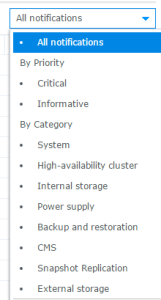
- Add your new custom “tags” at the end of the file with an adequate definition (see bellow for an example). You must specify a Title, a Subject, the text, and a Category with its priority. The category is used to group the Notifications in the DSM > Control Panel > Notification > Advanced Tab. For each Category, specify one of the possible values with a “Priority”, separated by a coma. The priority is used to filter the notifications in the “Advanced” tab (Look at existing tags in the file for illustration):
- Possible values for “Category”
- Backup/Restore: group under ‘Backup and Restoration’ in the “Advanced” tab
- CMS
- External Storage
- HA: grouped under ‘High-availability cluster’
- AHA: not displayed in the “Advanced” tab but related to External Storage
- Storage: grouped under ‘Internal Storage’
- USB Copy: not displayed in the “Advanced” tab but related to External Storage
- Power System: grouped under ‘Power supply’
- System
- PerfEvent: not displayed in the “Advanced” tab but related to System
- Possible values for “Priority”
- Possible values for “Category”
- Save your changes (E.g.: back to the telnet console, execute: cp /volume1/web/mails enu/mails)
Examples:
Category: Backup/Restore,Important
Title: Database backup failed
Subject: Database backup on %HOSTNAME% has failed
Dear User,
Database backup on %HOSTNAME% has failed.
Category: Backup/Restore
Title: Database backup completed
Subject: Database backup on %HOSTNAME% has succeeded
Dear User,
Database backup on %HOSTNAME% has successfully completed.
Next, define how to sent those custom Notifications if and only if they are in a Category which does not appear in the “Advanced” tab of the “Control Panel” > “Notifications” pane > “Advanced” tab (Ex.: the categoryPerfEvent). It’s indeed via that Tab that you should to enable the desired delivery modes: “email”, “sms”, …. which is obviously only possible for Notifications in a Category which is displayed.
- Go back to the telnet console and execute: cp /usr/syno/etc/notification/notification_filter.settings /volume1/web/
- As an alternative, you can use the Package “Config File Editor” to edit “/usr/syno/etc/notification/notification_filter.settings”
- Edit the file ‘notification_filter.settings’ (E.g. with notepad++)
- At the end of that file, insert a configuration line for each custom tag, specifying how the notification must be sent (Look at the other line for illustrations). Possible delivery mode are:
- sms
- mobile
- cms: this is the native popup notification mechanism of DSM, enabled by default for all notifications
- msn: not supported anymore since 17th July 2014
- skype: not supported anymore since 17th July 2014
- Copy the file back to its original location: cp /volume1/web/notification_filter.settings /usr/syno/etc/
Examples:
MySqlBkpOK=”mail”
MySqlBkpError=”mail”
Now, reboot your Synology
It seems that in the past, I was able to apply my changes in those files without a reboot. But while testing this trick on DSM 6.x, I didn’t find how to do it without a reboot.
Finally, modify your script to sent your notifications:
- Edit your script (E.g. with notepad++).
- Add where required the following command: /usr/syno/bin/synonotify <YourCustomTag>
- Save your changes.
In the example here after, I sent notifications depending on the success or failure of the previous command:
if [ $? -eq 0 ]
then /usr/syno/bin/synonotify MySqlBkpOK
else /usr/syno/bin/synonotify MySqlBkpError
fi
Finally, check that the “Notifications” are enabled on your Synology and tick options like emails, SMS, … for the new tags if required:
- In your DSM, go to “Control Panel” > “Notification” > “E-Mail”
- Tick the option “Enable e-mail notifications”.
- Complete all the fields in that tab. At least: SMTP server, SMTP port, SMTP authentication and Primary email.
- Send also a test mail from this tab to verify your settings.
- Go next to the “Advanced” tab
- Tick the “E-mail” option (and possibly others) for the new tags which appear now in the list.
- If the tags do not appear,
close and reopen the control panel.restart your DSM! - The tags appear with their Title under their Category
- If the tags do not appear,

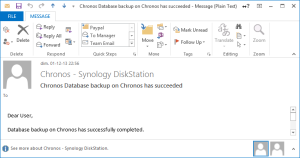
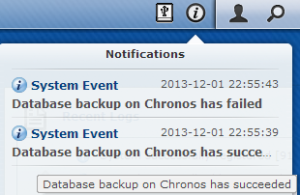
And here are the outcomes: a popup message and an email


Pay attention that the tags are case sensitive ! Also backup the changes you made in the file ‘mails’ and ‘notification_category’ as they will be overwritten for sure when you will update the DSM… Finally, delete the files ‘mails’ and ‘notification_category’ from your web folder…
Notice: the user EConceptApplications suggested on Synology Forum to use a script as here under to automatically reinsert the notifications
grep -q “MySqlBkpOK” /usr/syno/etc/notification/notification_filter.settings
if [ $? -ne 0 ]
then
echo MySqlBkpOK=”mail” >> /usr/syno/etc/notification/notification_filter.settings
fi
Notice: a reader, k13tas, suggested that it was much easier to reuse an existing notification tag and customize its text via Control Panel > Notification > Advanced. Indeed, those changes are not lost after a DSM update.
Notice: a reader, Rusmin, posted here that he found how to pass parameters to be used in the notification message, via a hash json string. In his sample, one passes the value “value1” via a variable named %VAR1%. The value can obviously come from any variable of your shell script. Ex.: $PPID, $MyVariable, $$, etc…
Usage: /usr/syno/bin/synonotify tag_event [hash_json_string]
/usr/syno/bin/synonotify Tag_Name ‘{“[%VAR1%]”: “value1”, “[%VAR2%]”: “value2”}’
NB: another reader, Paul Marcos, reports however that for him:
this wouldn’t work with the brackets:
/usr/syno/bin/synonotify Tag_Name ‘{“[%VAR1%]”: “value1”}’
but this, without the brackets would:
/usr/syno/bin/synonotify Tag_Name ‘{“%VAR1%”: “value1”}’
![]()

Leave a Reply