Category: Tips

  • Download all Images from Imgur’s account for backup reasons

    I have been looking for a quite long hour how to download all images from my Imgur account.

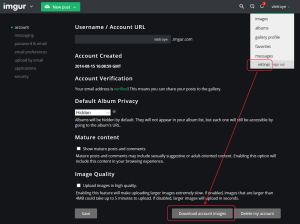
    The solution is damn stupid simple: use the button “Download account images” in the “Settings” page.

    Click to Read More

    Download Imgur Images
    Download Imgur Images

    This button will download a zip file with all your images…

    To download a public album, of any user, you can also simply use MyJdownloader 😉

    Loading

  • Prolong OnePlus One Battery life by limiting charge

    My OnePlus One being only used to play music via AirPlay, it’s always plugged into his craddle. I knew this was not good for the battery life and started to look for an App able to prevent my mobile to reload as long as its battery was not less than a certain percentage. I found a paper recommending to reload only once the battery was lower than 25, but also recommending to no reload higher than 85%. And I found an App able to control this on many rooted android phones: “Battery Charge Limit“.

    Click to Read More

    According to this paper, it’s not good for lithium batteries’ life to do cycles between full charge (100%) and full discharged (0%). Ex.: Doing cycles between 85% and 25% provides a longer service life than doing cycles between 100% and 50%.

    For sure, only a full charge (100%) will provide the specified energy of the battery, and therefore its maximum runtime. So, one has to find a compromise:

    • Cycles between 75–65% offer longest life
    • Electrical Vehicles do cycles between 85–25% to prolong battery life
    • Cycles between 100–25% give long runtime, makes best use of battery, but reduces battery life.

    All being linear, the life-prolonging mid-range of 85-25% reduces the energy to 60 percent.

    More details on the App “Battery Charge Limit” on this blog.

    Loading

  • Easy Root Toolkit for OnePlus One

    My OnePlus One is already a quite old mobile, but I am still using it at home to play music. I recently reinstall Cyanogen Mod 13 and wanted to root it as this is required to use AirAudio. To avoid doing many manual operations, I looked for a fully automated toolkit and found “Bacon Root Toolkit“.

    Click to Read More

    Highly recommended, it works like a charm!

    A demo video exists on YouTube.

    http://www.wugfresh.com/brt/

    Loading

  • Display standard quotes in a WordPress post

    Single and double quotes typed in a post are displayed by WordPress as directionnal quotes: ‘blabla’ or “blabla” (I.e.: left/right single/double quotes). This becomes an issue when publishing “shell scripts” samples to be copy/pasted. The solution is to type “encoded quotes”. Ex.: & #39; for ' or & #34; for " (without the blanks between & and #).

    Click to Read More

    This is due to the WordPress converting Straight Quotes to Pretty Quotes… a feature also named Smart Quotes and due to a filter running in WordPress: the “wptexturize”.

    Here after, an example I used to post to illustrate how to send custom notifications from a script running on a Synology. The code was directly copy/pasted here from a shell script opened within Notepad++ (where the quotes appeared as &#39 and &#34).

    /usr/syno/bin/synonotify Tag_Name ‘{“[%VAR1%]”: “value1”, “[%VAR2%]”: “value2”}’

    As you can see above, the single and double quotes are displayed by WordPress as symbols: ‘…’ and “…”.

    The problem is that readers who copied/pasted as-is this sample in their script got execution errors. Indeed, a ‘ and a &#39 are not interpreted the same way within a shell.

    To solve this issue, I did replace all ‘ and ” respectively by & #39 and & #34 (without the blanks between & and #). I don’t use the menu Insert > Special Character as

    Another option would be to disable the “pretty-fication” feature… This can be done by opening up your theme’s functions.php file and pasting the following code at the bottom right before the closing ?> PHP tag:

    remove_filter('the_content', 'wptexturize');

    Notice that Quotes in preformatted text (as here just above) are not replaced by Smart Quotes. But one one side, this can’t be used on Quotes typed inline, and on the other side, I don’t use preformatted text for my code samples…

    Yet another option would be to use a plugin like the Smart Quote Fixer to remove the Smart Quotes.

    But I prefer to use type the num codes as I don’t want to disable Smart Quotes on the complete post…
    Loading

    ,
  • Can’t initialize disk (cyclic redundancy check)

    I recently added an old 1TB disk in a tray of my PC and was prompted by Windows to initialize it. Proceeding with this initialization, I got an error message: Can’t initialize disk (cyclic redundancy check). The problem was that, in the past, this disk was part of a RAID array.

    Click to Read More

    The problem was not solved by using GPT versus MBR, or by installing HDSentinel, or using third party tools such as HDDScan, SeaTools, …

    I did first open the “Computer Management” interface ( :win: + E > This PC > Manage) and went into the “Disk Management” pane. But couldn’t initialize the disk from there either, nor do anything else on it.

    I did next start my SATA Controller management software: Intel Rapid Storage Technology. Once in there, I saw that the disk was recognized as the only available member of a Raid Array. I remember that it was indeed used in a physical RAID 1 array a long time ago. I should have guess it as the Disk Management interface was pretending that the disk was 2TB (recognized as an RAID 1 array of 2x 1TB) although it was a 1TB…

    So, I simply deleted that array (still via Intel RST) and was finally able to initialize the disk.

    Et voilà.

    Loading

  • Convert CodePlex’s HTML Markup into GitHub’s Markdown

    As you probably know if using CodePlex, it will shutdown by the end of 2017. The option suggested by CodePlex is to move to GitHub.

    Click to Read More

    The move is facilitated by an automated “import” procedure. But HTML pages created on CodePlex are not automatically converted into Markdow.

    This can fortunately be done using Pandoc.
    For demo purpose, pick From = “HTML” and To = “Markdown (GitHub)”.

    Loading

  • ‘Add Mirror…’ option is grayed out in Windows’ Disk Management

    How to ‘Add Mirror’ on a disk containing data when the option is grayed-out although you have another very similar disk available and empty? Check that your two disks are “Dynamic” and shrink the volume on the disk with data!

    Click to Read More

    I had a 2 TB disk with a unique volume (on one single partition), containing data.

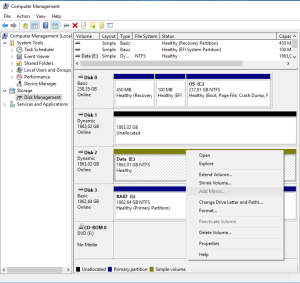
    I did add a new 2 TB disk to be used as a mirror of the existing one. I went into the Disk Management tool to “add Mirror” but found that this option was not available. The menu was disabled:

    Add Mirror Grayed Out
    Add Mirror Grayed Out

    First thing to check: the two disks to be used must be “Dynamic”. Right-click on “Disk x” to “Convert to Dynamic Disk …”.

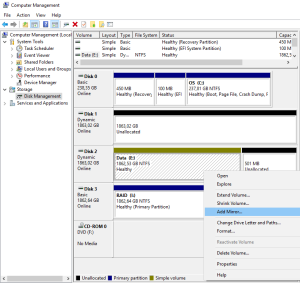
    Next, to be able to create a mirror, the system needs some free space to create its own reserved partition on the disk. So, right-click on the Volume of the disk with data to “Shrink Volume…” (Try first with 1 Mb). Once the disk has been shrunk, the menu “Add Mirror…” becomes accessible.

    Add Mirror Enabled
    Add Mirror Enabled

    Et voilà.

    NB.:

    • It does not matter if the disks are MBR or GPT.
    • Once the volume shrunk, you will possibly have to reboot.
    • If you encounter an issue while adding a mirror, do a “Check Disk” (Properties > Tools > Check).
    • If you can really not get rid of the error “DiskPart has referenced an object which is not up-to-date.” although rebooting, do an “Extend Volume” of 1 MB! (Sound silly, I know…) and then “Add Mirror”.
    • In my case, while the disks were re-syncing, I did remove the mirror, did an “Extend Volume” to reuse the whole free space, and was still able to do an “Add Mirror”.
    • MS Partition & Volume Info here.

    Mirror using DiskPart

    • Run DiskPart in a cmd prompt started as Administrator
    • list disk
    • select disk x [x=disk containing the volume to be mirrored]
    • list volume
    • select volume x [x=volume to be mirrored]
    • add disk x [x=disk to be used for mirroring]

    Loading

  • Check if Samsung Smart TV is alive with Php Server Monitor

    Samsung Smart TVs have two http ports that can be queried from Php Server Monitor: 8000 and 8001.

    Click to Read More

    If the TV is on, querying on http://IP:8000, you get the response:

    Server is running...

    If the TV is on, querying on http://IP:8001/ms/1.0/, you get a response like:

    {
      "DUID": "08f0d181-0096-1000-82d5-c4576e33a21d",
      "Model": "14_X14_BT",
      "ModelName": "UE48H6500",
      "ModelDescription": "Samsung TV RCR",
      "NetworkType": "wired",
      "SSID": "",
      "IP": "192.168.0.180",
      "FirmwareVersion": "Unknown",
      "DeviceName": "[TV]Samsung LED48",
      "DeviceID": "08f0d181-0096-1000-82d5-c4576e33a21d",
      "UDN": "08f0d181-0096-1000-82d5-c4576e33a21d",
      "Resolution": "1920x1080",
      "CountryCode": "BE",
      "SmartHubAgreement": "true",
      "ServiceURI": "http://192.168.0.180:8001/ms/1.0/",
      "DialURI": "http://192.168.0.180:8001/ws/apps/",
      "Capabilities": [
        {
          "name": "samsung:multiscreen:1",
          "port": "8001",
          "location": "/ms/1.0/"
        }
      ]
    }

    When the TV is Off (powered off or in standby mode), you won’t get any response from those ports but:

    ERR_CONNECTION_TIMED_OUT

    Loading

  • PC waking up in sleep mode

    Recently, I noticed that my PC was waking up from sleep mode without me explicitly clicking the mouse, pressing a key on the keyboard or sending a magic packet…

    I found this problem was due to an update of the Ethernet drivers which allowed any packet to wake up the computer…

    Click to Read More

    This is a problem which comes back regularly when updating drivers. Each time, I wonder what’s wrong again. So, here are some tricks to find the cause.

    First:

    • Put the computer at sleep and wait until it wakes up.

    Next, look for the last device which turned on the PC:

    • Execute in a Dos prompt : powercfg -lastwake
    C:\WINDOWS\system32>powercfg -lastwake
    Wake History Count - 1
    Wake History [0]
     Wake Source Count - 1
     Wake Source [0]
     Type: Device
     Instance Path: USB\VID_046D&PID_C52B&2b3c7d9c&0&3
     Friendly Name:
     Description: USB Composite Device
     Manufacturer: (Standard USB Host Controller)
    Device 0xC52B is a USB Receiver for Wireless Mouse 
    Vendor 0x046D is Logitech Inc.
    • Go into the Device Manager, find that device and open its properties. In its “Power Management” tab, disallow the device to turn on the computer. If the option is not available, this device is not causing your issue.
      • If your PC has been waked up by the Ethernet Controller, it can be because any packet can wake it up. In the Power Management tab, tick the option “Only allow a magic packet to wake the computer”.

    If this does not help:

    • Open the “Event Viewer” (eventvwr) > “Windows Logs” > “System”.
    • “Filter Current Log” on “Event Source” = Power-Troubleshooter to find which device did wake up your PC:
    The system has returned from a low power state.
    Sleep Time: ‎2016‎-‎12‎-‎24T09:40:11.549148000Z
    Wake Time: ‎2016‎-‎12‎-‎24T09:41:07.347715900Z
    Wake Source: Device -Intel(R) Ethernet Connection (2) I219-V

    You can also look for the list of devices able to wake up the PC:

    • Type in a Dos Prompt: powercfg -devicequery wake_armed
    C:\WINDOWS\system32>powercfg -devicequery wake_armed
    Logitech HID-compliant Unifying keyboard
    HID-compliant mouse
    HID Keyboard Device
    HID Keyboard Device (001)
    Logitech HID-compliant Unifying Mouse
    Intel(R) Ethernet Connection (2) I219-V
    Logitech HID-compliant Unifying Mouse (001)

    The PC can also be waked up by Timers (Scheduled Tasks):

    • Type in a Dos Prompt: powercfg -waketimers
    • Open the “Task Scheduler” and find the task mentioned by the command above.
    • In the tab “Conditions” of that task, disable the option “Wake the computer to run this task”

    You call also disable all tasks that could wake up the PC at once:

    • Open the “Power Options” > “Change plan settings” > “Change advanced power settings”. Under “Sleep”, disable “Allow wake Timers”

    Finally, you could also have to disable the Automatic Maintenance:

    • Open “Change Automatic Maintenance settings” and disable “Allow scheduled maintenance to wake up my computer at the scheduled time”

    Loading

  • Cannot access my NAS from Internet Since I have enabled Wifi on my modem

    I just discovered that I was not able to access my NAS anymore from internet. The problem was that I did re-enabled the Wifi by accident on my Vdsl modem.

    Click to Read More

    Tthe DHCP server gave unfortunately the first free IP of the IPv4 pool to “an unknown Wifi device” instead of assigning this IP to my router as it used to be the case in the past. Port Forwarding from internet to my router, defined using that first IP, couldn’t work anymore.

    I just did assign a static IP to my router in the Vdsl modem’s DHCP server settings (and re-disabled the WiFi). I did reboot next the router.

    Loading