A real pain in: out of the box, it is impossible to use an Azerty physical keyboard with a NVidia Shield TV console… You need an app for that! I am personally using the “External Keyboard Helper Pro”.
Click to Read More
You can get it on Google Play
![]()
The Joys of Computing
A real pain in: out of the box, it is impossible to use an Azerty physical keyboard with a NVidia Shield TV console… You need an app for that! I am personally using the “External Keyboard Helper Pro”.
Click to Read More
You can get it on Google Play
![]()
I noticed that between 50GB and 100Gb of my Internet Quota was consumed per day since two weeks. After investigation, I found it was due to the Cloud Sync service of my Synology Nas “looping” infinitely.
Click to Read More
The first step was to identify the device downloading some many Gb per day.
I did enable the logging service on my router and turn on the logging of its firewall for all outgoing connections.
I did export the log of the firewall into notepad++, cleaned up a bit the log to keep the source and destination IP only.
I did copy that into Excel and created a pivot table to see which source was doing many connection and onto which external IP (eliminating known destinations as the DNS of google 8.8.8.8 and 8.8.4.4, the Synology’s KeepAlive service 118.163.30.162, Broadcast 192.168.0.255, …) I saw that most connections were onto 172.217.16.193, 172.217.21.202, 172.217.22.42, … from my NAS.
Using a IP who IS service, I found that 172.217 belongs to Google. Why was my NAS connection to Google ? I did look all the packages installed on my NAS and “tilt”: Cloud Sync was configured to sync two google accounts… Having a quick look into the current status of Cloud Sync, I noticed it was “syncing” 1 file… apparently for ever.
I did connect on my NAS via Telnet and looked into /var/log/cloudsync/daemon.log
In there, I found that cloud sync was logging, in a loop, errors like:
Dec 10 11:19:26 [ERROR] gd-pull-event-by-list-handler.cpp(89): ListDirectory: ListRemoteSubitems failed (retrying) [-1000] User rate limit exceeded
Dec 10 11:19:26 [ERROR] gd-transport.cpp(2195): error reason: [rateLimitExceeded].
Dec 10 11:19:26 [ERROR] gd-transport.cpp(2196): error message: [Rate Limit Exceeded].
Dec 10 11:19:26 [ERROR] gd-transport.cpp(2238): Hit rate limitation.
Dec 10 11:19:26 [ERROR] gd-transport.cpp(3082): [-1000] User rate limit exceeded. URL=’https://www.googleapis.com/drive/v2/files?fields=nextLink%2Citems%28id%2Ctitle%2CmimeType%2CfileSize%2CmodifiedDate%2Cmd5Checksum%2CdownloadUrl%2CalternateLink%2Cparents%28id%29%2Clabels%28trashed%29%29&q=trashed%20%3D%20false%20and%20%271QmcGFz7PI0P_0TUlaAJkNfzWRw%27%20in%20parents’
I will look into a solution to this issue and temporarily unlinked the Google Drive account from Coud Sync…
voilà voilà.
![]()
Just to keep track of this on my blog: a great tutorial to install a new image on my OnePlus One and root it…
Click to Read More
The tutorial : http://www.dexteroid.com/how-to/root-install-cyanogen-os-13-oneplus-one/
And the page with all Cyanogen images: https://forums.oneplus.net/threads/mirrors-for-official-cyanogen-roms-ota-updates.141825/
Worked fine 😉
![]()
By default, MX player doesn’t support ac3 audio due to licensing issue. Using a custom codec solves this.
Click to Read More
Don’t download and install the «NEON Codec 1.8.9 for Android 6+» usually suggested for MX player in order to support AC3 (available on Google play as «MX Player Codec for ARMv7 NEON CPUs»).
Instead, download the custom codec for arm v7 neon 1.8.6 (available here). Unzip that file, open MX Player, click on the menu …, go to settings > decoder. Scroll down to the very bottom and select Custom Codec. There, pick the file libffmpeg.mx.so.neon.1.8.6 you have just unzipped.
MX Player will next restart. You can now try a video with ac3 codec. Ex.: download a sample from here.
Et voilà.
![]()
Since a few week, I have issues when trying to access devices or services in my LAN via domain names defined within my local DNS Server. The problem was due to AVAST’s “Secure DNS” feature (recently enabled unmindfully).
Click to Read More
I have defined a Master Zone for BeatificaBytes.be in my DNS Server (hosted on my Synology). It’s pointing on my NAS itself. Doing so, I can access my blog from my LAN just as from Internet. Without that Master Zone, a ping on BeatificaBytes.be would return the internet IP of my modem. And I can’t use that IP to access my NAS (hosting my blog) from within my LAN.
In that Master Zone, I have defined a A record for www, to forward www.BeatificaBytes.be onto the local IP of my blog.
I have also a few other Master Zones defined to access various devices…
Since a few weeks, I was not able to ping any devices anymore and my blog was only accessible on BeatificaBytes.be but not anymore on www.BeatificaBytes.be.
I spent hours to reconfigure my DNS Server, testing all the various settings, without success. I have never executed so many ipconfig /flushdns, ipconfig /release, ipconfig /renew, ipconfig /all, ping www.BeatificaBytes.be and nslookup www.BeatificaBytes.be 😀
I have finally figured out that the problem was with AVAST. It has a feature named “Secure DNS” which protects yourself against “DNS hijacking”. DNS hijacking redirects you from the site you want to visit, to one that looks just like it. Secure DNS ensures the site you’re visiting is real.
So, Avast was preventing me to access my blog on an IP which was not the one of my real “domain name” registered on Internet. But as I only defined the fully qualified “www.BeatificaBytes.be” within my Internet Provider’s DNS Settings, I was still able to access my blog locally on “BeatificaBytes.be” (This has been a lot disturbing my investigation).
It’s really the first time since 1996 that I curse Avast !
![]()
Since a few weeks, WordPress is really slow when I access it from my LAN with it’s domain name http://beatificabytes.be
The problem was with the name resolution on my PC.
Click to Read More
My blog is hosted on my NAS, that I usually accessed via its netbios name or via its local IP address. But to make it easier for me, I also defined a domain ‘beatificabytes.be’ on my NAS’ DNS Server, with a A Records for www, pointing on the IP of the NAS.
So, I can access my blog locally with either the domain name ‘beatificabytes.be’ (if I am lazy) or with the fully qualified name ‘www.beatificabytes.be’.
The problem is that the actual URL of my blog, defined in WordPress’ settings, is ‘www.beatificabytes.be’. So, many pages of the blog are referencing scripts and images hosted on on that address ‘www.beatificabytes.be’.
And, a few weeks ago, for some unclear reason, my PC started to fail to access my NAS via the url ‘www.beatificabytes.be’. I was only able to access it with its netbios name, its IP or the domain name ‘beatificabytes.be’ (without www).
The reason was an issue with the name resolution on my PC (I thought it was an issue with the “DNS” Server but it was actually due to Avast’s feature ‘Secure DNS’).
Therefore, each page trying to load resources from www.beatificabytes.be was getting timeouts, making the rendering very slow (without any visual notification!)…
I did fix the name resolution issue and I can now access again my blog ‘full speed’.
Conclusion, open the Debug window of your browser to look at possible network or script errors 😉
![]()
Many tutorials explain how to reboot in Safe Mode. But they usually need you to already be in a Windows session for that. What if Windows doesn’t start well anymore and the usual F8 doesn’t work? Well, you can enable the classic Boot Menu via the Command Prompt of a Recovery Drive.
Click to Read More
In my case, the Graphic Cards’ drivers were corrupted. So Windows was actually still booting but I couldn’t do anything as not having access to the UI. I had to restart in safe mode to remove those drivers and reinstall them. But without a UI, impossible to change Windows’s Startup Options…
Typing F8 during Windows boot didn’t gave me access to the Boot Menu as, since Windows 8, the boot so fast that there is no way to interrupt it anymore – except if you have enabled F8 explicitly, sacrificing a couple of seconds during startup. This can be done by opening an elevated Command Prompt and executing:
To undo this reopen the elevated Command Prompt and type:
If F8 is not enabled, you can force Windows to present you the Boot Menu using a Recovery Drive (or USB Key):
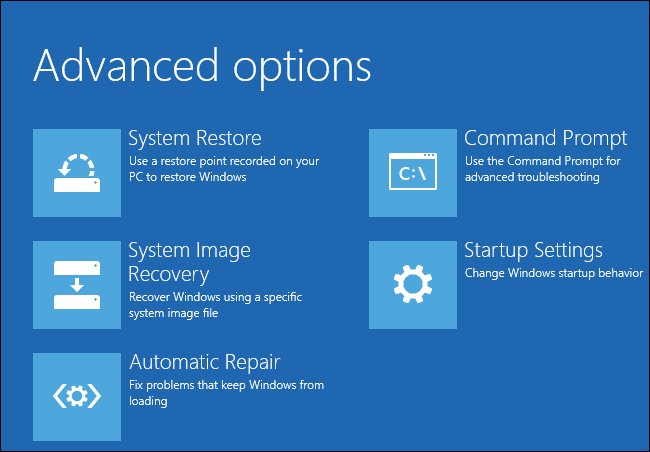
Et voilà.
Once everything is back to normal with your Windows, run a command Prompt as Admin and disable the Boot Menu by typing:
![]()
I am a big fan of Windows’ search feature since Windows 7. So, I was really frustrated when searching stopped to work this morning on my Windows 10. Fortunately, I have been able to fix it easily by deleting a key of the registry.
Click to Read More
Et voilà, the Search feature should now work fine again.
![]()
Yes, this is possible. But you have to enable the support for «Bluetooth headphones» via a hidden menu.
Click to Read More
To access the samsung hidden menu:
– Switch off the tv with your remote
– Press the key «Info»
– Press the key «Menu»
– Press the key «Mute»
– Switch on the tv and wait for a few seconds
The hidden menu is now appearing on the screen. With the keys «up» and «down» you navigate between entries (submenus or settings). With the key «ok» (Enter) you enter a selected submenu or edit a setting. With the key «Return» you exit the submenu or the edit mode. With the keys «Left» and «Right» you change the value of a setting in edit mode.
To enable the support for «Bluetooth headphones»:
– select the entry «Option»
– select the entry «MRT option»
– select the setting «BT support»
– change the value of that setting to set: ON
– exit that setting
– exit the submenu
– select now the entry «Engineer Option»
– select the setting «BT_AUDIO_ON_OFF»
– change the value of that setting to set: ON
And now switch off the tv. Voilà. The feature should be enabled. To access it, switch on the tv and press the key Menu. Then go to > Sound > Speaker Settings > Bluetooth headphones. From there you can search for Bluetooth devices and pair them.
Later, to reconnect a Bluetooth which is already paired, use the key «tools» and in «Speaker Select», pick «Bluetooth headset». If it does not connect immediately, switch off and on your headphone and retry changing the “Speaker Select”. Notice that you must do this before starting any application like Plex or Netflix in the SmartHub.
![]()
It can be tricky… And here is the trick: disable the Secure Boot and use CSM Boot mode instead of UEFI. Once you don’t need to boot from the key anymore, reset those settings.
Click to Read More
I did need that to reinstall Windows 7 x64 SP1 on a old Toshiba as the CD/DVD reader is broken.
I did create the bootable USB Key using Rufus 2.9: https://rufus.akeo.ie/
Within Rufus, I did use a “MBR Partition Scheme for Bios or UEFI”.
Finally, I had issue to install Windows with the key connected on the USB 3.0 port (the one which is blue) : “A required CD/DVD driver is missing”. I did solve that issue plugging the key on a USB 2.0 port and restarting the PC.
![]()
Acer iDea 510 AirPlay Android Backup DD-WRT DNS DS209+ DS713+ DS1815+ FlexRaid Galaxy Galaxy S2 Galaxy S7 Google Assistant Google Home HTPC Kies MCE MySQL Nabi 2 Nvidia TV Shield One Plus One OpenHab Outlook Philips Hue Plex RAID Raspberry PI Remote Desktop Root Access Samsung Scripts Synology Team Build Visual Studio VMWare Wi-Fi Windows Windows 8 Windows 8.1 Windows 10 Windows Server 2012 XBMC Xpenology ZigBee