Since a long time, I was waiting to have enough free time to investigate how to sign my own packages with Synology’s toolkit. It’s now finally done!
Click to Read More
Initial installations
- First, install IPKG as explained here.
- Next, install the official Synology package “python3”
Alternative: install python3 using the command: ipkg install python3
- Then, create a symlink into /usr: ln -s /usr/local/bin/python3 /usr/bin/python3
if using python installed with ipkg, create a symlink into /usr: ln -s /opt/bin/python3 /usr/bin/python3
- install gpg using the command: ipkg install gpgme
- This was needed as gpg was installed on my NAS without gpg-agent (? to be investigated later)…
- Now, install GIT as explained here.
- Finally run:
- cd /volume1/
- There was not enough free space in the system partition to install the toolkit!!
- mkdir -p toolkit
- cd toolkit/
- git clone https://github.com/SynologyOpenSource/pkgscripts-ng pkgscripts
- cd pkgscripts/
- cd /volume1/
If you want to use the toolkit for other purpose than signing
You can check the available platform for your DSM version in the toolkit (e.g. here for 6.1). Run : ./EnvDeploy -v 6.1 --list
It should display a list like this one:
Available platforms: 6281 alpine alpine4k armada370 armada375 armada38x armadaxp avoton braswell broadwell bromolow cedarview comcerto2k dockerx64 evansport grantley hi3535 kvmx64 monaco qoriq x64 rtd1296 denverton apollolake
- N.B.: The major and minor version (E.g. 6.1 for major=6 and minor =1) of your DSM can be found using: cat /etc.defaults/VERSION
- N.B.: the platform of your Synology can be found in this list based on your model (See the column “Package Arch”). The model of your Synology can be found running the command: cat /etc.defaults/synoinfo.conf | grep -m 1 ‘upnpmodelname’ | cut -d “=” -f 2
- N.B.: You can also check the CPU of your Synology using: cat /proc/cpuinfo | grep -m 1 ‘model name’ | cut -d “:” -f 2 | cut -d “@” -f 1
And you can configure the toolkit by running the following command with your DSM version (E.g.: 6.1) and platform (E.g.: avoton) as parameter: ./EnvDeploy -v 6.1 -p avoton
- NB: the platform must be in lower case !!!
In order to sign packages
You have to create a GPG key. Type: /opt/bin/gpg2 --gen-key
Once prompted, choose:
- RSA and RSA (default)
- key size 1024, 2048 or 4096
- key does not expire
- And do not type any passphrase. Just press ‘Enter’ without typing any character until it accepts to not make your key secure.
gpg (GnuPG) 2.0.18; Copyright (C) 2011 Free Software Foundation, Inc.
This is free software: you are free to change and redistribute it.
There is NO WARRANTY, to the extent permitted by law.
Please select what kind of key you want:
(1) RSA and RSA (default)
(2) DSA and Elgamal
(3) DSA (sign only)
(4) RSA (sign only)
Your selection? 1
RSA keys may be between 1024 and 4096 bits long.
What keysize do you want? (2048) 2048
Requested keysize is 2048 bits
Please specify how long the key should be valid.
0 = key does not expire
<n> = key expires in n days
<n>w = key expires in n weeks
<n>m = key expires in n months
<n>y = key expires in n years
Key is valid for? (0) 0
Key does not expire at all
Is this correct? (y/N) y
GnuPG needs to construct a user ID to identify your key.
Real name: vletroye
Email address: <obfuscated>
Comment: BeatificaBytes’ Packages
You selected this USER-ID:
“vletroye <obfuscated>”
Change (N)ame, (C)omment, (E)mail or (O)kay/(Q)uit? O
You need a Passphrase to protect your secret key.
You don’t want a passphrase – this is probably a *bad* idea!
I will do it anyway. You can change your passphrase at any time,
using this program with the option “--edit-key”.
We need to generate a lot of random bytes. It is a good idea to perform
some other action (type on the keyboard, move the mouse, utilize the
disks) during the prime generation; this gives the random number
generator a better chance to gain enough entropy.
We need to generate a lot of random bytes. It is a good idea to perform
some other action (type on the keyboard, move the mouse, utilize the
disks) during the prime generation; this gives the random number
generator a better chance to gain enough entropy.
gpg: key 9ABC9981 marked as ultimately trusted
public and secret key created and signed.
gpg: checking the trustdb
gpg: 3 marginal(s) needed, 1 complete(s) needed, PGP trust model
gpg: depth: 0 valid: 1 signed: 0 trust: 0-, 0q, 0n, 0m, 0f, 1u
pub 2048R/9C293482 2017-12-23
Key fingerprint = 4AB4 051C EF8D 009D 4BF3 D78F EEBC 5B44 9C29 3481
uid vletroye (BeatificaBytes’ Packages) <obfuscated>
sub 2048R/4C18D693 2017-12-23
You can now:
- view public keys using: gpg2 --list-keys
- view private keys using: gpg2 --list-secret-keys
- delete a private key: gpg2 --delete-secret-key <user name> (you can also use the <email> or <key id>, displayed after pub xxxxR/ where xxxx is the keysize, e.g.: 1024)
- Ex.: gpg2 --delete-secret-key vletroye
- Ex.: gpg2 --delete-secret-key 9C293482
- delete a public key: gpg2 --delete-key <user name>
- You can also use specific rings (Ex.: if you did copy them somewhere else than the default user’s home folder : ~/.gnupg)
- gpg2 --no-default-keyring --secret-keyring /root/.gnupg/secring.gpg --list-keys
- gpg2 --no-default-keyring --secret-keyring /root/.gnupg/secring.gpg --list-secret-keys
- gpg2 --no-default-keyring --keyring /root/.gnupg/secring.gpg --list-keys
- gpg2 --no-default-keyring --keyring /root/.gnupg/secring.gpg --list-secret-keys
And last but not least… you can finally sign a package located e.g. under /web/packages, using: php CodeSign.php --sign=/volume1/web/packages/YourPackage.spk --keydir=/root/.gnupg --keyfpr=9C293482
Now that this package is signed, add your certificate into the list of trusted publishers within your Synology’s Package Center.
- First, run: gpg2 --armor --export <user name> > YourCertificate.asc
- Next copy this one into a public shared folder. E.g.: cp YourCertificate.asc /volume1/web/packages/
- Finally:
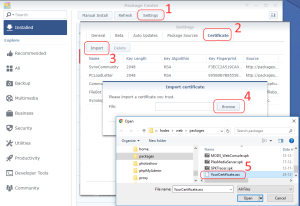
- import it: Package Center > Settings > Certificate > Import > Browse >
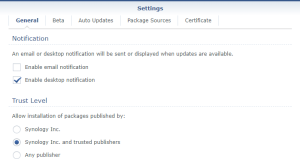
- and only trust Synology Inc. and trusted publishers: Package Center > Settings > General


Instead of manually importing your certificate as illustrated above, if you are using SSPKS to distribute your packages, you can copy it there: cp YourCertificate.asc /var/services/web/sspks/gpgkey.asc
Doing so, it will automatically be added as a trusted publisher for anyone who is adding your SSPKS url in his list of “Package Sources”.
![]()
Leave a Reply