Tag: Scripts

  • Run a command as root on Synology with any user

    Synology is reinforcing the security within its DMS, making more difficult the execution of scripts as root from packages. Here is my trick to do so based on the use of ssh and php.

    Click to Read More

    Theoretically, to run something as root, a user must be a sudoer, i.e.: a user having the right to execute commands as root. It’s not difficult to configure a user to be a sudoer. You simply have to add that user into a file located under /etc/sudoers.d/, with a few parameters to describe what he can execute and if he requires to type his password or not. Ex.: to let a user named “beatificabytes” able to execute the command ‘shutdown’ on a Synology:

    1. Create a file (the name does not matter): /etc/sudoers.d/beatificabytes 
    2. Edit that file with vi (or nano if you installed that package). Notice that you should really be careful as any error in that file will prevent you to log in anymore:  DANGER !!! That’s why it is usually highly recommended to use the command ‘visudo’ to edit such files (it checks the syntax before saving changes)… Unfortunately, this command is not available on Synology.
    3. To grant rights without having to type a password, type this: beatificabytes ALL=(ALL) NOPASSWD: /sbin/shutdown

    The problem I have with this approach is that I have many various users (each package runs with its own user) and I don’t want to define them all as sudoers.

    One option would be to run all packages with the same user who is defined as a sudoer. This is possible via a privilege file to be added into the packages (/conf/privilege).

    But if like me you want to always use the same administrator account, who is already a sudoer, if you have php installed on your NAS and if you have enabled ssh, then your could simply open a ssh session with that admin account, from a php script, to execute your commands.

    Here is the php script I am using for such a purpose (saved into a file named ‘sudo.php’):

    <?php
    $options = getopt("u:p:s:o:c:");
    $user = $options['u'];
    $password = $options['p'];
    $server = $options['s'];
    $port = $options['o'];
    $command = $options['c'];
    
    if (!function_exists("ssh2_connect")) die("php module ssh2.so not loaded");
    if(!($con = ssh2_connect($server, $port))){
        echo "fail: unable to establish connection to '$server:$port'\n";
    } else {
        // try to authenticate with username password
        if(!ssh2_auth_password($con, $user, $password)) {
    	if (strlen($password) > 2){
    		$pass = str_repeat("*",strlen($password)-2);
    	} else {
    		$pass = "";
    	}
    	$pass =  substr($password, 0,1).$pass.substr($password, -1);
            echo "fail: unable to authenticate with user '$user' and password '$pass'\n";
        } else {
            // allright, we're in!
            echo "okay: logged in...\n";
    
            // execute a command
    	$command = "echo '$password' | sudo -S $command 2>&1 ";
            if (!($stream = ssh2_exec($con, $command ))) {
                echo "fail: unable to execute command '$command'\n";
            } else {
                // collect returning data from command
                stream_set_blocking($stream, true);
                $data = "";
                while ($buf = fread($stream,4096)) {
                    $data .= $buf;
    		echo $buf;
                }
                fclose($stream);
            }
        }
    }
    ?>
    

    And to call it, from a shell for example, assuming that your are using php7.3, type something like:

    php -dextension=/volume1/@appstore/PHP7.3/usr/local/lib/php73/modules/ssh2.so sudo.php -u YourAdminAccount -p YourAdminPassword -s 127.0.0.1 -o 22 -c "whoami"
    

    Here above

    • 22 is the port defined for ssh on my Synology
    • I executed the command ‘whoami’. So, the outcome will be “root”

    Et voilà.

    Loading

  • Script to automate IPKG installation on Synology

    Installing ipkg is not difficult, but I hate to do it manually each time I (re)install a Synology… So, here attached is a script to install it automatically.

    [EDIT] ipkg is not maintained anymore. Many packages do not run anymore with the most recent DSM. So, use opkg instead.

    Click to Read More

    First Installation:

    1. Copy on your NAS the script attached at the bottom of this post (Ex.: into \\<YourSyno>\web\admin as used for the illustration here after).
    2. Connect as root on your NAS (Ex.: via telnet using the command ‘telnet <YourSyno>’, the login ‘root’ and the password of your ‘admin’ account – see more details here).
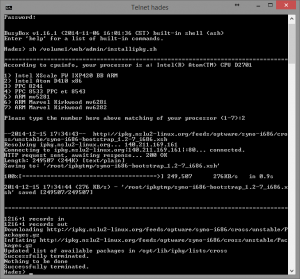
    3. Execute the script (Ex.: use the command ‘sh /volume1/web/admin/installipkg.sh’)
    4. Check which processor your have on your NAS and select the right option accordingly. The script will show you the cpu found using ‘cpuinfo’. But you can double-check here (NB.: I have a DS713+ which is currently not listed. I didn’t test ipkg for the other versions).

    Automatic Installation of Ipkg
    Automatic Installation of Ipkg

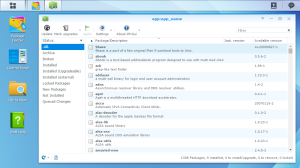
    You can now use ipkg directly in a shell or via the (really) great UI named “IpkgGUI”. This one is available as a Community Package from cphub.net. Add “https://www.cphub.net” as a Package Source in the Package Center’s settings pane and install IpkgGUI.

    Ipkg GUI
    Ipkg GUI

    Re-installation/upgrade:

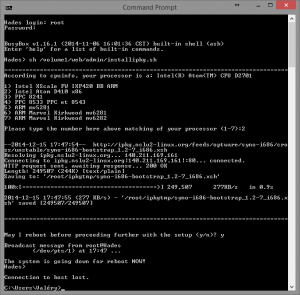
    If ipkg is already installed, the script will remove it automatically and reboot the NAS before proceeding further with the installation (A reboot takes a bit more than one minute to shutdown and a bit more than two minutes to restart on my DS 713+). After the reboot, thanks to a script inserted into /etc/rc.local, the setup will continue automatically.

    Automatic Installation of Ipkg With Reboot
    Automatic Installation of Ipkg With Reboot

    Installation status:

    (After the reboot, reconnect to the NAS). You can now check the status of the setup in its log, using the command: cat /root/ipkg.log. The output should looks like this:

    [code]
    
    [Mon Dec 15 17:34:44 CET 2014] Installing IPKG...
    Optware Bootstrap for syno-i686.
    Extracting archive... please wait
    bootstrap/
    bootstrap/bootstrap.sh
    bootstrap/ipkg-opt.ipk
    bootstrap/ipkg.sh
    bootstrap/optware-bootstrap.ipk
    bootstrap/wget.ipk
    Creating temporary ipkg repository...
    Installing optware-bootstrap package...
    Unpacking optware-bootstrap.ipk...Done.
    Configuring optware-bootstrap.ipk...Done.
    Installing ipkg...
    Unpacking ipkg-opt.ipk...Done.
    Configuring ipkg-opt.ipk...Done.
    Removing temporary ipkg repository...
    Installing wget...
    Installing wget (1.12-2) to root...
    Installing wget (1.12-2) to root...
    Installing wget (1.12-2) to root...
    Installing wget (1.12-2) to root...
    Installing wget (1.12-2) to root...
    Installing wget (1.12-2) to root...
    Installing wget (1.12-2) to root...
    Installing wget (1.12-2) to root...
    Installing wget (1.12-2) to root...
    Configuring wget
    Successfully terminated.
    Creating /opt/etc/ipkg/cross-feed.conf...
    Setup complete.
    
    [/code]

    Notice: after the setup of ipkg, this one is upgraded and updated once automatically.

    PS.: If you don’t choose the right version of the boostrap, the installation of ipkg will fail. While trying to run it, you could see errors like “line 1: syntax error: unexpected word (expecting “)”)“. Try to install the right package. The script should delete the previous installation and install the new one as explained above.

    Loading

  • Touch your scripts! Don’t be lazy…

    I have just created a new shell script for my NAS. But its behavior is really weird. It seems that concatenating strings is actually overwriting them. Ex.:

    #!/bin/bash
    A=abcd
    B=12
    echo $A$B
    

    results in: 12cd

    Click to read more


    Also, redirecting any output into a file results in a new folder and an new empty file, both with a weird name. Ex.:

    [shell]
    DIR=/volume1/sharedFolder/
    FILENAME=${DIR}outputFile
    echo Hello World &amp;gt; $FILENAME
    [/shell]

    results in a file named “outputFile” and a folder named “” ( beeing displayed as ‘dots’ in Windows Explorer!). Both are well located under /volume1/sharedFolder/ and visible in Windows Explorer. However the folder does not appear when executing ‘ls -la’ in a console on the NAS (only the file appears) and the only way to delete this folder is to execute ‘rm -R /volume1/sharedFolder’ in the console.

    I quickly realized that this behavior was a consequence of creating the file on a Shared Folder of the NAS using the Windows Explorer’s contextual menu “New”>”Text Document”… Creating an empty file with the command “touch” directly in a console on the NAS does not suffer the same issues.

    There is indeed at least one difference that I know between the file format of Unix and DOS: the return character which is 0x0A in Unix, while it is 0x0A, 0x0D in DOS (a.k.a /n in Unix and /r/n in DOS)

    I realized that this was the issue because each empty line in the script was resulting in an error: “: not founde x:”, x being the line number. Meaning that the “empty lines” were actually not empty (due to the /r).

    Notice that the magic “touch” only works because I use next Notepad++ to edit the file. Indeed, this great freeware preserve the Unix file format while NotePad, WordPad, etc…, do not.

    I did use the Windows Explorer’s contextual menu to create the empty file because I was too lazy to create a new file with notepad++ and browse next for the target subfolder on the NAS where I had to save it 🙁

    Otherwise, with the “Save As” of NotePad++, I would have been able to pick the right format: “Unix Script File” 🙂

    Loading