Once a server is promoted to a DC, write cache is disabled by default. You can try to enable it, but it will revert back to disabled after a reboot. This is default and can’t theoretically not be changed. It’s done to protect the AD database as well as improve AD DC performance. There is however a registry tip that can force the server to keep that setting.
Click to Read MoreClick to Close
I did experience this on my Server 2010 Essentials which is out-of-the-box a Domain Controller. Although not impossible, it’s not recommended to uninstall the DC feature from a Server 2010 Essentials. It’s not easy and various features could stop to run (More info here and here).
The write-Caching was disabled after a reboot only on the System Disk. Not on any other disk in the server… I finally read it was the default behavior for servers with a Domain Controller and found tips here:
One option is to re-enable write-caching at boot with a script using dskcache. E.g.:
c:\dskcache.exe +w
exit
also a hack that can be made in the registry and works really fine:
Path: HKLM\System\CurrentControlSet\Services\NTDS\Parameters
Value: “DSA Heuristics”
Type: REG_SZ
Setting this to “1” (Note: the type MUST be a string type) prevents AD service from disabling write cache.
In the past, I have been using the onboard RAID controller of my Home Server’s motherboard to secured its data, a RAID 5 with 6 HDD to be more precise. But I was in a urgent need for a new solution.
Click to Read MoreClick to Close
Indeed, I had several concerns:
If the motherboard would die, data would not be accessible anymore except with a replacement motherboard with same amount of identical RAID controllers
if I would be out of space, new disks could not be added to easily in the existing RAID array (mainly due to lack of space in the case). Also replacing existing disks with larger ones would be quite dangerous as duplicating the whole array before such a risky upgrade was not possible (lack of backup storage).
After a power failure or a BSOD, the RAID was checked (for about 12 hours), making all read access veryyyy sloooooooow.
So, I have decided to “upgrade” my Home Server with
A server case able to enclose up to 24 HDD (with adequate controller cards)
A software RAID solution to not rely on hardware anymore
A software Pooling solution to be able to expand seamlesslythe storage space
For the Home Server Hardware part, including the case, see here.
For the Software part, I wanted to go with a Server 2012 Essentials because I really like
Its centralized PC-image backup feature and
Its centralized File History backup functionality.
I don’t want to mix OS in my network
Server 2012 also supports pools of disks with data redundancy, a feature named Space Storage. But it has a several (big or not) disadvantages IMO:
Drives containing data may not be added into the pool 🙁
In addition, if the server dies, a disk moved into another PC will be readable but not writable, except if this other PC is also running Space Storage and all disks are moves. That could be an issue if the dead server cannot be quickly replaced.
So… What else ? I started to look for solutions to manage pools of disks or to manage RAID, or – better – to do both: Greyhole, SoftRaid, mhddfs, UnRAID, FlexRAID, mdadm, SnapRaid, Amahi, FreeNAS, disParity, LVM, JBOD, MooseFS, GlusterFS, ZFS, Liquesce… And I finally decided to go with FlexRaid although it is not free (but not expensive either):
It runs on Windows Server 2012 x64 (On the opposite, FreeNAS or Unraid for example are integrated with their own OS – linux based).
It has a nice Web UI (based on extJS like the DSM of my Synology) which make remote management easy and comfortable, although IMO there is still place for improvement.
It supports both RAID software and Pooling (There are separated licences if you don’t want both)
It has supports for either a RealTime protection or a Snapshot mode (I.e.: RAID is nightly updated on schedule – not slowing down read/write access during the day).
Disks containing data can be added in the Pool at any time.
Disks can be temporarily removed to be accessed from within another machine. If Snapshot mode is used, data may be modified before re-plugging the disk in FlexRaid. Notice: If data are modified, they will only be protected if the disk is re-plugged in FlexRaid and if a the RAID is updated.
Disks temporarily removed can be re-plugged anywhere in the machine. FlexRaid does not rely on the physical location but on the disk mount point which is “memorized” on the disk itself.
It does not store any recovery information on the disks containing data. This information is stored on dedicated disks
It supports multiple simultaneous disk failures (it implements several type of RAID) depending on how many disks are assigned to store the recovery information.
It comes with a Wizard “for dummies” to easily create a pool of disks with a few default settings. It also supports an expert mode with more flexibility – but also with more complexity;
Disks can be replaced with larger ones.
As far as the FlexRaid configuration is backuped, the OS can be re-installed from scratch; the recovery information won’t have to be recomputed and the data are safe.
In case of crash, RAID validation is fast (I still have to check the speed of a recovery)
It has support for S.M.A.R.T monitoring with email alerts (although configuring S.M.A.R.T is not integrated in a Wizard and can require some research).
To be honest, IMHO, the version 2.0 of this product is not yet ready for all end-users. They will have to be comfortable themselves with server engineering to solve various possible issues. Also, it seems to me that only one technical guy from FlexRaid is answering questions and offering support on the official forum. He knows very well his product, but still…
On my own, I had a lot of issues while testing the product – mainly because I did a lot of operations like creating/deleting pools, adding/removing disks, sharing/un-sharing folders, stopping/starting the service, etc… But also because Murphy was at the party: after many various issues followed by a complete re-installation of the server, one disk used to store FlexRaid’s parity data started to die. If you intend to test it, I really recommend to do it in a VM with virtual drives that can be easily re-staged. FlexRaid has a Trial of 14 days.
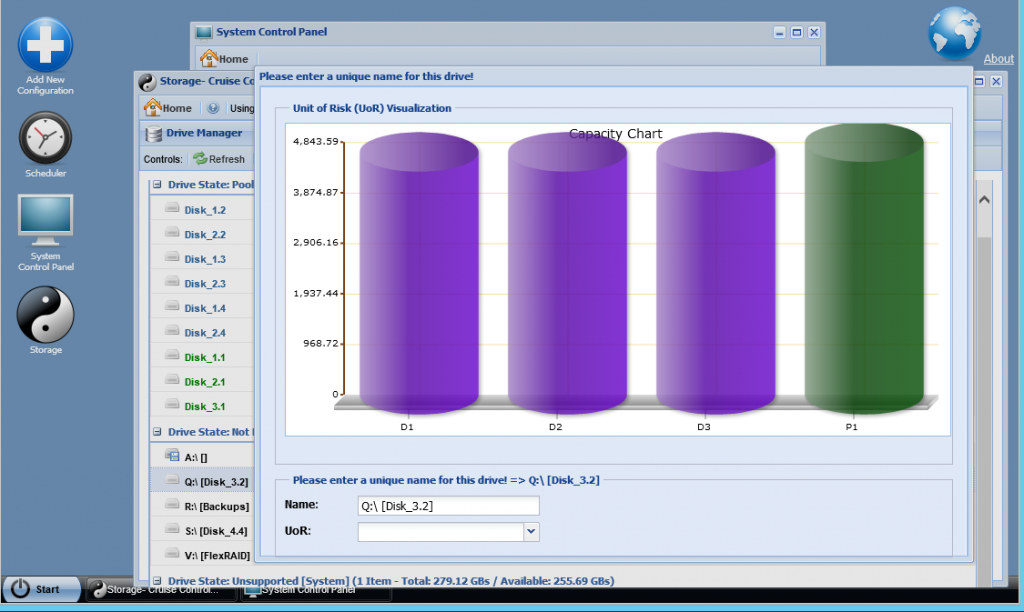
Once the dead disk removed, FlexRaid started to run fine with the following “configuration” (as named in FlexRaid) – See Attention Points before create a new configuration:
3 data disks (named DRU in FlexRaid terminology – they contains the data) compound each of 2 HDD (2TB + 3TB)
HDD used in DRU are not using a proprietary format but simply NTFS
HDD can be added in a DRU with existing data
HDD can be of any size, but DRU have better be of the same size.
One parity disk (named a PPU in FlexRaid terminology – they contain the recovery information) compound of 2 HDD (2TB + 3TB).
PPU must be at least as large as the largest DRU
It has better be larger because in case of bad-sector on a HDD in the PPU, FlexRaid will be out-of-space and fail to update the parity data.
It’s recommended to have one PPU per 3 DRU.
PPU and DRU created with the wizard (Cruise Control) instead of the expert mode.
Merge Mode = “Auto-Folder-Priority”.
To optimize power consumption (most probably only one drive accessed when fetching data)
To keep data grouped if by any chance the disks must be moved into another PC during DRP.
a Snapshot mode
To not slow down write operation
As anyway, data on the Home Server does not change often at all.
A login/password set in “System Control Toolbox” > Login pane
Automatic start-up of FlexRaid storage pool 15″ after the Server boot in “[your configuration] > “Preferences and settings”
A Scheduled Task to Update the RAID (Parity Data) every day at 23:00.
A Scheduled Task to Validatethe RAID (Parity Data) every week at .
The Validate task does both change detection along with datarot (silent data corruption) detection through data checksum valiation.
A Scheduled Task to Verifythe RAID (Parity Data) every month.
The Verify task does bit for bit verification of the RAID.
To be safe however, and based on the amount of disk I have, someone from FlexRaid told me I should either use two PPU of 3TB or possibly add one PPU of 5TB. Doing so, I will double the security level (the RAID could survive after 2 simultaneous disk failures) while only loosing ~6% of space (1TB). For sure, RAID updates will be slower as 2 PPU will have to be updated. But based on my experience, it’s really not that slower. It takes about 1 hour per TB of Data.
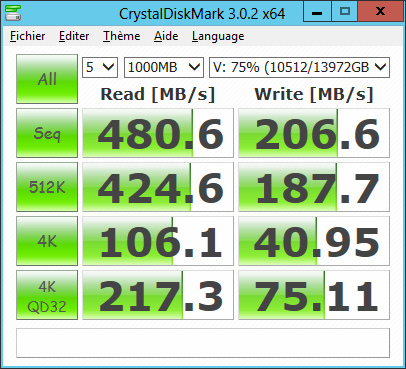
Here is a benchmark of accessing data in FlexRaid’s pool configured with one 5TB PPU and 3x5TB DRU (And I got the same results for two 3TB PPU and 4x3TB DRU…) Clearly, FlexRaid with SnapShot mode does not really impact the performances… (Actually, one the Pool features has an impact).
FlexRaid Snapshot Performance
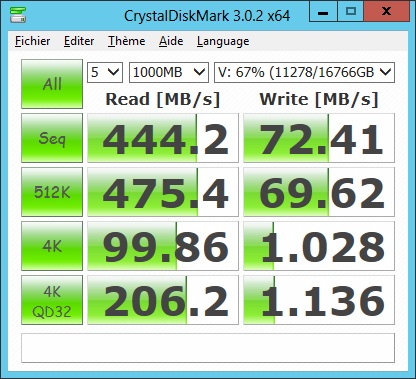
Here is the same benchmark for accessing data in an equivalent Pool with the Real-Time mode..;
FlexRaid Real-Time Performance
Writing small files is not performing well in Real-Time but that’s due to the accesses to the FlexRaid Configuration Database (on C:\). If that drive is on a SSD, those performance should be quite improved (Support to store that DB on another disk is foreseen…)
For information: it took a little bit less that 13 hours to compute the parity for about 11TB of data in this 15TB pool.
ATTENTION POINTS:
Before starting:
Drives used by FlexRaid may not be used as target for Paging or Shadow Copy.
However, Shadow Copy can be used as far as the volume used as target for the Storage Location is on a dedicated drive outside of the Pool.
Shadow Copy must be enabled:
On the Start Screen type Computer and run Computer Management
Right-Click Shard Folders > All Tasks > Configure Shadow Copies…
Enable for all sources drives (DRU) but not for the virtual drive (Pool)
And the Storage Location must be configured on each disk
Via the Dsik Management node in the Computer Management: Properties > Shadow Copies Tab > Settings button > Storage Area (Click details) (to be completed).
Configured via command lines (to be completed)
Recycle Bin may not be used on drives used by FlexRaid as well as in the virtual drive (pool)
Instead FlexRaid proprietary Recycle Bin can be enabled in the Snapshot mode only (there is no such support for Real-Time mode): Configuration > Preferences and Settings > Advanced Properties : Enable Recycle bin mode: true (and Save).
Also, make sure this registry folder exists or you could experience “Recycle Bin on V: is corrupted” errors
HKEY_LOCAL_MACHINE\SOFTWARE\Microsoft\Windows\CurrentVersion\Explorer\BitBucket (For 32 bit Windows)
HKEY_LOCAL_MACHINE\SOFTWARE\Wow6432Node\Microsoft\Windows\CurrentVersion\Explorer\BitBucket (For 64 bit Windows)
And finally disable all the Recycle Bin on the drives intended to be managed by FlexRaid (as well as on the virtual drive)
Using Windows Explorer, navigate to each drive create a dummy file and then delete that dummy file. This will for sure create a Recycle Bin
After doing the above for each drive, empty the recycle bin
Right-click on the Windows recycle bin icon and choose properties
There disable recycle bin for each of your drives
Reboot
Also notice:
FlexRaid web UI is not fully compatible with Chrome. Some expansible panes of this UI collapse and expand for ever one accessed.
The logs are full of security errors. It’s simply due to the Web Client UI session which expires… It’s not fatal.
To change the log level, edit the files in C:\Program Files (x86)\<FlexRAID folder>\logging.options.txt
FLEXRAID_LOG_LEVEL=TRACE
FLEXRAID_SYS_LOG_LEVEL=TRACE
Also change the logs location as many files will be created in TRACE level
FLEXRAID_LOG_FILE_ROOT=C:\FlexRaidLogs\
The path of the log in Log4j.properties must be like C:/FlexRaidLogs/
I always experience issues when trying to remove disks from PPU or DRU. The only solution I found is to delete the configuration and create a new one.
Once a disk is added in a PPU or DRU, it’s mounted by FlexRaid in a hidden folder under C:\FlexRAID-Managed-Pool\…
This folder is only accessible by the System account which is the account configured to run the FlexRaid Service.
After deleting a “configuration” or uninstalling Flexraid, this folder is still there.
To view it, you must
Start Explorer, click on the “View” menu and select “Options” (on the extreme right).
There, go to the “View” tab and tick “Show hidden files, folder and drives”
Uncheck “Hide protected operating system files (recommended).
Once the folder is visible, you can change the Security and grant full access right to the “Administrators” group. Possibly use this great tip to also easily take back the ownership with a contextual menu (works only on files/folders. not on drives).
Hidden files are not protected as ignored by FlexRaid.
When deleting a “configuration”, disk that were assigned a letter before being added in a PPU or DRU will get back that letter. However, in my case, disks were mounted. After deletion of the “configuration”, they should have been re-mounted on their original folder (according to someone from FlexRaid). But this didn’t occur. I had to re-mount them myself one by one. I have not receive any valid explanation yet…
When managing Shares and Permissions via FlexRaid UI:
You must use username defined in the domain (on Server 2012 Essential, a domain is always installed by default – and mandatory for various services). However, you don’t have to prefix that username with the domain name (I.e.: <domain>\<username>)
Latest changes done via the UI appear sometimes to not be reflected immediately in the Windows Properties (In the “Advanced Sharing” tab of the folder). Ex.: If you delete permissions for a user. You must both
Close the folder Properties window if already open in Windows.
Navigate to the “Home” menu and back to “Server Shares” in FlexRaid UI.
Back to the folder Properties > Advance Sharing, the changes should now be visible.
Don’t forget that you need to use a domain user to access the shares from remote machine. If you try to access them from a PC not joined to the domain, you must provide a login like “<domain>\<username>”. Also remind that Server 2012 Essentials is missing “HomeGroup” support.
Important remarks:
When using a “Snapshot” mode, data are in great danger as soon as files start to be modified and as long as the RAID is not updated. Indeed, as some data are modified, the information on the PPU may not be used anymore to restore files in the same range of address (?) in a DRU which would crash. Concretely, files restored using a not-up-to-date PPU will be corrupted.
I didn’t find any information that confirm (or not) that a disk is most likely to fail during write operations. But as I plan to often backup data on my server, I am afraid that I wouldn’t be able to restore my files after a crash occurring such an operation… So => I will investigate the RealTime mode which is still experimental
When using a RealTime Mode
Only use softwares that preallocate files to copy data into the pool (e.g.: Windows Explorer but not TeraCopy!!!)
There must be at least 10GB of free space on each disk going to be added in the Pool (As DRU).
Check that the Reserve is at least 50GB or more in the Configuration > Preferences and Settings > Run-Time Properties > General Properties: Reserve. This is the default when using the Cruise Control mode.
After a server crash, a Reconcile is required (Similar to a Windows Disk Scan).
Always stop the storage pool through the Web UI before restarting the FlexRAID service or your OS!!!
This can be solved using a Shutdown Task to be created in the Local Group Policies. See the script posted as comments.
Increase the WaitToKillServiceTimeout Registry key value to 300000 (it’s 5000 by default; i.e. Windows systems will kill the service in as little as 5 seconds which often does not leave FlexRAID with enough time to properly close up it resources).
HKEY_LOCAL_MACHINE \ System \ CurrentControlSet \ Control
Never write directly to the “source” drives but only through the pool as Explorer writes silently data on the disks. It means that a drive may never be temporarily removed from the pool, accessed from within another PC (even for “READ” only operations) and re-plugged later in the pool.
There is no Recycle Bin, meaning that data are deleted permanently.
And unfortunately, Shadow Copies can NOT be used on the Pool… So it cannot be used either to restore deleted files.
Actually Recycle Bin must be disable on all disks participating in the pool as well as on the pool itself. And that must be done for all accounts connected on the server.
As a replacement, the undeluxe software pro can be used. It can run as a service (start with windows) and will move deleted files into a folder that can be configured to be located on a drive outside the FlexRAID Pool… As an alternative, FlexRAID will come with a universal recycle bin in a next version…
It could be advised – for the Real-Time mode only – to disable thumbs.db file generation although those files being hidden, they are not taken into account (I.e.: not protected by FlexRaid). In addition
On the Start Screen, type and run gpedit.msc.
Expand User Configuration – Administrative Templates – Windows Components.
Click on File Explorer.
Right-click the entry “Turn off the caching of thumbnails in hidden thumbs.db files” and choose Edit.
Enable the setting.
Log offand back on again (or reboot) after making these changes.
Delete all the thumb.db files from you drives using this command: Del {Drive Letter}:\Thumbs.db /f/s/q/a
Actually the options “Restrict Thumbs.db” and “Restrict Desktop.ini” can be used in the Console for that purpose, but it is useful only when using the Real-Time RAID in Expert mode and if frequently browsing the source drives. Indeed, although we are not changing anything on the source drives, Explorer will actually update the thumbs.db and desktop.ini files as we browse. There are implications though with selecting those options as Explorer will no longer cache your thumbnails or remember certain folder view preferences.
Parity data are only updated when accessing the drives through the Pool. If data are modified directly on the source drives, you will have to fix that by running the Reconcile task in FlexRaid.
That being, the following Windows Features are safe to use with FlexRaid
I didn’t succeed to connect to my Server 2012 Essentials through Remote Desktop until I remembered me that this one was set up by default as a domain controller, one of the major differences between this server and WHS 2011.
Click to Read MoreClick to Close
First, check that Remote Desktop is enabled on the server, just to be sure:
On the Start Screen, type SystemPropertiesRemote and run that tool
Allow remote connection to this computer.
Next, I have disabled the Firewall, I don’t need to allow Remote Desktop Connection as an exception in this firewall.
Finally, Windows Server 2012 Essentials being a domain controller, accounts created on that machine belongs to the domain defined at the end of the installation. So, the user name to be provided in Remote Desktop must be like <domain name>\<user name> instead of simply <user name> (equivalent to <remote machine name>\<account> as by default, Remote Desktop uses the target machine name as domain name).
This subtle difference between Server 2012 Essentials and WHS 2011 (which was not a domain controller) could be a source of confusions while trying to connect for “end-users” used to work with workgroups instead of domains.
I have always experienced issues to enable the support for Wake-on-Lan on my PC and again, today, I spent hours to succeed in configuring WOL on the Windows Server 2012 of my Asus Striker II Formula. But this time, I took notes for the future 🙂
Click to Read MoreClick to Close
I initially though that the default driver installed with Server 2012 for the nVidia ForceWare network adapters of my motherboard did not support Wake-On-Lan (as reported sometimes for other brand). But after installing the latest drivers from Asus website, WOL was not yet effective… All the settings of the machine were the default ones (issued from the installation) as I didn’t touch any of them yet… So I started to enable/disable/reenable plenty of various settings before being finally able to remotely wake up my PC with a Magic Packet (I am using the “WOL” page of my Buffalo router for sending those messages).
First, notice that depending on the Motherboard, Wake-On-Lan could work for you only if your PC is in a Sleep mode or in an Hibernate mode. Mine can be waked-up from a full shutdown (as most recent/decent motherboards 🙂 ).
In the Computer Management > Device Manager > Network adapter > right click Properties on “your adapter“
In the tab “Power Management”, check all the options:
Allow this computer to turn off this device to save power
Allow this device to wake up the computer
Only allow a magic packet to wake up the computer
In the tab “Advanced”
Enable the adequate WOL features, whose names depend on your adapter:
“Wake up capabilities” must be “Magic Packet” or “Both”
“Wake On Magic Packets” < I have this one
“Wake Up From Shutdown”
“Wake On Lan After Shutdown”
“Wake On Lan From PowerOff” < I have this one
“Shutdown Wake-On-Lan”
“Wake On Lan”
“Wake On Pattern Match” < I have this one
…
WOL however only started to work for me when I did disable “Device Sleep on Disconnect” in this advanced tab.
I am using Windows Server 2012 Essentials (quite a replacement for WHS 2011 although not exactly) on my Home Server for File Storage, Media Sharing and centralized PC backups. I also plan to use it to run Virtual Machines.
However, I actually don’t care about most of the “Server 2012” features. So, I “fine tune” the server to make it more user-friendly. I will keep track of the changes I do, and other useful tips, here (Edit: I found an interesting web site here to convert a server 2012 into a workstation, including a wizard).
Click to Read MoreClick to Close
Regarding the execution of VM on that server, I don’t know yet:
if I will use Hyper-V and do an “in-place” upgrade from Server Essentials to Standard Edition(limited to two VM per licence of Standard Edition) or
Doing this upgrade, I would lose the support for Video Streaming…
if I will use the old VMWare Server 2.0 (not supported anymore but free for unlimited VM)…
To edit system files such as the “host” file (in C:\Windows\System32\drivers\etc), the editor (e.g.: notepad++) must be run “As Administrator”, otherwise, the changes may not be saved! I need this to define some hostnames (among other to access my blog using its internet address as I don’t use a DNS server in my local network).
To enable theHibernate mode: (I didn’t succeed yet… I will need a new Graphic Card – But most probably I won’t use hibernation as it’s not recommended on machine with disk managed via FlexRaid…)
Type cmd on the Start Screen and execute Command Prompt with run as administrator.
In the command prompt, type: powercfg.exe /hibernate on.
Type Power on the Start Screen and select Settings under the search box. Execute next Change what the power buttons do.
Click on Change settings that are currently unavailable.
Select Hibernate in the combo of the Power button settings.
Check the option Hibernate in the Shutdown settings.
I did NOT select Turn on Fast Startup in the Shutdown settings because my server don’t power off anymore with that option. Some people also report that with this option they were not able to use WOL anymore… I can’t validate that as my PC does not even shutdown, so… 🙂
Click Save Changes
Click now Create a new Power Plan (e.g.: based on the Balanced plan and named “Hibernate”).
Your new plan becomes the current one. Click “Change Plan Settings” to edit you plan.
Click on Change advanced power settings.
Click on Change settings that are currently unavailable.
Select your plan in the combo if it is not the displayed one.
Under Hard Disk > Turn off hard disk after, select (e.g.) 30 minutes.
Under Sleep > Hibernate after, select (e.g.) 60 Minutes.
Under Media Settings > When sharing media > Settings, select “Allow the computer to sleep”, although the server is really used for Media Sharing. In my case, the feature is enabled, but I mainly use my NAS for media sharing.
Click OK to apply the changes and close the window.
Notice that I still don’t see “Hibernate” in the Power Menu available from the Start Screen. It’s only available when closing Windows from the Desktop with Alt-F4.
Next, in the Bios, you need to:
Enable the ACPI function
Set the ACPI Suspend Type on S1/S3 ? To be validated as possibly not required base on:
S1: All processor caches are flushed, and the CPU(s) stops executing instructions. Power to the CPU(s) and RAM is maintained; devices that do not indicate they must remain on may be powered down.
S2: CPU powered off. Dirty cache is flushed to RAM.
S3: Commonly referred to as Standby, Sleep, or Suspend to RAM. RAM remains powered
S4: Hibernation or Suspend to Disk. All content of main memory is saved to non-volatile memory such as a hard drive, and is powered down.
The Hibernate mode didn’t run as expected although I am quite sure of the configuration based on my previous experience. Concretely, the PC does not power off. Only the screen becomes black. I have the same behavior with a Shutdown if the “Fast Startup” option is enabled – which is actually a Partial Hibernate. So, to investigate, I did type in a command prompt Run As Administrator: powercfg /a
This command lists all the sleep states available and the reason why they are possibly not supported. In my case, it did report that the Graphic card was an issue. Missing specific drivers for the graphics device, the OS doesn’t know how to suspend and resume it. This is therefore disabling the hibernation (and would do so for other sleep states as reported by “powercfg /a”). CQFD. I found a version of Catalyst (for ATI graphic cards) that runs on Server 2012.. To be tested soon…
Notice also that if you have disabled an onboard Graphic Card within Windows because you did install another one, sleep states could also be disabled. Instead of disabling the onboard card, configure the display to be “disconnected” (Option of the Display > Screen Resolution).
To disable the Shutdown Event Tracker prompting you when shutting down the server (if you don’t use a Domain):
Type gpedit.msc on the Start Screen and then press Enter
Select Local Computer Policy
Select Computer Configuration
Select Administrative Templates
Select System
Select Display Shutdown Event Tracker (in the root of the System folder)
If you want to get rid of the dialog box, then select ‘Disabled’ for Display Shutdown Event Tracker. To restore the default then check the ‘Enabled’ box.
The change will be effective immediately (No need to reboot).
To disable the Windows Firewall (which I don’t use in my intranet)
Type Firewall on the Start Screen and select Firewall with advanced security
Select the node Firewall with advanced security on Local Computer
In the overview, click Windows Firewall Properties
In the tabs Domain Profil, Private Profil set Firewall state: “Off“. Possibly keep it “On” in the tab Public Profil (In my case, the server won’t be connected to a public network ever).
To remotely shutdown the server
Use the psShutdown command from SysInternals.
psshutdown \\<servername> -s -t 0
Or the windows command shutdown
shutdown /s /m \\<servername> t 0
And disable UAC on the server (at least for psShutdown)
To Disable Default IE Security Restriction
On the Start Screen, type Server and select Server Manager,
In the left pane, select Local Server
In the right pane, in the section Properties, click at the On link behind the IE Enhanced Configuration setting.
Switch the setting to Off for both Administrators and Users to disable the restrictions.
To Display the Shutdown button on the Logon Screen
On the desktop, press :win: + R
In the Run Dialod, type gpedit.msc — this will launch the Local Group Policy Editor within the Microsoft Management Console.
Select Computer Configuration > Windows Settings > Security Settings > Local Policies > Security Options.
In the right-side pane, Select the Policy “Shutdown: Allow system to be shut down without having to log on” and change the value in the Security Setting column to be “Enabled“
To enable NIC Teaming
Type lbfoadmin.exe on the Start Screen and run it “As Administrator” to open the NIC Teaming console
In the Adapters And Interfaces pane, select the NICs to team (control-click each NIC) then Right-Click the selected group and Click on Add to New Team
Give a name to the New Team and Click OK. No need to change defaults in the “Additional properties” section.
Enable all PowerShell Scripts execution
On the Start Screen type “Power” and run “Windows PowerShell”
Type this to enable Scripts execution for the current user
Go to the Start Screen, type and run Server Manager
Click on the node Local Server
In the Properties pane, find “IE Enhanced Security Configuration” and click on its value to change it.
Set Off for Admin (or possibly both Admin and Users)
To enable FTP Server
Transferring a lot of small files is very very slow (a few KB/s instead of at least 80 MB/s for large files). This is due to latency… For such file transfer, it is far better to use FTP.
On the Start Screen, Click the Server Manager tile, then click Yes.
In the Server Manager Dashboard, click Add roles and features.
If the Before you begin page of Add Roles and Features Wizard is displayed, click Next.
On the Select installation type page, select Role-based or feature-based installation, and click Next.
On the Select destination server page, select Select a server from the server pool, select your server from the Server Pool list, and then click Next.
On the Select server roles page, expand the Web Server (IIS) node, and then expand the FTP Server node.
Select the FTP Server check box and the FTP Service check box, and then click Next.
On the Select features page, click Next.
Once the service installed, a FTP site has still to be created
On the Start Screen, type IIS and run the Internet Information Services (IIS) Manager (not the IIS 6.0 Manager!!!)
Right click on the node of your server in the Connections pane and select Add FTP Sites…
To skip Domain Joining on a workstation
I don’t use my Server 2012 as an actual Server 24/7 with Domain Control (centralized credentials), DHCP, Group Policy, VPN etc… Instead, I did configure on all my workstations to prevent them to be enrolled by Server 2012 Essentials when they access it for the first time.
To skip Domain Joining on a PC with a Pro/Enterprise/Ultimate Windows 7 or 8):
On your client computer, go to Start (Win7) or Start Screen (Win8) and search for command prompt “cmd“.
Follow next those steps to connect on Server 2012 Essentials:
With your brower, go to http://<servername>/Connect
Click on “Dowload software for Windows 7 and Windows 8”
Execute the ComputerConnector(xxxx).exe just downloaded and follow the wizard. When prompted for a login and password, use the credentials of an administrator defined on your Server 2012.
To access the Dashboard through Remote Desktop, you also have to provide the credentials of the an administrator defined on the Server.