I recently noticed that chrome was not rotating anymore when I was turning my mobile, a One Plus One (running Cyanogen). I tried to disable and re-enable the feature “rotate” via the upper Menu Bar, without success. The trick is to authorize all the rotation angles: only 0° was enabled…
Click to Read MoreClick to Close
No idea how 90°, 180° and 270° were disabled, but that was my issue. Clearly, enabling the feature “rotate” with only the angle 0° is totally useless…
To authorize various rotation angles, go to: Settings > Display and lights > Rotation. And there, enable the various mode.
“ACPI-On-Lan” is a package I have created for my Synology DS 713+ (also tested on my DS 3612sx).
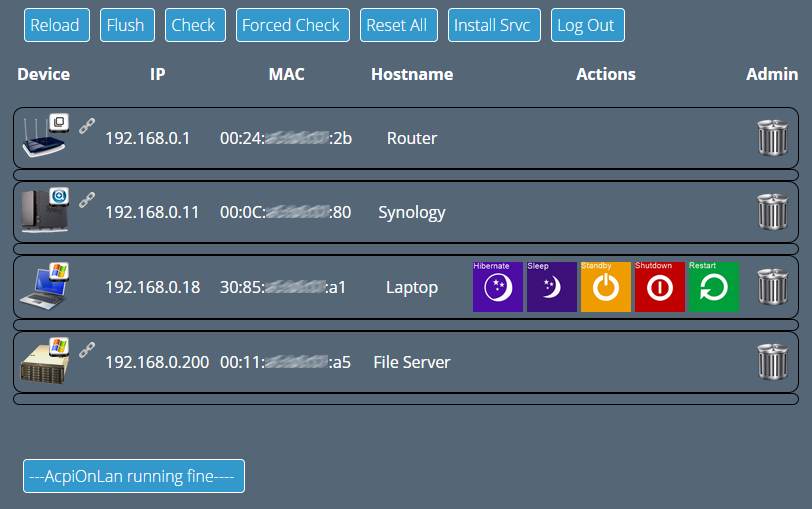
It installs a website that list all your network devices. Depending on the OS, you can possibly send a sleep, shutdown or hibernate command to the device. ACPI-On-Lan tries also to reach each device (using a ping) and checks if there is a default web page accessible on the device (Ex. a configuration or administration page). Finally, it can send Wake-On-Lan magic packets to wake-up devices currently switched off.
Click to Read MoreClick to Close
Disclaimer
This package is a prototype made for learning purpose. I did test many development techniques and libraries I never touched before: ajax/jquery, boostrap, .Net click-once deployment, creation of Synology spk packages, WebAPI/Microsoft .Net Owin, Newtonsoft.Json, running shell commands from php, etc… So don’t expect the most amazing bits out of there. It’s just this well known Big Ball of Mud 😳
This is not a beta version (even not an alpha), which would be well designed. My prototype is a Quick and Dirty App made of various pieces of code dropped together. It must be complete rewritten properly or at least deeply re-factored. Briefly said, I don’t want my name to be associated with this ugly mess (even if most scientists seem to produce such a code :D).
Nevertheless, and although still really incomplete (as most prototypes), it works on my own NAS and I have already been asked to share it. So, here it is:
Some details
A few details on ACPI-On-Lan’s basics first:
it reuses the login cgi module of the Synology to authenticate the user
it parses the ARP table of the Synology to find the devices available on the LAN.
it pings the devices using the “inetutil” library (from ipkg)
it does not use any database
it stores all the details about the network devices in a file with json format. If you plan to uninstall the package, you must backup those files manually first.
for hibernate, sleep, standby, restart Windows PC, it talk to a Windows Service hosting WebAPI services.
this Windows Service was intended to be deployed via click-once. Because I didn’t want to resign the click-once setup for each new deployment url, the Windows Service is installed now via MSI. However, the Windows Service is still self-installing (simply run the exe once and it will do the complete setup)
all commands (ping, WOL, …) are executed server side (by the NAS). So the Web UI can be used from the WAN without requiring direct access to each devices on the LAN.
Notice also that:
the web UI doesn’t render well on mobiles.
there is not support yet to shutdown MAC, LINUX or ANDROID devices. I am planning to look how to use RPC commands (later this year 😉 )
Windows mobiles are not yet supported.
there are still some bugs when refreshing the status of some devices and a wrong state can sometimes be displayed. Also an action to “shutdown” the NAS is displayed although not yet implemented.
it’s not possible to define a specific port for the website possibly hosted on a device (Ex.: a custom local port of a port forwarded from the modem/router in order to access the device from the WAN)
I have to yet filled the spk’s “texts” files to translate the package.
Prerequisite:
You will have to install the package ‘inetutil’ on your NAS. This is required to be able to ping the devices while not running as super user (i.e.: ‘root’).
The package ‘inetutil’ can be easily installed via the graphic interface “IpkgGUI” once IPKG is installed. And there are many tutorial on the web to install IPKG. If you are not afraid, you can try my own installation script*, described here (“IpkgGUI” is a graphical interface to manage IPKG packages. It is available as a Community Package for Synology on https://www.cphub.net)
(*) Notice that you can install the package “ACPI-On-Lan” first and than connect on your NAS via telnet. The script to install IPKG is deployed with “ACPI-On-Lan”. Once connected, run: sh /var/packages/AcpiOnLan/target/application/service/installipkg.sh
If you want to be able to send Sleep/Restart/Hibernate/shutdown command to Windows PC, you will need the Microsoft .Net Framework 4.5. This service is not required if you only want to send WOL commands to Windows machines.
Setup:
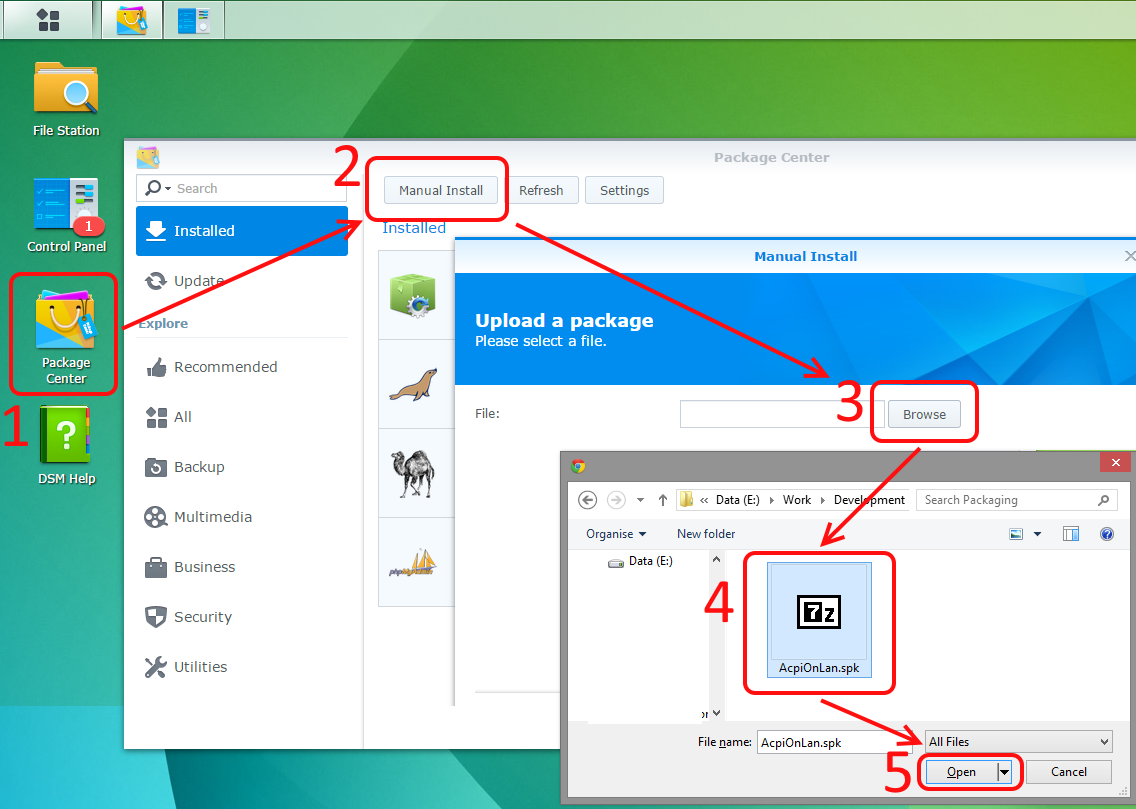
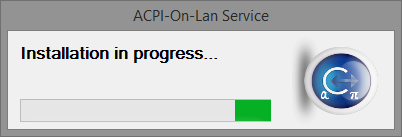
1) Download the package attached at the bottom of this page and install it manually via the “Package Manager” of Synology. 5 clicks and ~that’s it~.
Manual Installation of ACPI On Lan
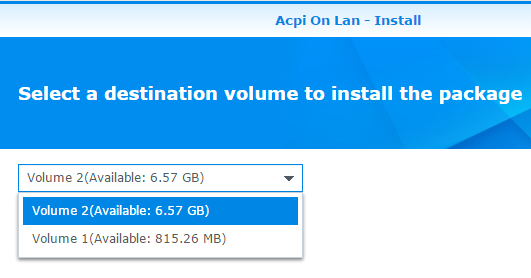
2) It can theoretically be installed on any volume (if you have several).
Install On Any Volume
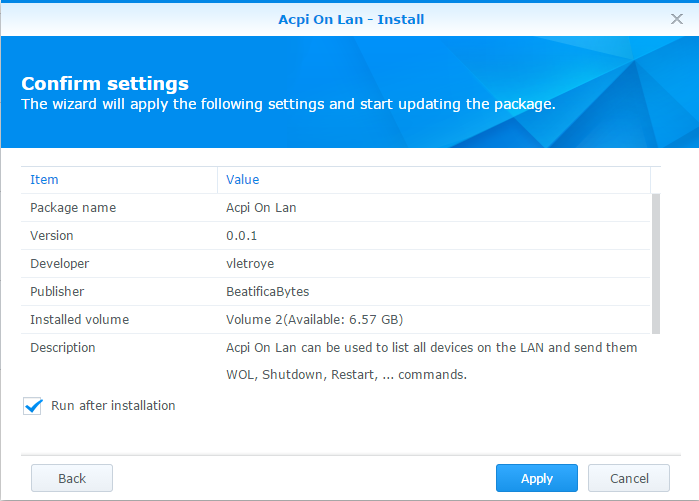
3) And you can “run it after installation”
The setup of the package will mainly:
deploy the sources under /var/packages/AcpiOnLan/
the web application will be in /var/packages/AcpiOnLan/target/application
all the data of AcpiOnLan will be stored next to the web application in a file named Computers.json
create a php alias AcpiOnLan to “redirect” the http calls into the folder here above
force open_basedir = null for the new web site “AcpiOnLan”
add an icon into the DSM Start Menu
Acpi On Lan Icon
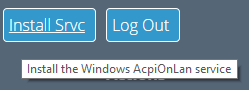
4) Once ACPI-On-Lan opened in a browser, you will have access to a menu “install srvc”. Click on it to download the MSI which installs the Windows Service (Do this on Windows only!).
Install AcpiOnLan Windows Service
5) The download of AcpiOnLanInstaller.msi will most probably be blocked by your browser/antivirus as it’s not a common download. If you want it, you have to accept the download (“Keep” within Chrome)
AcpiOnLanInstaller Blocked
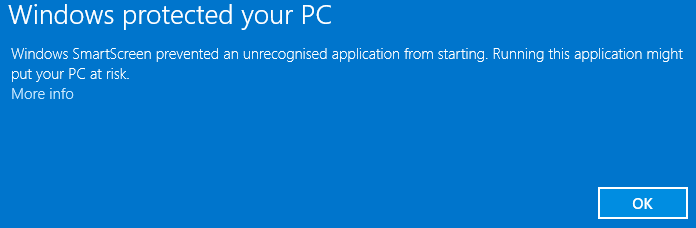
6) Once you run the msi, recent version of Windows will also prevent its execution
AcpiOnLanInstaller Stopped by Windows
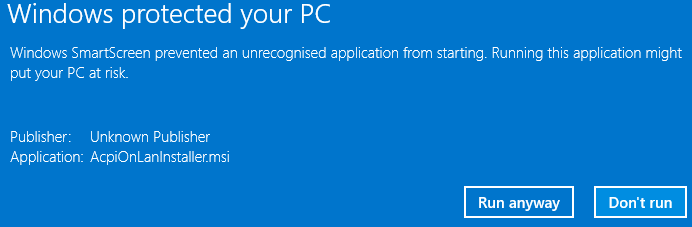
7) You will have to approve the installation by clicking on “More Info” here above and then “Run Anyway”
AcpiOnLanInstaller Forced
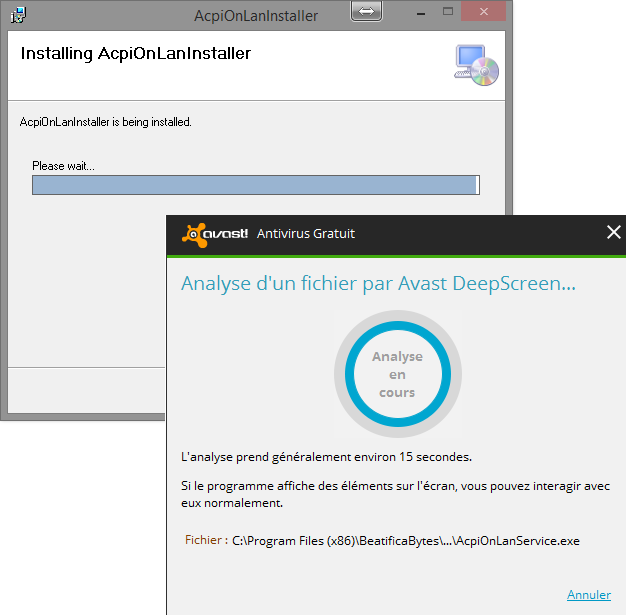
8) Once the msi is running, it will copy the required files and do a first run of the service. When the service is run interactively (it’s the case when run by rom the msi), it install/uninstall itself instead of starting WebAPI Services. But it means that the antivirus will again react. Due to installation timeout this could disturb the setup…
AcpiOnLanInstaller AntiVirus
9) The Windows Service will be installed and will register itself the port the url where it will run its WebAPI services (It uses ‘netsh’ for that purpose)
Installation
Et voilà, the Windows Service should now be running.
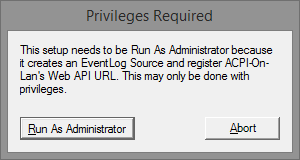
IMPORTANT NOTICE 1: as the Windows Service was designed to be deployed via Click-Once, it was not assumed to be launched “As Administrator” directly (An exe “run” via Click-Once can by the way not require elevated rights). So, if run without such rights, the exe of the Windows Service will stop itself automatically and restarts “As Administrator” (You could be prompted to provide adhoc credentials).
Previledge Required
IMPORTANT NOTICE 2: when the Windows Service is installed via the msi, NEVER run the exe yourself from a command prompt of from the Windows Explorer. Again because the service has not been designed to be installed via a msi (with ‘installutil’ tool or with an installer class) a “self-installation/uninstallation” process has been foreseen if and only if the exe is run “interactively”. So, if you run the exe after the installation of the msi, it will do a self-uninstallation of the service.You have to run it once more to reinstall it.
IMPORTANT NOTICE 3: The worst wase occurs if you run the exe once ad then uninstall the msi via the Control Panel > Add & Remove Programs. Indeed the msi will simply run the exe which will actually do a self-reinstallation of the service. So you will still have the service defined in the “Local Services” but neither the exe nor the entry in “Add & Remove Programs” anymore. To fix this, Quickly reinstall the msi, which will do a self-uninstallation of the service. Than run the exe interactively (from Windows Explorer) to redo a self-installation of the service. And you will end with the service defined in the “Local Services”, the exe available and the entry in “Add & Remove Programs” (which can now be used to safely uninstall the service). Sorry for that. I will improve the process to prevent the msi to put such a mess asap.
Quick guide:
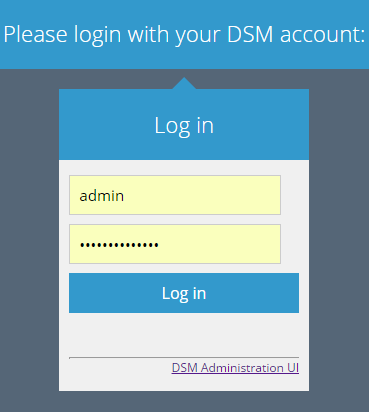
1) When you access Acpi-On-Lan, you have to log in with a DSM account
AcpiOnLan Login
2) When you run Acpi-On-Lan for the very first time, it will search for your LAN (possibly one per Ethernet port on your NAS)
AcpiOnLan Looking For Network
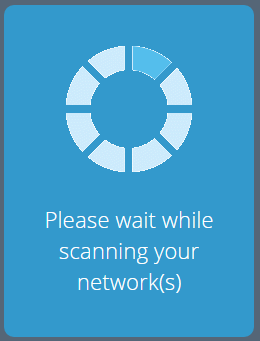
3) Next, it will scan the LAN(s) (look into the ARP table)
AcpiOnLan Scanning Network
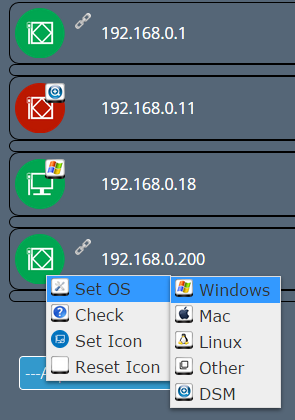
4) Finally, it will display a list of network devices found. For each device, you will have to “Set the OS” and “Set an Icon” (Except if you are happy with the default icons).
AcpiOnLan Set OS and Icon
5) If there is an hyperlink symbol next to a device, it means that there is a we page available. You can click on it. Also to refresh the status of a device, you can use the menu “Check”.
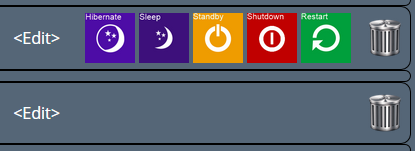
6) Depending on the OS:
if the device if on, you will have actions to Hibernate, Sleep, Standby, Shutdown or Restart the device.
Once you have clicked on an action, an Abort action is made available for a few second.
If the device is off, you will only have a Wol action.
The recycle bin can be used to hide a device and you can edit the name of the device.
AcpiOnLan Actions
7) Finally, you have various menu
AcpiOnLan Menu
Reload: will reload the list of devices (and add newly detected ones if any)
Flush: will empty the ARP table and reload the list of devices (you will have to ‘reload’ again until all the devices appear. Possibly ping manually your devices from a telnet session to populate the ARP table… I will possibly add such a feature in the UI soon or later)
Check: check the status of all the devices displayed in the list not checked since 5 minutes. Notice: up to 3 devices are checked simultaneously by the UI (limitation for mobile devices slow to execute jquery)
Forced Check: check the status of all the devices displayed in the list even if checked within the latest 5 minutes.
Reset All: delete all the devices from the list (including your customization like icons/OS/hostnames). The network will net be rescanned. Notice that your previous data will actually be backuped in a subfolder “backups” and named Computers.x.json. You can manually restore them.
Show All: will show all devices previously hidden by clicking on its recycle bin. Clicking again on its recycle bin will un-hide the device.
Hide: Hide all devices marked to be hidden (to be used after the menu Show All)
Log Out: guess 😉
NOTICE: your devices will be listed only if they have been switched-on at least one and in touch with the NAS during that time (I.e.: if they have been added into the ARP table). Some devices although switched-on are never in touch with the NAS. EX.: power lines Ethernet adapters, … I will plan a procedure to ping all the IP in the LAN so all such devices are touched (if switched-on). In the mean time, you will have to ping them yourself from a telnet session. Ex.: ping -c 1 192.168.0.1
I was close to bite my keyboard when I found the reason why I was not able to type characters like \, @, .. on my AZERTY keyboard on Windows 7 (Belgium/french) : it was due to the Remote Desktop window.
Click to Read MoreClick to Close
When there is an application opened on your desktop that handles keys pressed to forward these events, you can sometimes not type some extended characters anymore (I.e.: characters that require special key combinations). It happened to me for characters to be typed with Alt-Gr.
This happens with applications like Remote Desktop (RDP)/Terminal Services and Virtual Box (VirtualPC/VMWare/Hyper-V/…)… Those applications handles indeed the key combination to possibly forward them to the Virtual Box/Remote PC.
For some users, it happens when the application is in full screen or minimized. In my case, RDP was windowed (i.e. neither maximized nor minimized)…
As soon as I closed RDP, the key Alt-Gr came back.
An alternative could have been to use CTRL-ALT instead as this is another shortcut for Alt-Gr !
In some cases, I want to use a headset to watch TV, the movies being played either by my HTPC, by the TV itself (internal receiver) or an external TV decoder. In some case, there is a sound-bar connected to the TV (via HDMI-ARC) or between the player and the TV. Where to connect my headset has been a source of headache until a professional audio dealer gave me the “universal” solution: a “Digital to Analog Audio converter”.
Click to Read MoreClick to Close
Why this question is such an issue?
First, because the sound-bar I am using has no audio out for a headset (i.e: a “AUX” connector). Otherwise, that would have been the logical place to connect the headset.
Next, because I gave up to use the TV “AUX” audio out for headset:
If a sound-bar is connected between the player and the TV, this last one automatically mutes its speakers and I don’t get any sound via the headset. It’s maybe possible to force the sound on the TV, but I didn’t find any such option (neither on the TV nor on the sound-bar).
If the player is connected directly on the TV (when I don’t use a sound-bar), I have to unplug the headset each time I don’t use it. The headset is indeed automatically detected by the TV if it is plugged and the speakers are muted. This is really not practical.
I didn’t try with the player connected directly to the TV and the TV connected to the sound-bar via HDMI-ARC (which could maybe work: i.e.: have sound via both audio output) as I gave up trying to use the TV audio “AUX”. Indeed, I have a Samsung TV with a really crappy audio “AUX” connector. The signal coming out is so poor that my wireless headset regularly switches off as detecting no good signal anymore.
Finally, because using the HTPC audio “AUX” connector is far from practical.
To use the headset, I have to reconfigure the Audio Device in Windows which is set by default to use the HDMI audio output (specific graphic drivers being used to send the sound via the HDMI connector).
And when I unplug the headset, I have again to reconfigure the Audio Device to used the HMDI otherwise I get no sound anymore.Switching back to HDMI is indeed not automatic.
Also, this solution only works when watching a movies with my HTPC, not when watching a broadcast on the TV itself or from any other external player…
The best solution is to connect a “Digital to Analog Audio converter” on the optical output of the TV.
Analog to Digital Audio Converter
Albeit using a player directly connected on the TV, or when watching a broadcast directly received be the TV tuner, I simply have to mute the TV Speakers (or the sound-bar when one connected via HDMI-ARC). The sound continues to be flowed through the Optical output and I can regulate the volume directly on my headset.
I didn’t try yet and will do so asap… but if the sound-bar is used and connected between the player and the TV, the sound should also still be flowed from the sound-bar to the TV though HDMI and next to the Optical Audio output. Only the Speakers and the Audio “Aux” should be muted… [to be continued]
IMPORTANT NOTICES
Choose a Converter supporting all compressed audio formats such as Dolby Digital (AC3) and DTS 5.1. Some don’t fully support e.g. DTS and this could be very disappointing. Ex.: When using Smart Apps such as Plex or DS Video (from Synology) on a Samsung Smart TV, playing direct sound, the Converter will have to support correctly all the formats also supported by the TV and therefore not transcoded by Plex or Synology.
To have sounds via both the HDMI-ARC and the Optical output, you may have to reconfigure some TV parameters. Ex.: on my Samsung Smart TV I had to set “Audio Output” = “Receiver” (instead of “Speakers”, …) and maybe set “Audio Format” = “PCM” (instead of DTS Neo 2:5). NB.: When using a Smart App, this one is able to change the “Audio Format” (via the Samsung API). I.e.: if you set “PCM” because “Dolby” is not supported by your Converter, an App like Plex could set it back to Dolby when direct playing a movie using that format…
I have tried a KanaaN (Digital to Analog Audio Converter): it was really not great… No support of DTS and continuous “noises” within Smart Apps (until one starts a movie)
I have now a Fiio DAC Audio USB D07. It supports both DD and DTS with great quality, works with all my TV channels (including HD such a TF1 HD in France) and produces no “noises” when using Smart Apps (like Plex, DS Audio, Youtube, Netflix, …) even with the volume of the headset at a high level.
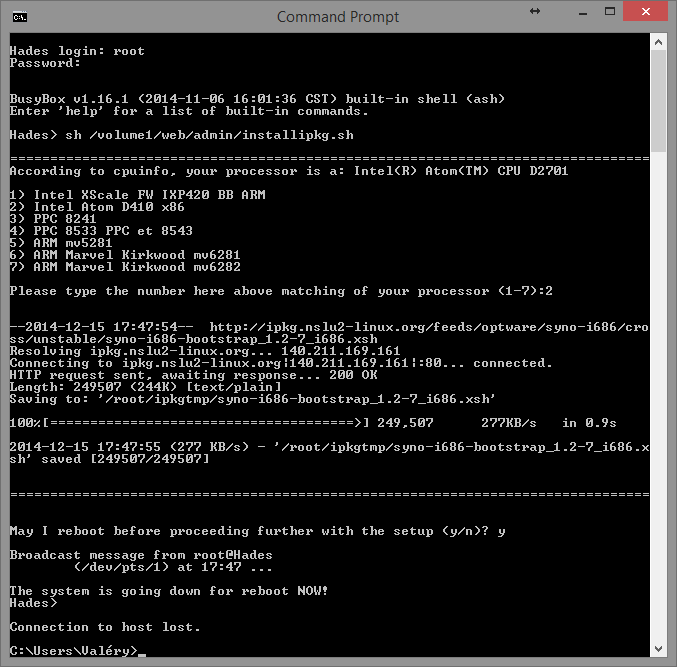
Installing ipkg is not difficult, but I hate to do it manually each time I (re)install a Synology… So, here attached is a script to install it automatically.
[EDIT] ipkg is not maintained anymore. Many packages do not run anymore with the most recent DSM. So, use opkg instead.
Click to Read MoreClick to Close
First Installation:
Copy on your NAS the script attached at the bottom of this post (Ex.: into \\<YourSyno>\web\admin as used for the illustration here after).
Connect as root on your NAS (Ex.: via telnet using the command ‘telnet <YourSyno>’, the login ‘root’ and the password of your ‘admin’ account – see more details here).
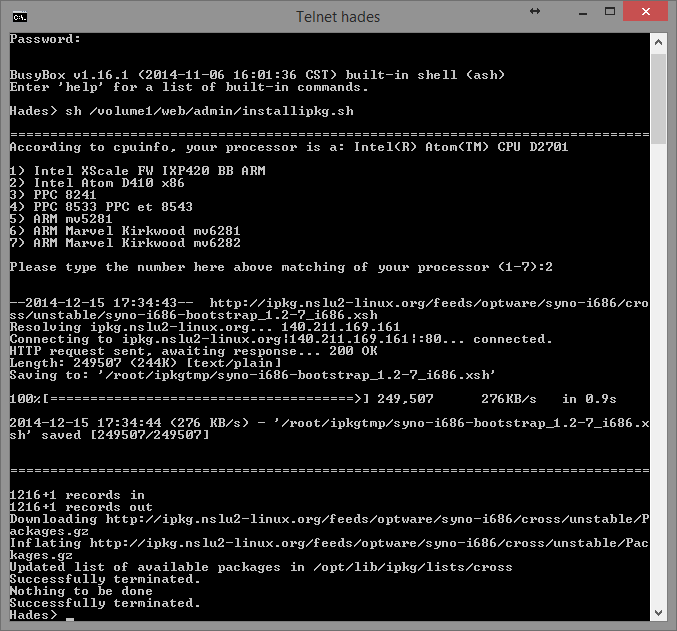
Execute the script (Ex.: use the command ‘sh /volume1/web/admin/installipkg.sh’)
Check which processor your have on your NAS and select the right option accordingly. The script will show you the cpu found using ‘cpuinfo’. But you can double-check here (NB.: I have a DS713+ which is currently not listed. I didn’t test ipkg for the other versions).
Automatic Installation of Ipkg
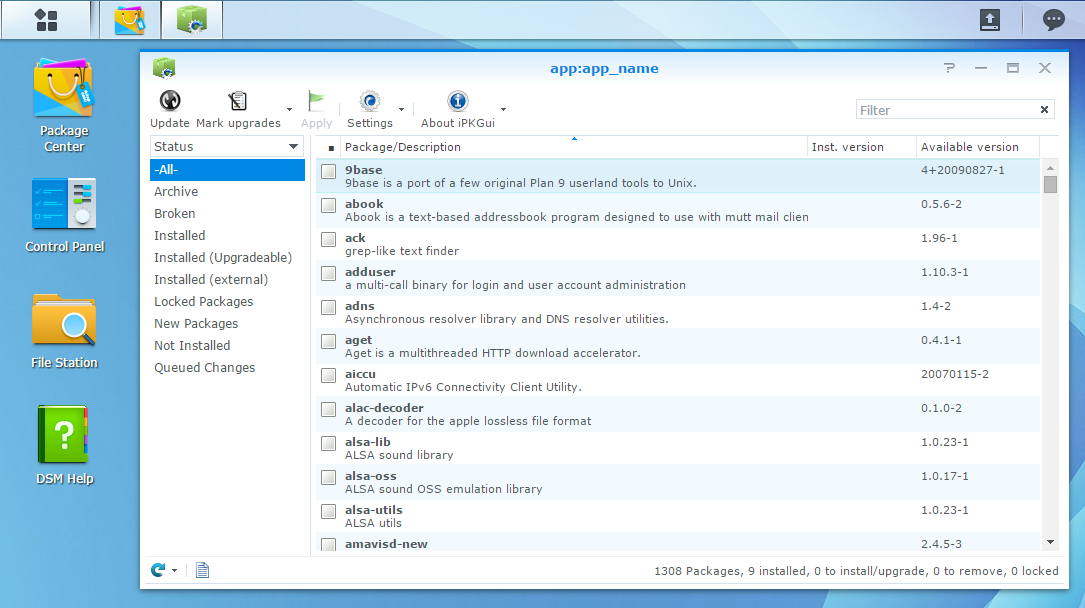
You can now use ipkg directly in a shell or via the (really) great UI named “IpkgGUI”. This one is available as a Community Package from cphub.net. Add “https://www.cphub.net” as a Package Source in the Package Center’s settings pane and install IpkgGUI.
Ipkg GUI
Re-installation/upgrade:
If ipkg is already installed, the script will remove it automatically and reboot the NAS before proceeding further with the installation (A reboot takes a bit more than one minute to shutdown and a bit more than two minutes to restart on my DS 713+). After the reboot, thanks to a script inserted into /etc/rc.local, the setup will continue automatically.
Automatic Installation of Ipkg With Reboot
Installation status:
(After the reboot, reconnect to the NAS). You can now check the status of the setup in its log, using the command: cat /root/ipkg.log. The output should looks like this:
[code]

[Mon Dec 15 17:34:44 CET 2014] Installing IPKG...
Optware Bootstrap for syno-i686.
Extracting archive... please wait
bootstrap/
bootstrap/bootstrap.sh
bootstrap/ipkg-opt.ipk
bootstrap/ipkg.sh
bootstrap/optware-bootstrap.ipk
bootstrap/wget.ipk
Creating temporary ipkg repository...
Installing optware-bootstrap package...
Unpacking optware-bootstrap.ipk...Done.
Configuring optware-bootstrap.ipk...Done.
Installing ipkg...
Unpacking ipkg-opt.ipk...Done.
Configuring ipkg-opt.ipk...Done.
Removing temporary ipkg repository...
Installing wget...
Installing wget (1.12-2) to root...
Installing wget (1.12-2) to root...
Installing wget (1.12-2) to root...
Installing wget (1.12-2) to root...
Installing wget (1.12-2) to root...
Installing wget (1.12-2) to root...
Installing wget (1.12-2) to root...
Installing wget (1.12-2) to root...
Installing wget (1.12-2) to root...
Configuring wget
Successfully terminated.
Creating /opt/etc/ipkg/cross-feed.conf...
Setup complete.

[/code]
Notice: after the setup of ipkg, this one is upgraded and updated once automatically.
PS.: If you don’t choose the right version of the boostrap, the installation of ipkg will fail. While trying to run it, you could see errors like “line 1: syntax error: unexpected word (expecting “)”)“. Try to install the right package. The script should delete the previous installation and install the new one as explained above.
You become crazy because after hours of trials and errors, your brand new (and probably first) shell script still complains about “syntax error: unexpected “fi” (expecting “then”)”, “syntax error: unexpected “fi” (expecting “then”)” or “syntax error: unexpected word (expecting “in”)”, … The problem is probably with the EOL.
Click to Read MoreClick to Close
The problem could indeed be that you are editing your script with a Windows Text Editor… In such a case, you have to convert the Windows EOL (End Of Line character) into the Linux equivalent.
Edit your script with Notepad++ and use the menu “Edit” > “EOL Conversion” > “Unix/OSX Format”. Then save your script and try again…
You may also have to use the ANSI encoding with the menu “Encoding” > “Convert to ANSI”
I got an automatic Windows Update yesterday on my Intel NUC D54250WYK. After the reboot, I discovered that I had no “HDMI audio device” anymore, but only the “Headphone audio device”. Re-installing “Realtek Audio Drivers” didn’t solve the problem. The trick is to uninstall and re-install both the Audio Drivers AND the Graphics Drivers!
Click to Read MoreClick to Close
Indeed, the connection to the TV being made through HDMI, the audio connection is managed via the Graphic Drivers.
Get both Audio and Graphic Drivers from the Intel Download site (I.e.: “Audio: Realtek ALC Audio Driver for Intel® NUC” and “Graphics: Intel® HD Graphics Driver for Intel® NUC”).
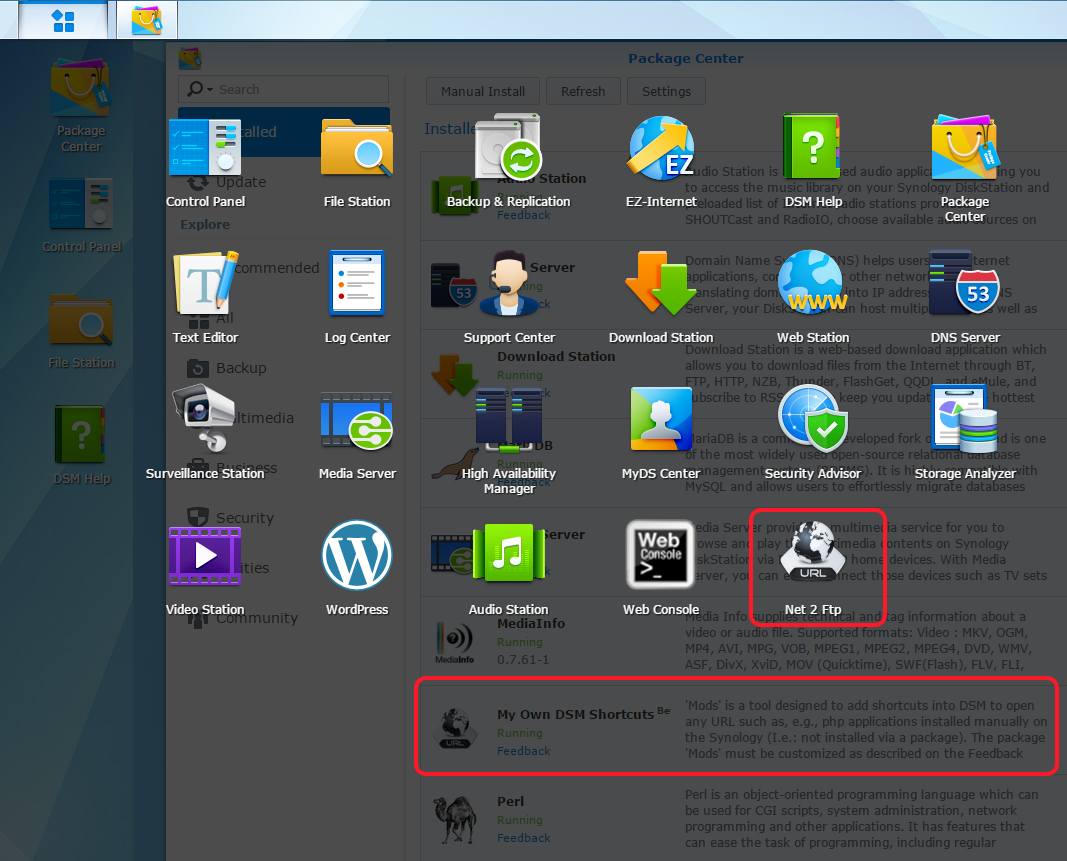
I did post a feature request on Synology forum to get support for custom shortcuts on the DSM’s desktop. But as I found a trick to do it myself, I have implemented a small .Net application to automate the configuration part. I named it “Mods – My Own DSM Shortcuts”.
Click to Read MoreClick to Close
The trick is to create a Dummy Package which will, as any package, add a shortcut for itself into the Synology’s Start menu… This is a Dummy Package as it does nothing else (no installation of an actual application)..
You can find the source code of my App as well as binaries for windows here https://mods.codeplex.com/. Read the documentation for additional information, including how to create such a Dummy Package manually (E.g.: you don’t have Windows)…
On the screenshot here after, you can see both the Dummy Package “My Own DSM Shortcuts” installed via the “Package Center” and the Custom Shortcut that was created to open Net2Ftp – a php website I installed manually on my NAS (I.e.: copied into the webstation).
It was time to replace my old TV… But having become addicted to Plex (on my NUC), I really wanted my new TV to be a Smart one, able to run smoothly the Plex App, with native support for most codecs, to avoid transcoding, as well as 3D and a universal remote control. After a lot of research I have chosen the UE48H6500.
Smartv TV Samsung UE48H6500
Click to Read MoreClick to Close
I finally found a TV not too expensive (<700€) but matching perfectly all my requirements!
Features are available in attachment… Here are some notes:
It’s large but not too much (fit in my living room: 48″ = 121 cm).
It runs both “Plex” and “DS Video” that are great apps to play movies stored on a Synology NAS. Those Apps are available in the category “Videos”. But there are really much more Apps than those.
With its Quad Core Processor, the menus (including Plex) are very reactive. That’s the point I was the most afraid of… But I am really not disappointed.
It supports really many many formats (Plex has therefore never to transcode any movie and can easily run with a “lower profile” Synology) – see the User Guide for details:
With its IR repeater, it can remote control the TV Decoder of my Provider (Belgacom) and as it’s own TV Guide (I.e. an EPG) which is really running smoother than to Belgacom’s Guide. The only drawback is that one has to use the Provider’s default sort order of the channel. It can actually be changed, but it requires some tricking.
With the HDMI ARC (Audio Return Channel), no need to switch between audio sources anymore on my Sound Bar (TV Decoder, NUC or TV/plex).
Once named adequately (e.g.: with H-SBS in the name), 3D movies are automatically played as such by Plex on the TV.
A really great Smart Remote Control with a touchpad and motion control. I love it ! Small, it fits perfectly in one hand and works really like a charm both to control the TV Decoder and Plex. Also, using the control as a pointer (based on motion control) to pick entries in menu, etc… is so user-friendly!
The TV runs also a decent Web Browser that works:
It’s not the fastest one but it displays fine most web sites (Google, MSN, Facebook, …)
One can scroll easily within pages using the Smart Control’s “OK button” (which is actually a touchpad), simply sliding the finger on that “touchpad/button”. This is very convenient to read pages!!
It’s also very easy to type text/urls/… pointing letters on the onscreen-keyboard with the Smart Control
And it supports Flash animations.
One can connect a Wireless Keyboard to make typing even more comfortable. I am using a Logitech Wireless Touch Keyboard K400 and it works seamlessly.
Samsung Smart Control
Tips and tricks:
One thing I have been looking for was how to delete Apps installed in the Smart Hub. One simply has to select an Apps and press ‘OK’ for a few seconds on the Smart Control. It opens a menu with useful actions. To learn more about playing within the Smart Hub, this video is really great.
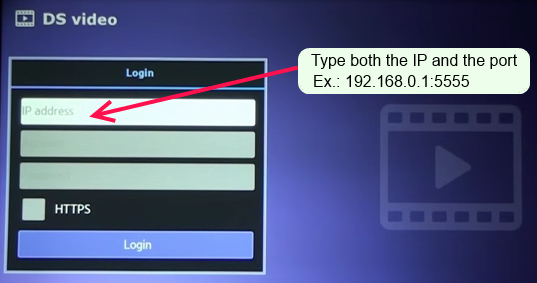
Another stupid thing I didn’t find immediately: how to specify a specific port within the “DS Video” App to connect on my Synology NAS. Indeed, as long as my Synology’s DSM was configured to run on its default port (I.e.: 5000), there was no need to specify this port in the “DS Video” App (One only had to enter the IP of the NAS and credentials). But once I did reconfigure my DSM to run on another port, “DS Video” didn’t succeed to connect to the NAS anymore. There is no field to type a port in “DS Video” App’s connection pane. The trick (stupid and obvious) was to type the port in the IP field. E.g.: 192.168.0.1:5555
Many years ago, Parental Control was already a native feature of my previously favorite Media Library Manager: Media Browser – reason why, since I am using Plex (mainly because Plex Media Server runs on my Synology), the lack of efficient support for such Control has been really frustrating. A solution has fortunately been developed by iSh0w, early in 2014, as a plugin named “L0ck”. This plugin is now really pretty mature!
NB.: two days after this post, Plex released native Parental Control as part of their new Plex Home feature… But this is not yet available for Samsung so L0ck still makes sense for me.
[EDIT 12/2015] Later in 2015, a new version of Plex for Samsung has been released, which support user accounts (and hence, Parental Control).
Click to Read MoreClick to Close
The only solution currently suggested by Plex to prevent Kids watching inadequate content is to create dedicated Plex Accounts for the kids and only share with those accounts the adequate content. This is totally inconvenient, especially when sharing the same player device such as a TV or a Tablet. Indeed, parents may not forget to “disconnect” the device from their account. Next, kids need to be able to connect with a login/password, which is far from easy for the youngest ones. Definitively, Plex is missing a a true Parental Control!
L0ck plugin for Plex, although(*) not yet the very best solution, should be loved by the thousands of users who voted for such a feature!
(*) You have to re-Lock the libraries before quitting your Plex Client. Libraries are not automatically re-locked after x hours or when Plex Client is restarted… Also, when unlocked, libraries are visible for all the Plex Clients, possibly for other devices that would start Plex! Next, the plugin is unl0cking/l0cking all the Controlled libraries at once (If there is a trick to protect distinct subsets of libraries with distinct passwords, I didn’t find it yet). Finally, restarting the Plex Client is usually required… But still, this is better than nothing or much better than Plex’s suggested approach.
Here is how to install this plugin for Plex on Synology:
Disable the “authentication on local networks” on your Plex Media Server (if enabled)
Go to your Plex Server Administration page http://<YourSynology>:32400/web/index.html#!/settings/server
Click on the entry “Connect”
Click on the button “Show Advanced“
Disable “Require authentication on local networks”
Go to the “L0ck” page to download the Plugin customized to lock/unlock some of your Libraries with a password
Type the local IP (LAN) of your Synology
Click “Search For Section(s)!“
Select the section(s) you would like control access to.
Enter next Password. Ex.: 4 digits
And click on “Generate Plugin!“
Finally click on “Download plugin!” on download a zip with your customized plugin (This is not working with all browsers! Use Chrome).
Deploy the plugin into Plex’s plugin folder after customization for Synology
Unzip the archive downloaded at step 2..F into a temp folder
Open within notepad++ the file <YourTemp>\L0ck.bundle\Contents\Resources\l0ck_support\l0ck.sh
Search and Replace “/var/lib/plexmediaserver” with “/volume1/Plex” and Save the file.
Open next the file <YourTemp>\L0ck.bundle\Contents\Resources\l0ck_support\unl0ck.sh
Search and Replace “/var/lib/plexmediaserver” with “/volume1/Plex” and Save the file.
NB.: No need to change the __init__.py as mentioned on L0ck’s webpage.
Finally Move the folder L0ck.bundle into the hidden Shared folder \\<YourSynology>\Plex\Library\Application Support\Plex Media Server\Plug-ins\
Grant access for plex onto the plugin
Open a Telnet console onto your Synology
Run “telnet” from Windows
Type: open <YourSynology>
Login as ‘root’ with your admin password
Execute the following commands
cd /volume1/Plex/Library/Application\ Support/Plex\ Media\ Server/Plug-ins
chown -R plex:users L0ck.bundle
cd L0ck.bundle/Contents/Resources/l0ck_support
chmod a+x l0ck.sh
chmod a+x unl0ck.sh
chmod a+x sqlite3
Re-enable the “authentication on local networks” on your Plex Media Server (if it was enabled)
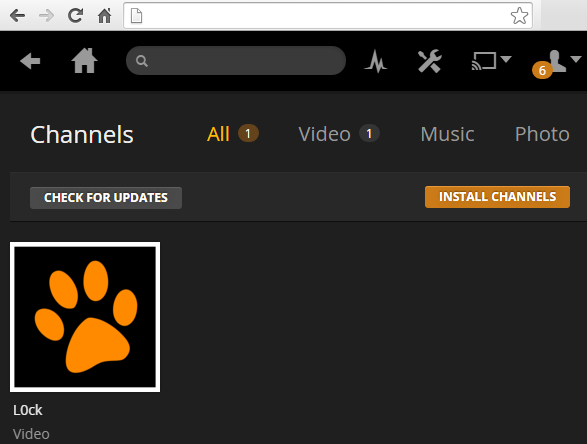
Restart now your Plex Clients and go to the “Channels” where you should see the L0ck” Icon:
L0ck Plugin
Et voilà 😉
NB 1: By default, the libraries to be “controlled” are all unlocked. So, enter the plugin and L0ck them.
NB 2: The display is not the same within Plex Home Theater and Plex Web Client. E.g.: in the Plex Home Theater (for Windows), you see both the icon “L0ck” and “Unl0ck”. In the Plex Web Client, instead, you see only the “L0ck” icon. In the Plex Home Theater, when you click on “L0ck”, nothing seems to happen while in the Plex Web Client, you see an “Locked” icon replacing the “Lock” icon. But you will quickly find your path…
NB 3: Once your have clicked on “L0ck”, you have to restart your Plex Home Theater or refresh your browser if using Plex Web Client. On the opposite, with Plex for Samsung, I don’t have to quit and restart Plex after Unl0cking/L0cking my libraries, even if e.g. unl0cking via the Web Client…
NB 4: To Unlock the libraries with the Plex Web Client (where the “unl0ck” icon is missing), go to the “Channels” page and enter the “L0ck” channel. Then type your password in the Search box and simply hit “enter”.
NB 5: Once a movie started from an unl0cked Controlled library, the libraries can be rel0cked immediately. This is not stopping the movie as you could see when playing a movie within Plex Home Theater and re-locking the libraries via a Web Plex Client. So, based on that finding, I have customized the L0ck plugin to add a new button: “Short Unlock“. This one unl0cks the libraries for 2 minute and then re-locks them automatically. If you are interested in such a feature, you can simply add the following line in unlo0ck.sh, before the last line (with “exit;”):
[shell](sleep 120 ; sh ./l0ck.sh) &amp;amp;amp;[/shell]
I have submitted this idea to the creator of the plugin (See here). So far, adding a new button does not offer the best user experience with the Plex Web Client due to some technical limitation…
On Synology, L0ck plugin’s log file is named “com.plexapp.plugins.l0ckunl0ck.log” and located in \\<YourSynology>\Plex\Library\Application Support\Plex Media Server\Logs\PMS Plugin Logs. It has better be opened with notepad++.