• How to Add Multiple Hosts in phpMyAdmin on Synology

    On Google, one can easily find how to add servers in the list presented on the login page of phpMyAdmin. But thes results don’t apply if you are using the package ‘phpMyAdmin’ for Synology. With that package, one must edit the synology_server_choice.json file.

    Click to Read More

    If you are connected on your NAS via a SSH console, the file to be edited is located in /var/services/web/phpMyAdmin/synology_server_choice.json.

    But you should also be able to access it from a Windows PC on \\<YourNAS>\web\phpMyAdmin\synology_server_choice.json

    To add a server, simply duplicate the first statement of the json file, separated with a comma:

    [
    {"verbose":"Server 1","auth_type":"cookie","host":"localhost","connect_type":"socket","socket":"\/run\/mysqld\/mysqld10.sock","compress":false,"AllowNoPassword":false},
    {"verbose":"Server 2","auth_type":"cookie","host":"192.168.0.20","connect_type":"socket","socket":"\/run\/mysqld\/mysqld10.sock","compress":false,"AllowNoPassword":false},
    {"verbose":"Server 3","auth_type":"cookie","host":"192.168.0.100","connect_type":"socket","socket":"\/run\/mysqld\/mysqld10.sock","compress":false,"AllowNoPassword":false}
    ]

    Et voilà.

    Loading

  • Install Java 8 SDK and OpenHab 2 on Raspberry Pi Desktop for RPI 4

    I wanted to install OpenHab 2 on my RPI 4 which is running the latest Raspberry Pi Desktop. But I was missing Java 8 which is a prerequisite and unfortunately not available anymore as a stable version, for Debian 10, due to a security issue.

    Click to Read More

    First, here is the version of Raspberry Pi Desktop I have:

    $ cat /etc/os-release
    PRETTY_NAME="Raspbian GNU/Linux 10 (buster)"
    NAME="Raspbian GNU/Linux"
    VERSION_ID="10"
    VERSION="10 (buster)"
    VERSION_CODENAME=buster
    ID=raspbian
    ID_LIKE=debian
    HOME_URL="http://www.raspbian.org/"
    SUPPORT_URL="http://www.raspbian.org/RaspbianForums"
    BUG_REPORT_URL="http://www.raspbian.org/RaspbianBugs"

    Trying to install Java 8 SDK was resulting in errors like:

    $ sudo apt-get install openjdk-8-jdk
    Reading package lists... Done
    Building dependency tree
    Reading state information... Done
    E: Unable to locate package

    Or like:

    Reading package lists... Done
    Building dependency tree
    Reading state information... Done
    Package openjdk-8-jdk is not available, but is referred to by another package.
    This may mean that the package is missing, has been obsoleted, or
    is only available from another source
    However the following packages replace it:
    openjdk-8-jdk-headless
    E: Package 'openjdk-8-jdk' has no installation candidate

    My Package sources were:

    deb http://ftp.debian.org/debian/ buster main contrib non-free
    deb http://security.debian.org/ buster/updates main contrib non-free
    deb http://ftp.debian.org/debian/ buster-updates main contrib non-free

    The solution was to add a new source with the ‘unstable’ arm-hf packages in /etc/apt/sources.list.d/raspi.list (‘sid’ is the codename for unstable):

    $ echo 'deb http://ftp.debian.org/debian sid main' | sudo tee -a /etc/apt/sources.list.d/

    Next, do:

    $ sudo apt-get update
    $ sudo apt install gcc-8-base
    $ sudo apt-get install openjdk-8-jdk

    NB.: without installing gcc-8-base, you would get an error like this :

    Reading package lists... Done
    Building dependency tree
    Reading state information... Done
    Some packages could not be installed. This may mean that you have
    requested an impossible situation or if you are using the unstable
    distribution that some required packages have not yet been created
    or been moved out of Incoming.
    The following information may help to resolve the situation:

    The following packages have unmet dependencies:
    libc6-dev : Breaks: libgcc-8-dev (< 8.4.0-2~) but 8.3.0-6+rpi1 is to be installed
    E: Error, pkgProblemResolver::Resolve generated breaks, this may be caused by held packages.


    Now, you can install OpenHab 2:

    $ wget -qO - 'https://bintray.com/user/downloadSubjectPublicKey?username=openhab' | sudo apt-key add -
    $ sudo apt-get install apt-transport-https
    $ echo 'deb https://dl.bintray.com/openhab/apt-repo2 stable main' | sudo tee /etc/apt/sources.list.d/openhab2.list
    $ sudo apt-get update

    If you get an error like this one:

    E: The repository 'https://openhab.jfrog.io/openhab/openhab-linuxpkg unstable Release' is not signed.
    N: Updating from such a repository can't be done securely, and is therefore disabled by default.
    N: See apt-secure(8) manpage for repository creation and user configuration details.

    Then do:

    $ echo 'deb [trusted=yes] https://dl.bintray.com/openhab/apt-repo2 stable main' | sudo tee /etc/apt/sources.list.d/openhab2.list

    Finally, do:

    $ sudo apt-get install openhab2
    $ sudo apt-get install openhab2-addons
    $ sudo systemctl daemon-reload
    $ sudo systemctl enable openhab2.service
    $ sudo adduser openhab dialout
    $ sudo adduser openhab tty

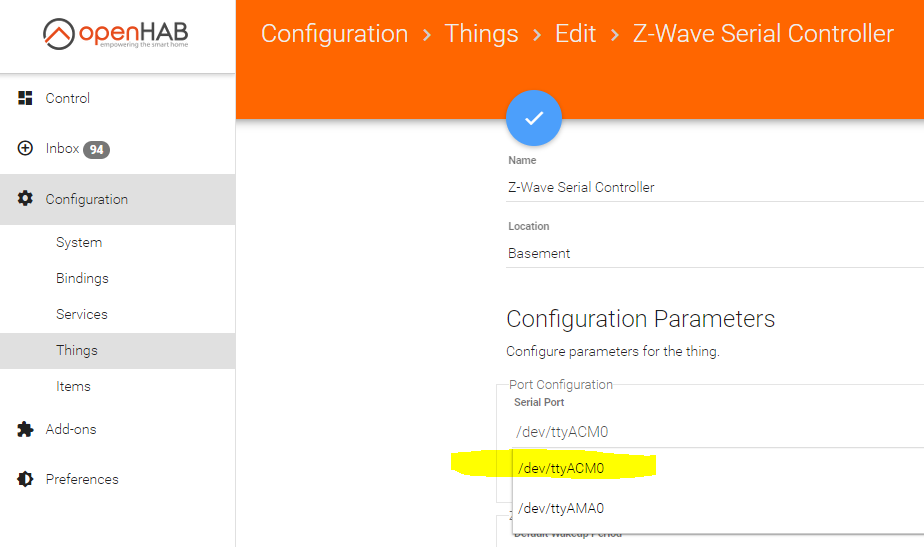
    Edit /etc/default/openhab2 to add access for Java to the serial ports (ex.:for Zwave keys)

    $ nano /etc/default/openhab2 

    EXTRA_JAVA_OPTS="-Dgnu.io.rxtx.SerialPorts=/dev/ttyUSB0:/dev/ttyS0:/dev/ttyS2:/dev/ttyACM0:/dev/ttyAMA0"

    It should output:

    openhab2.service - openHAB 2 - empowering the smart home
    Loaded: loaded (/usr/lib/systemd/system/openhab2.service; disabled; vendor preset: enabled)
    Active: active (running) since Wed 2020-07-15 21:57:07 BST; 28min ago
    Docs: https://www.openhab.org/docs/
    https://community.openhab.org
    Main PID: 26101 (java)
    Tasks: 101 (limit: 4915)
    Memory: 212.3M
    CGroup: /system.slice/openhab2.service
    └─26101 /usr/bin/java -Dopenhab.home=/usr/share/openhab2 -Dopenhab.conf=/etc/openhab2 -Dopenhab.runtime=/usr/share/openhab2/runtime -Dopenhab.userdata=/var/lib/openhab2 -Dopenhab.logdir=/var/log/openhab2 -Dfelix.cm.dir=/var/li

    Jul 15 21:57:07 Helios systemd[1]: Started openHAB 2 - empowering the smart home.


    As far as I am concerned, I share via smb the various folders

    Edit /etc/samba/smb.conf

    $ sudo nano /etc/samba/smb.conf

    [openHAB2-userdata]comment=openHAB2 userdata
    path=/var/lib/openhab2
    browseable=Yes
    writeable=Yes
    only guest=no
    public=no
    create mask=0777
    directory mask=0777

    [openHAB2-conf]comment=openHAB2 site configuration
    path=/etc/openhab2
    browseable=Yes
    writeable=Yes
    only guest=no
    public=no
    create mask=0777
    directory mask=0777

    [openHAB2-logs]comment=openHAB2 logs
    path=/var/log/openhab2
    browseable=Yes
    writeable=Yes
    only guest=no
    public=no
    create mask=0777
    directory mask=0777

    [openHAB2-backups]comment=oepnHAB2 backups
    path=/var/lib/openhab2/backups
    browseable=Yes
    writeable=Yes
    only guest=no
    public=no
    create mask=0777
    directory mask=0777

    Restart the Samba service:

    $ sudo systemctl restart smbd.service


    Start openHab with:

    $ sudo systemctl start openhab2.service
    $ sudo systemctl status openhab2.service

    It can take 15′ to be initialized, but soon you should be able to access openHab on your RPI on port 8080!


    Do a backup with:

    $ sudo ./usr/share/openhab2/runtime/bin/backup

    Restore a backup with:

    $ sudo systemctl stop openhab2.service
    $ sudo ./usr/share/openhab2/runtime/bin/restore /var/lib/openhab2/backups/openhab2-backup-....
    $ sudo systemctl start openhab2.service

    It will take long minutes to restart!


    More details about installing openHAb on Linux on the official page.

    Et voilà!

    Loading

  • Use a Z-Wave Controller USB Key with openHAB in Docker on a RPI 4

    It took me quite some hours to be able to use my Aeotec Z-Stick Gen5 (ZW090) key within my Docker image of openHAB, running on a Raspberry Pi 4 (with a Raspberry Pi OS). Here are all the tips I used.

    Click to Read More

    First, before plugging the controller  in your RPI, configure it to see the Serial Ports. Connect onto your RPI within a SSH Console (ex.: via Putty)  and type the command:

    sudo raspi-config

    Use “5 interfacing Options” > “P6 Serial” > “Yes” > “Ok”

    And now reboot.

    Next, back into a SSH conscole, check what USB devices already exists with the command:

    lsusb

    Bus 002 Device 001: ID 1d6b:0003 Linux Foundation 3.0 root hub
    Bus 001 Device 002: ID 2109:3431 VIA Labs, Inc. Hub
    Bus 001 Device 001: ID 1d6b:0002 Linux Foundation 2.0 root hub

    And flush the kernel and boot logs:

    sudo dmesg -c >> ~/dmesg-`date +%d%m%Y`.log

    Then, plug your Z-Wave Controller USB Key in a USB Port and check that it’s detected and mounted properly:

    lsusb

    Bus 002 Device 001: ID 1d6b:0003 Linux Foundation 3.0 root hub
    Bus 001 Device 009: ID 0658:0200 Sigma Designs, Inc. Aeotec Z-Stick Gen5 (ZW090) - UZB
    Bus 001 Device 002: ID 2109:3431 VIA Labs, Inc. Hub
    Bus 001 Device 001: ID 1d6b:0002 Linux Foundation 2.0 root hub

    dmesg

    [ 3124.779069] usb 1-1.4: new full-speed USB device number 9 using xhci_hcd
    [ 3124.919928] usb 1-1.4: New USB device found, idVendor=0658, idProduct=0200, bcdDevice= 0.00
    [ 3124.919942] usb 1-1.4: New USB device strings: Mfr=0, Product=0, SerialNumber=1
    [ 3124.919953] usb 1-1.4: SerialNumber: 32303136-3131-3033-3030-303031383932
    [ 3124.926704] cdc_acm 1-1.4:1.0: ttyACM0: USB ACM device


    “lsusb” should show you a new device. Ex.: Aeotec Z-Stick Gen5 (ZW090) – UZB.

    And “dmesg” must should you the mount point: cdc_acm 1-1.4:1.0: ttyACM0: USB ACM device.

    If you don’t see the mount point, then you possibly have a device not supported by the RPI 4. It seems that it is the case with the old Aeotec “Z-Stick Gen5”. “New Z-Stick Gen5” and “Z-Stick Gen5+” should however be compatible. But there is a trick: plug your key on the RPI 4 via a USB HUB (2.0 or 3.0).

    I presume that the Docker Image is already up and running. If not, install it.

    sudo useradd -r -s /sbin/nologin openhab
    usermod -a -G openhab pi
    mkdir /opt/openhab
    mkdir /opt/openhab/conf
    mkdir /opt/openhab/userdata
    mkdir /opt/openhab/addons
    chown -R openhab:openhab /opt/openhab

    Check the id of the user openhab with:

    id openhab

    uid=999(openhab) gid=994(openhab) groups=994(openhab)

    Grant access on the Serial Port for the user ‘openhab’:

    sudo chmod 777 /dev/ttyACM0
    sudo chown openhab /dev/ttyACM0

    And use the uid and gid found above in the following command, setting the ttyA* found previously and specifying the version to be used:

    docker run –name openhab –net=host –device=/dev/ttyACM0 -v /etc/localtime:/etc/localtime:ro -v /etc/timezone:/etc/timezone:ro -v /opt/openhab/conf:/openhab/conf -v /opt/openhab/userdata:/openhab/userdata -v /opt/openhab/addons:/openhab/addons -d -e USER_ID=<uid> -e GROUP_ID=<gid> –restart=always openhab/openhab:latest


    Now, using Portainer (because it’s easy), open a console within openhab… Portainer is not yet installed ? Do it with:

    docker run -d -p 9000:9000 -p 8000:8000 –name portainer1 –restart always -v /var/run/docker.sock:/var/run/docker.sock -v portainer:/data portainer/portainer:latest

    Go to the page http://<Your RPI IP>:9000, open the Containers and click on the “Exec Console” icon of ‘openhab’ container:

    Grant the same accesses inside the image than on the RPI:

    sudo chmod 777 /dev/ttyACM0
    sudo chown openhab /dev/ttyACM0

    chown -R openhab:openhab /opt/openhab

    Now restart the ‘openhab’ container (with the icon Restart 😉 ). It will take some minutes to be available. But once you can get into it, go to the Things and configure the Controller to use the Serial Port ttyACM0:


    Et voilà

    Loading

  • Raspberry Pi’s SD card full ?

    Trying to update one of my Raspberry Pi Desktop, I see messages pretending that there is not enough free space ? 

    Click to Read More

    I saw that my Pi was full when I tried to update it with

    sudo apt-get update && sudo apt-get upgrade -y

     Error writing to output file - write (28: No space left on device)

    I could also see that there was no free storage anymore as the system was unable to allocate the swap file:

    systemctl status dphys-swapfile.service

    dphys-swapfile.service - dphys-swapfile - set up, mount/unmount, and delete a swap file
    Loaded: loaded (/lib/systemd/system/dphys-swapfile.service; enabled; vendor preset: enabled)
    Active: failed (Result: exit-code) since Sun 2020-06-28 12:35:15 BST; 4min 21s ago
    [...]Jun 28 12:35:15 helios dphys-swapfile[327]: want /var/swap=100MByte, restricting to 50% of remaining disk size: 0MBytes
    Jun 28 12:35:15 helios systemd[1]: Failed to start dphys-swapfile - set up, mount/unmount, and delete a swap file.

    And indeed, the swap file was 0B:

    free -h

          total   used   free   shared  buff/cache  available
    Mem: 3.8Gi 285Mi 2.7Gi 11Mi    886Mi       3.4Gi
    Swap: 0B      0B     0B

    Start to investigate with:

    sudo df -h

    Filesystem      Size  Used Avail Use% Mounted on
    /dev/root 29G 29G 0 100% /
    devtmpfs 1.8G 0 1.8G 0% /dev
    tmpfs 2.0G 0 2.0G 0% /dev/shm

    Or use the version for Inode which won’t include the mounted drives

    sudo df -i

    Filesystem Inodes  IUsed  IFree   IUse% Mounted on
    /dev/root 1895552 328167 1567385 18% /
    devtmpfs 117763 409 117354 1% /dev
    tmpfs 183811 1 183810 1% /dev/shm

    Check, in the output of those commands, that the size of the root partition (/dev/root) is close the the size of your SD (Here above, I have IUsed =~ 32G). If it is not the case, enlarge it with:

    sudo raspi-config

    7 Advanced Options > A1 Expand Filesystem 

    (reboot)

    If the size of the root partition is maximum, then investigate to find the very large stuff with:

    sudo du -xh / | grep -P “G\t”

    1,2G /opt/openhab/userdata
    1,2G /opt/openhab
    1,2G /opt
    1,3G /usr
    11G /var/lib/docker
    11G /var/lib
    11G /var
    16G /mnt/backup
    16G /mnt
    29G /

    To only have the size of the first level folders, use:

    sudo du -xh –max-depth=1 / | grep -P “G\t”

    1.2G /opt
    1.3G /usr
    11G /var
    16G /mnt
    29G /

    Check, in the output of that command, if there as any folder or file which could be cleaned-up.

    You can also us this to navigate into your SD:

    sudo mount –bind /  /mnt
    sudo ncdu -x /mnt

    -- /mnt ------------------------
    15,1 GiB [##########] /mnt
    10,6 GiB [###### ] /var
    1,3 GiB [ ] /usr
    1,2 GiB [ ] /opt
    415,3 MiB [ ] /home
    353,3 MiB [ ] /lib
    9,3 MiB [ ] /bin

    You can navigate in this table (with keys up and down) and open folders (press enter) to see the details of their content. Exit this table by pressing “q”.

    If by any accident, you don’t succeed to delete a large file or folder (especially if located under /media or /mnt), check that it’s not on a mounted drive. Auto-mount are usually in /etc/fstab and may only be :

    cat /etc/fstab

    You can umount all at once with

    sudo umount -a -t cifs -l


    Regarding packages, You can cleanup some space with:

    sudo apt-get autoremove

    sudo rm -R /var/cache/

    sudo mkdir -p /var/cache/apt/archives/partial
    sudo touch /var/cache/apt/archives/lock
    sudo chmod 640 /var/cache/apt/archives/lock
    sudo apt-get clean


    If you are using docker,

    you can check the space consumed with:

    sudo du -sh /var/lib/docker/overlay2

    docker system df

    you can cleanup some space with:

    docker system prune -a -f

    docker system prune –all –volumes –force

    docker volume rm $(docker volume ls -qf dangling=true)


    If using GitLab, you can cleanup some space with:

    sudo gitlab-ctl registry-garbage-collect


    Other useful commands:

    sudo find / -type f -size +500M -exec ls -lh {} \;

    sudo touch /forcefsck ; sudo reboot

    sudo resize2fs /dev/mmcblk0p2 ; sudo reboot

    After reboot check the resize status with:

    systemctl status resize2fs_once.service

    If you see the error “Failed to start LSB: Resize the root filesystem to fill partition”, you can disable the resize2fs with:

    sudo systemctl disable resize2fs_once


    What was the issue in my own case: my remote folder for backup was not mounted anymore on /mnt/backup but the backup script run and stored a 16Gb file into the local folder /mnt/backup. I have been able to delete the local backup by commenting the related shared folder in /ect/stab, rebooting and then deleting /mnt/backup.

    Et voilà!

    Loading

  • Run Raspberry Pi Desktop 4 in VMWare

    Instead of testings new softwares or configs on my actual RPI, I do it in a VM Machine. Much easier to rollback if I do a mistake. There are many videos on YouTube to explain how to install the Raspberry Pi Desktop in VMWare.

    Click to Read More

    The ISO image of Raspberry Pi Desktop is available here.

    I did create an VM, as illustrated here, with:

    • 4GB Memory
    • 32GB Hard Disk(SCSI)
    • USB 3 .1
    • And everything else “by default”
      • 1 processor
      • NAT Network Adapter

    I did:

    • a “Graphical Install” of the Raspberry Pi Desktop
    • enable SSH
    • keep the password “raspberry” for the user pi (with auto-login enabled)
    • configure the keyboard for me (Belgian – Azerty)
    • configure to location as Brussels/Belgium
    • install the VMWare-Tools (screen resolution maximized automatically)
    • Create an icon “Desktop Update” to update the packages via: sudo apt-get update && sudo apt-get upgrade -y

    And here attached in the resulting VM (a 4.5GB zip file). Download it, unzip and double click the file “Raspberry Pi 4.vmx” to open the VM into your VMWare Workstation.

    Et voilà.

    Loading

  • Create a Plex Media Player with a Raspberry 4

    I used to run Rasplex on a RPI 2 to play movies from my Plex Media Server. Unfortunately Rasplex has not been updated to run on a RPI 4. Here is how to build PMP for RPI 4.

    Click to Read More

    Install an OS on your RPI 4

    1. Download the “Raspberry Pi Imager” here.
    2. Download next the “Raspberry Pi OS (32-bit) with desktop” here (the 64-bit is still only in beta. See here). Unzip the file.
      • This is the smallest image (no extra softwares) with a Desktop (mandatory to display the Plex Media Player GUI)
    3. Install and Run the “Raspberry Pi Imager” to setup the “Raspberry Pi OS” on a micro-SD card.
      • Click on “Choose OS”

      • Select “Use Custom”

      • Pick the .img file “YYYY-MM-DD-raspios-buster-armhf.img” unzipped from the “Raspberry Pi OS (32-bit) with desktop” image.
      • Next Click “Choose SD” and “Write”.
      • Once the operation completed, install the micro-SD in your RPI 4 and turn it on. The Raspberry Pi Desktop will appear after some automatic reboots. Follow the setup of the Welcome screen. Steps are:
        • Setup the Country (use Page up and Page down in the Country Combo to scroll faster)
        • Change the Password of the user ‘pi’. ATTENTION: the keyboard layout is most probably not the right one. Untick the “Hide characters” option to check what you type!
        • Set Up Screen
        • Select Wireless Network (You can skip this step if the RPI is connected via ethernet). Again, untick the “Hide characters” option to check what you type!
        • Update Software
        • Click “Restart” on the last step “Setup Complete”

    Configure your OS

    Open a “Terminal” :

    First, type this command in the Terminal to check your IP address:

    ifconfig

    Type next this command to configure the os:

    sudo raspi-config

    Among other:

    • Configure your keyboard if required via “4 Localisation Options” > “change keyboard layout”
      • If your keyboard is not in the list, use the Generic 100x-Key PC corresponding to your layout. Look the picture of this wiki page for more details.
      • You can possibly also find more info about your keyboard here.
    • Enable SSH via “5 Interfacing Options” > “P2 SSH”
    • Give at least 512MB or more to your GPU via “7 Advanced Options” > “Memory Split” (I did set 512. Using 1024 result in a black screen after reboot)
    • I gave the whole micro-SD card storage for the OS via “7 Advanced Options” > A1 Expand File System”
    • I set the audio output on the HDMI port via “7 Advanced Options” > A4 Audio”
    • NB.: I don’t use the 4Kp60 HDMI, but it can be configured via “7 Advanced Options” > AA Pi 4 Video Output”
    • Finally, reboot to be sure that it still work.
      • If you have an issue, wait for 3 minutes and proceed with the next step here under.


    You can now open a SSH console from your PC (E.g: using PuTTY) to connect on the IP address found previously and login with the user ‘pi’ and the password you introduced during the installation.

    You will possibly get a PuTTY Security Alert because of the ssh key fingerprint… Accept if you are sure that you are connecting safely to your RPI.

    If it seems that your RPI didn’t reboot properly and you are not able to connect using SSH after a moment, they you probably have to redo to whole setup from scratch and try other configuration options within raspi-config

    If it seems that your RPI didn’t reboot properly and you are able to connect via SSH, redo the configuration with the command sudo raspi-config (try to reset the “Memory Split” to 64 if you did change it).

    If you want to be sure that your OS is up-to-date, with the very latest fixes, type the following commands:

    sudo apt-get update
    sudo apt-get full-upgrade

    And finally disable the screen sleep with the command

    sudo sed -i 's/#xserver-command=X.*/xserver-command=X -s 0 dpms/g' /etc/lightdm/lightdm.conf

    Build PMP for your RPI 4

    Use now the SSH console (to be able to copy/paste from here) to execute this:

    sudo apt-get install -y autoconf automake libtool libharfbuzz-dev libfreetype6-dev libfontconfig1-dev libx11-dev libxrandr-dev libvdpau-dev libva-dev mesa-common-dev libegl1-mesa-dev yasm libasound2-dev libpulse-dev libuchardet-dev zlib1g-dev libfribidi-dev git libgnutls28-dev libgl1-mesa-dev libsdl2-dev cmake python3 python python-minimal git mpv libmpv-dev

    Then these 3 commands:

    wget https://github.com/koendv/qt5-opengl-raspberrypi/releases/download/v5.12.5-1/qt5-opengl-dev_5.12.5_armhf.deb 
    sudo apt-get install -y ./qt5-opengl-dev_5.12.5_armhf.deb
    rm qt5-opengl-dev_5.12.5_armhf.deb

    And finally these:

    mkdir ~/pmp
    cd ~/pmp
    git clone git://github.com/plexinc/plex-media-player
    cd plex-media-player/
    mkdir build
    cd build
    cmake -DCMAKE_BUILD_TYPE=Debug -DQTROOT=/usr/lib/qt5.12/ -DCMAKE_INSTALL_PREFIX=/usr/local/ ..
    make -j4
    sudo make install

    Now, PMP can be run. Go back to the Raspberry Pi Desktop, and type this command in a Terminal:

    plexmediaplayer --fullscreen --tv &

    In my case, the option ‘tv’ is not convenient (I can’t see enough on the screen)…

    You will have to Sign In via the link page of Plex.tv and next configure Plex Media Player.

    Configure PMP to launch at boot

    Back into you SSH Console, on your PC, create a new user ‘plex’ with a password:

    sudo adduser plex
    sudo adduser --disabled-password plex
    sudo passwd -d plex

    Login as ‘plex’ in your RPI desktop to run once PMP via a Terminal (Without this step, it will not be displayed full screen after an autologin):

    plexmediaplayer --fullscreen --tv &

    Configure the user ‘plex’ to autologin with a desktop session named ‘plex’:

    sudo sed -i 's/#*user-session=.*/user-session=plex/g' /etc/lightdm/lightdm.conf
    sudo sed -i 's/#*autologin-user=.*/autologin-user=plex/g' /etc/lightdm/lightdm.conf
    sudo sed -i 's/#*autologin-user-timeout=.*/autologin-user-timeout=delay/g' /etc/lightdm/lightdm.conf

    Create the ‘plex’ desktop:

    sudo nano /usr/share/xsessions/plex.desktop

    and paste into it:

    [Desktop Entry]Name=Plex
    Comment=Plex Media Player
    Exec=/usr/local/bin/plexmediaplayer
    Icon=
    Type=Application

    And now reboot ! (It can take 3 long minutes !!):

    sudo reboot

    If there is a configuration issue with the desktop, edit the config via a SSH console and restart lightDM (the Desktop Manager):

    sudo service lightdm restart

    Tips: I had no issue with getting Plex Media Player in fullscreen but here are notes in case I would have to resize it:

    sudo apt-get install -y xdotool
    export DISPLAY=':0.0'
    xdotool search --onlyvisible --maxdepth 1 ""
    xdotool windowmove {window_id} {posx} {posy} windowsize {window_num} {sizex} {sizey}


    This is based on a post of Stueh on Plex forum (see here)


    If you did configure Plex Media Player on a PC Screen and move next on TV Screen, it will most probably not fit that screen et the resolution will possibly not be correct. In that case, here is how I proceed:

    • Log on your RPI using any SSH console on your mobile or Tablet (I presume that your PC is not next to your TV). I am using “RaspController” on Android
    • Edit the desktop to force an error. Hence, you will fallback on the default Desktop. Type in you SSL console : sudo nano /usr/shared/xsession/plex.desktop
      • Ex.: modify this line to define an invalid path: Exec=xxx/usr/local/bin/plexmediaplayer
    • Now, restart LightDM
      • Either type this in your SSH console: sudo service lightdm restart
      • Or CTRL-ALT-Backspace on the keyboard of your RPI.
    • You will get an error message because ‘xxx/usr/local/bin/plexmediaplayer’ does not exist and next get a prompt to login.
    • Login as ‘pi’ 
    • Now, open the Start menu > Preferences > Raspberry Pi Configuration > Display (or Interfaces). If you don’t see the ‘Start menu’ because it is out of the screen, press the ‘Windows’ key on your Keyboard.

    • Next, change the resolution to fit the limitation of your TV:
      • 480p = DVD, old TV 720 x 480 pixels, format 16/9.
      • 720p = HD Ready, 1280 x 720 pixels, format 16/9.
      • 1080p = Full HD, 1920 x 1080 pixels, format 16/9.
      • 2160p, UHDTV1, 3840 x 2160 pixels, format 16/9 (a.ka. UHD-4K or 4K).
      • 4320p, UHDTV2, 7680 x 4320 pixels, format 16/9 (a.k.a UHD-8K or 8K).
    • Then, open Plex Media Player (Start Menu > …) and configure it in TV mode. If it does not fit the TV Screen, reduce the resolution.
    • Finally, log off (or restrat lightDM with CTRL-ALT-BACKSPACE) and login as ‘plex’ to also run Plex Media Player and be sure it’s also well configured.
    • Ho, yes, sure: edit again the plex.desktop to remove the xxx in the path of the EXEC setting and reboot.

    Voilà

    Loading

  • Shrink a SHR Volume and remove disks from a Synology

    I wanted to try this since years… I finally did it successfully in a virtual Synology with an array of 5 disks in a single volume using btrfs (See here for VM and btfrs).

    Click to Read More

    This is a summary of my attempts. It is based on various posts found on the web:

    • https://superuser.com/questions/834100/shrink-raid-by-removing-a-disk
    • https://unix.stackexchange.com/questions/67702/how-to-reduce-volume-group-size-in-lvm#67707
    • https://blog.reboost.net/manually-removing-a-disk-from-a-synology-raid/

    Notice that xfs File System only supports “extend” and not “reduce”. So, I only tried with etx4 and btrfs.

    Although I used a DSM with a video station, a photo station, the web station and wordpress, this was not a “real case” (most of the data were still on the first sectors of the disks). So, I would really not recommend to do this on a real NAS !!!


    Open a SSH console and enter root mode (sudo -i) to execute the commands here after.

    To identify which process is accessing a volume, we possibly need lsof (only if umount fails)

    Install OPKG : See https://www.beatificabytes.be/use-opkg-instead-of-ipkg-on-synology/

    Install lsof: /opt/bin/opkg install lsof

    Layout of the Physical Volume/Volume Group/ Logical Volumes :

    Find the Filesytem of /volume1:

    df -h

    Filesystem      Size  Used Avail Use% Mounted on
    /dev/md0        2.3G 1016M  1.2G  46% /
    none            2.0G     0  2.0G   0% /dev
    /tmp            2.0G  536K  2.0G   1% /tmp
    /run            2.0G  3.2M  2.0G   1% /run
    /dev/shm        2.0G  4.0K  2.0G   1% /dev/shm
    none            4.0K     0  4.0K   0% /sys/fs/cgroup
    cgmfs           100K     0  100K   0% /run/cgmanager/fs
    /dev/vg1000/lv   14G  3.2G  9.9G  25% /volume1

    • Show Physical Volume: pvdisplay
    • Show Volume Group: vgdisplay
    • Show Logical Volume: lvdisplay
    • Show Disks: fdisk -l

    Check if one can umount the volume1 :

    umount /dev/vg1000/lv

    umount: /volume1: target is busy
           (In some cases useful info about processes that
            use the device is found by lsof(8) or fuser(1).)

    Stop all services :

    synopkg onoffall stop

    /usr/syno/etc.defaults/rc.sysv/S80samba.sh stop

    /usr/syno/etc.defaults/rc.sysv/S83nfsd.sh stop

    /usr/syno/etc.defaults/rc.sysv/pgsql.sh stop

    /usr/syno/etc.defaults/rc.sysv/synomount.sh stop

    check which daemons are still using volume1 :

    /opt/bin/lsof | grep volume1

    COMMAND    PID  TID     USER  FD        TYPE                          DEVICE SIZE/OFF       NODE NAME
    s2s_daemo 10868         root    8u      REG               0,30    11264        608 /volume1/@S2S/event.sqlite
    synologan  8368         root  3u        REG               0,30       3072        654 /volume1/@database/synologan/alert.sqlite
    synoindex  8570         root  mem       REG               0,28                  7510 /volume1/@appstore/PhotoStation/usr/lib/libprotobuf-lite.so (path dev=0,30)
    synoindex  8570         root  mem       REG               0,28                 30143 /volume1/@appstore/VideoStation/lib/libdtvrpc.so (path dev=0,30)
    lsof       8585         root  txt       REG               0,30     147560      32161 /volume1/@entware-ng/opt/bin/lsof

    Kill those daemons :

    initctl list | grep synoindex

    synoindexcheckindexbit stop/waiting
    synoindexd start/running, process 11993

    killall synoindexd

    initctl list | grep synologan

    synologand start/running, process 8368

    killall synologand

    This is not working… synologand  restart immediately ☹

    chmod u-x /usr/syno/sbin/synologand

    killall synologand 

    killall s2s_daemon

    Shrink the ext2 or ext4 Filesystem :

    Only do the steps here under if using ext2 or ext4 instead of btfrs

    Resize the File System :

    umount -d /dev/vg1000/lv

    e2fsck -C 0 -f /dev/vg1000/lv

    e2fsck 1.42.6 (21-Sep-2012)
    Pass 1: Checking inodes, blocks, and sizes
    Pass 2: Checking directory structure
    Pass 3: Checking directory connectivity
    /lost+found not found. Create<y>? yes
    Pass 4: Checking reference counts
    Pass 5: Checking group summary information

    1.42.6-23739: ***** FILE SYSTEM WAS MODIFIED *****
    1.42.6-23739: 30742/889440 files (0.7% non-contiguous), 734048/3553280 blocks

    NB. If you want to stop e2fsck : killall -USR2 e2fsck
    NB. If you want to get a progress from e2fsck : killall -USR1 e2fsck

    resize2fs -p -M /dev/vg1000/lv

    resize2fs 1.42.6 (21-Sep-2012)
    Resizing the filesystem on /dev/vg1000/lv to 702838 (4k) blocks.
    The filesystem on /dev/vg1000/lv is now 702838 blocks long.

    If you see the error message here under, you possibly have another file system than ext2 or ext4 (E.g.: btfrs, …):

    resize2fs: Bad magic number in super-block while trying to open /dev/vg1000/lv
    Couldn't find valid filesystem superblock.

    If you have this error message although having ext2 or ext4, try: lvm lvchange –refresh /dev/vg1000/lv

    Check the results :

    mount /dev/vg1000/lv /volume1
    df -h

    Filesystem Size Used Avail Use% Mounted on
    /dev/md0 2.3G 968M 1.3G 44% /
    none 2.0G 0 2.0G 0% /dev
    /tmp 2.0G 512K 2.0G 1% /tmp
    /run 2.0G 3.0M 2.0G 1% /run
    /dev/shm 2.0G 4.0K 2.0G 1% /dev/shm
    none 4.0K 0 4.0K 0% /sys/fs/cgroup
    cgmfs 100K 0 100K 0% /run/cgmanager/fs
    /dev/vg1000/lv 2.6G 2.5G 0 100% /volume1

    Resize the Logical Volume :

    Resize the logical volume a bit larger than the file system (See the outcome of df -h above)

    umount /dev/vg1000/lv
    lvm lvreduce -L 2.7G /dev/vg1000/lv

    Rounding size to boundary between physical extents: 2.70 GiB
    WARNING: Reducing active logical volume to 2.70 GiB
    THIS MAY DESTROY YOUR DATA (filesystem etc.)
    Do you really want to reduce volume_1? [y/n]: y
    Size of logical volume vg1/volume_1 changed from 13.55 GiB (3470 extents) to 2.70 GiB (692 extents).
    Logical volume volume_1 successfully resized.

    NB: to get a progress, use : LV=/dev/vg1000/lv; echo `lvdisplay -v $LV | grep current | wc -l` `lvdisplay -v $LV | grep stale | wc -l` | awk ‘{printf ( “%3d percent Complete \n”, 100-$2/$1*100) }’

    Shrink a BTRFS File System :

    Only do the steps here under if using btfrs

    Resize the File System :

    btrfs filesystem resize 2.7G /volume1

    You can restore max size if required: btrfs filesystem resize max /volume1

    df -h

    Filesystem      Size  Used Avail Use% Mounted on
    /dev/vg1000/lv  2.6G 2.5G  1.4G  71% /volume1

    Resize the Logical Volume:

    umount -d /dev/vg1000/lv

    lvm lvreduce -L 2.7G /dev/vg1000/lv


    Next steps :

    The steps here under are both for ext2/ext4 and btfrs

    Resize the Physical Volume :

    Look for the device and if blocks must be moved:

    pvdisplay -C

    PV VG Fmt Attr PSize PFree
    /dev/md2 vg1 lvm2 a-- 13.57g 10.85g

    pvs -v –segments /dev/md2

        Using physical volume(s) on command line.
       Wiping cache of LVM-capable devices
    PV         VG     Fmt  Attr PSize  PFree   Start SSize LV   Start Type   PE Ranges
    /dev/md2   vg1000 lvm2 a--  14.00g 440.00m     0  3473 lv       0 linear /dev/md2:0-3472
    /dev/md2   vg1000 lvm2 a--  14.00g 440.00m  3473   110          0 free

    If there is a bloc trailing after the “free” part (I had not), use:

    lvm pvmove –alloc anywhere /dev/md2:xxx-xxx


    Resize the device a bit larger than the logical volume. If you don’t use a sufficient size, you will get an error message:

    pvresize –setphysicalvolumesize 2.7G /dev/md2

    /dev/md2: cannot resize to 691 extents as 695 are allocated.
    0 physical volume(s) resized / 1 physical volume(s) not resized

    pvresize –setphysicalvolumesize 2.8G /dev/md2

    Physical volume "/dev/md2" changed
    1 physical volume(s) resized / 0 physical volume(s) not resized


    Resize the array to use less disks:

    Reduce the array to use 3 disks (-n3)

    mdadm –grow -n3 /dev/md2

    mdadm: this change will reduce the size of the array.
          use --grow --array-size first to truncate array.
          e.g. mdadm --grow /dev/md2 --array-size 7114624

    You have first to reduce the array size.

    mdadm –grow /dev/md2 –array-size 7114624

    mdadm –grow -n3 /dev/md2 –backup-file /root/mdam.md2.backup &


    Monitor the progress of the resizing with:

    cat /proc/mdstat

    Personalities : [linear] [raid0] [raid1] [raid10] [raid6] [raid5] [raid4] [raidF1]md2 : active raid5 sdak5[4] sdaj5[3] sdai5[2] sdah5[1] sdag5[0]7114624 blocks super 1.2 level 5, 64k chunk, algorithm 2 [3/3] [UUU][======>..............] reshape = 31.7% (1129600/3557312) finish=0.3min speed=112960K/sec

    md1 : active raid1 sdak2[4] sdaj2[3] sdai2[2] sdah2[1] sdag2[0]2097088 blocks [12/5] [UUUUU_______]
    md0 : active raid1 sdak1[4] sdaj1[3] sdag1[0] sdah1[1] sdai1[2]2490176 blocks [12/5] [UUUUU_______]
    unused devices: <none>

    This can take a lot of time, but you can continue (I did wait 😉 )

    Finalize

    pvresize /dev/md2

    Physical volume "/dev/md2" changed
    1 physical volume(s) resized / 0 physical volume(s) not resized

    lvextend -l 100%FREE /dev/vg1000/lv

    Size of logical volume vg1/volume_1 changed from 2.70 GiB (692 extents) to 4.07 GiB (1041 extents).
    Logical volume volume_1 successfully resized.

    for btrfs:

    btrfs filesystem resize max /volume1

    for ext2/ext4:

    e2fsck -f /dev/vg1000/lv

    e2fsck 1.42.6 (21-Sep-2012)
    Pass 1: Checking inodes, blocks, and sizes

    Running additional passes to resolve blocks claimed by more than one inode...
    Pass 1B: Rescanning for multiply-claimed blocks
    Multiply-claimed block(s) in inode 13: 9221
    Pass 1C: Scanning directories for inodes with multiply-claimed blocks
    Pass 1D: Reconciling multiply-claimed blocks
    (There are 1 inodes containing multiply-claimed blocks.)

    File /@tmp (inode #13, mod time Sat May 23 23:00:14 2020)
    has 1 multiply-claimed block(s), shared with 0 file(s):
    Multiply-claimed blocks already reassigned or cloned.

    Pass 2: Checking directory structure
    Pass 3: Checking directory connectivity
    Pass 4: Checking reference counts
    Pass 5: Checking group summary information
    1.42.6-23739: 30742/179520 files (0.7% non-contiguous), 685397/720896 blocks

    Hope that no nodes are corrupted. Otherwise… well… accept to fix them.

    resize2fs /dev/vg1000/lv

    resize2fs 1.42.6 (21-Sep-2012)
    Resizing the filesystem on /dev/vg1/volume_1 to 1065984 (4k) blocks.
    The filesystem on /dev/vg1/volume_1 is now 1065984 blocks long.

    mount /dev/vg1000/lv /volume1

    Restart services:

    /usr/syno/etc.defaults/rc.sysv/S80samba.sh start

    /usr/syno/etc.defaults/rc.sysv/S83nfsd.sh start

    /usr/syno/etc.defaults/rc.sysv/pgsql.sh start

    /usr/syno/etc.defaults/rc.sysv/synomount.sh start


    synopkg onoffall start


    Remove the new  spare disks from the volume

    mdadm –detail –scan

    ARRAY /dev/md0 metadata=0.90 UUID=3b122d95:7efea8ff:3017a5a8:c86610be

    ARRAY /dev/md1 metadata=0.90 UUID=bd288153:d00708bf:3017a5a8:c86610be

    ARRAY /dev/md2 metadata=1.2 spares=2 name=DS3617_62:2 UUID=875ad2d6:956306b7:8c7ba96b:4287f6e6


    mdadm –detail /dev/md2

    /dev/md2:
           Version : 1.2
    Creation Time : Sat May 23 14:00:02 2020
        Raid Level : raid5
        Array Size : 7114624 (6.79 GiB 7.29 GB)
    Used Dev Size : 3557312 (3.39 GiB 3.64 GB)
      Raid Devices : 3
    Total Devices : 5
       Persistence : Superblock is persistent

        Update Time : Sat May 23 18:54:30 2020
             State : clean
    Active Devices : 3
    Working Devices : 5
    Failed Devices : 0
    Spare Devices : 2

             Layout : left-symmetric
        Chunk Size : 64K

               Name : DS3617_62:2  (local to host DS3617_62)
              UUID : 875ad2d6:956306b7:8c7ba96b:4287f6e6
            Events : 56

        Number   Major   Minor   RaidDevice State
          0       8        5        0      active sync   /dev/sda5
          1       8       37        1      active sync   /dev/sdc5
          2       8       53        2      active sync   /dev/sdd5
          3       8       69        -      spare   /dev/sde5
          4       8       85        -      spare   /dev/sdf5

    Here above, we see that sde5 and sdf5 are unused


    mdadm –fail /dev/md2 /dev/sde5

    mdadm: set /dev/sde5 faulty in /dev/md2

    mdadm –fail /dev/md2 /dev/sdf5

    mdadm: set /dev/sdf5 faulty in /dev/md2

    mdadm –remove /dev/md2 /dev/sde5

    mdadm: hot removed /dev/sde5 from /dev/md2

    mdadm –remove /dev/md2 /dev/sdf5

    mdadm: hot removed /dev/sdf5 from /dev/md2


    Et voilà.

    Loading

  • Add Support for SHR on Synology DS3617xs

    I wanted to test a procedure to shrink a SHR volume on a virtual Synology DS3617. Unfortunately, SHR is not an available option on the high end models of Synology. But it can be enabled easily 😉

    Click to Read More

    DS3617xs is a model where SHR is not enabled:

    0KenZdg.png

    To enable it:

    1. Open a SSH console and enter root mode.
    2. Edit the file  /etc.defaults/synoinfo.conf
    3. At the end, you should find: supportraidgroup=”yes”
    4. Comment that line with a #
    5. Next to it, add a new line with: support_syno_hybrid_raid=”yes”
    6. Reboot your Synology

    You can use “vi” to edit the file: sudo vi /etc.defaults/synoinfo.conf,

    • Press i or the insert key to make your modifications, then “Esc” to end the modifications.
    • After that type :x! to save and exit. Ot :q! to exit without saving.

    Et voilà, your DS3617xs offers now the option for SHR

    Loading

  • VMWare Workstation not compatible with Windows 10

    Starting a VM this morning, I got a new message “VMware Workstation and Device/Credential Guard are not compatible”. To be able to run my VM, I had to disable this Credential Guard.

    Click to Read More

    Credential Guard uses virtualization to store credentials in protected containers separate from the OS. As a result, the information Credential Guard protects is safe even if malware or some other malicious attack penetrates an organization’s network.

    But it prevents VMWare to run VM’s.

    To disable it, copy this script in a file named “disableCG.ps1” in your personal home folder C:\Users\<Your Name>\

    Run next a PowerShell as Administrator:

    Pay Attention that this will reboot automatically your PC !!

    In this PowerShell, execute: cd ~

    Next execute : .\disableCG.ps1 -Disable -AutoReboot

    You will see errors displayed in Red in the PowerShell. This won’t be a problem. And after a minute, the PC will reboot.

    During the reboot, you will be prompted to confirm that you really want to disable the Windows Defender Credential Guard. Press the Windows Key or F3 to confirm.


    Other options : https://windowsreport.com/disable-credential-guard-windows-10/

    Ex. Execute in a PowerShell run as Administrator: bcdedit /set hypervisorlaunchtype off


    I also had to remove “Guarded Host” and “Hyper -V” via the Control Panel > Programs > Turn Windows features on or off

    But now, Docker does not run anymore on my PC as it needs Hyper-V 🙁

    Loading

  • Best Package delivery price

    Looking for the best price to deliver a package ?

    Packlink.com allows to compare the costs for shipping parcels from everywhere to everywhere: https://www.packlink.com/

    Loading

Tags


Acer iDea 510 AirPlay Android Backup DD-WRT DNS DS209+ DS713+ DS1815+ FlexRaid Galaxy Galaxy S2 Galaxy S7 Google Assistant Google Home HTPC Kies MCE MySQL Nabi 2 Nvidia TV Shield One Plus One OnePlus One OpenHab Outlook Philips Hue Plex RAID Raspberry PI Remote Desktop Root Access Samsung Scripts Synology Team Build Visual Studio VMWare Wi-Fi Windows Windows 8 Windows 8.1 Windows 10 Windows Server 2012 XBMC Xpenology

Categories


Archives