Category: Tips

  • Shell Script for Synology not working

    You become crazy because after hours of trials and errors, your brand new (and probably first) shell script still complains about “syntax error: unexpected “fi” (expecting “then”)”, “syntax error: unexpected “fi” (expecting “then”)” or “syntax error: unexpected word (expecting “in”)”, … The problem is probably with the EOL.

    Click to Read More

    The problem could indeed be that you are editing your script with a Windows Text Editor… In such a case, you have to convert the Windows EOL (End Of Line character) into the Linux equivalent.

    Edit your script with Notepad++ and use the menu “Edit”  > “EOL Conversion” > “Unix/OSX Format”. Then save your script and try again…

    You may also have to use the ANSI encoding with the menu “Encoding” > “Convert to ANSI”

    Loading

    ,
  • Intel NUC : no more audio via HDMI after Windows Update

    I got an automatic Windows Update yesterday on my Intel NUC D54250WYK. After the reboot, I discovered that I had no “HDMI audio device” anymore, but only the “Headphone audio device”. Re-installing “Realtek Audio Drivers” didn’t solve the problem. The trick is to uninstall and re-install both the Audio Drivers AND the Graphics Drivers!

    Click to Read More

    Indeed, the connection to the TV being made through HDMI, the audio connection is managed via the Graphic Drivers.

    Get both Audio and Graphic Drivers from the Intel Download site (I.e.: “Audio: Realtek ALC Audio Driver for Intel® NUC” and “Graphics: Intel® HD Graphics Driver for Intel® NUC”).

    Et voilà.

    Loading

  • TFS TeamBuild doesn’t copy references (Assemblies)

    As a TFS administrator, I often have to solve the same issue again and again: new developers complain that referenced assemblies are not dropped by TeamBuild although locally, Visual Studio copies those references into the bin folder… The trick is to set the property “Copy Local” = “False” on the references to be copied, Save the project, reset the property “Copy Local” = “True” and Save again the project.

    Click to Read More

    We have experienced this issue at least with VS 2010 – TFS 2010 and VS 2013 – TFS 2013. I have to say I don’t remember about VS 2008 – TFS 2008  and VS 2005 – TFS 2005.

    Project’s “Copy Local” property is the one that indicates if a file reference must be copied or not in the output folder. The value of that property is stored in a tag <Private> in the project file (.csproj, .vbproj, …). Ex.: <Private>true</Private>

    The problem is that VS does not add this tag for references whose ‘Copy Local’ property is ‘true’, ‘true’ being the default value for file references added on assemblies not in the GAC. It only adds this tag if one changes the property value to ‘false’. Later, if one sets the value back to ‘true’, the tag is kept but its value is changed.

    This is a problem because MSBuild, run by TeamBuild to compile the projects, assume that the value of a “Copy Local” property is ‘False’ if the tag <Private> is not found in the project file.

    So, the trick is to force VS to add the tag for all references added with ‘Copy Local’=’true’. This can be done as explained above:  set “Copy Local” = “False” on the required references, Save the project, reset “Copy Local” = “True” and Save again the project.

    Loading

    ,
  • Increase internal storage memory for Apps on Galaxy SII

    I had two main reasons to replace my good old Galaxy SII (GT-I9100): I wanted a larger screen and much more space for the Apps. But since yesterday, only one reason remains: a larger screen. I ave indeed successfully increased the storage for the Apps from 2GB to 6GB thanks to a tutorial from “Techotv“.

    Click to Read More

    Samsung Galaxy S2 has 16GB of internal storage out of which 14GB space is available, but not the entire available capacity is usable for apps installation. Unlike modern smartphones like Galaxy S4, our galaxy S2 has two internal partition, known as Device Memory (about 2GB) and USB Storage (the rest i.e. about 12GB). Device memory is the location where apps are usually installed. USB Storage is the location where data (apps data like those of games), user files are stored. So, even though you might have lots of internal storage space available, you might face storage issues during apps installation because you’ve just about 2GB available for apps. In this tutorial, we’ll see how we can increase device memory partition and decrease usb storage partition to accommodate as many apps as we want on our beloved Galaxy s2 smartphone.

    Posted => here <= on JANUARY 3, 2014 by SAURABH

    Important Notices:

    1. This tutorial is for Samsung Galaxy SII (GT-I9100) model only !!!
    2. Backup all contents of your android phone including pictures, music, videos, call logs, SMS, etc… as this process will completely format your mobile. Possibly enable next Google’s Automatic Backup and Restore features so all your Apps, Contact, Calendar and Settings will be automatically re-installed.
      1. Go to Settings > (Personal) Back up and reset.
      2. Check the options “Backup up my data” and “Automatic restore”.
      3.  Never put all the eggs in one basket. Use another backup tool next to Google. Also notice that Calls logs, SMS, MMS are not backuped by Google.

    Prerequisites:

    1. Download Odin3 v1.85 program from Techotv and unzip it. Samsung Odin is the ROM Flashing tool for SAMSUNG Android Smart phone and tablets devices. Including Samsung Galaxy SII, etc. Other official versions are available here.
    2. Download Philz CWM Recovery for Galaxy SII from here. The ClockWorkMod Recovery (CWM) is a replacement recovery option for Android devices. It’s used as being better than the Stock android Recovery. A Recovery is a bootable partition that has the recovery console installed where you can find tools to help repair (recover) your installation as well as install system (OS) updates, delete all user data and files, etc… On Galaxy Samsung SII, you can access the Recovery by turning off the mobile and pressing next simultaneously Volume Down + Home + Power for a few seconds.
    3. Download the Partition files (PIT) from Techotv and unzip them. A PIT file is a Partition Information Table that can be used to re-partition the phone’s internal memory space.
    4. You phone doesn’t need to be rooted but this tutorial is assumed to work both if you have rooted your device or already installed a custom ROM. NB.: Android needs to be rooted to get the full control on the device, various features being indeed usually locked by default to prevent among other users’ mistakes, etc…
    5. You need a PC with the Samsung Drivers for Galaxy SII installed, otherwise the connection required by Odin to flash the mobile won’t succeed (although the mobile is detected by Odin).
      1. Install “Kies” from Samsung (available here) to get those drivers on your PC.
      2. Don’t RUN Kies after the setup. It could interfere with Odin. If required, kill all its related processes using the Task Manager (via CtrlShiftEsc).
      3. If drivers are not installed, you will be stuck within Odin on the step “<ID:0/003> SetupConnection..”

    Go go go!

    1. Launch ODIN program.
    2. Turn off your mobile.
    3. Press mobile’s Volume Down + Home + Power buttons together for few seconds.You will enter the Recovery mode.
    4. Press Volume Up key when prompted on the phone screen to continue in download mode.
    5. Connect your phone to computer. You’ll see one of the rectangular boxes in ODIN turned yellow indicating that the program has detected your phone.
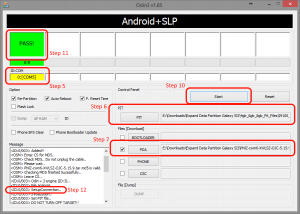
    6. Click on PIT button within Odin and select one pit file. I have chosen for the 6GB PIT file as I store anyway music and video files on micro-sd card instead of internal storage and want a lot of place for my Apps!
    7. Hit on PDA button within Odin and select Philz CWM Recovery file.
    8. Keep selected the Options “Re-Partition”, “Auto-Reboot” and “F. Reset Time”.
    9. All other Options must be unchecked.
    10. Hit on Start button.
    11. You will see Messages displayed by Odin… The process is completed once the message “<OSM> All threads completed. (succeed 1 / failed 0)” appears. You should also see a green rectangular box with the message “PASS!”.
    12. If Odin is stuck on “SetupConnection..”, try each of the following tips:
      1. Check that Samsung Drivers are installed (See “Prerequisites”) and Kies stopped.
      2. Connect your mobile on another USB port.
      3. Use a shorter USB cable.
      4. Remove the battery of your mobile for 5 minutes.
    13. Unplug your phone from computer.
    Odin Storage Extension on Galaxy SII
    Odin Storage Extension on Galaxy SII

    Check the outcomes:

    1. Go to phone storage settings and check if the device memory has increased and USB storage space adjusted accordingly. You may be required to format USB storage before it is shown in storage setting. I had to do so as requested by a notification.
    2. If the new storage setting is still not visible on your phone, then do factory reset either from recovery (volume up+home+power keys together in phone off state) or from phone settings (Setting > Backup and Reset > Factory reset). I had to do it.
    3. If storage is still not increased, flash stock Samsung firmware or custom ROM for your phone. I didn’t have to do this!

    Google started automatically to restore all my Apps, Contacts, Settings, etc… I only had to reorganize my Apps on the “desktop”…

    10.000 thx to SAURABH from Techotv.com for this tutorial. Thanks to him, I have only one more reason to buy another smart phone, which is not enough regarding my own criteria 😥

    Loading

  • SoundBlaster Audigy 2 NX USB – Cannot Unmute

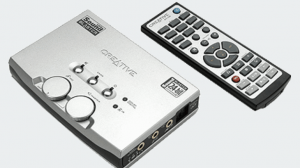
    I have a very old SoundBlaster Audigy 2 NX USB (produced in 2002) and wanted to reuse it on my laptop, as I needed an optical audio output for some testing purpose. Unfortunately, it didn’t produce any sound… until I discovered that the Main volume was disabled in the Configuration pane.

    Sound Blaster Audigy 2 NX
    Sound Blaster Audigy 2 NX

    Click to Read More

    I was first impressed that, once that external audio card plugged on my PC (Windows 8.1 x64), Windows found, downloaded and installed drivers for it. I was actually not expecting such an old card to still be supported by Windows 8.1.

    But soon I noticed the “Mute” led that was on (red). And indeed, I was unable to get sound from my speakers 🙁

    Pressing the Mute button on the card, or using the remote control to unmute the card didn’t succeed. The led never turned off.

    Finally, I found that I had to:

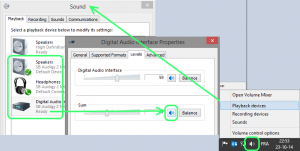
    1. Right-click the speaker icon in the systray
    2. Select “Playback devices”
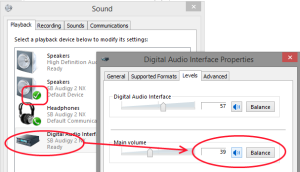
    3. Set the “Speakers” : “SB Audigy 2 NX” as “Default Device”
    4. Possibly set “Headphone” : “SB Audigy 2 NX” as “Default Communication Device”
    5. Double-click on “Digital Audio Interface” : “SB Audigy 2 NX” to access its properties
    6. Go to its tab “Levels” and enabled the speaker of the “Main Volume”, sometimes also named “Sum”. If it is already enabled, disable it first and then re-enable it!
    Config Audigy 2 NX
    Config Audigy 2 NX – named “Sum”
    Config Audigy 2 NX
    Config Audigy 2 NX – named “Main Volume”

    This is going to turn off the “Mute” led immediately. But if you press the Mute button on the card or mute it with the remote control, you will again not be able unmute it physically. You will have to redo the step 6 here above!

    Loading

    ,
  • Multiple concurrent Remote Desktop session for Win 8.1: Overwrite System Files

    I usually patch the Remote Desktop service to allow multiple simultaneous connections.But trying to do so on Win 8.1 results in an error message: “Access denied: You need permission to perform this action.”. The solution is to take owner ship of the file…

    Click to Read More

    1. First, get the patched RDP service termsrv.dll here.
    2. Then, take owner ship of the existing termsrv.dll: takeown /f C:\Windows\System32\termsrv.dll
    3. Next, grant you access on that file: cacls C:\Windows\System32\termsrv.dll /G <YourAccount>:F
    4. As termsrv.dll is currently loaded, rename it into “-termsrv.dll”
    5. Finally, copy the patched file into C:\Windows\System32\
    6. Restart the PC.

    Loading

  • Change your Reply Address in the default Android’s Email app

    When configuring the default Android’ EMail app, you have to set an “account” to access your mailbox. In most cases, you are using the email address of that mailbox. And by default, the EMail app will use that email address as the “sender” of all your mails. If you don’t want people to reply to that email address you should have set a “Reply Address” as “account“.

    Click to Read More

    You have to remove the account already created and reconfigure it:

    1. Start the Email App and open the Settings (Where you can see your account(s))
    2. Click on the “Delete” icon and select the account to be reconfigured with your “Reply Address”. Then press “Delete”.
    3. You will get a Warning like “Deleting this account also deletes all of its messages, contacts, and other data from the devices”. Be sure that all those data are also on your server so they are not lost. Only the local copy will be deleted.
    4. Now, click on the “+” icon to recreate your account.
    5. Type now your “Reply Address” as account, instead of the actual email address used to access your mailbox, with a dummy password (required to enable the “Next” button). Then, click on “Next” (possibly after ticking the option “send email from this account by default”.
    6. On the next screen, select your type of account (Pop3, IMap, Exchange)
    7. Next, as “user name”, type the email address used as actual account, with its password, to access your mailbox.
    8. Finally, complete all the other parameters as usual

    Et voilà.

    Loading

  • Asus P9X79 Pro and Surround Audio 5.1: Get sound from Side Speakers

    I have an old Creative Gigaworks ProGamer G550W – a 5.1 Surround System – connected to my Asus P9X79 Pro, and I have never been able to configure my Audio Playback Device as an actual 5.1. But I recently found a step by step procedure posted by “EomaMY” on the forum of Asus’ Republic of Gamers that works like a charm.

    Click to Read More

    The problems with the “Realtek HD Audio Manager” (installed on a clean machine, i.e. immediately after a fresh install of Windows 8.1 x64) were:

    • I had cracking noises in the Center Speaker (See here). I had no such noises with the Microsoft default drivers.
    • with the “Realtek High Definition Audio” Speakers configured as a “5.1 Surround” in the “Playback Devices” configuration pane of Windows, I never got any sound from the Speaker Pair connected either to the Rear Speaker Jack or to the Side Speaker Jack.
    • with my Speakers configured as a “7.1 Surround“, I didn’t get sound from the Speaker Pair if connected to the Rear Speaker Jack. But I got sound from this Speaker Pair if connected to the Side Speaker Jack as far as I was disabling the “Rear Pair” in the “Speaker Setup“. Unfortunately, with such a config, I was not getting any sound from the Rear Pair when playing 5.1 movies within Plex Home Theater.

    So, I did follow EomaMY’s procedure:

    1. Try and re-plug your rear cable back to the rear port.
    2. Uninstall the audio drivers.
    3. Reboot.
    4. Let windows install the standard “windows” drivers, DO NOT install the realtek drivers yet.
    5. Reboot
    6. Now install the latest Realtek audio drivers from Asus (not Realtek, those didn’t work for me). Rear cable should still be plugged in rear port.
    7. Reboot
    8. Open up Realtek control panel. Now go and change rear cable to side. A notification should pop out.
    9. Test the 5.1 setup.

    5.1 works now fine, including with Plex, and without cracking sounds in the Center Speaker anymore  8)

    I did copy/paste here above the procedure of EomaMY. Only notice that I used the Audio Drivers 6.0.1.7335 found on Asus Support webpage for Notebook. This version is more recent than the Audio Drivers 6.0.1.7023 found on the specific Asus Support webpage for P9X79 Pro.

    Notice that it’s physically correct to plug the 5.1 “Rear Speakers” in the “Side Speaker Jack”! Indeed, “surrounds” have always been on the sides but nomenclature and general usage vary and confuses the terms. Reading information from Dolby.com, I keep in mind that:

    • In a 5.1 system, the ‘Surrounds’ are on the sides.
    • In a 7.1 system, the ‘Surrounds’ are on the sides while the ‘Rears’ are the ‘Surround Back’.

    Loading

  • Replacing RAID-F by T-RAID

    T-RAID (for Transparent RAID) is a new product of flexRAID. It comes as another option next to the existing product: RAID-F (RAID over File System). I did migrate from Raid-F to T-RAID months ago…

    T-RAID
    T-RAID

    Here is how I configure it now in order to get the best performances for my server and my own usage.

    Click to Read More

    Nice Features

    I love T-RAID. It has great features similar to RAID-F, e.g.:

    • Software Raid Array fully independent from the hardware.
      • If a physical controller die, no need to replace it with another identical one.
    • Support adding a disk with existing data into the Software Raid Array.
      • No need to add blank disk as required with hardware raid or with Windows Storage Server.
    • Survive to simultaneous failure of several drives.
    • Access each disk through a virtual disk or through a Pool offering a unique/global view on all the virtual disks.

    But it comes with its own advantages on RAID-F

    • It’s a native Real-Time protection without any drawback compared to “RAID-F RealTime” (E.g.: RAID-F in RT mode MUST be stopped gracefully before shutting down the machine)
    • Data on failing disks are still accessible in Read and Write mode! There is therefore no downtime during the “disk reconstruction” (Similar to hardware Raid)
    • It comes with interesting monitoring and notification tools (Performances, S.M.A.R.T, …)
    • It comes with Storage Accelerations.
      • Currently, a “Landing Zone”: use of a SSD as a temporary storage. Files copied into the array are dropped onto the SDD and transferred later, in background, to the array.
      • Soon, “SSD caching”.

    RAID Options

    Once Physical Drives “Registered as Pass-Through”, to be used as DRU or PPU, and added into a “RAID Configuration (defining hence an “Array”), one can set various options on that “Configuration”

    Options:

    • Auto Start Array=false. Because I don’t always turn on my PC to access the data stored in the T-RAID array. Bu also because I often change settings in my Configuration for testing purpose and changes may often not be applied if the array is already running…
    • Global Hot-Spare Rebuild=false. This is the recommended value as human interaction is preferred on automatic rebuild in case of disk failure
    • Read-Only Policy=Never. This is the default and authorize writing on all disks in the array, even on disks failing.
    • Scheduled Range Operation Size (in GB)=100. I didn’t fine-tune this default value yet (taking into account e.g. how much data can be validated per hours when the server is on). Actually, I turn my server on only a few times per month, to do massive backups. Once the backups completed, I start a complete Validation of the array and configure the system to shutdown on completion.
    • Statistics: File=true, RAID=true. I want indeed to monitor my system. But File Statistics requires a Job to be scheduled for the Storage!

    Performance Options:

    • Performance Profile=PERFORMANCE. Because my server is only on when I want to do backups, I don’t care about saving disks/energy. On the opposite, I care about performance and this profile provides indeed noticeable improvements at disk access speed level.
    • Concurrency Queuing (CQ) Depth=64, Salt=16. Salt is use in the algorithm managing “concurrency” within T-RAID.  System could experience lock overrides if the salt is too high and constant out of sync blocks if it is too low. The perfect values depends on the hardware… So, as long as “out of sync blocks” are reported during “Verify and Sync” tasks, increase the salt. But look into the “RAID Monitoring” tab for the graphic “Lock Override“, if the value is increasing drastically, lower the salt!
    • OS Caching=false. I don’t use this one as it doesn’t help to keep high performances when copying files larger than the amount of RAM, which is the case for me. In addition, the PERFORMANCE mode is not guarantee to be efficient with “OS Caching”=true when using multiple PPU, which is also the case for me.
    • Tagged Command Queuing (TCQ)=true, Depth=32. I am using this option to improve performances as it’s compatible with the PERFORMANCE mode while using multiple PPU. It allow up to 90% of source disk write speed.
    • Sequential Write Optimization (SWO)=true, Depth=8. I keep those default values.
    • Direct I/O=true. I also keep those default values.

    Storage Options:

    • Auto Storage Pooling Start=false, Delay=15. Notice that it’s recommended to never access the virtual disks directly (assigning them with a drive letter). Instead, using only the Pool add an extra visualization layer which makes hot-unplugging much less issue prone. But I often change settings in my Configuration for testing purpose and changes may often not be applied if the pool is already running…
    • Removable=false. This settings must be set on false on Windows Server 2012 Essentials.
    • Storage Pool Caching=META_DATA_ONLY, Max=310. I noticed that performances are much better when using this setting instead of File_AND_META_DATA for copy of large files, which is the case for me.
    • Sync Folder Last Modified Date=false. I would enable this only if I use a program tracking file modification date (Ex.: sync or backup daemon)
    • Thread Pool Size=32. I keep this default
    • Space Management Reserve (in GB)=50. I keep this default.
    • File Management Strategy=STRICT_FOLDER_PRIORITY. I want to keep all files together even if it’s not “energy optimal”. Indeed, in case of disaster, I will at least easily retrieve related files on disks still “alive”…
    • File System=NTFS, strict ACL Mode=false. I keep those defaults
    • Drive Letter or Folder Mount Point=V. This is the letter to be assigned to the Pool. It is shared to be accessible from other machine in my Intranet
    • Native NFS Support=false. I keep this default.
    • Volume Label: tRAID Storage Pool

    Advanced Operations

    • Storage Acceleration. I don’t use it so far as the write performances are good enough for me and anyway, I don’t keep my server up and running 24/7. So I want to know when I can switch it off (I.e.: when the transfers are really completed). Using the Storage Acceleration, the SSD used as Landing Zone would never be flushed in my case… I indeed only turn the server on when I want to backup huge amount of data…

    S.M.A.R.T

    • For each disks on a LSI SAS controller, I have to set an “Advanced Mapping”
      • Device Path Mapping: /dev/pdx where x is the disk id
      • DeviceType Mapping: sat
    • For each disks, I also enable SMART Monitoring (every 4 hours) except when disks are in standby.

    Notes

    • Write performances are a lot impacted by the performances of the PPU. The best disks should be used as PPU instead of DRU.
    • To increase Read Performances, the File Management Strategy has better be ROUN_ROBIN as it enables I/O parallelism.
    • Never Defrag or Chkdsk the “Pool Drive” or “Source (physical) Drives”. Defrag instead the “NZFS (Virtual) Drives”. That being said:
      • I really try to avoid doing a Defrag as so-far, I am not yet 100% convinced that, on my system, it does not results “blocks out of sync” (I.e.: requires a Verify&Sync). For that reason, I have disabled the automatic-daily-defrag; E.g.: Turn off the Windows Disk Defragmenter Schedule (See FlexRaid’s Wiki) or uncheck the automatic optimization on concerned drives in O&O Defrag. Pay attention that new NZFS disk appearing when the array start can be taken automatically into account by the defrag tool.
      • Defrag, if done, should never be executed on several disk simultaneously (See FlexRaid’s wiki).
      • If you do a Defrag, you better stop the Pool or at least imperatively disable “Storage Pool Caching”.
      • I didn’t succeed to do a Chkdsk on the “NZFS Drives” and had to bring the “Source Drives” online to repair them… Once repaired, a Verify&Sync is mandatory! (NB.: One thing to try is dis-engaging driver protection mode. asit blocks certain low level operations. Unfortunately, it’s not recommended to run disk tools on the transparent disks with driver protection dis-engaged).
    • When a Verify task fails, it provides the exact first and last byte failure as well as the amount of 4KB blocks. One can then start an “Range Specific Operation” to Verify&Sync the specified zone.
      • Notice that first/last position of failure is in Bytes while the “Range Specific Operation” can be in KB, MB, etc… 1KB = 1024B).
      • Notice also that the Verify&Sync updates complete blocks (4KB) and will therefore possible report different addresses (first byte of the updated block) than the Verify Task!

    Loading

  • LSI_SAS2 and Disk Warnings in the System Event Log

    I noticed that there are a lot of Warnings issued from my LSI controllers in the eventlogs. LSI support told me that this can be due to failing disks, but in my case it could be something else, related to my SMART monitoring tool…

    Click to Read More

    Concretely, I have two LSI SAS Controllers: a LSI SAS 9211-8i and a LSI SAS 9201-16i. Both have been updated with the Firmware 19.00.00.00 and I am using the drivers version 2.0.72.0 for Windows x64: LSI Adapter SAS2 2008 Falcon and LSI Adapter SAS 2 2116 Metero ROC(E). I didn’t upgrade the bios of those cards as more recent versions are not compatible with my motherboard (See here).

    I often noticed “Warnings” related to my two LSI adapters (with “LSI_SAS2” as a source) in my Event Log; either “Reset to device, \Device\RaidPort1, was issued.” or “Reset to device, \Device\RaidPort2, was issued.”. Those Warnings are usually followed by one or two other Warnings like “The IO operation at logical block address 0 for Disk 0 was retried.” with “disk” as a source. The address and the disk number vary a lot but the Warnings appear very precisely every 180 seconds (3 minutes)

    I read on the web that this is usually due to a timeout on accessing the disk and resulting in the controller to be reset. This issue is often solved by using the “High Performance” Power Plan Power with the option “PCI Express” > “Link State Power Management” set to “Off” ! But it didn’t solve my own issue.

    I have therefore contacted LSI support and was told that “The resets are to the drives which are timing out. It is possible one or more of them have an issue. Replace the drive that has the highest number of resets on his port.”

    I have the issue mostly with all my disks, so I didn’t know where to start… especially as according to their SMART status, they were all definitively perfect. Could it therefore be due to the cables ? No idea yet… But looking once more the SMART details, I noticed that the Warnings where typically logged when I was refreshing those status.

    I am using CrystalDiskInfo which is IMO definitively the best free SMART Monitoring tool… It is e.g. configured on my PC to send emails as soon as an SMART alert occurs… and… it is configured to check the SMART status every 3 minutes ! Gosh ! A refresh rate of 180 seconds?! That rings a bell and even a siren! I immediately disabled the SMART Monitoring and didn’t get any Warning anymore. Trying other SMART tools, I noticed the same issue…

    I did submit my findings to LSI and wait now on their feedback: is there any conflict at LSI SAS adapter level when accessing data on disk at the same time as the disk’s SMART info?

    That being said, I noticed also that most 99% of the Warnings are related to my 5 Seagate ST3000DM001. I seldom have Warnings for my Samsung HD204UI (patched to avoid data corruption when accessing SMART info!)

    Loading