Category: Tips

  • Torch switching on auto-magically on One Plus One

    From time to time, the torch of my One Plus One (running Cyanogen) was turning on “by itself”, although the screen was switched off. I finally figured out why and how: it was due to a “Gesture shortcut” that was enabled…

    Click to Read More

    I never enabled this Gesture feature explicitly, so I presume it was on by default. But when enabled, drawing a V on the screen, even if this one is turned off, switches the torch on (or off is already on)…

    This gesture (as well as other gestures) can be disabled via: Settings > Gestures

    Loading

  • One Plus One: rotate not working although enabled

    I recently noticed that chrome was not rotating anymore when I was turning my mobile, a One Plus One (running Cyanogen). I tried to disable and re-enable the feature “rotate” via the upper Menu Bar, without success. The trick is to authorize all the rotation angles: only 0° was enabled…

    Click to Read More

    No idea how 90°, 180° and 270° were disabled, but that was my issue. Clearly, enabling the feature “rotate” with only the angle 0° is totally useless…

    To authorize various rotation angles, go to: Settings > Display and lights > Rotation. And there, enable the various mode.

    Et voila!

    Loading

  • “Alt Gr” not working: cannot type characters like backslash, arobas, etc… anymore

    I was close to bite my keyboard when I found the reason why I was not able to type characters like \, @, .. on my AZERTY keyboard on Windows 7 (Belgium/french) : it was due to the Remote Desktop window.

    Click to Read More

    When there is an application opened on your desktop that handles keys pressed to forward these events, you can sometimes not type some extended characters anymore (I.e.: characters that require special key combinations). It happened to me for characters to be typed with Alt-Gr.

    This happens with applications like Remote Desktop (RDP)/Terminal Services and Virtual Box (VirtualPC/VMWare/Hyper-V/…)… Those applications handles indeed the key combination to possibly forward them to the Virtual Box/Remote PC.

    For some users, it happens when the application is in full screen or minimized. In my case, RDP was windowed (i.e. neither maximized nor minimized)…

    As soon as I closed RDP, the key Alt-Gr came back.

    An alternative could have been to use CTRL-ALT instead as this is another shortcut for Alt-Gr !

    Loading

  • Sound-bar + HTPC + TV: where to connect a headset ?

    In some cases, I want to use a headset to watch TV, the movies being played either by my HTPC, by the TV itself (internal receiver) or an external TV decoder. In some case, there is a sound-bar connected to the TV (via HDMI-ARC) or between the player and the TV. Where to connect my headset has been a source of headache until a professional audio dealer gave me the “universal” solution: a “Digital to Analog Audio converter”.

    Click to Read More

    Why this question is such an issue?

    1. First, because the sound-bar I am using has no audio out for a headset (i.e: a “AUX” connector). Otherwise, that would have been the logical place to connect the headset.
    2. Next, because I gave up to use the TV “AUX” audio out for headset:
      1. If a sound-bar is connected between the player and the TV, this last one automatically mutes its speakers and I don’t get any sound via the headset. It’s maybe possible to force the sound on the TV, but I didn’t find any such option (neither on the TV nor on the sound-bar).
      2. If the player is connected directly on the TV (when I don’t use a sound-bar), I have to unplug the headset each time I don’t use it. The headset is indeed automatically detected by the TV if it is plugged and the speakers are muted. This is really not practical.
      3. I didn’t try with the player connected directly to the TV and the TV connected to the sound-bar via HDMI-ARC (which could maybe work: i.e.: have sound via both audio output) as I gave up trying to use the TV audio “AUX”. Indeed, I have a Samsung TV with a really crappy audio “AUX” connector. The signal coming out is so poor that my wireless headset regularly switches off as detecting no good signal anymore.
    3.  Finally, because using the HTPC audio “AUX” connector is far from practical.
      1. To use the headset, I have to reconfigure the Audio Device in Windows which is set by default to use the HDMI audio output (specific graphic drivers being used to send the sound via the HDMI connector).
      2. And when I unplug the headset, I have again to reconfigure the Audio Device to used the HMDI otherwise I get no sound anymore.Switching back to HDMI is indeed not automatic.
      3. Also, this solution only works when watching a movies with my HTPC, not when watching a broadcast on the TV itself or from any other external player…

    The best solution is to connect a “Digital to Analog Audio converter” on the optical output of the TV.

    Analog to Digital Audio Converter
    Analog to Digital Audio Converter
    • Albeit using a player directly connected on the TV, or when watching a broadcast directly received be the TV tuner, I simply have to mute the TV Speakers (or the sound-bar when one connected via HDMI-ARC). The sound continues to be flowed through the Optical output and I can regulate the volume directly on my headset.
    • I didn’t try yet and will do so asap… but if the sound-bar is used and connected between the player and the TV, the sound should also still be flowed from the sound-bar to the TV though HDMI and next to the Optical Audio output. Only the Speakers and the Audio “Aux” should be muted… [to be continued]

    IMPORTANT NOTICES 

    • Choose a Converter supporting all compressed audio formats such as Dolby Digital (AC3) and DTS 5.1. Some don’t fully support e.g. DTS and this could be very disappointing. Ex.: When using Smart Apps such as Plex or DS Video (from Synology) on a Samsung Smart TV, playing direct sound, the Converter will have to support correctly all the formats also supported by the TV and therefore not transcoded by Plex or  Synology.
    • To have sounds via both the HDMI-ARC and the Optical output, you may have to reconfigure some TV parameters. Ex.: on my Samsung Smart TV I had to set “Audio Output” = “Receiver” (instead of “Speakers”, …) and maybe set “Audio Format” = “PCM” (instead of DTS Neo 2:5). NB.: When using a Smart App, this one is able to change the “Audio Format” (via the Samsung API). I.e.: if you set “PCM” because “Dolby” is not supported by your Converter, an App like Plex could set it back to Dolby when direct playing a movie using that format…

    I have tried a KanaaN (Digital to Analog Audio Converter): it was really not great… No support of DTS and continuous “noises” within Smart Apps (until one starts a movie)

    I have now a Fiio DAC Audio USB D07. It supports both DD and DTS with great quality, works with all my TV channels (including HD such a TF1 HD in France) and produces no “noises” when using Smart Apps (like Plex, DS Audio, Youtube, Netflix, …) even with the volume of the headset at a high level.

    Loading

  • Shell Script for Synology not working

    You become crazy because after hours of trials and errors, your brand new (and probably first) shell script still complains about “syntax error: unexpected “fi” (expecting “then”)”, “syntax error: unexpected “fi” (expecting “then”)” or “syntax error: unexpected word (expecting “in”)”, … The problem is probably with the EOL.

    Click to Read More

    The problem could indeed be that you are editing your script with a Windows Text Editor… In such a case, you have to convert the Windows EOL (End Of Line character) into the Linux equivalent.

    Edit your script with Notepad++ and use the menu “Edit”  > “EOL Conversion” > “Unix/OSX Format”. Then save your script and try again…

    You may also have to use the ANSI encoding with the menu “Encoding” > “Convert to ANSI”

    Loading

    ,
  • Intel NUC : no more audio via HDMI after Windows Update

    I got an automatic Windows Update yesterday on my Intel NUC D54250WYK. After the reboot, I discovered that I had no “HDMI audio device” anymore, but only the “Headphone audio device”. Re-installing “Realtek Audio Drivers” didn’t solve the problem. The trick is to uninstall and re-install both the Audio Drivers AND the Graphics Drivers!

    Click to Read More

    Indeed, the connection to the TV being made through HDMI, the audio connection is managed via the Graphic Drivers.

    Get both Audio and Graphic Drivers from the Intel Download site (I.e.: “Audio: Realtek ALC Audio Driver for Intel® NUC” and “Graphics: Intel® HD Graphics Driver for Intel® NUC”).

    Et voilà.

    Loading

  • TFS TeamBuild doesn’t copy references (Assemblies)

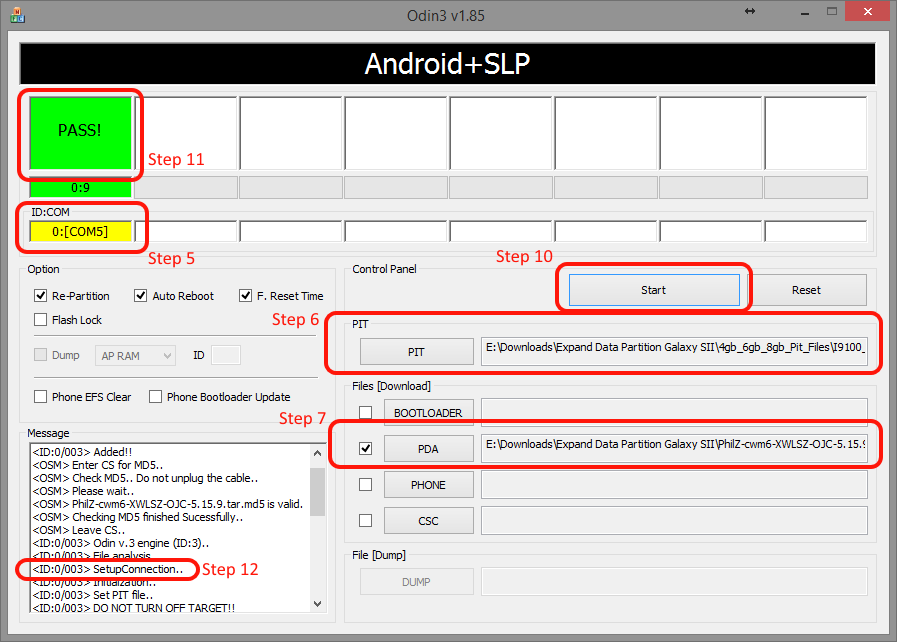
    As a TFS administrator, I often have to solve the same issue again and again: new developers complain that referenced assemblies are not dropped by TeamBuild although locally, Visual Studio copies those references into the bin folder… The trick is to set the property “Copy Local” = “False” on the references to be copied, Save the project, reset the property “Copy Local” = “True” and Save again the project.

    Click to Read More

    We have experienced this issue at least with VS 2010 – TFS 2010 and VS 2013 – TFS 2013. I have to say I don’t remember about VS 2008 – TFS 2008  and VS 2005 – TFS 2005.

    Project’s “Copy Local” property is the one that indicates if a file reference must be copied or not in the output folder. The value of that property is stored in a tag <Private> in the project file (.csproj, .vbproj, …). Ex.: <Private>true</Private>

    The problem is that VS does not add this tag for references whose ‘Copy Local’ property is ‘true’, ‘true’ being the default value for file references added on assemblies not in the GAC. It only adds this tag if one changes the property value to ‘false’. Later, if one sets the value back to ‘true’, the tag is kept but its value is changed.

    This is a problem because MSBuild, run by TeamBuild to compile the projects, assume that the value of a “Copy Local” property is ‘False’ if the tag <Private> is not found in the project file.

    So, the trick is to force VS to add the tag for all references added with ‘Copy Local’=’true’. This can be done as explained above:  set “Copy Local” = “False” on the required references, Save the project, reset “Copy Local” = “True” and Save again the project.

    Loading

    ,
  • Increase internal storage memory for Apps on Galaxy SII

    I had two main reasons to replace my good old Galaxy SII (GT-I9100): I wanted a larger screen and much more space for the Apps. But since yesterday, only one reason remains: a larger screen. I ave indeed successfully increased the storage for the Apps from 2GB to 6GB thanks to a tutorial from “Techotv“.

    Click to Read More

    Samsung Galaxy S2 has 16GB of internal storage out of which 14GB space is available, but not the entire available capacity is usable for apps installation. Unlike modern smartphones like Galaxy S4, our galaxy S2 has two internal partition, known as Device Memory (about 2GB) and USB Storage (the rest i.e. about 12GB). Device memory is the location where apps are usually installed. USB Storage is the location where data (apps data like those of games), user files are stored. So, even though you might have lots of internal storage space available, you might face storage issues during apps installation because you’ve just about 2GB available for apps. In this tutorial, we’ll see how we can increase device memory partition and decrease usb storage partition to accommodate as many apps as we want on our beloved Galaxy s2 smartphone.

    Posted => here <= on JANUARY 3, 2014 by SAURABH

    Important Notices:

    1. This tutorial is for Samsung Galaxy SII (GT-I9100) model only !!!
    2. Backup all contents of your android phone including pictures, music, videos, call logs, SMS, etc… as this process will completely format your mobile. Possibly enable next Google’s Automatic Backup and Restore features so all your Apps, Contact, Calendar and Settings will be automatically re-installed.
      1. Go to Settings > (Personal) Back up and reset.
      2. Check the options “Backup up my data” and “Automatic restore”.
      3.  Never put all the eggs in one basket. Use another backup tool next to Google. Also notice that Calls logs, SMS, MMS are not backuped by Google.

    Prerequisites:

    1. Download Odin3 v1.85 program from Techotv and unzip it. Samsung Odin is the ROM Flashing tool for SAMSUNG Android Smart phone and tablets devices. Including Samsung Galaxy SII, etc. Other official versions are available here.
    2. Download Philz CWM Recovery for Galaxy SII from here. The ClockWorkMod Recovery (CWM) is a replacement recovery option for Android devices. It’s used as being better than the Stock android Recovery. A Recovery is a bootable partition that has the recovery console installed where you can find tools to help repair (recover) your installation as well as install system (OS) updates, delete all user data and files, etc… On Galaxy Samsung SII, you can access the Recovery by turning off the mobile and pressing next simultaneously Volume Down + Home + Power for a few seconds.
    3. Download the Partition files (PIT) from Techotv and unzip them. A PIT file is a Partition Information Table that can be used to re-partition the phone’s internal memory space.
    4. You phone doesn’t need to be rooted but this tutorial is assumed to work both if you have rooted your device or already installed a custom ROM. NB.: Android needs to be rooted to get the full control on the device, various features being indeed usually locked by default to prevent among other users’ mistakes, etc…
    5. You need a PC with the Samsung Drivers for Galaxy SII installed, otherwise the connection required by Odin to flash the mobile won’t succeed (although the mobile is detected by Odin).
      1. Install “Kies” from Samsung (available here) to get those drivers on your PC.
      2. Don’t RUN Kies after the setup. It could interfere with Odin. If required, kill all its related processes using the Task Manager (via CtrlShiftEsc).
      3. If drivers are not installed, you will be stuck within Odin on the step “<ID:0/003> SetupConnection..”

    Go go go!

    1. Launch ODIN program.
    2. Turn off your mobile.
    3. Press mobile’s Volume Down + Home + Power buttons together for few seconds.You will enter the Recovery mode.
    4. Press Volume Up key when prompted on the phone screen to continue in download mode.
    5. Connect your phone to computer. You’ll see one of the rectangular boxes in ODIN turned yellow indicating that the program has detected your phone.
    6. Click on PIT button within Odin and select one pit file. I have chosen for the 6GB PIT file as I store anyway music and video files on micro-sd card instead of internal storage and want a lot of place for my Apps!
    7. Hit on PDA button within Odin and select Philz CWM Recovery file.
    8. Keep selected the Options “Re-Partition”, “Auto-Reboot” and “F. Reset Time”.
    9. All other Options must be unchecked.
    10. Hit on Start button.
    11. You will see Messages displayed by Odin… The process is completed once the message “<OSM> All threads completed. (succeed 1 / failed 0)” appears. You should also see a green rectangular box with the message “PASS!”.
    12. If Odin is stuck on “SetupConnection..”, try each of the following tips:
      1. Check that Samsung Drivers are installed (See “Prerequisites”) and Kies stopped.
      2. Connect your mobile on another USB port.
      3. Use a shorter USB cable.
      4. Remove the battery of your mobile for 5 minutes.
    13. Unplug your phone from computer.
    Odin Storage Extension on Galaxy SII
    Odin Storage Extension on Galaxy SII

    Check the outcomes:

    1. Go to phone storage settings and check if the device memory has increased and USB storage space adjusted accordingly. You may be required to format USB storage before it is shown in storage setting. I had to do so as requested by a notification.
    2. If the new storage setting is still not visible on your phone, then do factory reset either from recovery (volume up+home+power keys together in phone off state) or from phone settings (Setting > Backup and Reset > Factory reset). I had to do it.
    3. If storage is still not increased, flash stock Samsung firmware or custom ROM for your phone. I didn’t have to do this!

    Google started automatically to restore all my Apps, Contacts, Settings, etc… I only had to reorganize my Apps on the “desktop”…

    10.000 thx to SAURABH from Techotv.com for this tutorial. Thanks to him, I have only one more reason to buy another smart phone, which is not enough regarding my own criteria 😥

    Loading

  • SoundBlaster Audigy 2 NX USB – Cannot Unmute

    I have a very old SoundBlaster Audigy 2 NX USB (produced in 2002) and wanted to reuse it on my laptop, as I needed an optical audio output for some testing purpose. Unfortunately, it didn’t produce any sound… until I discovered that the Main volume was disabled in the Configuration pane.

    Sound Blaster Audigy 2 NX
    Sound Blaster Audigy 2 NX

    Click to Read More

    I was first impressed that, once that external audio card plugged on my PC (Windows 8.1 x64), Windows found, downloaded and installed drivers for it. I was actually not expecting such an old card to still be supported by Windows 8.1.

    But soon I noticed the “Mute” led that was on (red). And indeed, I was unable to get sound from my speakers 🙁

    Pressing the Mute button on the card, or using the remote control to unmute the card didn’t succeed. The led never turned off.

    Finally, I found that I had to:

    1. Right-click the speaker icon in the systray
    2. Select “Playback devices”
    3. Set the “Speakers” : “SB Audigy 2 NX” as “Default Device”
    4. Possibly set “Headphone” : “SB Audigy 2 NX” as “Default Communication Device”
    5. Double-click on “Digital Audio Interface” : “SB Audigy 2 NX” to access its properties
    6. Go to its tab “Levels” and enabled the speaker of the “Main Volume”, sometimes also named “Sum”. If it is already enabled, disable it first and then re-enable it!
    Config Audigy 2 NX
    Config Audigy 2 NX – named “Sum”
    Config Audigy 2 NX
    Config Audigy 2 NX – named “Main Volume”

    This is going to turn off the “Mute” led immediately. But if you press the Mute button on the card or mute it with the remote control, you will again not be able unmute it physically. You will have to redo the step 6 here above!

    Loading

    ,
  • Multiple concurrent Remote Desktop session for Win 8.1: Overwrite System Files

    I usually patch the Remote Desktop service to allow multiple simultaneous connections.But trying to do so on Win 8.1 results in an error message: “Access denied: You need permission to perform this action.”. The solution is to take owner ship of the file…

    Click to Read More

    1. First, get the patched RDP service termsrv.dll here.
    2. Then, take owner ship of the existing termsrv.dll: takeown /f C:\Windows\System32\termsrv.dll
    3. Next, grant you access on that file: cacls C:\Windows\System32\termsrv.dll /G <YourAccount>:F
    4. As termsrv.dll is currently loaded, rename it into “-termsrv.dll”
    5. Finally, copy the patched file into C:\Windows\System32\
    6. Restart the PC.

    Loading