When going to travel for hours by car with my kids, I usually copy some cartoons on their tablets before leaving. A question which arose recently was: how to play a movie from one tablet on the others, while there is no network in the car. Answer: using BubbleUPnP and Wifi-Direct.
Click to Read MoreClick to Close
The question arose as I forgot once to copy cartoons on one of the tablets. Being in the car, I had no Wi-Fi network to connect the devices (no wireless router). And I didn’t want to use a mobile data connection as, being in a foreign country, the cost would have been excessive. So I had to find another solution.
Looking on internet how to share media or files between two devices without Wi-Fi access point, I found that the modern way to go was: wifi-direct.
Connecting devices via wifi-direct was easy as natively supported by Android, as well as iOS (one can find many how-to on internet). But next, how to access the media on other devices was more tricky.
Usually, on mobile devices, I am using:
Plex connected via internet to play media from my NAS.
Plex to play media synced locally on the device.
Plex to play media synced on another device with Plex «advertised» on the LAN, by that device, as a server (see settings of Plex on the mobile device).
Archos Video to play media available locally (internal or external strorage) or via FTP, SMB shares or UPnP.
Possibly MX Player to play media while directly browsing the storage of the device.
I also used to play media via UPnP with MediaHouse as, just like Plex and Archos Video, it is managing libraries of movies with metadata automatically fetched from internet. But that was before getting support for UPnP within Archos Video.
As Archos Video and Plex are IMO, the very best apps to manage libraries of movies, my hope was to use them. Unfortunately, none of them was able to access media on the other devices using Wi-Fi direct… Plex didn’t see the Plex servers running on the other devices, and Archos Video didn’t even display any menu to access media via network. I think that none of them was aware there was actually a network (WLAN Direct).
As I read that UPnP over Wi-Fi direct was very well supported (it’s now a standard), I thought that a solution could be to use an upnp server/client. My favorite being BubbleUPnP, I gave it a try. And good news, it works like a charm. I was able to play the same cartoon simultaneously on three devices without any hiccup (with MX Video as a player).
That being said, I wrote to the developer of Archos Video and on the Plex forum to ask if playing video with their app via wifi Direct was actually supported (with a trick) or would be soon or later…
After updating my Synology with the latest version of the DNS Server, this one was not resolving my domain names anymore. I had to reset to “resolution service” to solve that issue.
Click to Read MoreClick to Close
To access my blog, hosted on my NAS, from my intranet but using its public domain name, I had to define the same domain name on my DNS Server, with A records pointing to the NAS’ IP… (see details here).
When my DNS Server does not run anymore, trying to access my blog from my intranet, using its domain name, I get the web page of my ADSL Modem. Is IP address is indeed the one obtained when resolving my domain name using a public DNS Server.
To check if my DNS Server runs fine, I simply had to run a dos cmd prompt and type ping www.beatificabytes.be. If I get the local IP of my NAS, it works fine. If I get the public IP of my ADSL modem, there is something wrong…
It’s not the first time that I have this issue after updating my DSM or the DNS Server. But each time, the solution is the same: I have to uncheck and recheck the options “Enable resolution services” in my Synology’s “Control Panel > DNS Server > Resolution” settings.
NB.: I have next to reboot my mobile devices. on PC, possibly execute “ipconfig /release” and then “ipconfig /renew” in a command prompt.
I wanted to play with the Recovery and the Rom of my Nabi 2 and I ended with a bricked tablet. Trying to boot the OS, I was stuck for ever on the screen with a freezed Nabi logo. Trying to boot the Recovery, I was stuck on a screen with a dead android and an exclamation mark. Here is how to solve that situation.
Click to Read MoreClick to Close
Prerequisites
First, be sure that the “Universal ADB Drivers” are installed. To be found here or here. the ADB command is available here. ADB documentation exists here. ADB won’t work if “USB debugging” was not enabled on the device. But it was, for sure, if as me your bricked it…
Then, get a TWRP Recovery image from here that can be installed without the need for a previous version. I took the TWRP 2.2.2.1 which is the only one that works fine with my Nabi 2 due to a Calibration issue with the other versions. As not available anymore from the page mentioned above (with all versions for Nabi 2), I had to take it from the Auto-Installer mentioned here (from the subfolder twrp/old).
Restore a Recovery
Now, connect the Nabi 2 on the PC and reboot the Nabi 2 in “Fastboot” mode:
Press volume + and hold it while pressing also Power.
Use Volume – to select “Fastboot” and select it with Volume +
Next, open a command prompt as admin on the PC and type:
fastboot flash recovery.img
Wait for the image to be loaded and reboot the device by pressing Volume + (to Select Bootloader) and next twice Volume – and once Volume + (to Select “Recovery Kernel”). The “Recovery” should now load (not be blocked anymore with a dead android) !
Upgrade to the most recent Recovery
One can now upgrade TWRP to a version which may only be installed on top of an existing one, such as the TWRP 2.8.5.0. I took the TWRP 2.8.5.0 v2 for KitKat here.
I went again into the “FastBoot” mode and uploaded the new Recovery image (TWRP 2.8.5.0) before restarting to enter the new Recovery Kernel.
Flash a stock Rom
And once in TWRP, I did “Backup” it on the SD card!
I moved next the SD card into my PC, I went to the folder \TWRP\BACKUPS\<id of my table>\<current date> and delete all the files in there.
Then, I downloaded the stock Rom 3.0.13 for KitKat (3013stock.zip) here and did unzip it in the backup folder before moving the SD back into the tablet.
I did reboot again the tablet in the Recovery and once there I did a “Restore” (keeping all items selected).
Once flashed, I did reboot the System (without installing SuperSU). After ~1 minute, the Logo started to spin and after ~2 other minutes the system started to initialize. After ~5 minutes, it was asking me to pick a language and configure the Wifi.
Et voilà FIXED !!!
Android is now 4.4.2, Build Bumber KOT49H, Product Version 3.0-release-keys.
The only version of TWRP that was previously compatible with my tablet Fuhu Nabi 2 was TWRP 2.2.2.1 due to a calibration bug (See Here). But I just found that TWRP 2.8.5.0 works fine!
Click to Read MoreClick to Close
My tablet was running:
Fuhu Nabi 2-NV7A-US
Version Android 4.1.1
Kernel 3.1.10-g160ecc9-dirty
Build JRO03C
Product Version 2.3-release-keys
As I still have Android 4.1.1 (Jelly Bean) on my Nabi 2, I did get the Jelly Bean version of TWRP 2.8.5.0 mentioned here as I still have Android 4.1.1 on my Nabi 2.
Then, I did unzip the “Twrp-recovery-JBNV7AUS-285.zip” into the Auto-Installer’s subfolder “twrp\new” and renamed it from “twrp-recovery.img” into “recovery.img” (replacing the existing img file).
Finally, I run RecoveryUpdater.bat and pick the option 1: “1. Install TWRP 2.3.3.0 for Nabi versions 1.9.37 (recommended)“.
It pushed the image I just copied into the subfolder “twrp/new” on my Nabi 2 and Bingo 😉
In the part titled “Debugging”, tick the option ‘USB Debugging’ and answer OK if prompted to confirm
Now Plug the tablet into the PC and Run “Kingo Root” on the PC:
Kingo Root starts with the message “Not Connected”.
Then it immediately continues with “connecting…”
And finally it displays the name of the connected device “LENOVO A5500-F” with the messages “Mode Normal”, “Root Status : No”
On the tablet, you see a picture with “Kingo Root” and the message “USB connected”
If you have a prompt from the tablet to authorize the PC to connect on the tablet, accept it 😉
You are ready to start rooting the tablet!
Press the Button “Root” in “Kingo Root”.
It starts to root the device. On the tablet, you see the message “Rooting…”
After a few minutes, the tablet will reboot automatically a first time (you will hear the sound of disconnection/re-connection on the PC). Wait until “Kingo Root” redetect the tablet. As soon as rededected, it will check that it’s well rooted. During that operation, the picture with “Kingo Root” reappears on the tablet.
If you see a prompt from Google on the tablet, to check that the device has no security issue, just refuse it.
After the first reboot, “Kingo Root” saw that my device was not yet rooted and it continued with installing more stuff… Soon later, the tablet rebooted again automatically and “Kingo Root” restarted the same process. Concretely, it did the same routine 5 times (I.e. it rebooted five times) before announcing that the device was successfully rooted.
Something weird however… Although Kingo Root” pretended that the device was rooted, “Root Checker” told me it’s not the case ?!
I did restart “Kingo Root” and pressed “Root Again”. It did some updates but didn’t reboot automatic and Bingo ! “Root Checker” now confirmed that it was rooted.
NB.: you should be prompted to confirm that “Root Checker” may be granted Root Access by KingoUser.
It took me a bit more than 30 minutes.
NB.: Later, I did update the device with Build Number A5500F_A442_000_027_141207_ROW to Build Number A5500F_A442_000_029_150408_ROW and I had to re-root the device! It went fast and without any reboot. (NB.: I had to accept again to grant Root Access to Root Checker for KingoUser).
I just bought the new Raspberry Pi 2 to run Rasplex (Plex + OpenElec) within my Home Theater System. The only question I had was: would I be able to use the remote of my amplifier to control Rasplex. The answer is yes, it works !
Yamaha-HTR-4067
Click to Read MoreClick to Close
My Home Theater System includes:
A amplifier Yamaha HTR-4067
Speakers Eltax Monitor 91 HC with
two floor-standing speakers Eltax Monitor IX
two speakers Eltax Monitor I
one speaker Eltax Monitor Center
A subwoofer Yamaha NS-SW200
A projector BenQ W1070+
A Raspberry Pi 2 with RasPlex
NB.:
The Raspberry is connected on the “HDMI 1 (BD/DVD)” input.
I had to change the HDMI cable to use one certified “High Speed with Ethernet”.
I had to turn on first the Amplifier, next the projector, and finally the Raspberry.
When starting, Rasplex :
Detects the “Pulse-Eight CEC adapter”
Updates the CEC adapter configuration
And finally displays a message: “connected: TV-HTR-4067”
Within Plex:
I went to “> Preferences > Change Preferences for System”
I selected “Input Devices” and then “Peripherals”
There, Plex displays info about the “CEC adapter”. I did click on “Ok” to enter the settings of that adapter. There, I have the following settings:
Enabled is ticked
Make XBMC the active source when stating is not ticked
“Device to power on…” is none
“Device to pwoer off…” is none
“Send inactive source…” is ticked
“Put device in standby…” is not ticked
“When the TV is switched off” is “Ignore”
“Put device in standby” is not ticked
“Use the TV’s language setting” is not ticked
“Pause playback” is ticked
“Physical address (overrules HDMI port)” is 0
“Com port” is –
Notice: when the amplifier is switched off (standby), the video is still forwarded to the projector, as well as the sound. But what’s great is that the remote control still works too via CEC !!!
From time to time, the torch of my One Plus One (running Cyanogen) was turning on “by itself”, although the screen was switched off. I finally figured out why and how: it was due to a “Gesture shortcut” that was enabled…
Click to Read MoreClick to Close
I never enabled this Gesture feature explicitly, so I presume it was on by default. But when enabled, drawing a V on the screen, even if this one is turned off, switches the torch on (or off is already on)…
This gesture (as well as other gestures) can be disabled via: Settings > Gestures
I recently noticed that chrome was not rotating anymore when I was turning my mobile, a One Plus One (running Cyanogen). I tried to disable and re-enable the feature “rotate” via the upper Menu Bar, without success. The trick is to authorize all the rotation angles: only 0° was enabled…
Click to Read MoreClick to Close
No idea how 90°, 180° and 270° were disabled, but that was my issue. Clearly, enabling the feature “rotate” with only the angle 0° is totally useless…
To authorize various rotation angles, go to: Settings > Display and lights > Rotation. And there, enable the various mode.
“ACPI-On-Lan” is a package I have created for my Synology DS 713+ (also tested on my DS 3612sx).
It installs a website that list all your network devices. Depending on the OS, you can possibly send a sleep, shutdown or hibernate command to the device. ACPI-On-Lan tries also to reach each device (using a ping) and checks if there is a default web page accessible on the device (Ex. a configuration or administration page). Finally, it can send Wake-On-Lan magic packets to wake-up devices currently switched off.
Click to Read MoreClick to Close
Disclaimer
This package is a prototype made for learning purpose. I did test many development techniques and libraries I never touched before: ajax/jquery, boostrap, .Net click-once deployment, creation of Synology spk packages, WebAPI/Microsoft .Net Owin, Newtonsoft.Json, running shell commands from php, etc… So don’t expect the most amazing bits out of there. It’s just this well known Big Ball of Mud 😳
This is not a beta version (even not an alpha), which would be well designed. My prototype is a Quick and Dirty App made of various pieces of code dropped together. It must be complete rewritten properly or at least deeply re-factored. Briefly said, I don’t want my name to be associated with this ugly mess (even if most scientists seem to produce such a code :D).
Nevertheless, and although still really incomplete (as most prototypes), it works on my own NAS and I have already been asked to share it. So, here it is:
Some details
A few details on ACPI-On-Lan’s basics first:
it reuses the login cgi module of the Synology to authenticate the user
it parses the ARP table of the Synology to find the devices available on the LAN.
it pings the devices using the “inetutil” library (from ipkg)
it does not use any database
it stores all the details about the network devices in a file with json format. If you plan to uninstall the package, you must backup those files manually first.
for hibernate, sleep, standby, restart Windows PC, it talk to a Windows Service hosting WebAPI services.
this Windows Service was intended to be deployed via click-once. Because I didn’t want to resign the click-once setup for each new deployment url, the Windows Service is installed now via MSI. However, the Windows Service is still self-installing (simply run the exe once and it will do the complete setup)
all commands (ping, WOL, …) are executed server side (by the NAS). So the Web UI can be used from the WAN without requiring direct access to each devices on the LAN.
Notice also that:
the web UI doesn’t render well on mobiles.
there is not support yet to shutdown MAC, LINUX or ANDROID devices. I am planning to look how to use RPC commands (later this year 😉 )
Windows mobiles are not yet supported.
there are still some bugs when refreshing the status of some devices and a wrong state can sometimes be displayed. Also an action to “shutdown” the NAS is displayed although not yet implemented.
it’s not possible to define a specific port for the website possibly hosted on a device (Ex.: a custom local port of a port forwarded from the modem/router in order to access the device from the WAN)
I have to yet filled the spk’s “texts” files to translate the package.
Prerequisite:
You will have to install the package ‘inetutil’ on your NAS. This is required to be able to ping the devices while not running as super user (i.e.: ‘root’).
The package ‘inetutil’ can be easily installed via the graphic interface “IpkgGUI” once IPKG is installed. And there are many tutorial on the web to install IPKG. If you are not afraid, you can try my own installation script*, described here (“IpkgGUI” is a graphical interface to manage IPKG packages. It is available as a Community Package for Synology on https://www.cphub.net)
(*) Notice that you can install the package “ACPI-On-Lan” first and than connect on your NAS via telnet. The script to install IPKG is deployed with “ACPI-On-Lan”. Once connected, run: sh /var/packages/AcpiOnLan/target/application/service/installipkg.sh
If you want to be able to send Sleep/Restart/Hibernate/shutdown command to Windows PC, you will need the Microsoft .Net Framework 4.5. This service is not required if you only want to send WOL commands to Windows machines.
Setup:
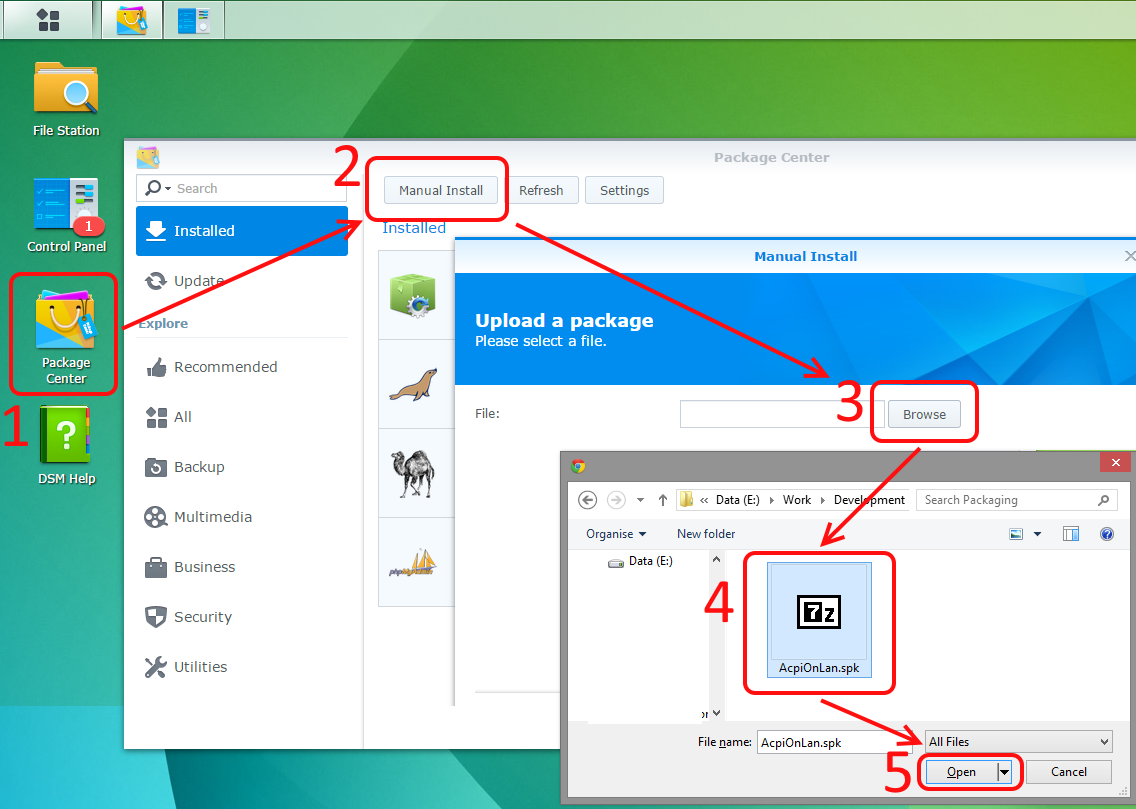
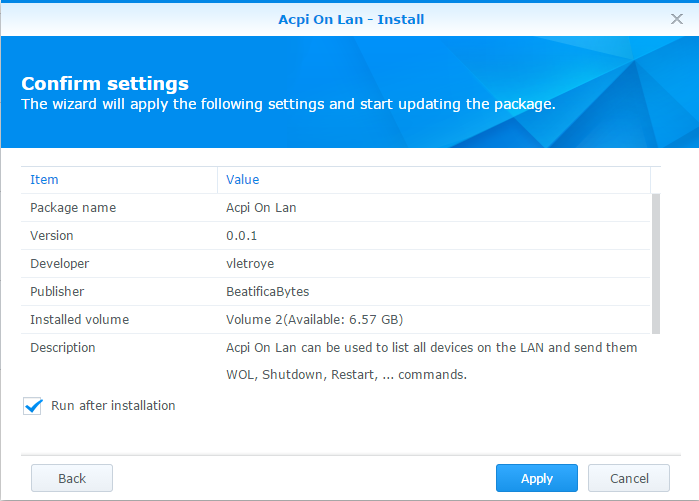
1) Download the package attached at the bottom of this page and install it manually via the “Package Manager” of Synology. 5 clicks and ~that’s it~.
Manual Installation of ACPI On Lan
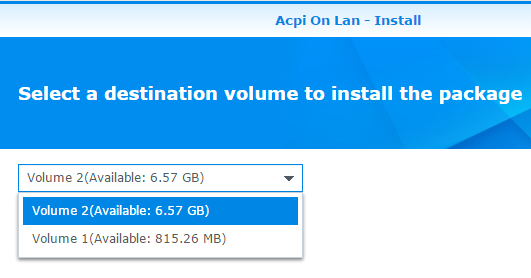
2) It can theoretically be installed on any volume (if you have several).
Install On Any Volume
3) And you can “run it after installation”
The setup of the package will mainly:
deploy the sources under /var/packages/AcpiOnLan/
the web application will be in /var/packages/AcpiOnLan/target/application
all the data of AcpiOnLan will be stored next to the web application in a file named Computers.json
create a php alias AcpiOnLan to “redirect” the http calls into the folder here above
force open_basedir = null for the new web site “AcpiOnLan”
add an icon into the DSM Start Menu
Acpi On Lan Icon
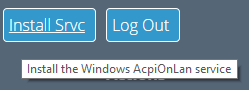
4) Once ACPI-On-Lan opened in a browser, you will have access to a menu “install srvc”. Click on it to download the MSI which installs the Windows Service (Do this on Windows only!).
Install AcpiOnLan Windows Service
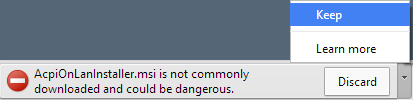
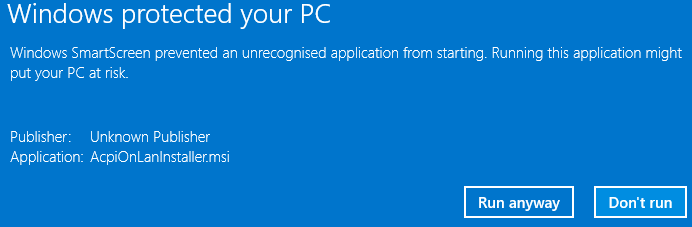
5) The download of AcpiOnLanInstaller.msi will most probably be blocked by your browser/antivirus as it’s not a common download. If you want it, you have to accept the download (“Keep” within Chrome)
AcpiOnLanInstaller Blocked
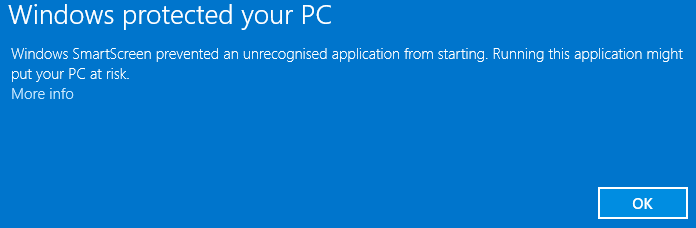
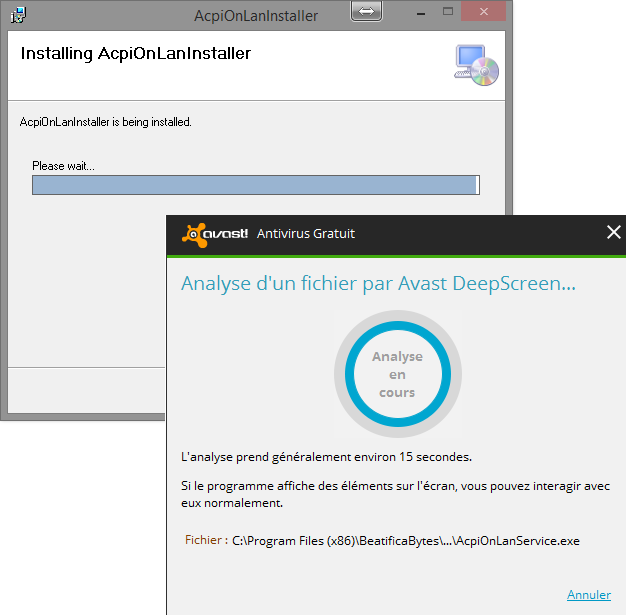
6) Once you run the msi, recent version of Windows will also prevent its execution
AcpiOnLanInstaller Stopped by Windows
7) You will have to approve the installation by clicking on “More Info” here above and then “Run Anyway”
AcpiOnLanInstaller Forced
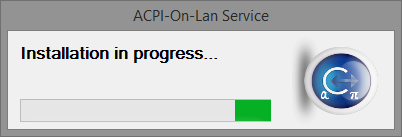
8) Once the msi is running, it will copy the required files and do a first run of the service. When the service is run interactively (it’s the case when run by rom the msi), it install/uninstall itself instead of starting WebAPI Services. But it means that the antivirus will again react. Due to installation timeout this could disturb the setup…
AcpiOnLanInstaller AntiVirus
9) The Windows Service will be installed and will register itself the port the url where it will run its WebAPI services (It uses ‘netsh’ for that purpose)
Installation
Et voilà, the Windows Service should now be running.
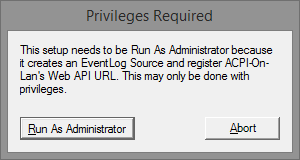
IMPORTANT NOTICE 1: as the Windows Service was designed to be deployed via Click-Once, it was not assumed to be launched “As Administrator” directly (An exe “run” via Click-Once can by the way not require elevated rights). So, if run without such rights, the exe of the Windows Service will stop itself automatically and restarts “As Administrator” (You could be prompted to provide adhoc credentials).
Previledge Required
IMPORTANT NOTICE 2: when the Windows Service is installed via the msi, NEVER run the exe yourself from a command prompt of from the Windows Explorer. Again because the service has not been designed to be installed via a msi (with ‘installutil’ tool or with an installer class) a “self-installation/uninstallation” process has been foreseen if and only if the exe is run “interactively”. So, if you run the exe after the installation of the msi, it will do a self-uninstallation of the service.You have to run it once more to reinstall it.
IMPORTANT NOTICE 3: The worst wase occurs if you run the exe once ad then uninstall the msi via the Control Panel > Add & Remove Programs. Indeed the msi will simply run the exe which will actually do a self-reinstallation of the service. So you will still have the service defined in the “Local Services” but neither the exe nor the entry in “Add & Remove Programs” anymore. To fix this, Quickly reinstall the msi, which will do a self-uninstallation of the service. Than run the exe interactively (from Windows Explorer) to redo a self-installation of the service. And you will end with the service defined in the “Local Services”, the exe available and the entry in “Add & Remove Programs” (which can now be used to safely uninstall the service). Sorry for that. I will improve the process to prevent the msi to put such a mess asap.
Quick guide:
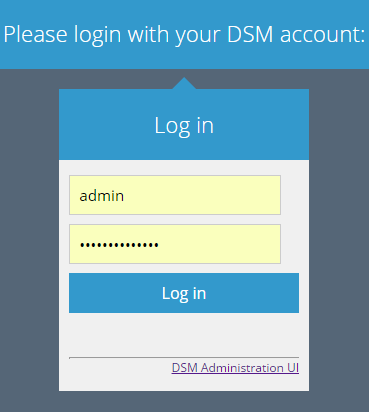
1) When you access Acpi-On-Lan, you have to log in with a DSM account
AcpiOnLan Login
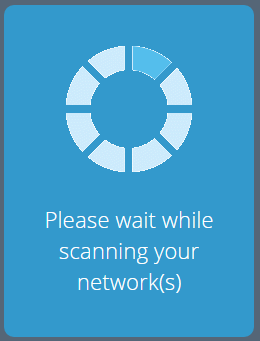
2) When you run Acpi-On-Lan for the very first time, it will search for your LAN (possibly one per Ethernet port on your NAS)
AcpiOnLan Looking For Network
3) Next, it will scan the LAN(s) (look into the ARP table)
AcpiOnLan Scanning Network
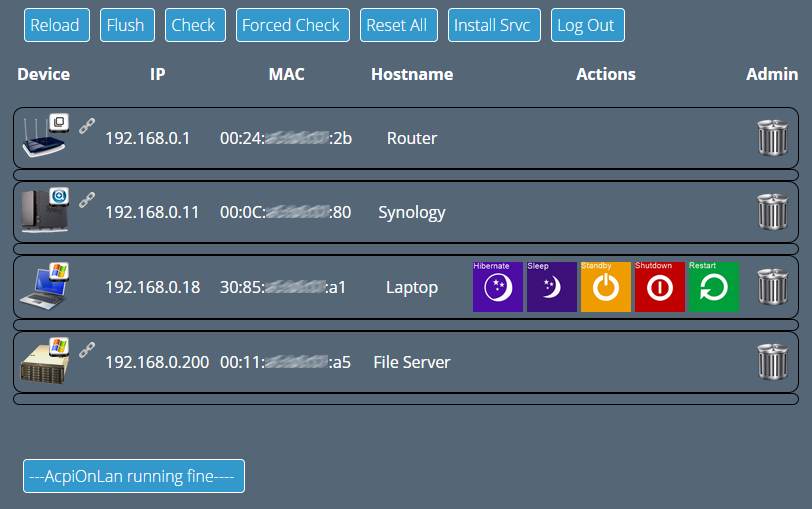
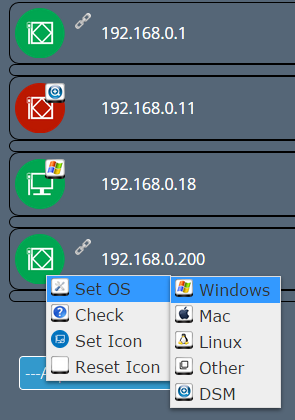
4) Finally, it will display a list of network devices found. For each device, you will have to “Set the OS” and “Set an Icon” (Except if you are happy with the default icons).
AcpiOnLan Set OS and Icon
5) If there is an hyperlink symbol next to a device, it means that there is a we page available. You can click on it. Also to refresh the status of a device, you can use the menu “Check”.
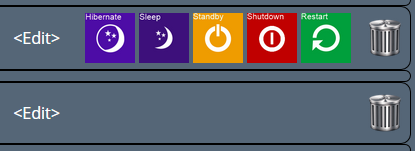
6) Depending on the OS:
if the device if on, you will have actions to Hibernate, Sleep, Standby, Shutdown or Restart the device.
Once you have clicked on an action, an Abort action is made available for a few second.
If the device is off, you will only have a Wol action.
The recycle bin can be used to hide a device and you can edit the name of the device.
AcpiOnLan Actions
7) Finally, you have various menu
AcpiOnLan Menu
Reload: will reload the list of devices (and add newly detected ones if any)
Flush: will empty the ARP table and reload the list of devices (you will have to ‘reload’ again until all the devices appear. Possibly ping manually your devices from a telnet session to populate the ARP table… I will possibly add such a feature in the UI soon or later)
Check: check the status of all the devices displayed in the list not checked since 5 minutes. Notice: up to 3 devices are checked simultaneously by the UI (limitation for mobile devices slow to execute jquery)
Forced Check: check the status of all the devices displayed in the list even if checked within the latest 5 minutes.
Reset All: delete all the devices from the list (including your customization like icons/OS/hostnames). The network will net be rescanned. Notice that your previous data will actually be backuped in a subfolder “backups” and named Computers.x.json. You can manually restore them.
Show All: will show all devices previously hidden by clicking on its recycle bin. Clicking again on its recycle bin will un-hide the device.
Hide: Hide all devices marked to be hidden (to be used after the menu Show All)
Log Out: guess 😉
NOTICE: your devices will be listed only if they have been switched-on at least one and in touch with the NAS during that time (I.e.: if they have been added into the ARP table). Some devices although switched-on are never in touch with the NAS. EX.: power lines Ethernet adapters, … I will plan a procedure to ping all the IP in the LAN so all such devices are touched (if switched-on). In the mean time, you will have to ping them yourself from a telnet session. Ex.: ping -c 1 192.168.0.1