I had two main reasons to replace my good old Galaxy SII (GT-I9100): I wanted a larger screen and much more space for the Apps. But since yesterday, only one reason remains: a larger screen. I ave indeed successfully increased the storage for the Apps from 2GB to 6GB thanks to a tutorial from “Techotv“.
Click to Read More
Samsung Galaxy S2 has 16GB of internal storage out of which 14GB space is available, but not the entire available capacity is usable for apps installation. Unlike modern smartphones like Galaxy S4, our galaxy S2 has two internal partition, known as Device Memory (about 2GB) and USB Storage (the rest i.e. about 12GB). Device memory is the location where apps are usually installed. USB Storage is the location where data (apps data like those of games), user files are stored. So, even though you might have lots of internal storage space available, you might face storage issues during apps installation because you’ve just about 2GB available for apps. In this tutorial, we’ll see how we can increase device memory partition and decrease usb storage partition to accommodate as many apps as we want on our beloved Galaxy s2 smartphone.
Posted => here <= on JANUARY 3, 2014 by SAURABH
Important Notices:
- This tutorial is for Samsung Galaxy SII (GT-I9100) model only !!!
- Backup all contents of your android phone including pictures, music, videos, call logs, SMS, etc… as this process will completely format your mobile. Possibly enable next Google’s Automatic Backup and Restore features so all your Apps, Contact, Calendar and Settings will be automatically re-installed.
- Go to Settings > (Personal) Back up and reset.
- Check the options “Backup up my data” and “Automatic restore”.
- Never put all the eggs in one basket. Use another backup tool next to Google. Also notice that Calls logs, SMS, MMS are not backuped by Google.
Prerequisites:
- Download Odin3 v1.85 program from Techotv and unzip it. Samsung Odin is the ROM Flashing tool for SAMSUNG Android Smart phone and tablets devices. Including Samsung Galaxy SII, etc. Other official versions are available here.
- Download Philz CWM Recovery for Galaxy SII from here. The ClockWorkMod Recovery (CWM) is a replacement recovery option for Android devices. It’s used as being better than the Stock android Recovery. A Recovery is a bootable partition that has the recovery console installed where you can find tools to help repair (recover) your installation as well as install system (OS) updates, delete all user data and files, etc… On Galaxy Samsung SII, you can access the Recovery by turning off the mobile and pressing next simultaneously Volume Down + Home + Power for a few seconds.
- Download the Partition files (PIT) from Techotv and unzip them. A PIT file is a Partition Information Table that can be used to re-partition the phone’s internal memory space.
- You phone doesn’t need to be rooted but this tutorial is assumed to work both if you have rooted your device or already installed a custom ROM. NB.: Android needs to be rooted to get the full control on the device, various features being indeed usually locked by default to prevent among other users’ mistakes, etc…
- You need a PC with the Samsung Drivers for Galaxy SII installed, otherwise the connection required by Odin to flash the mobile won’t succeed (although the mobile is detected by Odin).
- Install “Kies” from Samsung (available here) to get those drivers on your PC.
- Don’t RUN Kies after the setup. It could interfere with Odin. If required, kill all its related processes using the Task Manager (via Ctrl–Shift–Esc).
- If drivers are not installed, you will be stuck within Odin on the step “<ID:0/003> SetupConnection..”
Go go go!
- Launch ODIN program.
- Turn off your mobile.
- Press mobile’s Volume Down + Home + Power buttons together for few seconds.You will enter the Recovery mode.
- Press Volume Up key when prompted on the phone screen to continue in download mode.
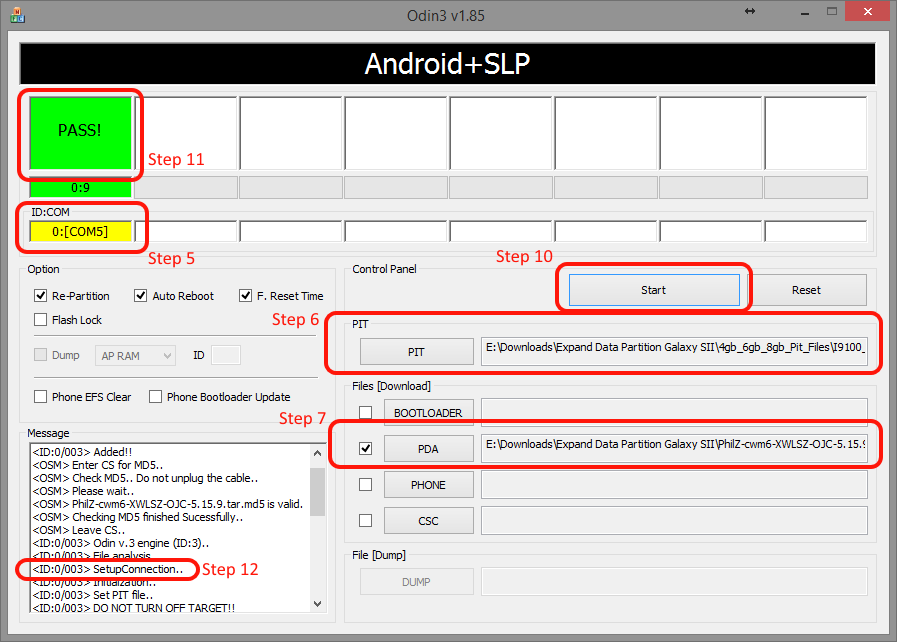
- Connect your phone to computer. You’ll see one of the rectangular boxes in ODIN turned yellow indicating that the program has detected your phone.
- Click on PIT button within Odin and select one pit file. I have chosen for the 6GB PIT file as I store anyway music and video files on micro-sd card instead of internal storage and want a lot of place for my Apps!
- Hit on PDA button within Odin and select Philz CWM Recovery file.
- Keep selected the Options “Re-Partition”, “Auto-Reboot” and “F. Reset Time”.
- All other Options must be unchecked.
- Hit on Start button.
- You will see Messages displayed by Odin… The process is completed once the message “<OSM> All threads completed. (succeed 1 / failed 0)” appears. You should also see a green rectangular box with the message “PASS!”.
- If Odin is stuck on “SetupConnection..”, try each of the following tips:
- Check that Samsung Drivers are installed (See “Prerequisites”) and Kies stopped.
- Connect your mobile on another USB port.
- Use a shorter USB cable.
- Remove the battery of your mobile for 5 minutes.
- Unplug your phone from computer.
Check the outcomes:
- Go to phone storage settings and check if the device memory has increased and USB storage space adjusted accordingly. You may be required to format USB storage before it is shown in storage setting. I had to do so as requested by a notification.
- If the new storage setting is still not visible on your phone, then do factory reset either from recovery (volume up+home+power keys together in phone off state) or from phone settings (Setting > Backup and Reset > Factory reset). I had to do it.
- If storage is still not increased, flash stock Samsung firmware or custom ROM for your phone. I didn’t have to do this!
Google started automatically to restore all my Apps, Contacts, Settings, etc… I only had to reorganize my Apps on the “desktop”…
10.000 thx to SAURABH from Techotv.com for this tutorial. Thanks to him, I have only one more reason to buy another smart phone, which is not enough regarding my own criteria 😥
![]()