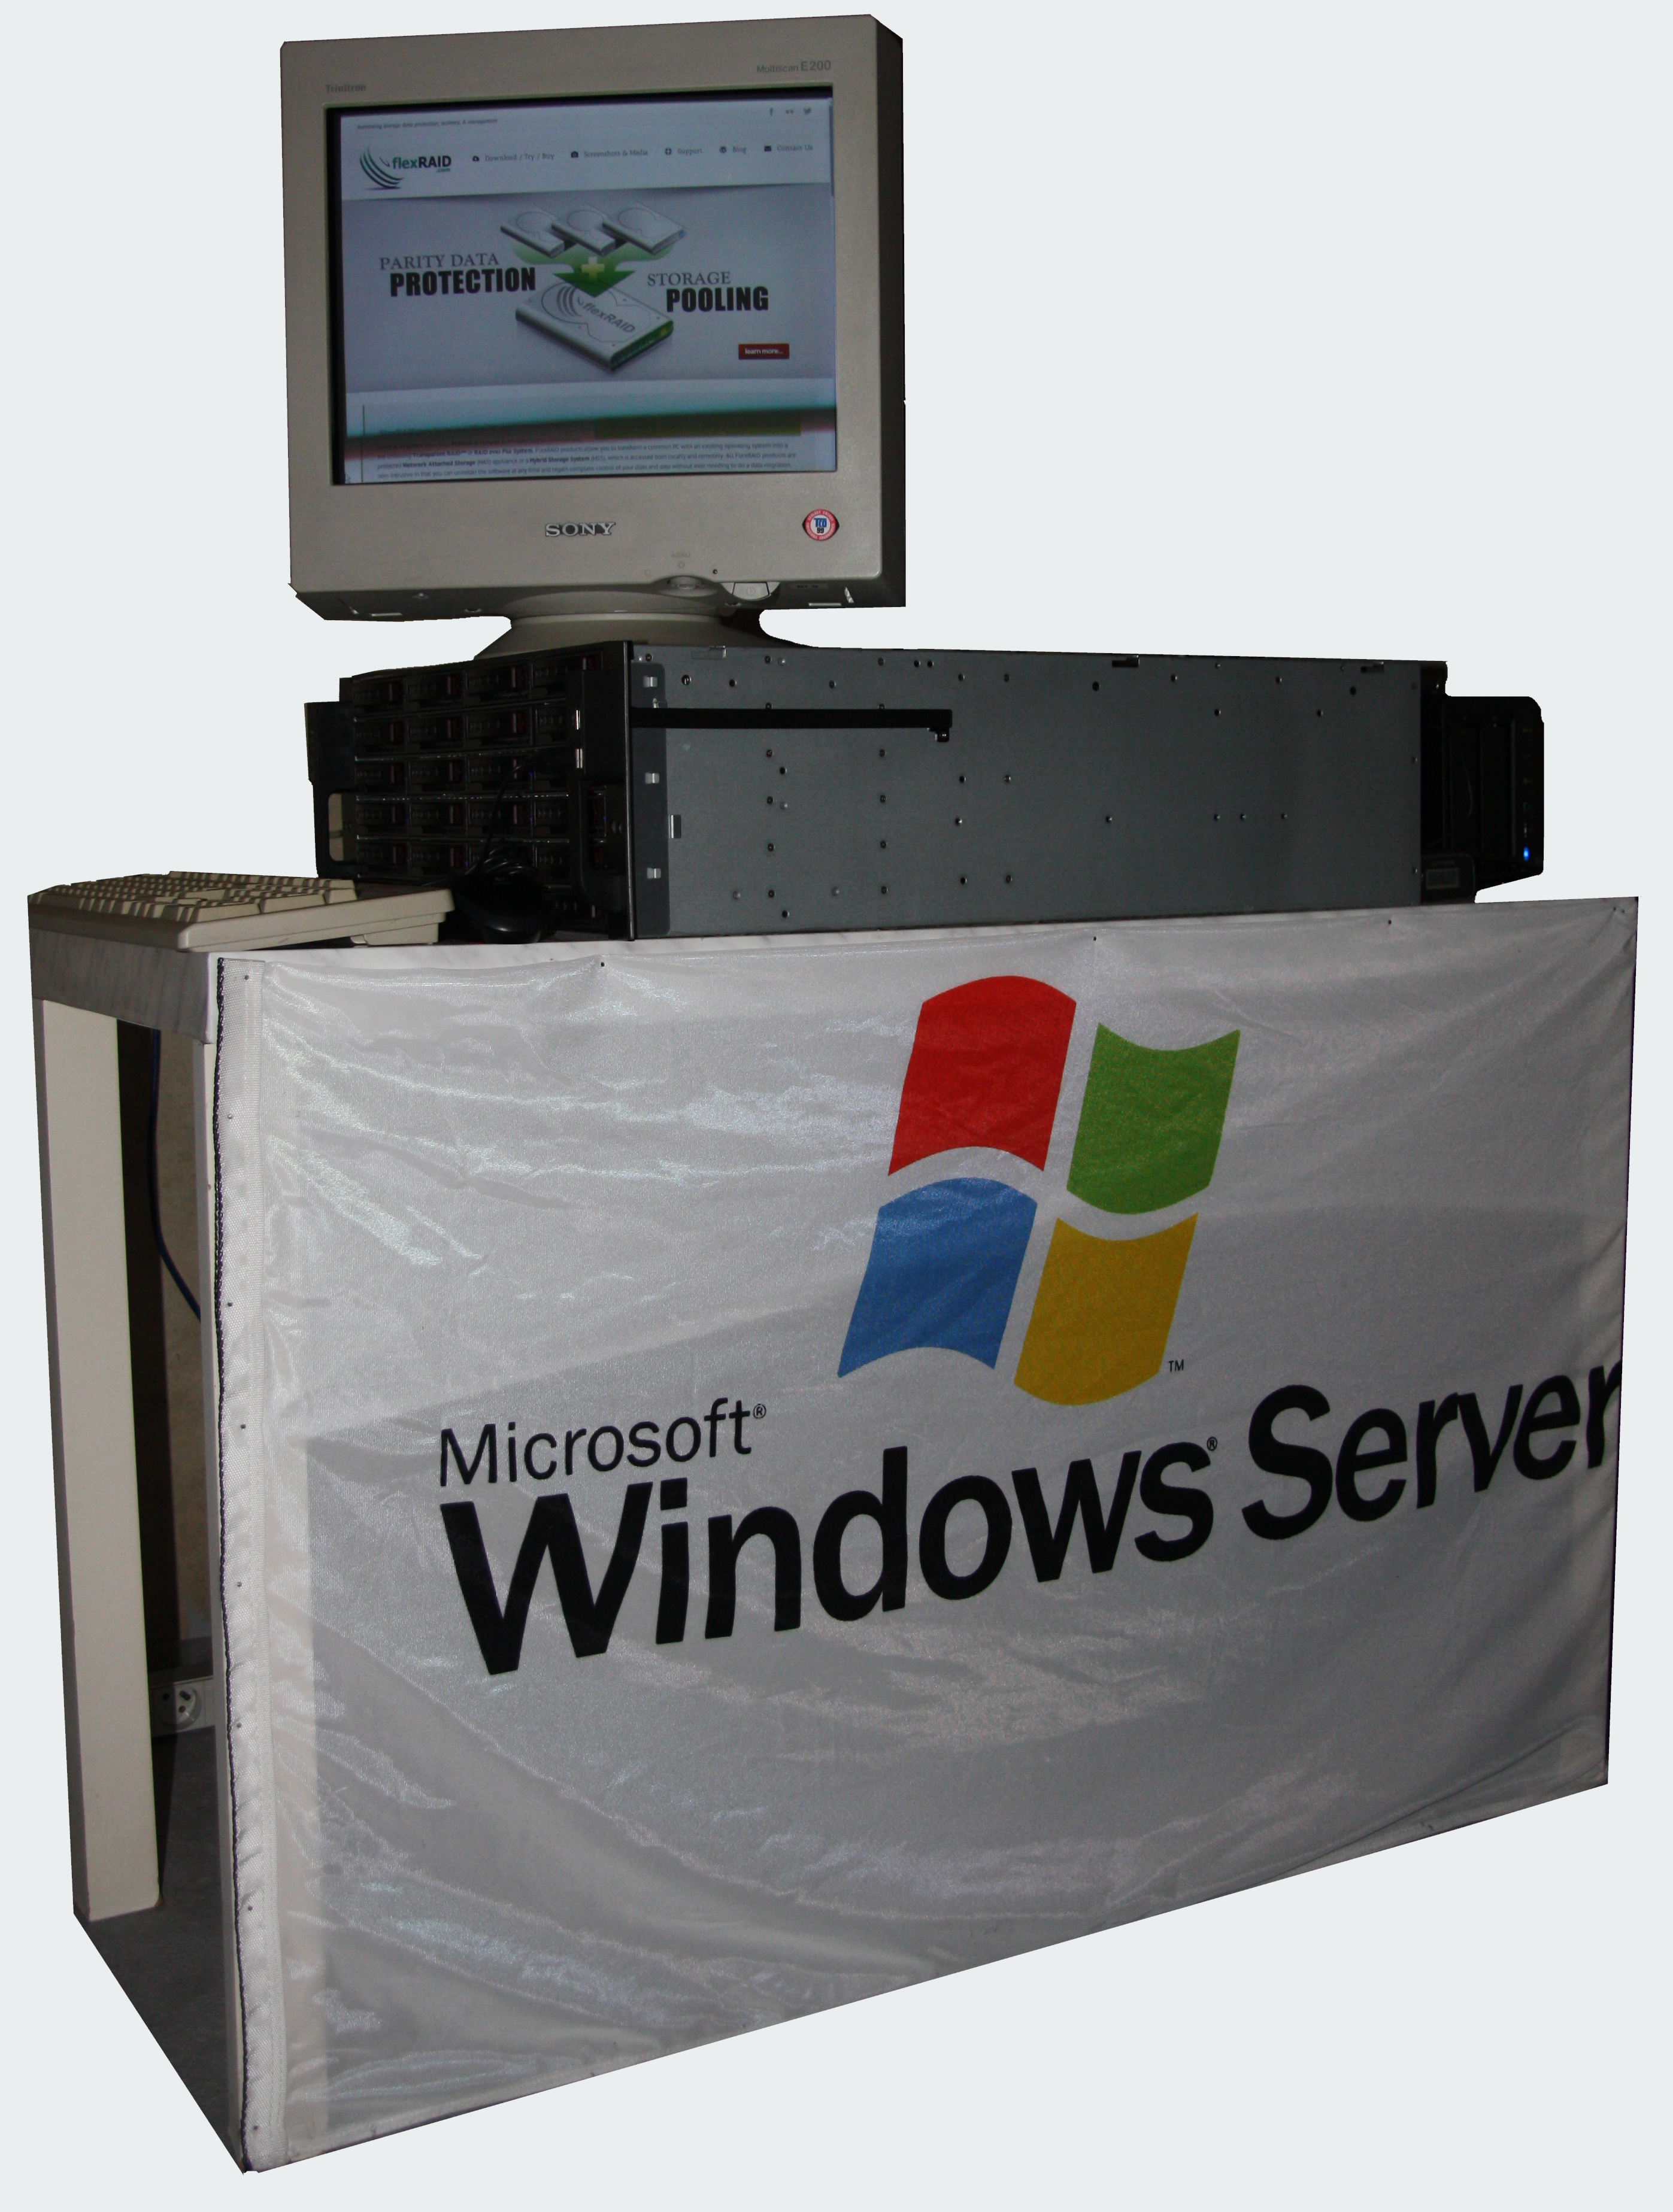
In the past, I have been using the onboard RAID controller of my Home Server’s motherboard to secured its data, a RAID 5 with 6 HDD to be more precise. But I was in a urgent need for a new solution.
Click to Read More
Indeed, I had several concerns:
- If the motherboard would die, data would not be accessible anymore except with a replacement motherboard with same amount of identical RAID controllers
- if I would be out of space, new disks could not be added to easily in the existing RAID array (mainly due to lack of space in the case). Also replacing existing disks with larger ones would be quite dangerous as duplicating the whole array before such a risky upgrade was not possible (lack of backup storage).
- After a power failure or a BSOD, the RAID was checked (for about 12 hours), making all read access veryyyy sloooooooow.
- A server case able to enclose up to 24 HDD (with adequate controller cards)
- A software RAID solution to not rely on hardware anymore
- A software Pooling solution to be able to expand seamlesslythe storage space
For the Software part, I wanted to go with a Server 2012 Essentials because I really like
- Its centralized PC-image backup feature and
- Its centralized File History backup functionality.
- I don’t want to mix OS in my network
Server 2012 also supports pools of disks with data redundancy, a feature named Space Storage. But it has a several (big or not) disadvantages IMO:
- Drives containing data may not be added into the pool 🙁
- In addition, if the server dies, a disk moved into another PC will be readable but not writable, except if this other PC is also running Space Storage and all disks are moves. That could be an issue if the dead server cannot be quickly replaced.
So… What else ? I started to look for solutions to manage pools of disks or to manage RAID, or – better – to do both: Greyhole, SoftRaid, mhddfs, UnRAID, FlexRAID, mdadm, SnapRaid, Amahi, FreeNAS, disParity, LVM, JBOD, MooseFS, GlusterFS, ZFS, Liquesce… And I finally decided to go with FlexRaid although it is not free (but not expensive either):
- It runs on Windows Server 2012 x64 (On the opposite, FreeNAS or Unraid for example are integrated with their own OS – linux based).
- It has a nice Web UI (based on extJS like the DSM of my Synology) which make remote management easy and comfortable, although IMO there is still place for improvement.
- It supports both RAID software and Pooling (There are separated licences if you don’t want both)
- It has supports for either a RealTime protection or a Snapshot mode (I.e.: RAID is nightly updated on schedule – not slowing down read/write access during the day).
- Disks containing data can be added in the Pool at any time.
- Disks can be temporarily removed to be accessed from within another machine. If Snapshot mode is used, data may be modified before re-plugging the disk in FlexRaid. Notice: If data are modified, they will only be protected if the disk is re-plugged in FlexRaid and if a the RAID is updated.
- Disks temporarily removed can be re-plugged anywhere in the machine. FlexRaid does not rely on the physical location but on the disk mount point which is “memorized” on the disk itself.
- It does not store any recovery information on the disks containing data. This information is stored on dedicated disks
- It supports multiple simultaneous disk failures (it implements several type of RAID) depending on how many disks are assigned to store the recovery information.
- It comes with a Wizard “for dummies” to easily create a pool of disks with a few default settings. It also supports an expert mode with more flexibility – but also with more complexity;
- Disks can be replaced with larger ones.
- As far as the FlexRaid configuration is backuped, the OS can be re-installed from scratch; the recovery information won’t have to be recomputed and the data are safe.
- In case of crash, RAID validation is fast (I still have to check the speed of a recovery)
- It has support for S.M.A.R.T monitoring with email alerts (although configuring S.M.A.R.T is not integrated in a Wizard and can require some research).
To be honest, IMHO, the version 2.0 of this product is not yet ready for all end-users. They will have to be comfortable themselves with server engineering to solve various possible issues. Also, it seems to me that only one technical guy from FlexRaid is answering questions and offering support on the official forum. He knows very well his product, but still…
On my own, I had a lot of issues while testing the product – mainly because I did a lot of operations like creating/deleting pools, adding/removing disks, sharing/un-sharing folders, stopping/starting the service, etc… But also because Murphy was at the party: after many various issues followed by a complete re-installation of the server, one disk used to store FlexRaid’s parity data started to die. If you intend to test it, I really recommend to do it in a VM with virtual drives that can be easily re-staged. FlexRaid has a Trial of 14 days.
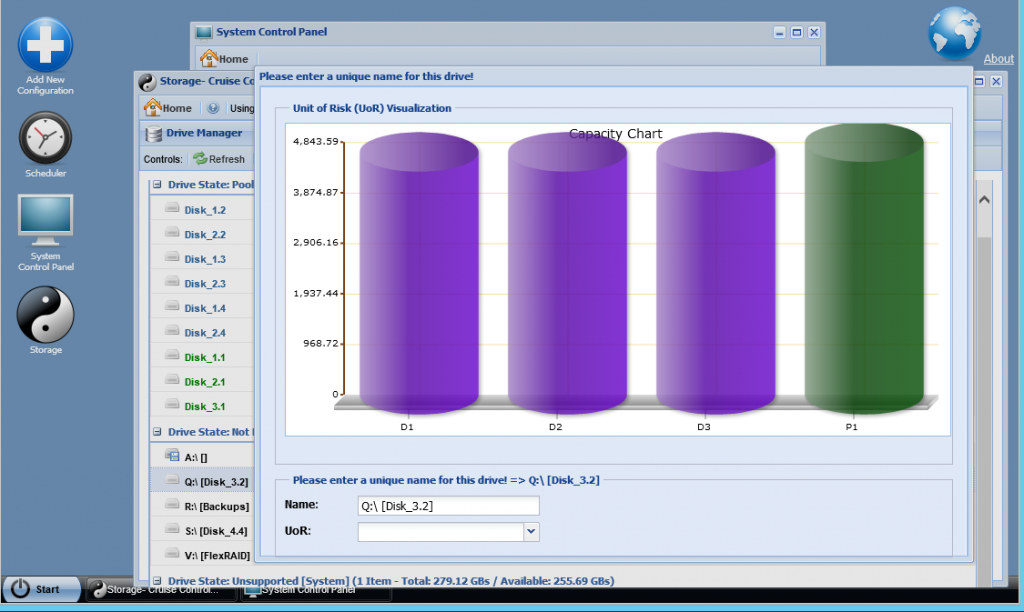
Once the dead disk removed, FlexRaid started to run fine with the following “configuration” (as named in FlexRaid) – See Attention Points before create a new configuration:
- 3 data disks (named DRU in FlexRaid terminology – they contains the data) compound each of 2 HDD (2TB + 3TB)
- HDD used in DRU are not using a proprietary format but simply NTFS
- HDD can be added in a DRU with existing data
- HDD can be of any size, but DRU have better be of the same size.
- One parity disk (named a PPU in FlexRaid terminology – they contain the recovery information) compound of 2 HDD (2TB + 3TB).
- PPU must be at least as large as the largest DRU
- It has better be larger because in case of bad-sector on a HDD in the PPU, FlexRaid will be out-of-space and fail to update the parity data.
- It’s recommended to have one PPU per 3 DRU.
- PPU must be at least as large as the largest DRU
- PPU and DRU created with the wizard (Cruise Control) instead of the expert mode.
- Merge Mode = “Auto-Folder-Priority”.
- To optimize power consumption (most probably only one drive accessed when fetching data)
- To keep data grouped if by any chance the disks must be moved into another PC during DRP.
- a Snapshot mode
- To not slow down write operation
- As anyway, data on the Home Server does not change often at all.
- Merge Mode = “Auto-Folder-Priority”.
- A login/password set in “System Control Toolbox” > Login pane
- Automatic start-up of FlexRaid storage pool 15″ after the Server boot in “[your configuration] > “Preferences and settings”
- A Scheduled Task to Update the RAID (Parity Data) every day at 23:00.
- A Scheduled Task to Validatethe RAID (Parity Data) every week at .
- The Validate task does both change detection along with datarot (silent data corruption) detection through data checksum valiation.
- A Scheduled Task to Verifythe RAID (Parity Data) every month.
- The Verify task does bit for bit verification of the RAID.
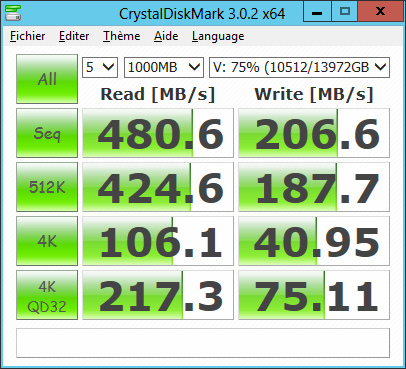
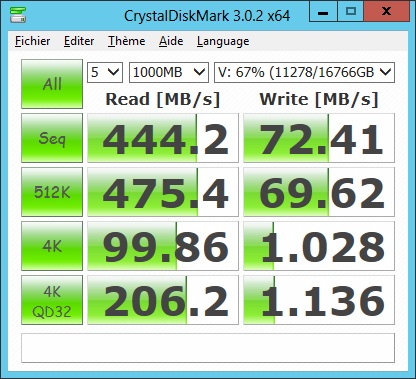
Here is the same benchmark for accessing data in an equivalent Pool with the Real-Time mode..;
Writing small files is not performing well in Real-Time but that’s due to the accesses to the FlexRaid Configuration Database (on C:\). If that drive is on a SSD, those performance should be quite improved (Support to store that DB on another disk is foreseen…)
For information: it took a little bit less that 13 hours to compute the parity for about 11TB of data in this 15TB pool.
ATTENTION POINTS:
Before starting:
- Drives used by FlexRaid may not be used as target for Paging or Shadow Copy.
- However, Shadow Copy can be used as far as the volume used as target for the Storage Location is on a dedicated drive outside of the Pool.
- Shadow Copy must be enabled:
- On the Start Screen type Computer and run Computer Management
- Right-Click Shard Folders > All Tasks > Configure Shadow Copies…
- Enable for all sources drives (DRU) but not for the virtual drive (Pool)
- And the Storage Location must be configured on each disk
- Via the Dsik Management node in the Computer Management: Properties > Shadow Copies Tab > Settings button > Storage Area (Click details) (to be completed).
- Configured via command lines (to be completed)
- Shadow Copy must be enabled:
- However, Shadow Copy can be used as far as the volume used as target for the Storage Location is on a dedicated drive outside of the Pool.
- Recycle Bin may not be used on drives used by FlexRaid as well as in the virtual drive (pool)
- Instead FlexRaid proprietary Recycle Bin can be enabled in the Snapshot mode only (there is no such support for Real-Time mode): Configuration > Preferences and Settings > Advanced Properties : Enable Recycle bin mode: true (and Save).
- Also, make sure this registry folder exists or you could experience “Recycle Bin on V: is corrupted” errors
- HKEY_LOCAL_MACHINE\SOFTWARE\Microsoft\Windows\CurrentVersion\Explorer\BitBucket (For 32 bit Windows)
- HKEY_LOCAL_MACHINE\SOFTWARE\Wow6432Node\Microsoft\Windows\CurrentVersion\Explorer\BitBucket (For 64 bit Windows)
- And finally disable all the Recycle Bin on the drives intended to be managed by FlexRaid (as well as on the virtual drive)
- Using Windows Explorer, navigate to each drive create a dummy file and then delete that dummy file. This will for sure create a Recycle Bin
- After doing the above for each drive, empty the recycle bin
- Right-click on the Windows recycle bin icon and choose properties
- There disable recycle bin for each of your drives
- Reboot
- FlexRaid web UI is not fully compatible with Chrome. Some expansible panes of this UI collapse and expand for ever one accessed.
- The logs are full of security errors. It’s simply due to the Web Client UI session which expires… It’s not fatal.
- To change the log level, edit the files in C:\Program Files (x86)\<FlexRAID folder>\logging.options.txt
- FLEXRAID_LOG_LEVEL=TRACE
- FLEXRAID_SYS_LOG_LEVEL=TRACE
- Also change the logs location as many files will be created in TRACE level
- FLEXRAID_LOG_FILE_ROOT=C:\FlexRaidLogs\
- To change the log level, edit the files in C:\Program Files (x86)\<FlexRAID folder>\logging.options.txt
- The path of the log in Log4j.properties must be like C:/FlexRaidLogs/
- I always experience issues when trying to remove disks from PPU or DRU. The only solution I found is to delete the configuration and create a new one.
- Once a disk is added in a PPU or DRU, it’s mounted by FlexRaid in a hidden folder under C:\FlexRAID-Managed-Pool\…
- This folder is only accessible by the System account which is the account configured to run the FlexRaid Service.
- After deleting a “configuration” or uninstalling Flexraid, this folder is still there.
- To view it, you must
- Start Explorer, click on the “View” menu and select “Options” (on the extreme right).
- There, go to the “View” tab and tick “Show hidden files, folder and drives”
- Uncheck “Hide protected operating system files (recommended).
- Once the folder is visible, you can change the Security and grant full access right to the “Administrators” group. Possibly use this great tip to also easily take back the ownership with a contextual menu (works only on files/folders. not on drives).
- Hidden files are not protected as ignored by FlexRaid.
- When deleting a “configuration”, disk that were assigned a letter before being added in a PPU or DRU will get back that letter. However, in my case, disks were mounted. After deletion of the “configuration”, they should have been re-mounted on their original folder (according to someone from FlexRaid). But this didn’t occur. I had to re-mount them myself one by one. I have not receive any valid explanation yet…
- When managing Shares and Permissions via FlexRaid UI:
- You must use username defined in the domain (on Server 2012 Essential, a domain is always installed by default – and mandatory for various services). However, you don’t have to prefix that username with the domain name (I.e.: <domain>\<username>)
- Latest changes done via the UI appear sometimes to not be reflected immediately in the Windows Properties (In the “Advanced Sharing” tab of the folder). Ex.: If you delete permissions for a user. You must both
- Close the folder Properties window if already open in Windows.
- Navigate to the “Home” menu and back to “Server Shares” in FlexRaid UI.
- Back to the folder Properties > Advance Sharing, the changes should now be visible.
- Don’t forget that you need to use a domain user to access the shares from remote machine. If you try to access them from a PC not joined to the domain, you must provide a login like “<domain>\<username>”. Also remind that Server 2012 Essentials is missing “HomeGroup” support.
- When using a “Snapshot” mode, data are in great danger as soon as files start to be modified and as long as the RAID is not updated. Indeed, as some data are modified, the information on the PPU may not be used anymore to restore files in the same range of address (?) in a DRU which would crash. Concretely, files restored using a not-up-to-date PPU will be corrupted.
- I didn’t find any information that confirm (or not) that a disk is most likely to fail during write operations. But as I plan to often backup data on my server, I am afraid that I wouldn’t be able to restore my files after a crash occurring such an operation… So => I will investigate the RealTime mode which is still experimental
- When using a RealTime Mode
- Only use softwares that preallocate files to copy data into the pool (e.g.: Windows Explorer but not TeraCopy!!!)
- There must be at least 10GB of free space on each disk going to be added in the Pool (As DRU).
- Check that the Reserve is at least 50GB or more in the Configuration > Preferences and Settings > Run-Time Properties > General Properties: Reserve. This is the default when using the Cruise Control mode.
- After a server crash, a Reconcile is required (Similar to a Windows Disk Scan).
- Always stop the storage pool through the Web UI before restarting the FlexRAID service or your OS!!!
- This can be solved using a Shutdown Task to be created in the Local Group Policies. See the script posted as comments.
- Increase the WaitToKillServiceTimeout Registry key value to 300000 (it’s 5000 by default; i.e. Windows systems will kill the service in as little as 5 seconds which often does not leave FlexRAID with enough time to properly close up it resources).
- HKEY_LOCAL_MACHINE \ System \ CurrentControlSet \ Control
- Never write directly to the “source” drives but only through the pool as Explorer writes silently data on the disks. It means that a drive may never be temporarily removed from the pool, accessed from within another PC (even for “READ” only operations) and re-plugged later in the pool.
- There is no Recycle Bin, meaning that data are deleted permanently.
- And unfortunately, Shadow Copies can NOT be used on the Pool… So it cannot be used either to restore deleted files.
- Actually Recycle Bin must be disable on all disks participating in the pool as well as on the pool itself. And that must be done for all accounts connected on the server.
- As a replacement, the undeluxe software pro can be used. It can run as a service (start with windows) and will move deleted files into a folder that can be configured to be located on a drive outside the FlexRAID Pool… As an alternative, FlexRAID will come with a universal recycle bin in a next version…
- It could be advised – for the Real-Time mode only – to disable thumbs.db file generation although those files being hidden, they are not taken into account (I.e.: not protected by FlexRaid). In addition
- On the Start Screen, type and run gpedit.msc.
- Expand User Configuration – Administrative Templates – Windows Components.
- Click on File Explorer.
- Right-click the entry “Turn off the caching of thumbnails in hidden thumbs.db files” and choose Edit.
- Enable the setting.
- Log off and back on again (or reboot) after making these changes.
- Delete all the thumb.db files from you drives using this command: Del {Drive Letter}:\Thumbs.db /f/s/q/a
- Actually the options “Restrict Thumbs.db” and “Restrict Desktop.ini” can be used in the Console for that purpose, but it is useful only when using the Real-Time RAID in Expert mode and if frequently browsing the source drives. Indeed, although we are not changing anything on the source drives, Explorer will actually update the thumbs.db and desktop.ini files as we browse. There are implications though with selecting those options as Explorer will no longer cache your thumbnails or remember certain folder view preferences.
- Parity data are only updated when accessing the drives through the Pool. If data are modified directly on the source drives, you will have to fix that by running the Reconcile task in FlexRaid.
- That being, the following Windows Features are safe to use with FlexRaid
- Windows Search Service
- Windows Backup
- BITS (Background Intelligent Transfer Service)
Site: http://www.flexraid.com/
Documentation: http://wiki.flexraid.com/
Support: http://forum.flexraid.com/ (support Tapatalk ;))
![]()