Category: Tips

  • Change your Reply Address in the default Android’s Email app

    When configuring the default Android’ EMail app, you have to set an “account” to access your mailbox. In most cases, you are using the email address of that mailbox. And by default, the EMail app will use that email address as the “sender” of all your mails. If you don’t want people to reply to that email address you should have set a “Reply Address” as “account“.

    Click to Read More

    You have to remove the account already created and reconfigure it:

    1. Start the Email App and open the Settings (Where you can see your account(s))
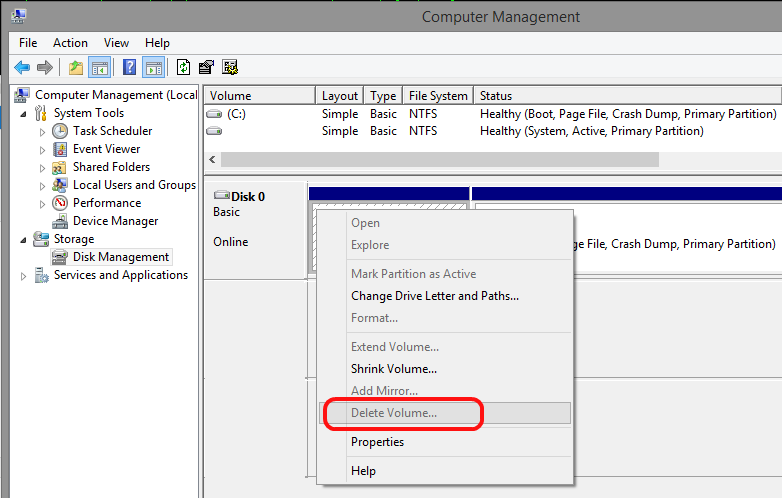
    2. Click on the “Delete” icon and select the account to be reconfigured with your “Reply Address”. Then press “Delete”.
    3. You will get a Warning like “Deleting this account also deletes all of its messages, contacts, and other data from the devices”. Be sure that all those data are also on your server so they are not lost. Only the local copy will be deleted.
    4. Now, click on the “+” icon to recreate your account.
    5. Type now your “Reply Address” as account, instead of the actual email address used to access your mailbox, with a dummy password (required to enable the “Next” button). Then, click on “Next” (possibly after ticking the option “send email from this account by default”.
    6. On the next screen, select your type of account (Pop3, IMap, Exchange)
    7. Next, as “user name”, type the email address used as actual account, with its password, to access your mailbox.
    8. Finally, complete all the other parameters as usual

    Et voilà.

    Loading

  • Asus P9X79 Pro and Surround Audio 5.1: Get sound from Side Speakers

    I have an old Creative Gigaworks ProGamer G550W – a 5.1 Surround System – connected to my Asus P9X79 Pro, and I have never been able to configure my Audio Playback Device as an actual 5.1. But I recently found a step by step procedure posted by “EomaMY” on the forum of Asus’ Republic of Gamers that works like a charm.

    Click to Read More

    The problems with the “Realtek HD Audio Manager” (installed on a clean machine, i.e. immediately after a fresh install of Windows 8.1 x64) were:

    • I had cracking noises in the Center Speaker (See here). I had no such noises with the Microsoft default drivers.
    • with the “Realtek High Definition Audio” Speakers configured as a “5.1 Surround” in the “Playback Devices” configuration pane of Windows, I never got any sound from the Speaker Pair connected either to the Rear Speaker Jack or to the Side Speaker Jack.
    • with my Speakers configured as a “7.1 Surround“, I didn’t get sound from the Speaker Pair if connected to the Rear Speaker Jack. But I got sound from this Speaker Pair if connected to the Side Speaker Jack as far as I was disabling the “Rear Pair” in the “Speaker Setup“. Unfortunately, with such a config, I was not getting any sound from the Rear Pair when playing 5.1 movies within Plex Home Theater.

    So, I did follow EomaMY’s procedure:

    1. Try and re-plug your rear cable back to the rear port.
    2. Uninstall the audio drivers.
    3. Reboot.
    4. Let windows install the standard “windows” drivers, DO NOT install the realtek drivers yet.
    5. Reboot
    6. Now install the latest Realtek audio drivers from Asus (not Realtek, those didn’t work for me). Rear cable should still be plugged in rear port.
    7. Reboot
    8. Open up Realtek control panel. Now go and change rear cable to side. A notification should pop out.
    9. Test the 5.1 setup.

    5.1 works now fine, including with Plex, and without cracking sounds in the Center Speaker anymore  8)

    I did copy/paste here above the procedure of EomaMY. Only notice that I used the Audio Drivers 6.0.1.7335 found on Asus Support webpage for Notebook. This version is more recent than the Audio Drivers 6.0.1.7023 found on the specific Asus Support webpage for P9X79 Pro.

    Notice that it’s physically correct to plug the 5.1 “Rear Speakers” in the “Side Speaker Jack”! Indeed, “surrounds” have always been on the sides but nomenclature and general usage vary and confuses the terms. Reading information from Dolby.com, I keep in mind that:

    • In a 5.1 system, the ‘Surrounds’ are on the sides.
    • In a 7.1 system, the ‘Surrounds’ are on the sides while the ‘Rears’ are the ‘Surround Back’.

    Loading

  • Replacing RAID-F by T-RAID

    T-RAID (for Transparent RAID) is a new product of flexRAID. It comes as another option next to the existing product: RAID-F (RAID over File System). I did migrate from Raid-F to T-RAID months ago…

    T-RAID
    T-RAID

    Here is how I configure it now in order to get the best performances for my server and my own usage.

    Click to Read More

    Nice Features

    I love T-RAID. It has great features similar to RAID-F, e.g.:

    • Software Raid Array fully independent from the hardware.
      • If a physical controller die, no need to replace it with another identical one.
    • Support adding a disk with existing data into the Software Raid Array.
      • No need to add blank disk as required with hardware raid or with Windows Storage Server.
    • Survive to simultaneous failure of several drives.
    • Access each disk through a virtual disk or through a Pool offering a unique/global view on all the virtual disks.

    But it comes with its own advantages on RAID-F

    • It’s a native Real-Time protection without any drawback compared to “RAID-F RealTime” (E.g.: RAID-F in RT mode MUST be stopped gracefully before shutting down the machine)
    • Data on failing disks are still accessible in Read and Write mode! There is therefore no downtime during the “disk reconstruction” (Similar to hardware Raid)
    • It comes with interesting monitoring and notification tools (Performances, S.M.A.R.T, …)
    • It comes with Storage Accelerations.
      • Currently, a “Landing Zone”: use of a SSD as a temporary storage. Files copied into the array are dropped onto the SDD and transferred later, in background, to the array.
      • Soon, “SSD caching”.

    RAID Options

    Once Physical Drives “Registered as Pass-Through”, to be used as DRU or PPU, and added into a “RAID Configuration (defining hence an “Array”), one can set various options on that “Configuration”

    Options:

    • Auto Start Array=false. Because I don’t always turn on my PC to access the data stored in the T-RAID array. Bu also because I often change settings in my Configuration for testing purpose and changes may often not be applied if the array is already running…
    • Global Hot-Spare Rebuild=false. This is the recommended value as human interaction is preferred on automatic rebuild in case of disk failure
    • Read-Only Policy=Never. This is the default and authorize writing on all disks in the array, even on disks failing.
    • Scheduled Range Operation Size (in GB)=100. I didn’t fine-tune this default value yet (taking into account e.g. how much data can be validated per hours when the server is on). Actually, I turn my server on only a few times per month, to do massive backups. Once the backups completed, I start a complete Validation of the array and configure the system to shutdown on completion.
    • Statistics: File=true, RAID=true. I want indeed to monitor my system. But File Statistics requires a Job to be scheduled for the Storage!

    Performance Options:

    • Performance Profile=PERFORMANCE. Because my server is only on when I want to do backups, I don’t care about saving disks/energy. On the opposite, I care about performance and this profile provides indeed noticeable improvements at disk access speed level.
    • Concurrency Queuing (CQ) Depth=64, Salt=16. Salt is use in the algorithm managing “concurrency” within T-RAID.  System could experience lock overrides if the salt is too high and constant out of sync blocks if it is too low. The perfect values depends on the hardware… So, as long as “out of sync blocks” are reported during “Verify and Sync” tasks, increase the salt. But look into the “RAID Monitoring” tab for the graphic “Lock Override“, if the value is increasing drastically, lower the salt!
    • OS Caching=false. I don’t use this one as it doesn’t help to keep high performances when copying files larger than the amount of RAM, which is the case for me. In addition, the PERFORMANCE mode is not guarantee to be efficient with “OS Caching”=true when using multiple PPU, which is also the case for me.
    • Tagged Command Queuing (TCQ)=true, Depth=32. I am using this option to improve performances as it’s compatible with the PERFORMANCE mode while using multiple PPU. It allow up to 90% of source disk write speed.
    • Sequential Write Optimization (SWO)=true, Depth=8. I keep those default values.
    • Direct I/O=true. I also keep those default values.

    Storage Options:

    • Auto Storage Pooling Start=false, Delay=15. Notice that it’s recommended to never access the virtual disks directly (assigning them with a drive letter). Instead, using only the Pool add an extra visualization layer which makes hot-unplugging much less issue prone. But I often change settings in my Configuration for testing purpose and changes may often not be applied if the pool is already running…
    • Removable=false. This settings must be set on false on Windows Server 2012 Essentials.
    • Storage Pool Caching=META_DATA_ONLY, Max=310. I noticed that performances are much better when using this setting instead of File_AND_META_DATA for copy of large files, which is the case for me.
    • Sync Folder Last Modified Date=false. I would enable this only if I use a program tracking file modification date (Ex.: sync or backup daemon)
    • Thread Pool Size=32. I keep this default
    • Space Management Reserve (in GB)=50. I keep this default.
    • File Management Strategy=STRICT_FOLDER_PRIORITY. I want to keep all files together even if it’s not “energy optimal”. Indeed, in case of disaster, I will at least easily retrieve related files on disks still “alive”…
    • File System=NTFS, strict ACL Mode=false. I keep those defaults
    • Drive Letter or Folder Mount Point=V. This is the letter to be assigned to the Pool. It is shared to be accessible from other machine in my Intranet
    • Native NFS Support=false. I keep this default.
    • Volume Label: tRAID Storage Pool

    Advanced Operations

    • Storage Acceleration. I don’t use it so far as the write performances are good enough for me and anyway, I don’t keep my server up and running 24/7. So I want to know when I can switch it off (I.e.: when the transfers are really completed). Using the Storage Acceleration, the SSD used as Landing Zone would never be flushed in my case… I indeed only turn the server on when I want to backup huge amount of data…

    S.M.A.R.T

    • For each disks on a LSI SAS controller, I have to set an “Advanced Mapping”
      • Device Path Mapping: /dev/pdx where x is the disk id
      • DeviceType Mapping: sat
    • For each disks, I also enable SMART Monitoring (every 4 hours) except when disks are in standby.

    Notes

    • Write performances are a lot impacted by the performances of the PPU. The best disks should be used as PPU instead of DRU.
    • To increase Read Performances, the File Management Strategy has better be ROUN_ROBIN as it enables I/O parallelism.
    • Never Defrag or Chkdsk the “Pool Drive” or “Source (physical) Drives”. Defrag instead the “NZFS (Virtual) Drives”. That being said:
      • I really try to avoid doing a Defrag as so-far, I am not yet 100% convinced that, on my system, it does not results “blocks out of sync” (I.e.: requires a Verify&Sync). For that reason, I have disabled the automatic-daily-defrag; E.g.: Turn off the Windows Disk Defragmenter Schedule (See FlexRaid’s Wiki) or uncheck the automatic optimization on concerned drives in O&O Defrag. Pay attention that new NZFS disk appearing when the array start can be taken automatically into account by the defrag tool.
      • Defrag, if done, should never be executed on several disk simultaneously (See FlexRaid’s wiki).
      • If you do a Defrag, you better stop the Pool or at least imperatively disable “Storage Pool Caching”.
      • I didn’t succeed to do a Chkdsk on the “NZFS Drives” and had to bring the “Source Drives” online to repair them… Once repaired, a Verify&Sync is mandatory! (NB.: One thing to try is dis-engaging driver protection mode. asit blocks certain low level operations. Unfortunately, it’s not recommended to run disk tools on the transparent disks with driver protection dis-engaged).
    • When a Verify task fails, it provides the exact first and last byte failure as well as the amount of 4KB blocks. One can then start an “Range Specific Operation” to Verify&Sync the specified zone.
      • Notice that first/last position of failure is in Bytes while the “Range Specific Operation” can be in KB, MB, etc… 1KB = 1024B).
      • Notice also that the Verify&Sync updates complete blocks (4KB) and will therefore possible report different addresses (first byte of the updated block) than the Verify Task!

    Loading

  • LSI_SAS2 and Disk Warnings in the System Event Log

    I noticed that there are a lot of Warnings issued from my LSI controllers in the eventlogs. LSI support told me that this can be due to failing disks, but in my case it could be something else, related to my SMART monitoring tool…

    Click to Read More

    Concretely, I have two LSI SAS Controllers: a LSI SAS 9211-8i and a LSI SAS 9201-16i. Both have been updated with the Firmware 19.00.00.00 and I am using the drivers version 2.0.72.0 for Windows x64: LSI Adapter SAS2 2008 Falcon and LSI Adapter SAS 2 2116 Metero ROC(E). I didn’t upgrade the bios of those cards as more recent versions are not compatible with my motherboard (See here).

    I often noticed “Warnings” related to my two LSI adapters (with “LSI_SAS2” as a source) in my Event Log; either “Reset to device, \Device\RaidPort1, was issued.” or “Reset to device, \Device\RaidPort2, was issued.”. Those Warnings are usually followed by one or two other Warnings like “The IO operation at logical block address 0 for Disk 0 was retried.” with “disk” as a source. The address and the disk number vary a lot but the Warnings appear very precisely every 180 seconds (3 minutes)

    I read on the web that this is usually due to a timeout on accessing the disk and resulting in the controller to be reset. This issue is often solved by using the “High Performance” Power Plan Power with the option “PCI Express” > “Link State Power Management” set to “Off” ! But it didn’t solve my own issue.

    I have therefore contacted LSI support and was told that “The resets are to the drives which are timing out. It is possible one or more of them have an issue. Replace the drive that has the highest number of resets on his port.”

    I have the issue mostly with all my disks, so I didn’t know where to start… especially as according to their SMART status, they were all definitively perfect. Could it therefore be due to the cables ? No idea yet… But looking once more the SMART details, I noticed that the Warnings where typically logged when I was refreshing those status.

    I am using CrystalDiskInfo which is IMO definitively the best free SMART Monitoring tool… It is e.g. configured on my PC to send emails as soon as an SMART alert occurs… and… it is configured to check the SMART status every 3 minutes ! Gosh ! A refresh rate of 180 seconds?! That rings a bell and even a siren! I immediately disabled the SMART Monitoring and didn’t get any Warning anymore. Trying other SMART tools, I noticed the same issue…

    I did submit my findings to LSI and wait now on their feedback: is there any conflict at LSI SAS adapter level when accessing data on disk at the same time as the disk’s SMART info?

    That being said, I noticed also that most 99% of the Warnings are related to my 5 Seagate ST3000DM001. I seldom have Warnings for my Samsung HD204UI (patched to avoid data corruption when accessing SMART info!)

    Loading

  • FlexRaid: powershell script to set disks online/offline

    FlexRaid‘s products (Raid-F and tRaid) are setting offline all disks used as DRU or PPU to prevent direct access and mistakes. Access are made through virtual disks created by FlexRaid. But if you have many disks and sometimes needs to access your physical disks, you will like this script to reset online all those disks…

    Click to Read More

    Create a file to store this powershell script (ex.: ManageDisks.ps1) :

    [code language=”shell”]

    Clear-Host
    $action = Read-Host ‘Type "Off" to set disks offline or "On" to set them online’
    Clear-Host
    if ($action.ToLower() -eq ‘off’)
    {
    echo ‘Please Wait…’
    $lines = Get-Content C:\OffLineDisks.txt
    foreach ($line in $lines) {
    if ($line.Trim())
    {
    $fields = $line -split ‘ : ‘
    $disk = $fields[1] $command = ‘"select disk ‘ + $disk + ‘", "offline disk" | diskpart’
    echo $command
    invoke-expression $command
    }
    }
    }
    elseif ($action.ToLower() -eq ‘on’) {
    echo ‘Please Wait…’
    Get-Disk | ? isoffline | Format-List Number > C:\OffLineDisks.txt
    $lines = Get-Content C:\OffLineDisks.txt
    foreach ($line in $lines) {
    if ($line.Trim()) {
    $fields = $line -split ‘ : ‘
    $disk = $fields[1] $command = ‘"select disk ‘ + $disk + ‘", "online disk", "detail disk" | diskpart | Where-Object {$_ -match ".*Volume.*Partition" } 2>&1’
    echo $command
    $output = invoke-expression $command
    if ($output -eq $null) {
    echo "No Volume on disk $disk"
    } else {
    $fields = $output.TrimStart(" Volume") -split ‘ ‘
    $volume = $fields[0] $command = ‘"select volume ‘ + $volume + ‘", "assign" | diskpart’
    echo $command
    invoke-expression $command
    }
    }
    }
    }
    else
    {
    $message = $action + ‘ is not a supported action’
    echo $message
    }

    [/code]

    Usage: run this script “As Administrator” and

    Type  ‘On’ to set online all disks currently offline. This will:

    1. Create a file OffLineDisks.txt on the C:\ drive with the ID of the disks currently offline. I presume that all disk offline are used by FlexRaid!
    2. Bring online each of those disks.
    3. Assign a letter to the volumes on those disks. I presume that there is only one volume per DRU and none on the PPU.

    Type ‘Off’ to set offline the disks listed in the file OffLineDisks.txt created previously.

    My purpose was to scan and repair various physical disks as this was not working when trying to do so via the NZFS Virtual Drives…

    Click to Read More

    Doing a Chkdsk on the NZFS Virtual Drive, I got:

    Chkdsk was executed in read/write mode.

    Checking file system on #:
    Volume label is #.

    Stage 1: Examining basic file system structure …

    # file records processed. File verification completed.

      # large file records processed.

      # bad file records processed.

    Stage 2: Examining file name linkage …
    The data written out is different from what is being read back
    at offset 0x# for 0x# bytes.
    An unspecified error occurred (696e647863686b2e 1324).

    So, instead, I do it on Physical Drives once set back online. And instead of Chkdks, I am using the powershell command “Repair-Volume”. E.g.: on a disk assigned with letter X:

    PS C:\> Repair-Volume X -Scan
    ScanErrorsFoundNeedSpotFix

    PS C:\> Repair-Volume X
    ErrorsFixed

    PS C:\> Repair-Volume X -Scan
    NoErrorsFound

    Loading

  • Disable “Wake on Mouse/Keyboard” while “Wake On By PCIe/PCI” must be enabled

    In order to support “Wake on Lan” from “Power Off State (S5)”, I had to enable “Wake On By PCIe/PCI” in the bios of my Asus P9X79 Pro. A consequence seems (?) to be that moving the mouse or pressing a key from the keyboard also wakes the PC from “Sleep States (S2/3/4)”. This can be solved by disallowing those devices to wake the PC via their “Power Management” properties.

    Click to Read More

    1. Disallow the Mouse to wake up the PC.
      1. Open Control Panel > Hardware and Sound > Devices and Printers
      2. Double-Click on your Mouse or on your receiver if you use a wireless Mouse (Ex.: Logitech Nano Receiver).
      3. Go to the “Hardware” tab and select the device named “HID-compliant mouse” with type “Mice and other pointing devices”. Then click on the “Properties” button.
      4. In the “HID-Compliant mouse Properties” pane now opened, click on the button “Change settings”. This will add a tab “Power Management”. Open that tab.
      5. In the tab “Power Management”, uncheck the option “Allow this device to wake the computer”
    2. Disallow the Keyboard to wake up the Computer
      1. Open Control Panel > Hardware and Sound > Devices and Printers
      2. Double-Click on your Keyboard or on your receiver if you use a wireless Keyboard (Ex.: Logitech Nano Receiver). NB.: my Bluetooth keyboard is displayed as “Logitech Elite Keyboard”.
      3. Go to the “Hardware” tab and select the device named “HID Keyboard Device” with type “Keyboards”. Then click on the “Properties” button.
      4. In the “HID Keyboard Device Properties” pane now opened, click on the button “Change settings”. This will add a tab “Power Management”. Open that tab.
      5. In the tab “Power Management”, uncheck the option “Allow this device to wake the computer”. NB.: if there is a “Sleep” button on the keyboard, it won’t work either to wake the PC from Sleep State !

    Loading

  • Wake on Lan from Power Off State (S5) on Asus P9X79 Pro

    My PC built on top of an Asus P9X79 Pro can be waked up from Lan when it is in Sleep Mode (=S1 state) but not when it has been completely turned off (=S5 state). Googling a bit I found the exact solution on Ryan’s Bliggity Blog: enable the “Network Stack” in the Bios.

    Click to Read More

    So, as a resume, here is my configuration:

    1. Windows Power Options
      1. Open Control Panel > Hardware and Sound > Power Options
      2. Click on “Change what the power buttons do” on the left
      3. Click on “Change settings that are currently unavailable”
      4. Uncheck the option “Turn on fast start-up (recommended)”
    2. Bios
      1. Enter your UEFI bios (I am using the latest version when posting his)
      2. Click on “Exit/advanced mode” button in the upper-right corner and enter the advanced mode
      3. Go to the “Advanced” tab and select the entry “APM”
        1. Enable the option “Power On By PCI/E/PCI”.
        2. Enable also the “Network Stack”
      4. Possibly go next to the “Boot” tab and
        1. Either disable the option “Fast Boot”
        2. Or if you enable it, enable its sub-option “Network Stack Driver Support”
    3. Network adapter settings:
      1. Open Control Panel > Network and Internet > Network and Sharing Center
      2. Click on “Change Adapter Settings” (on the left)
      3. Right-Click the Network Adapter “Intel(R) 82579V Gigabit Network Connection” and select “Properties”
      4. In the “Networking Tab”, click “Configure”
      5. In the “Power Management” tab, yous should now see and tick the option “Wake on Magic Packet from power off state”
      6. Keep the “Wake on Magic Packet” option ticked too (to wake from Sleep State).

    All about System Power States can be found on Intel website:

    • System Power State S0 the ON state: The system is completely operation, fully powered and completely retains the context.
    • System Power State S1 the Sleep state: The system consumes less power than S0 state. All Hardware & Processor context is maintained.
    • System Power State S2 the Sleep state: The system consumes less power than S1 state. Processor loses power and processor context and contents of the cache are lost.
    • System Power State S3 the Sleep state: The system consumes less power than S2 state. Processor & Hardware context, cache contents, and chipset context are lost. The system memory is retained.
    • System Power State S4 the Hibernate state: The system consumes the least power compared to all other sleep states. The system is almost at an OFF state, expect for a trickle power. The context data is written to hard drive (disk)and there is no context retained.
    • System Power State S5 the OFF state:The system is in a shutdown state and the system retains no context. Note that in power state S4 the system can restart from the context data stored on the disk, but in S5 the system requires a reboot.

    Loading

  • Couldn’t format SD/SDHC card or delete its volume

    I was recently unable to format a SDHC card with Windows Explorer or the Disk Management console (diskmgmt.msc). I did apply the same trick as when I was unable to delete a volume of a SDHC card.

    The symptom was the same: in the Computer Management > Disk Management console… the “Delete Volume…” menu was dimmed (disabled)…

    The solution was to format or delete the volume using command ‘Diskpart’ in a Dos prompt.

    Click to Read More

    See here how menu is disabled when I want to delete it:

    Computer Management: Delete Volume... dimmed

    To solve this, I used the solution published on Internet by Salty Wagyu : diskpart. Here is the list of commands to be used in a dos prompt run as Administrator:

    1. Diskpart
    2. List Disk
    3. Select Disk x (where x is the number corresponding to your SD Card)
    4. Clean
    5. Create partition primary
    6. Active
    7. Format fs=fat32 quick
    8. Assign

    Loading

  • Request Microsoft for an existing hotfix not publicly released

    I found a kb (article from the knwledge base) of Microsoft mentioning an existing hotfix but not providing a link to download this one.

    Here is a link to request Microsoft for such hotfix without going through the long and expensive process of a phone call,  etc… E.g.: for a dummy kb 1234567: Click here.

    Click to Read More

    I found a post that give all the requested details on that process: http://www.pesikov.tk/blog/request-download-kb-update-hotfix-directly-without-contacting-microsoft-customer-support-services/

    Only notice that you must now use a parameter “ln” in the URL to enforce the language of the page. Ex.: http://support.microsoft.com/hotfix/KBHotfix.aspx?kbnum=1234567&ln=en-us.

    This will bring you to such a support page:

    Request Microsoft for a hotfix
    Request Microsoft for a hotfix

    Loading

  • Mouse entering a ClickLock-like selection mode within Visual Studio

    Quite often, when I stop the Visual Studio debugger (possibly mainly when I just did an “edit and continue“) the mouse enters a kind of “ClickLock” mode: the text is automatically highlighted between the current mouse location and the location where it was when I stopped the debugger. Impossible to move the mouse (or the cursor using the arrows) without highlighting text (I.e.: doing a text selection)… So, impossible to work anymore as pressing any key will immediately delete the selection.

    I found only a few reports about that “issue/behavior” on the web. I still have no idea how to prevent it. But I found a way to halt it when it occurs: Press Alt-Gr + CTRL + SHIFT

    Loading