Category: Tips

  • Upgrade Fuhu Nabi 2 from Ice Cream Sandwich to Jelly Bean

    I used to root Kids’ tablet Fuhi Nabi 2 in order to be able to install Google Play. But I got a notification from Fuhi two weeks ago announcing that Google Play was now available out of the box with their latest update… This one upgrades from Android 4.0.1 to 4.1.1… So, hop, hop, hop, I immediately decided to rollback my tablet to a stock Rom and give a try to that new update. Piece of cake… if you know how to proceed…

    Click to Read More

    1. The Nabi 2 had Rom 1.9.37 and TWRP Recovery Image 2.2.2.1.
      • I had a touch screen calibration issue with more recent TWRP. I didn’t try to most recent one however (E.g.: 2.6.3.0).
      • Original site of TWRP can be found Here.
      • All TWRP versions tested for Nabi 2 can be found here as well as the native Recovery Image from Fuhu.
    2. Download the stock Rom 2.0.5 and unzip it from your PC onto a SD card under \TWRP\Backups\<device serial number>\abcdstock123, then re-plug the SD into the Nabi 2
      • This is the folder where TWRP did store my backup when I did root the device
      • All Stock Versions can be found here.
      • There should be 4 files: boot.emmc.win, boot.emmc.win.md5, recovery.emmc.win an System.ext4.win
    3. Install PDA.Net, to be found here, if not available anymore on your PC.
    4. Boot the Nabi 2 in recovery mode by pressing both the Volume + Button and the Power Button.
    5. Press twice the Volume – Button to move to the menu “Recovery Kernel”
    6. Press once the Volume + Button to enter the selected menu
      • it takes quite a few seconds to enter. Be patient.
    7. Once entered in Teamwin (TWRP), select “Restore”
    8. Then select “Using external SD” and pick the Stock Rom version 2.0.5 copied on the SD
    9. Only restore System and Boot, but not your data!
      • I presume that all your data, if any, are in gmail, google+, etc…
    10. Once the restore completed, reboot the system.
    11. It will take some time to reboot, installing the various packages, etc…
    12. Once back into Android, go to the “Settings” > “About” > “System Updates” > “Check now” for updates, “Download” it and install. Android will reboot at the end of that update.
    13. This was actually the “first part” of the upgrade from the Stock Rom 2.0.5 to 2.3.11. With that first part, you are not yet running Android 4.1.1. You have to redo the step here above once more to install the “second part”.

    Notice: I had an issue with the installation of the “first part”. I think that the “update” file was corrupted because I lost the Wi-Fi connection for a few seconds during the download. So, I had to restart the operation and it went then well.

    I had a bigger issue when I tried to install the “second part” of the update. During the reboot, I got the red triangle dead Android picture… This is because I still had traces of rooted files on the tablet. The update din’t recognize some system files and refused to proceed further… Fortunately, there is a solution

    1. Download the fix OTA2.zip to be found here (named Part2 Work Around)
    2. Copy the zip as is onto the SD card under \TWRP\ and re-plug the SD into the Nabi 2
    3. Reboot into Recovery mode as explained previously
    4. Now, instead of “Restore”, select “Install” and pick the file OTA2.zip from the “external SD”
    5. As far as I am concerned, I did a “Wipe Cache/dalvik” after the installation..
    6. Reboot the system.

    Et voilà. The Nabi 2 is now running a fresh Jelly Bean with all kids’ favorite games re-installed from Google Play. Big big thanks to XDA-Developers’ community for providing such a great support!!

    Notice: I am now running a US version instead of a UK version… But I don’t care as everything seems ok 😛

    Click to Read More

    I am not that happy about the upgrade…

    For sure, the new Android interface for the parents is great. But there is no real change for my kids except that:

    • It’s much slower to boot
    • It freezes regularly while my kids are unlocking the screen immediately after the boot. The lock screen start to slide and then freeze in the middle of the screen. I have no choice but hard-reboot (keeping the power button pressed for some seconds)
    • It also freezes sometimes while my kids are playing. Not often but still… I never had any issue in the past.

    And a problem that I always had: when charging the tablet, the tablet always completely switch off and it’s a real pain to reboot it once charged. I always have to wait a bit (> 1 minute) after unplugging the tablet before being finally able to boot. Possibly due to the fact I am on 230V/50Hz and some kind of protection ? It looks indeed like the tablet refuses to boot because the battery is too hot…

    Loading

  • Cropping and printing photos for standard photographic print sizes

    As far as photos edition and printing is concerned, I only use two free softwares: FastStone and Paint.Net. I use FastStone to crop pictures using predefined standard photographic print sizes or to print pictures keeping its size…

    Click to Read More

    Although Paint.Net is really great for editing photo (Ex.: clone and heal details, convert into Sepia, …) it can’t crop using predefined standard print sizes…

    Also, assuming that I have a photo with a custom size and a resolution like 600×600 , I cannot print it in its actual size… Paint.Net will always resize the photo to fit the paper (although I do not check the option “fit picture to frame”) – or – will print Full page, 13×18, 20×25, 10×15, 9×13, Wallet (9 picture) or Contact sheet (35 pictures). As said by the Team developping Pain.Net : it would mean rewriting the printing functionality from scratch and isn’t something we’ll do because it would take months if implementation and debugging.

    So, I use open my photos with FastStone and use its “Crop Board” as well as its “Print” feature.

    If I have to edit the photo, I can open it within Paint.Net directly from FastStone using its “Edit With External Program”…

    Notice: I use the “Sepia” adjustment of Paint.Net as the result is much better than with FastStone. I also use the “Clone stamp” of Paint.Net as I can adjust its width, something that I cannot do with FastStone.

    Loading

  • View or flush the content of the DNS cache on Windows

    Although my primary DNS is my Synology and the IP returned for ‘beatificabytes.be’ is expected to be the IP of my NAS, Chrome tried to access my blog on the web instead of locally. I thought it was an issue with the DNS and wanted to know how it resolved my domain name.

    Click to Read More

    Windows is caching the IP resolved by a DNS. So, thinking my DNS was possibly off when Chrome tried to resolve my domain name, I had to view the content of the cache. This can be done with the following command:

    ipconfig /displaydns

    The result was clear. My DNS didn’t answer itself and the domain name was therefore resolved by the DNS of my provider:

    www.beatificabytes.be
    —————————————-
    Record Name . . . . . : www.beatificabytes.be
    Record Type . . . . . : 5
    Time To Live . . . . : 30
    Data Length . . . . . : 8
    Section . . . . . . . : Answer
    CNAME Record . . . . : <myNAS>.diskstation.me
    Record Name . . . . . : <myNAS>.diskstation.me
    Record Type . . . . . : 1
    Time To Live . . . . : 30
    Data Length . . . . . : 4
    Section . . . . . . . : Answer
    A (Host) Record . . . : 91.182.141.78

    So, I tried to just flush the cache to see if my DNS would now resolve the domain name. The command to do so is:

    ipconfig /flushdns

    For information purpose, here are the commands to respectively turn off/on the DNS cache until next reboot:

    net stop dnscache

    net start dnscache

    Flushing the DNS didn’t solve the issue unfortunately 🙁

    Neither ipconfig /release nor ipconfig /renew did solve the issue either*… But this post is to keep a note about viewing/flushing the DNS cache only 😉

    * To be continued…

    Loading

  • Google search via url field vs search page

    I just noticed that I can not use Chrome’s url field anymore to search on my blog as I did so far… Google is using now my blog’s search feature.. EXACTLY the opposite of my expectation!

    Click to Read More

    As explained here, I use my blog as a knowledge base to be searched using Google.

    Concretely, if I want to find something like the processor used on my desktop (named Chaos), I used to type this in the url field of Chrome: beatificabytes chaos

    As I am very used to the keyword suggestion feature of Chrome, as soon as I see that the suggestion seems to match what I am typing, I press ‘tab’ to auto-complete it.

    Moreover, I use very often the url ‘beatificabytes.be’. So when I type ‘bea’ as a first keyword, I am suggested ‘beatificabytes.be’. I never had any problem with that as searching for ‘beatificabytes chaos’ or beatificabytes.be chaos’ used to be equivalent.

    But since a few days, when I type ‘tab’ to auto-complete ‘bea’, my keyword is replaced by ‘Search beatificabytes.be’. And if I add a keyword like ‘Chaos’ behind that, Chrome is using the WordPress’ search feature of my blog instead of searching via Google. Obviously, the result is disappointing.

    So, I have no choice but type now ‘beatificabytes’ after another keyword. The down side is that in such a case, I don’t have the auto-completion anymore on ‘bea’ 🙁

    Loading

  • NVIDIA GeForce 7600 Go – Support for Audio via HDMI

    I recently bought a Yamaha YSP-3300 to play the sound/music issued from my devices (HTPC, TV-box, video game console) while transfering the video to my TV. Unfortunately, my HTPC has a GeForce 7600 Go, and using the most recent drivers available for that graphic card, I had no audio via HDMI. The only solution I found was to install a much older version of the NVIDIA graphic drivers.

    Click to Read More

    When I did upgrade my HTPC to Windows 8, the only compatible drivers were made available on LaptopVideo2go. It was a modified version of the NVIDIA setup package for Vista: the version 180.70 (to be found in the “Archived Releases” of LaptopVideo2Go : “18x Series” ).

    But I had no audio via HDMI. I.e.: it was not working, whatever samples rates or audio format (Dobly, DTS, …) I was using and whatever audio drivers I was installing (Microsoft HD Audio or HD Realtek).

    Notice that Audio via HDMI is definitively a feature of the graphic drivers! With the more recent versions of NVIDIA control Panel, there is an entry to enable audio via HDMI explicitly (or it is made clear when selecting the connector to the screen)

    After an upgrade to Windows 8.1, I noticed that a version 307.68 of the NVIDIA drivers was automatically installed. But it also came without audio via HDMI either.

    I finally found that the oldest NVIDIA drivers supporting audio via HDMI on my HTPC, whatever version of the audio drivers is installed (Microsoft or Realtek), was the version 173.90.

    Notice: the version 174.16 is the last version to support audio via HDMI with the Microsoft HD Audio drivers. But Realtek HD Audio drivers come with some added value, reason why I stick to the version 173.90.

    At the “Playback device” level, to get audio via HDMI, I had to select:

    • Either “Digital Audio (S/PDIF)” if using Microsoft HD audio drivers.
    • Or “Realtek Digital Output” if using Realtek HD Audio drivers.

    Notice that unfortunately, under Windows 8.1, using any versions less or equal to 174.16 results in display issues:

    • IE starts to flicker when the mouse moves over the current page. This can be solved by enable software renderind instead of GPU rendering: go to “Internet Options” > “Advanced” > “Accelerated graphics” and tick the option “Use software rendering instead of GPU rendering”.
    • All tiles disappear from the Start Screen and it becomes impossible to “search” for files or apps anymore. This is not blocking for me as I did replace the Windows shell by Windows Media Center.

    So, I will test those drivers under Windows 8 as soon as I have time to “downgrade” (concretely, reinstall the HTPC from scratch). But I am not expecting any improvement reason why I am already looking for a new HTPC…

    Loading

  • Crackling Sound in Center Speaker with Realtek Drivers (Analog)

    Since many years, as soon as I was installing Realtek Drivers for my audio chipset on my PC, I had crackling sounds in my center speaker (only) when the PC was starting/stopping to play a sound (I use the Analog plugs). I had no such issue with the native Microsoft Drivers. I finally spent a few hours during those last days to try ALL the settings and found a trick to get rid of that issue : Enable the “Stereo Mix” feature of Realtek and mute it.

    Click to Read More

    As said above, I had no issue at all (even with volume very high) when playing sounds on my PC if I was using the native drives installed with Windows.

    My Motherboard is an Asus P9X79 pro with a Realtek audio chipset.

    As I had no such issue with my HTPC Acer Idea 510 (which also comes with a chipset Realtek), I wrote to Asus to get help on that issue (instead of contacting Realtek). They answered (as they always did for others requests I had in the past) that :

    In this case it’s advisable to test the system with a different speaker set.

    The Realtek driver utilizes the full potential of the audio card.
    As a result it might be sending different types of signals that might nog be compatible/supported by the speakers resulting in a crackling sound.

    I was using initially a Surround EAX System: the Inspire 6.1 from Creative. So, I did replace it with my Surround THX System, a Gigaworks G550W from Creative, that was in use without any issue on my HTPC. But the crackling sound didn’t disappear.

    I read tips and tricks on probably more that 20 forum (not exaggerating) such as helpdeskgeek which was the most interesting. But without more success.

    So, I decided to test ALL the possible settings and combination during hours and hours… And I think I finally found a solution. Don’t ask why it works but it does the trick 😀

    Here is the configuration of my Speakers. Nothing here is important as the trick is not at that level, but I publish it anyway:

    • As far as the RealTek Drivers are installed, I use the HD Realtek Audio Manager to configure the speakers.
    • I have only a 5.1 system…
      • The cable of the Front Speakers is in the “Front” plug (seems obvious I presume)
      • The cable for the subwoofer and Center Speaker is in the “Ctr Bass” plug
      • I wanted to use the remaining speakers as rear speakers, But they don’t produce any sound if connected to the “Rear Spk” plug (whatever configuration I use : 5.1, 7.1, etc.. etc…) I had to plug them in the “Side Spk” plug. I presume the rear plug may only be used with 7.1 speaker systems.
    • However, I configured the speakers as a 7.1 system and unchecked the “rear pair” and as a result, I get sound from the rear speakers too. Concretely, when my PC play a sound for the side or the rear speakers, they both play in the speakers connected to the “Side Spk” plug
    • I am using Sound Effects, Room Correction and DTS Connect. But they don’t cause or stop the the crackling sound.

    Easy way to reproduce the problem:

    • Open the Windows “Sound” panel:
      1. Right click the “Windows Speaker” in the systray (not the “Realtek Speaker”)
      2. Select “Playback Device”
    • Select the “Speakers” currently used as “Default Device” in the “Playback” tab
    • Click “Properties” to open to the “Speakers Properties” window
    • Now, click on the “Sound” window which is behind the “Speakers Properties” windows. As this last one is a modal dialog, you may not access the “Sound” window ans Windows plays a “beep”. In addition to the “beep” you ear an horrible crackling sound…

    The trick:

    • Back to the “Sound” window you just open to reproduce the problem, go to the Recording tab
    • Select and Enable the “Stereo Mix”
    • Click “Properties” to access the “Stereo Mix Properties” window
    • In the “Listen” tab,
      • Check the option “Listen to this device”
      • Select “Speakers (Realtek High Definition Audio)” in the list bellow that option
    • In the “Levels” tab, mute the speaker. This is important otherwise you will have “feedback”, which is not at all the purpose (It’s useful to capture some audio output as explained on HowToGeek)
    • “Apply” if the button is enabled

    Now, reproduce the problem again. If the “Stereo Mix Properties” window is till open, simply click on the “Sound” window which is behind… You have a clear “beep” ? Gotcha !!!

    Notice: I have not disabled ANY Playback device or Recording Device, such as the “Line In”, etc…

    There is however a serious drawback. When “Stereo Mix” is enabled on “Speakers (Realtek High Definition Audio)”, the desktop takes more than 30 seconds to be accessible (On Windows 8, the Start Screen appears immediately. The problem will only be experienced if one switch to the Destkop quick after the login). It seems to me that Windows Audio Service has difficulties (?) to start or wait on another service. The Windows Speaker appears disabled in the systray for 1 or 2 minutes before finally becoming enabled. It’s not blocking me as I don’t often reboot. Instead, I use the “Sleep” mode. I guess that the Audio Service actually wait on the Realtek Speakers/Drivers to be ready as this issue does no occur if one enables “Stereo Mix” on other speakers… People not switching immediately between the Start Screen and the Destkop won’t notice the issue.

    Edit: 21/09/2014 I finally found the perfect solution:

    Click to Read More

    NB.: Many other Asustek’s users are reporting issues when connecting the Surround Speaker Pair on the Rear Speaker Jack in a “5.1 setup”. They don’t have any sound coming out of those Speakers.

    I read that using “Side Speakers” is the technically correct setting for 5.1. Unfortunately, connecting my Speakers in the “Side” connector with a 5.1 config never worked.

    As explained above, my trick was to plug my Rear Speakers as Side Speakers instead, and use a 7.1 config with rear speakers disabled… It works for playing 5.1 movies with MPC-HC or Windows Media Center for example, but not when using Plex Home Theater 🙁

    I finally found a solution as explained here

    I can now play 5.1 movies with a 5.1 config (instead of 7.1) and get sound via the Side Speakers. And icing on the cake, I don’t ear the crackling noise anymore, even without the trick presented above 😛

    Loading

  • Use Belgacom 3G USB Dongle (Vodaphone) on my Fuhu Nabi (Android) tablet

    I used to buy the 3G USB dongle of Belgacom to surf for free on the web with my laptop during the weekends. It’s a Vodaphone dongle (a “HUAWEI Mobile Connect – 3G Modem” inside). I was just wondering if I could use it on my Fuhi Nabi II tablet. The answer is YES if your tablet is rooted!

    Click to Read More

    My Tablet, a Fuhu Nabi II, is running Android 4.0.4. It has Bluetooth and Wi-Fi but no 3G. Since a few weeks, I have a “Belgacom Internet Partout Maxi” subscription, including mobile internet for free during the whole week (You have to go into your “e-Services” to modify your current “Mobile Internet Free Weekend” subscription and activate the “Mobile Internet laptop” as mentioned here). That’s why I was motivated to try my Belgacom dongle on my tablet.

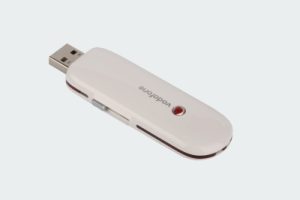
    Belgacom's vodafone 3G dongle
    Belgacom’s vodafone 3G dongle

    First, I had to install PPP Widget on my Tablet.

    Next, I did add the Widget on the screen. At that time, you will see a status “Checking access” displayed by PPP Widget and you will be prompted to grant it root access. If you don’t grant it root access, you will see a status “No root access” displayed. I suggest you to re-add the widget on the screen and grant it access or you won’t be able to use it.

    The status displayed next by PPP Widget should be No modem found”. Click on its “Configure” button to set the Belgacom parameters:

    1. Acces Point Name: internet.proximus.be
    2. Username: (keep it blank)
    3. Password: (keep it blank)
    4. Dialing string: (keep it unchanged: *99***1#)
    5. Check and set PIN: checked
    6. Pin Code: enter the pin code of the SIM plugged into the dongle
    7. HTTP Proxy: (keep it bank)
    8. Disable USB device sleep: unchecked
    9. Auto-Start Connection: unchecked
    10. Automatic Re-Connection: unchecked
    11. Automatic device detection: checked
    12. Manual port selection: unchecked

    Then reboot the tablet to start from a clean situation. Once back:

    1. Disable the Wi-Fi.
    2. Connect a USB cable to the tablet.  I did use an official Samsung USB adapter I bought for my Galaxy SII.
    3. Connect the Vodaphone Dongle on the USB cable.
    4. The dongle’s led should start to blink “green”.
    5. When you are prompted by PPP Widget to “open PPP Widget when this USB devices is connected”, select “Use by default for this USB device” and click OK.
    6. Wait for a few seconds. If nothing happens, unplug and replug the dongle. You should soon see the following status displayed by PPP Widget:
      1. Prepare device…
      2. Seach for port…
      3. Setup modem…
      4. Disconnected (and the button “Connect” should now be enabled)
    7. Now, The dongle’s led should blink “blue”.

    The Connect button of the PPP Widget will become “enabled”. Click on that button. PPP Widget will display the status “Dialing out…”. If it fails to connect, the status “Disconnected” will displayed. Otherwise, you should see “Connected!” and the dongle’s led should stay fixed “blue”. Enjoy !

    If it does not succeed to connect, check that the dongle is still working on your laptop. Running the application “Vodaphone Mobile Connect Lite” on your Laptop, you will possibly get more details like “Sim card not found”, … Notice: I tried to use the latest version of the application “Vodaphone Mobile Connect Lite” on my Laptop (Windows 8.1) but got a message like “This program as compatibility issues”. I tried to run the Compatibility Troubleshooter, but it didn’t find a solution. Finally, although the application could start anyway, it didn’t detect the dongle. So I would recommend to use the software version available on the key itself.

    You can also enable the log within PPP Widget, via the Configure menu.

    Notice: if your tablet goes to sleep mode, you will be “disconnected” and the dongle will restart to blink “green”. When the tablet waked up, you should see PPP widget trying to re-detect the dongle and setup the modem. If it succeeds, you will be able to click on “Connect”. Otherwise, to unplug and replug the dongle.

    Loading

  • Wi-Fi issues…

    Information possibly useful to understand, investigate and solve Wi-Fi issues.

    Click to Read More

    Here is a really interesting paper. I did copy the most useful part here:

    • 0.5-2 Mbps: Is enough for chatting and mailing services, though it will slow down some content-heavy websites for users with a 20+ Mbps download bandwidth.
    • 4-5 Mbps: Enough for handling all websites and basic video streaming.
    • 20+ Mbps: Minimum required for HD streaming. Typical bitrate of a 720p iTunes TV show is 2-6Mbps, but routers need to compensate for dropouts, other connected clients and prebuffering…
    • 50+ Mbps: Enough for 1080p movies and over-the-air backups.

    Some routers have a “Power savings” mode to save a few milliwatts. Unfortunately reduces bandwidth disproportionately.

    By doubling the distance between a router and a client, the throughput could shrink to one-third of its original value.

    Water acts as a blockade for 2.42GHz signals: Get all objects that contain any form of liquids out of the way Including radiators, flower pots, aquarium, …

    Also make sure that metal objects are not in the way of the router and the clients.

    Smooth and shiny surfaces are prone to reflecting signals and thus either creating drops or massive signal problems.

    Use a Wi-Fi heatmapping tool to measure the impact of distance, frequency changes and building structures on signal strength such as Heatmapper for Windows.

    Motherboards are working in the “Gigahertz” spectrum. That “noise” is being picked up by built-in Wi-Fi transmitter and the higher that noise is, the more likely it is for your wireless adapter to lower bandwidth automatically. As CPUs these days clock dynamically, the Wi-Fi adapter needs to constantly adapt the link rate which not only causes a variation in Mbps but may also be the cause for dropped connections. Especially on laptops, the Wi-Fi adapter is often built close to the memory and CPU bus, which is a major source for problems.

    Modern routers with “dualband” send two network signals: one at 2.4GHz which is crowded, and one at 5GHz, which is far less crowded and offers more channels. Keep both networks enabled on the router, connect the mobile devices to the 2.4 GHz network (as they other don’t supprt 5GHz) and enable only the 5GHz network on laptops and desktops.

    If choosing the 5GHz frequency band is not possible on the laptops/desktops, limit the router to sending out signals at intervals of 20MHz. It might reduce overall throughput a bit, but it will give a stronger signal with less dropouts.

    Reminder: all info above come form a paper of Sandro Villinger posted on TechWorld.

    Other information I have collected:

    WiFi Channels/Frequencies
    WiFi Channels/Frequencies

    Here in Europe, the frequency 2450 MHz is used by microwave ovens. Those could possibly disturb the Wi-Fi channels 9 and 10 that are both next to 2450 MHz. But if one does, it must be replaced immediately! Radiation that escapes from a microwave oven while it is in use may not exceed 5 mW (per cm2 at a distance of 5 cm). So, if your experience Wi-Fi issues when using a microwave oven, the leakage radiation is probably exceeding a lot that limit (It happens as some of my colleagues already experienced).

    Frequencies from 2400 to 2450 MHz (Wi-Fi channels 1 to 8) are used by “radio amateur”. Those could impact the Wi-Fi signal as their radio signal goes up to 120 Watts while Wi-Fi is usually around ~18-30 mWatts.

    Channels 1, 5, 9 and 13 are known to be used by some wireless transmitter and camera (at least here in Europe). Based on this info and those above, channel 13 seems to be the best candidate to avoid issues. InSSIDer is a tool for Windows that can be used to get information on channel usage in the area.

    Use iPerf to measure the improvement of the Wi-Fi signal.

    Before moving to the channel 13, my Wi-fi signal was lost every few seconds… Since it is on the channel 13, it’s stable as a rock!

    Loading

  • Enable Write-Caching on a Server 2012 Essential (or any Domain Controller)

    Once a server is promoted to a DC, write cache is disabled by default. You can try to enable it, but it will revert back to disabled after a reboot. This is default and can’t theoretically not be changed. It’s done to protect the AD database as well as improve AD DC performance. There is however a registry tip that can force the server to keep that setting.

    Click to Read More

    I did experience this on my Server 2010 Essentials which is out-of-the-box a Domain Controller. Although not impossible, it’s not recommended to uninstall the DC feature from a Server 2010 Essentials. It’s not easy and various features could stop to run (More info here and here).
    The write-Caching was disabled after a reboot only on the System Disk. Not on any other disk in the server… I finally read it was the default behavior for servers with a Domain Controller and found tips here:
    1. One option is to re-enable write-caching at boot with a script using dskcache. E.g.:

      c:\dskcache.exe +w
      exit


    2. also a hack that can be made in the registry and works really fine:

      Path: HKLM\System\CurrentControlSet\Services\NTDS\Parameters
      Value: “DSA Heuristics”
      Type: REG_SZ
      Setting this to “1” (Note: the type MUST be a string type) prevents AD service from disabling write cache.

    Loading

  • Boost Windows 8 Start-up Process

    Although I am running my OS on one of the fastest SSD (a Samsung Serie 840 Pro), I still have the feeling that the elapse time is much too long between the log-on and the moment when I have the hand on Windows. This is due to the Services and Applications run at start-up.

    There is fortunately solutions to  optimize your Start-up Process by delaying Applications and Services from starting up as soon as you log into your computer. Doing that, your computer becomes usable a lot faster.

    Click to Read More

    Delay the start-up of Applications

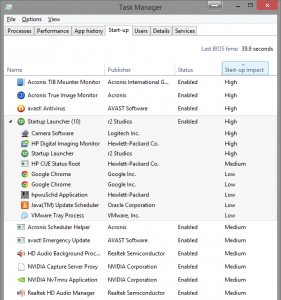
    You can have a look on the applications started with Windows in the Task Manager (CTRLSHIFTESC) > Tab “Start-up”.

    In that tab, you see which applications have an impact on the Start-up Process.There are several possible values:

    • High – the application uses more than 1000 millisecond of CPU time or more than 3MB of disk I/O
    • Medium – the application uses 300 to 1000 ms of CPU time or 300KB to 3MB of disk I/O
    • Low – the application uses less than 300 milliseconds of CPU time and less than 300KB of disk I/O
    • Not Measured – This could happen with some of the third party apps where windows is unable to determine the impact. An application like BootRacer (Free for non-commercial use) could be used to determine the impact.

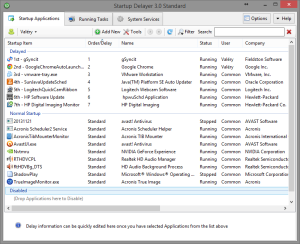
    Next, install “Startup Delayer” from R2 Studios, a simple but very flexible application used to postpone the startup of applications. You can customize how much you want to delay them and in which order you want to start them. E.g.: as long as there is not enough CPU available. I did delay all the applications that are not critical IMO to use Windows. I.e.: I kept only Acronis (backup), Avast (Antivirus), Audio and Video managers. And all the other ones have been delayed. A simple Drag&Drop can be used to move an application from “Normal Startup” to “Delayed” or “Disabled”, or to reorder the delayed ones.

    Startup Delayer

    In the screenshot of the Task Manager, all delayed applications appear grouped under “Startup Launcher”.

    Start-up Applications Delayed
    Start-up Applications Delayed

    A famous alternative to “Startup delayer” is “WinPatrol” but it does much more than just delaying start-up applications. And as always, I prefer simple applications that fit one single need than one big application trying to fit all needs…

    Delay the start-up of Services

    Services starting up can be delayed via the Service Management console (Services.msc). Use the “Automatic (Delayed Start)” option:

    Services Delay
    Services Delay

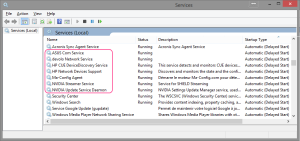
    Here are the services that I have delayed:

    Delayed Services
    Delayed Services

    Loading