Category: Tips

  • Enable 3D on ASUS VG278HR Lightboost 27” with NVidia Stereoscopic 3D

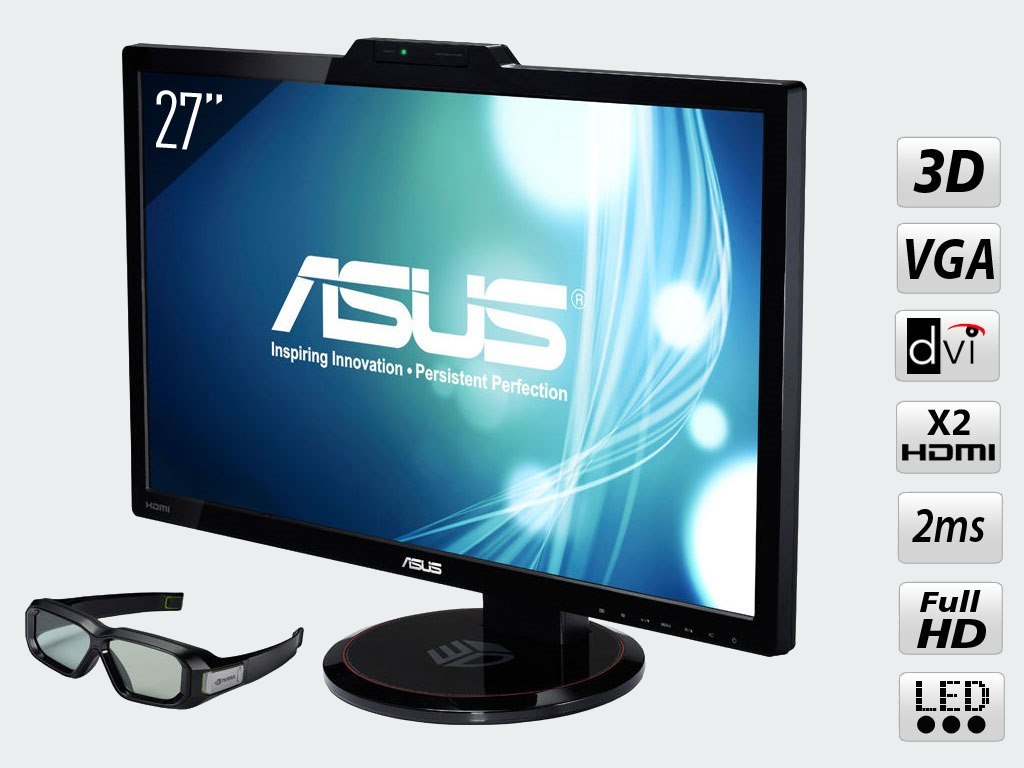
    I have been really puzzled by how to enable 3D on my Asus VG278HR screen.

    Asus VG278HR
    Asus VG278HR

    It sometimes worked and sometimes did not ?! Actually, it’s quite easy to enable/disable it if all the conditions are met, such as the right refresh rate, the right resolution, the 3D screen as primary display, …

    Click to Read More

    Requirement to play 3D movies:

    • A 3D screen with a 3D IR emitter: Mine is an ASUS VG278HR
    • A 3D compatible graphic card: Mine is a Nvidia GeForce GTX 760
    • “NVIDIA 3D Vision Video Player”: a player able to play 3D movies with side-by-side frames or up-and-down frames
    • The complete “NVIDIA Control panel”, i.e.: including the nodes “3D Settings” and “Stereoscopic 3D” in addition to “Display”, “Performance” and “Video”. If you are missing those configuration nodes, install the very latest “drivers” from NVIDIA. I am currently using “320.49-desktop-win8-win7-winvista-64bit-english-whql.exe”

    Notice: the difference between the ASUS VG278HR and ASUS VG278H is the 3D Infrared emitter embedded in the VG278HR to synchronize the glasses. Once the 3D is enabled, a small green led turns on on the emitter. This is the only way to know that the 3D is enabled. With a 3D screen without embedded IR, an external emitter must be bought. Also, one set of 3D glasses is included with the ASUS VG278HR.

    To enable 3D, try first the wizard (should be done at least once):

    1. Right click the desktop > NVidia Control Panel > Stereoscopic 3D
    2. Check “Enable stereoscopic 3D”
    3. Select “3D TV Play” as Stereoscopic 3D Display Type
    4. Click “Run Setup Wizard”

    All the screens (if several) will blink and the windows on the other screen will be moved. But finally the wizard will appear. Don’t click into another screen as the wizard would minimize. This wizard welcome screen must be title “Set up NVIDIA 3DTV Play” otherwise, it’s not the right one to be used to enable 3D with the VG278HR.

    1. Click “Next” on the welcome screen.
    2. You should now see a screen asking to “Turn On your glasses”. Press the button on the left side of your glasses. And click “Next”.
    3. On the next screen “Test your hardware setup”, you have to pick the right answers and then click “Next”. With only the left eye opened you should see the green shape only. With only the right eye opened, you should see the blue one only.
    4. On the next screen you “Verify your ability to see stereoscopic 3D pictures”. Select the right answer, accept the health notice and then click “Next”. The right answer is the left one (with a small elevate surface on top of the background).
    5. On the last screen I suggest to uncheck the option to start the demo.

    You can experience issues to enable 3D with the wizard, or you can loose the 3D once you close the wizard or far later for some unclear reason. In any case, check bellow for required settings to be able to enable/re-enable 3D. Possibly restart the wizard once every settings is fixed.

    Once the wizard completed, you will notice that the 3D is enabled (you see the green led turned on on top of the screen) but the resolution could be 1280 x 720. Ugly ! Unfortunately , if you try immediately to set 1980 x 1080 (which is recommended and supported for 3D) the 3D will probably be disabled. Don’t worry. This is due to the refresh rate. See bellow how to fix that.

    If 3D is disabled or can’t be enabled

    Check first that the Stereoscopic 3D mode is enabled: Right click the desktop > Screen resolution > select the option “Enable Stereoscopic 3D settings for all supported displays” and click “Apply”.

    Next, set the ASUS VG278HR as the main display if you have multiple screens. Otherwise, I notice that 3D is not effective: right click the desktop > Screen resolution > select the ASUS screen > check “Make this my main display” and “Apply”.

    Then, check that the Asus refresh rate is 24 Hertz: Right click the desktop > Screen resolution > select the ASUS screen > click “Advanced settings” > Go to the “Monitor” tab > select the refresh rate and “Apply”.

    Notice: If 3D is enabled and you select anything above 24Hz as a refresh rate, it will be disabled immediately.

    Finally, select a supported resolution such as 1920 x 1080 or 1280 x 720. If you select one of those resolution while the refresh rate is 24Hz, you should see Resolution: “1920 x 1080 (Recommended, 3D)” in the “Screen Resolution” window instead of simply “1920 x 1080 (Recommended)“. As soon as you click “Apply”, 3D should now be enabled.

    Disable properly the 3D

    In 3D mode, the screen appears to be grey although it’s really brilliant when 3D is disabled. This is normal as the refresh rate is divided by two (one frame must be generated for each eye).

    So, if you want to switch from 3D mode to normal mode, the easiest is simply to disable/re-enable the “Stereoscopic 3D”. I did try various tools and command line without success: Right click the desktop > Screen resolution > deselect or select the option “Enable Stereoscopic 3D settings for all supported displays” and click “Apply”.

    Notices:

    1. You have to enable 3D on the screen BEFORE starting your “NVIDIA 3D Vision Video Player”. If you did start it first, restart it otherwise your movie will be played side-by-side anyway.
    2. If your video does not expand to fit the screen and you want that, go to NVIDIA 3D Vision Video Player’s menu File > Aspect Ratio > 16:9

    Loading

    ,
  • Google Play Store: “Background data disabled”

    Since a few weeks I have frequently issues when trying to update applications installed on my mobile (Android 4.3 Jelly Bean + Play Store 4.3.11). The only solution is to kill and restart Play Store.

    Click to Read More

    Quite often since a few weeks, Play Store displays an error message “Background data disabled” when I want to use it. Next, it keeps asking me to enable “sync” (which is enabled for all my accounts and all types of content). And trying to skip that results in a “No connection – Retry”.

    This issue seems to appear when I have switched from a cellular data connection to a Wi-Fi connection while Play Store was running…

    To fix this, kill Play Store:

    1. Go to Settings > Application Manager > Google Play Store.
    2. Click “Force Stop” (no cache to be cleaned – no need to delete the data)

    And restart it.

    Loading

  • Office documents as email attachments: Experienced an error trying to open the file.

    I just saved a few Office documents received as email attachments and tried to open them when I got the following error: “office experienced an error trying to open the file.”. This is actually due to the “internet” security protection of Windows…

    Click to Read More

    I have been doing that for month, with Outlook 2010, on this PC and never got such an error. Fortunately I immediately thought to check the “Security” on the file. That was the issue.

    Unblock file downloaded from Internet
    Unblock file downloaded from Internet

    That’s easy to fix:

    1. Right click the attachments saved as files and select “Properties”.
    2. Click Unblock.

    If you have several files to be unblocked, you can also use one of the SysInternals: Streams v1.56 to unblock them all at once:

    1. Open a command prompt as Administrator.
    2. Run the command streams on the files to be unblocked. E.g.: streams -d *.*

    Actually, a attachment saved from Outlook seems to be (?now?) considered as a file downloaded from Internet. And there are information stored in an alternate filestream that are used by Windows to block the files downloaded from Internet. The “streams” command is nuking that alternate stream. So, Windows stops blocking the files.

    Loading

  • Mouse Lag on Windows 8

    I have a wireless Logitech Mouse (Performance Mouse MX™). This one is sometimes freezing although everything else seems to work fine (I can still see my video playing smoothly as well as flash animations in my browser, CPU is not high, free RAM is not low…). It looks like only the mouse is lagging.

    This issue seems however to be fixed since I have disabled the “Enhance pointer precision” feature in the “Mouse Properties”…

    Click to Read More

    one can find many questions about this issue on the web and as much explanations. One which is quite interesting is that many people experience lag with their mouse once they have Chrome open, due to the Chrome Flash player. This one can be disabled via the uri chrome://plugins

    I was indeed mainly experiencing mouse lag when many tabs were opened in Chrome. However, I didn’t have this plugin. So, I will only try to disable Chrome Plugins if the problem re-appears. Indeed, it disappeared since I have disable the “Enhance pointer precision” feature.

    1. Open the “Control Panel”
    2. Open the “Mouse Properties”
    3. In the “Pointer Options” tab, unselect “Enhance pointer precision”.

    Notice: I don’t use the Logitech drivers but only the default Microsoft drivers. I had indeed too many issues in the past with SetPoint compared to its added value (Among other connecting my Bluetooth keyboard)

    Loading

  • Cannot make my IMDB watchlist public?

    Each time I try to change my IMDB watchlist from “private” to “public”, it seems to be changed but comes back to “private” once I click on “Done”.

    This is a bug in the IMDB interface. There is fortunately a workaround: after changing the status of the list, add a movie in that list before clicking on “Done”.

    This bug is reported here.

    Loading

  • Connect a Logitech Elite Keyboard on a generic Bluetooth dongle

    I am still using the Logitech Elite Bluetooth Keyboard I bought years ago. It was sold in a bundle with a Bluetooth Optical Mouse MX900 and a Bluetooth Hub. That Hub also served as a cradle to charge the Mouse.

    Logitech Elite Keyboard And MX900 Mouse
    Logitech Elite Keyboard, MX900 Mouse and Bluetooth Hub

    Since I don’t user the Mouse anymore and don’t need therefore the Cradle to recharge it, I thought I could get rid of it if I could connect the Keyboard on a Generic Bluetooth dongle or even better: on my onboard Bluetooth.

    Click to Read More

    Actually, I don’t use the MX900 mouse anymore since the Cradle does not recharge it anymore. I think the “contacts” are dead. This seems to be a quite common issue.

    And since my Asus P9X79 Pro MB comes with an onboard Bluetooth, I thought that I could completely get rid of the Logitech Hub which has its own power supply, a usb connector and a PS/2 connector… i.e.: too many cables :/

    This is well supported by Logitech as explained in their Bluetooth FAQ. Here is how to proceed on Windows 8:

    1. The Bluetooth must already be installed. The default “drivers” (Bluetooth stack) from Microsoft will work fine.
    2. Right-click the Bluetooth icon in the system tray and select “Add a Bluetooth device.”
    3. Click “Add a device” on top of the Devices list.
    4. While the Wizard is searching for new devices press the “Connect” button behind the Keyboard (The small white button next to the battery compartment). A generic Keyboard will appear in the list. It will only be displayed as a Logitech Elite Keyboard once installed.
    5. Once the keyboard detected and added, Windows will prompt you to type a passkey on the Keyboard. You must end by pressing ‘Enter’ to validate the passkey.
    6. Now, you have to disallow Windows to turn off the Bluetooth while entering the sleep mode otherwise the Bluetooth keyboard will appear “Offline” when you wake up the computer.
      1. Right-Click the Bluetooth icon in the system stray and select “Open Settings”
      2. Open the “Hardware” tab in the “Bluetooth Settings” pane
      3. Select your Bluetooth dongle (or onboard emitter) and click on the “Properties” button to open the “Bluetooth Properties” pane
      4. Click on “Change settings”. You will see a new tab “Power Management”
      5. Open this “Power Management” tab and deselect “Allow the computer to turn off this device to save power”.
    7. The computer may have to be rebooted if the keyboard is not immediately enabled.

    The only drawback is that I won’t be able to use the keyboard at boot time (e.g.: to enter the bios) or in safe mode. To support that, the Logitech Bluetooth Hub came with a PS/2 connector.

    Loading

  • Fix Wi-Fi issue on Fuhu Nabi 2

    As I mentioned in a comment on this post, I was suddenly not able anymore to turn on the Wi-Fi of my Nabi 2. But it was easy to solve 🙂

    Click to Read More

    The situation when the problem occurred was this one:

    • My Nabi 2 is a UK version
    • The Product Version of my Nabi was 1.9.37 before rooting the device and installing the Gapps and it was still that version when the problem occurred.
    • I was using TWRP 2.2.2.1 as my Nabi 2 is suffering the Touch Screen Calibration issue with any next version.

    I have been reading many threads about that issue, mainly starting from this one. And I finally concluded that the only solution was to re-install the stock firmware, upgrade next to the latest Product Version and retry to root and install Gapps. It worked like a charm :p

    The easiest to do that is to use the Nabi Lab v2. It’s so well done and clear that the details provided here after are actually useless.

    1. If your PC is not ready (has the drivers) anymore to connect on the Nabi,  use first the menu 1.
    2. Use next the menu 3 to restore the stock firmware.
      • After this, my device was still running the Product Version 1.9.37 and all the original applications from Fuhu were back.
      • Most of the applications I installed from Google Play had disappeared but not all ?! I was expecting all of them to be swiped out…
    3. Reboot the device and go to the Settings > About tablet > Update to get the very latest Product Version.
      • In my case it moved from 1.9.37 to 2.0. I read somewhere that this one includes a fix or improvement related to Wi-Fi.. Good :p
    4. Back to Nabi Lab, use the menu 4 to root the device
      • I didn’t use the menu 1 to install TWRP, root the device and install Gapps because I wanted to keep the TWRP 2.2.2.1 proved to fit my Nabi regarding it’s Touch Screen Calibration issue.
    5. Finally, use the menu 3 to install Gapps.
    Et voilà. Wi-Fi is working and my Nabi is still rooted and has access to Google Play.
    Notice:
    • I did try to install TWRP 2.5.0.0 for Nabi 2 but I was still experiencing the Touch Screen Calibration Issue.
    • I did try also next “TWRP 2.3.3.0 for Nabi versions prior 1.9.37 (UK, …)” available with Nabi Lab v2 and it appeared to works fine on my Nabi! Great 🙂
    • What is still not great with the Nabi 2: there is no native support to move applications from internal to external SD. It’s well known that not all applications can be moved (Ex.: those with Widgets currently in use, …). But they could offer something to move the others like use of “simlinks” for each moved .apk..

    Loading

  • IE requests the root “/” of the website at the same time as any other page

    I have been reported that for 5 customers out of 10000, each time their Internet Explorer does GET a page (including a simple **blank** html page), it also requests next the root “/” of the website (i.e.: the “homepage”). This has been making me going nuts.

    Click to Read More

    This problem occurs when browsing any page of any site on internet as well as any page in any one of our business sites. So, it is absolutely not related the well known issues such as an image with an empty “src”, the use of the “base” tag, … Also, it occurs only when browsing with IE and not with Chrome, Firefox, …

    This is a major issue as far as our business sites are concerned as the first call to any page of our sites is consuming an authentication “ticket”. Once this ticket is consumed, it is not available anymore for subsequent calls made within the same session. And because it happens that the ticket is consumed by the call to the root instead of the call to the page actually browsed, the business applications sometimes fail.

    I already experienced such a weird behavior with Add-Ons aimed at “page rating”, “survey”, … Such Add-Ons are not always considered as “malwares” and therefore not reported by antivirus, etc..

    Unfortunately, the faulty PCs (where the problem occurs) do no have any such Add-Ons. They are also 100% “malware free”… Using TCPView from SysInternals, we have confirmed that the unwanted GET is done by IE and not by another process. Using WireShark, we have also confirmed that this GET is not done by IE due to an “http 302” (redirect) or any other similar reasons, that there is no suspicious proxy used during the communication, etc….

    Using Process Explorer, we have listed all the dlls loaded by IE both on a “faulty” PC and on a “normal” PC (where the problem does not occur). The purpose was to detect possible “third party” dll. But they all appeared to be from Microsoft. We noticed however one dll loaded on the faulty PC which was not reported on the “normal” PC: msrating.dll,  the interal “Internet Ratings and Local User Management” dll from Microsoft.

    Tilt! The purpose of this one sounds like the Add-Ons I mentioned above…

    As this dll is loaded by the IE’s “Content Advisor”, I have disabled this feature via “Tools-> Internet Options-> Content Tab” and the problem is now gone from all faulty PCs! Gotcha :p

    Also,  If I enable the “Content Advisor” on a “normal” PC, the problem occurs there too… confirming that this feature is the culprit.

    Finally, note that the access to the “Content Advisor” was protected by a user password  on one of the “faulty” PC and I had to hack it as explained here: http://www.wikihow.com/Remove-Content-Advisor-Password-in-Internet-Explorer.

    Loading

  • Laptop’s Wi-Fi off after Windows 8 Update

    My  laptop Sony Vaio VGN CR31 has just rebooted after a Windows Update. Before the reboot, I was still browsing internet via the wifi connection. But after the reboot, the WiFi was OFF(*) although the WiFi switch (on the left side of the latop) was ON.

    (*)  In the network connection panel, the Wi-Fi was showing “Wi-Fi (Off)”.

    I did run the Windows troubleshooting on the internet connection and network adapter.  All drivers were up to date and no issue were found.

    After various attempt to uninstall the latest updates, I found the solution:

    • Press :win: + C  to open Windows 8 Charms menu
    • Choose “Settings”,
    • Click “Change PC Settings” at the bottom.
    • Choose the “Wireless” section. There, you can see two (or three) toggles: Airplane Mode, Wireless Devicess (and possibly Bluetooth).

    Wi-Fi was also turned OFF! Toggling Wi-Fi back ON fixed my issue. No idea why the Windows Updates (or the reboot or ???) did change that settings ?!

    Loading

  • Remove Print Jobs stuck in Queue with state Deleting

    I have time to time Print Jobs stuck in the Print Queue that cannot be canceled or deleted. It’s always very frustrating as it blocks other Print Jobs which are usually quite urgent… The only solution is to stop the spooler and delete its content from a command prompt.

    Click to Read More

    Often, it starts with a Job stuck in the Print Queue and not printing. For some reason, although I restart both the PC and the Printer, the Job never starts. So, I try to cancel it but the Job does not disappear from the Queue and keeps displaying the status “Deleting-Printing…” for ever.

    I think that the problem occurs when the PC goes into the Sleep state while the Print Job is not yet completed (But I am quite sure there are other causes). When the PC is waked up, the Job appears stuck for ever.

    Here are the commands  to stop, clean and restart the spooler:

    [bash]net stop spooler
    del %systemroot%\system32\spool\printers\*.shd
    del %systemroot%\system32\spool\printers\*.spl
    net start spooler[/bash]

    Loading