• Extract DVD’s tracks as MKV and merge them

    In order to get access from my HTPC to any movie or cartoon at any time (without feeling like a DJ), I extract the content of my DVD as MKV. Sometimes, with some DVD, I obtain several MKV for a single episode. In such case, I merge the MKV’s in a single one. My favorite tools: MakeMKV and MKVToolNix (MKVMerge)

    Click to Read More

    The Beta version of MakeMKV is always free. It’s the most easiest tool I have tested to extract tracks from a DVD. Only a few steps are required to analyze and decrypt the DVD, list the content and extract it:

    1. Start MakeMKV.
    2. Insert the DVD. It’s automatically detected by MakeMKV.
    3. Press the large “DVD reader” Icon in MakeMKV. If an advanced decryption is required, it will take some times. Once completed, a list with the content is displayed.
    4. Select the titles (tracks) to be extracted (the larger ones are automatically selected as presumed to not be DVD menu).
    5. Select the “Output Folder”.
    6. And press the small “Disk with a green arrow” icon titled “Make MKV”.

    One MKV is produced by selected title. This MKV contains everything: not only the video and the various audio tracks of the title but also the definition of each chapters.

    To merge MKV, I use a tool installed with MKVToolNix: MKVMerge. The process is also easy and straightforward:

    1. Start MKVMerge
    2. Drag and Drop a first MKV into the “Input files” zone
    3. Press the “append” button to add a second MKV for merging purpose!
    4. Possibly change the “Output filename”
    5. And finally press “start muxing”.

    By default, the various audio tracks and all defined chapters are kept in the output MKV.

    Loading

  • Volume of my HTPC was extremely low

    Although the volume of Windows was still 100%, I recently had to push the volume of my surround system from 8 (as used usually) to 28 to ear the sound of movies and cartoons played on my HTPC.

    The problem was Windows 8 did (mysteriously) lost the configuration of the speakers. They used to be configured as 5.1 and appeared to be now configured in stereo.

    Click to Read More

    I recently tried to upgrade Media Browser from version 2 to version 3 on my HTPC. It was not a success because Media Browser 3 comes with a client part and a server part. If the server part is not running (locally on on the LAN), the client part can’t run either. And the server part might not run on my HTPC because it may only start if the windows shell starts (it’s not a Windows Service but a Startup Program instead) – shell that is not running on my HTPC as it has been replaced with Windows Media Center.

    After this trial, I did re-install Media Browser 2. Although I would be quite surprised if that would be true, this is maybe why the configuration of the speakers went back to “stereo” instead 5.1 ?!

    To check what was wrong, I had to close Windows Media Center using F4 (as not only it replaces the Windows shell, but it is also run without any “close” feature thanks to the option /mediamode).

    I did call the Task Manager (CTRL-Shift-Del) and run a new Task: Explorer, to get a Windows Shell. I was next able to check the Sound System Properties.

    1. Right-Click the “Speakers” icon in the systray.
    2. Select “Open Volume Mixer”.
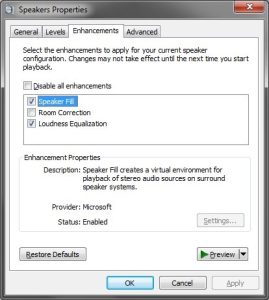
    3. Click the “Speakers” icon in the “Device” column of the “Volume Mixer” window. This is going to open the “Speakers Properties” window

    The Speakers where configured in stereo. I did reconfigured them as 5.1.

    Next, in the “Enhancement” tab of the “Speakers Properties” window, I did re-enable the “Loudness Equalization” and “Speaker Fill”.

    Spearkers Enhancements
    Spearkers Enhancements

    I did next log-off and restart a session. The issue was solved.

    Loading

  • Programmatic access to “Print Dialog” of my network printer is really slow

    In a .Net application, I am using the standard “Print Dialog” of Windows 7 x64 to print PDF document on a network printer named “\\Server\Printer”. It noticed on most test machines that the dialog window was taking up to 8 seconds only to open (I.e.: before doing the actual print). Configuring the printer “\\Server\Printer” as a “local printer on port \\Server\Printer” instead of configuring it as a “network printer” is solving that issue.

    Click to Read More

    I will post the .Net piece of code I am using to open the “Print Dialog” asap. It’s really the most simple one.

    I experience the issue with a network Printer “Ricoh Aficio MP C5000”. I didn’t try with another model as all printers I have access to at my Office are the sames.

    I looked for a solution to solve this issue without upgrading the network drivers or the firmware of the printer (as far as this could solve the issue as sometimes reported for HP printer) as I don’t have the required privileges to do so.  Here is the trick I found:

    1. If removed the current network printer via Control Panel > Device and Printers.
    2. Add a new Printer
    3. Choose  “local printer” on port  “\\Server\Printer”
    4. Choose the drivers in the list of available ones. Notice: I chose Ricoh Aficio MP C6000 PCL 6 as C5000 was not available.

    Next, the “Print Dialog” opened immediately on all workstations where I did test the trick.

    As soon as I re-install the printer as a “network printer”, the performance issue is back… Notice however that the dialog window always opens immediately when called from, e.g., MS Office (Word, Excel, …) whatever configuration mode I use for the printer.

    Loading

  • “Authentication Error Occurred” with my Samsung Galaxy – Android 4.1.2 – due to Wi-Fi

    Depending on the place where I was located at home, when trying to connect my Galaxy via Wi-Fi, I could got or not this infamous message “Authentication Error Occurred”. I did possibly solve it by changing the channel of my access points.

    Click to Read More

    My experience with this error message is that it really depends on the received signal(s) and possibly having several network with the same SSID.

    I have 3 Wi-Fi Access Points in my house. All are configured with the same password and encryption (WPA2/AES), the same SSID and the same channel. This is creating a large and stable wireless network in the house.

    But at some locations where I get either a poor signal or two signals of quite the same strength, I get the infamous “Authentication Error Occurred” message with my Galaxy SII (Android 4.1.2) just after enabling Wi-Fi. And I get this message whatever Access Point I am trying to connect from those locations.

    At those very same locations, my laptop “Sony Vaio” (Windows 8) can connect without any issue, as well as my tablet “Nabi 2” (Android 4.0.4). Reason why I conclude it’s probably an “Android/Galaxy issue” and not a “Router/Access Point issue”.

    Moving from those locations just a few meters away, I can successfully connect quite immediately after enabling the Wi-Fi. But in such cases, although I only moved a few meters away, I get at least one signal much better than the others.

    My access Points are “Devolo DLAN 200 Wireless N”. From security/encryption point of view, they only support WPA/TKIP and WPA2/AES. I tried both mode without success.

    I also tried to use shorter password (minimum being 8 chars) without success. But I admit I didn’t try to connect using WPS (which is supported by my Devolo and reported by some users on various blog to solve this issue).

    I finally tried to completely disable the security/encryption. I did enable the MAC filtering instead. In that mode, the connections succeed really more often, but still not always. And there is at least one location where I can never connect with my Galaxy SII although I can with my laptop and my tablet: my bed 🙁

    During my tests, I was monitoring the wireless signals using “Wi-Fi Analyzer”, to be sure that the signal was kept “fair”. So, loosing the signal for any reason is not presumed to be the issue either, especially as far as I was doing the same test (I.e.: I enable the Wi-Fi and wait for a connection) simultaneously with my Galaxy SII Android 4.1.2 and my Nabi 2 Android 4.0.4.

    As the quality of the signal was “fair” and as far as I had no issue in most other locations with free Wi-Fi, I started to consider that the problem was possibly related to some small signal disruptions in my area.

    Here in Europe, the frequency 2450 MHz is used by microwave ovens. Those could possibly disturb the Wi-Fi channels 9 and 10. But if your does, change it immediately ! Radiation that escapes from a microwave oven while it is in use may not exceed 5 mW (per cm2 at a distance of 5 cm ). So, if your experience Wi-Fi issues when using your microwave oven, the leakage radiation is probably exceeding a lot that limit (It happens as some of my colleagues already experienced). But I don’t have any special device turned on when I do my tests…

    Looking for more information about Wi-Fi signals, I discovered that frequencies from 2400 to 2450 MHz (Wi-Fi channels 1 to 8) are used by “radio amateur”. Those could effectively impact the Wi-Fi signal as their radio signal goes up to 120 Watts while Wi-Fi is usually around ~18-30 mWatts. It would therefore be advisable to check within the neighborhood if anyone has such a hobby. This could likely be the case if the Wi-Fi issues are only experienced during certain period of the day (e.g.: the evening) or during the weekend.

    I finally read that channels 1, 5, 9 and 13 are known to be used by some wireless transmitter and camera (at least here in Europe). As I don’t have such devices, and taking into account the info about the frequencies used by “ham radio”, I decided to use the channel 9 or 13.

    Concretely I did switch from channel 6 to channel 13 on all my access points and could immediately connect flawlessly from all locations where I was experiencing issues previously. That being said, there are possibly some other locations still to be discovered where I will experience again the problem. But for sure, changing the frequency has an impact on the connection!

    Loading

  • About This Wishlist

    The purpose of this page is to keep track of all stuff I would like to buy, get or build.

    NB.: This icon means that I got the item or at least something similar:

    Loading

  • WordPress: Create a page of Posts

    I don’t use menus that simply display all posts from one category as one can do using a custom menu (to be created via the Dashboard > Appearance > Menus). Instead, I use pages with a “custom Template” that displays such post with futher flexibility.

    Click to Read More

    1. Create a new “Page Template” (a php file) named “page-of-post.php” and save that one into the root folder of your theme if not yet available: \\<YourSynology>\web\wordpress\wp-content\themes\<YourTheme>\
    2. In this page Template, you should have the code provided at the bottom of this post.
    3. Go to the “Dashboard” > “Pages”, and click “Add New” to create a blank page.
    4. Type a name for your page. This name will be displayed in the menu (Header).
    5. In the “Page Attributes” pane, select “Page of Post” as a “Template” for the new page.
    6. Publish the page
    7. Add now that page to the Custom Menu (via the Dashboard > Appearance > Menus).
    8. Finally, possibly create one “Category Sticky” post which will stay at the bottom of the page and introduce the topic (E.g.: when creating a post, add a category in the “Category Sticky” pane made available via the Plugin “Category Sticky Posts” 0.13 of  Brian Zeligson)

    Here is the code of the page Template. Pay attention that I am using the theme ‘twentyeleven’:

    [code language=”php”] <?php
    /*
    Template Name: Page Of Posts
    */

    // if you are not using this in a child of Twenty Eleven, you need to replicate the html structure of your own theme.

    get_header(); ?>

    <div id="primary">
    <div id="content" role="main">

    <?php
    $slug = basename(get_permalink());
    $paged = (get_query_var(‘paged’)) ? get_query_var(‘paged’) : 1;
    $args= array(
    ‘category_name’ => $slug, // Change these category SLUGS to suit your use. Ex.: "categ1, categ2"
    ‘paged’ => $paged
    );
    query_posts($args);

    $category = get_category_by_slug($slug);
    if(empty($category))
    $name = $slug;
    else
    $name = $category->name;
    if( have_posts() ) :?>

    <?php twentyeleven_content_nav( ‘nav-above’ ); ?>

    <?php /* Start the Loop */ ?>
    <?php while ( have_posts() ) : the_post(); ?>

    <?php get_template_part( ‘content’, get_post_format() ); ?>

    <?php endwhile; ?>

    <?php twentyeleven_content_nav( ‘nav-below’ ); ?>

    <?php else : ?>

    <article id="post-0" class="post no-results not-found">
    <header class="entry-header">
    <h1 class="entry-title"><?php _e( ‘Nothing Found in the Category "’.$name.’"’, ‘twentyeleven’ ); ?></h1>
    </header><!– .entry-header –>

    <div class="entry-content">
    <p><?php _e( ‘Apologies, but no results were found for the requested archive. Perhaps searching will help find a related post.’, ‘twentyeleven’ ); ?></p>
    <?php get_search_form(); ?>
    </div><!– .entry-content –>
    </article><!– #post-0 –>

    <?php endif; ?>

    </div><!– #content –>
    </div><!– #primary –>

    <?php get_sidebar(); ?>
    <?php get_footer(); ?>
    [/code]

    Loading

  • WordPress: Sort items in the Header using a Custom Menu

    So far, I didn’t configure anything special in WordPress to get my “Home” menu and my various “pages” displayed in the header. I only had to customize WordPress to display a dropdow menu “Categories”. But to sort those items, I add to create a menu via the “Dashboard” > “Appearance” Menu.

    Click to Read More

    1. Go to the “Dashboard”, open “Appearance” and select “Menus”.
    2. Create a new Menu. The name of that menu won’t be displayed in the blog
    3. Select that menu as “primary menu” in the “Theme locations” pane.
    4. Add the “Home” entry in that menu. It’s available in the “Pages” pane > “View all”
    5. Add other “Pages” and “Categories”.
    6. Sort them according to your needs.

    Notice that using this feature, it’s easy to create one entry for each category. I don’t use this tip however to display all posts from one category. Instead, I create a custom page that displays only those posts. Doing so, I can customize further the display.

    Loading

  • WordPress: exclude categories from the Home Page

    I don’t want my posts from categories “Softwares” and “Wishlist” to appear in the main thread of my blog. In the past, I had to add some code in the “functions.php” page of my theme (twentyeleven) to filter that posts from the home page. Now, I am using the plugin “WP Exclude From Homepage 1.1.2”.

    Click to Read More

    The code I used to add in \\<YourSynology>\web\wordpress\wp-content\themes\<YourTheme>\function.php was:

    [code language=”php”]

    /**
    * Excludes post in category "softwares" from the home page
    */
    function exclude_cat_from_home($query) {
    if ( $query->is_home) {

    $acats = array();
    foreach ( array(‘wishlist’,’softwares’) as $catName ) {
    $cat = get_category_by_slug( $catName );
    $acats[] = ‘-‘.$cat->cat_ID;
    }
    $cats = join(‘,’, $acats);
    $query-> set(‘cat’,$cats);
    }

    return $query;
    }
    add_filter(‘pre_get_posts’,’exclude_cat_from_home’);

    [/code]

    It was located at the very bottom of the file

    Loading

  • A sound bar

    I would like to replace my Logitech 7.1 speaker system used on my TV by a single soundbar. The only one which “sounds” to be really great is the Yamaha YSP 3300 Soundbar (and above – but too expensive for my purpose).

    Yamaha-YSP-3300
    Yamaha-YSP-3300

    Click to Read More

    It’s IMO the best soundbar in that range of price

    • It employs 16 array speakers and 2 woofers to create a well dispersed soundstage at the front.
    • It comes with a Wireless Active Subwoofer to deliver the low end.
    • It also includes the Yamaha’s 5 BeamPlus2 feature for a more immersive audio experience.
    • It has 4 HDMI input and 1 HDMI output.
    • IT comes with a Wireless Transmitter (YIT-W12TX) which is designed to wirelessly stream music from iPod/iPhone/iPad or Mac/PC to the soundbar.

    I found the best price on www.amazon.de

    EDIT 19/01/2014 Et voilà: I bought it on bestekeus.be for only 878€ vs 929€-1299€ on other websites. And BesteKeus has a shop very close to my location (Brussels) where I can go to pick and pay the device.

    Loading

  • A scanner for negatives

    Looking for a really good device to scan my negatives, I found that Plustek offers good products such as the Plustek OpticFilm 7400.

    However, for a quite similar price, the Reflecta CrystalScan 7200 seems to be an even better option as it comes with hardware based dust- and scratch correction.

    To be investigated further…

    EDIT 18/07/2014 Et voilà: Finally, I ordered an Epson Perfection V550 Photo. The best compromise between price (189€ on CameraNu.nl) and quality of output (Amazing ICE Technology that really removes dust marks). Excellent Review here. My own experience is available here.

    EPSON Perfection V550 Photo

    Loading

Tags


Acer iDea 510 AirPlay Android Backup DD-WRT DNS DS209+ DS713+ DS1815+ FlexRaid Galaxy Galaxy S2 Galaxy S7 Google Assistant Google Home HTPC Kies MCE MySQL Nabi 2 Nvidia TV Shield One Plus One OpenHab Outlook Philips Hue Plex RAID Raspberry PI Remote Desktop Root Access Samsung Scripts Synology Team Build Visual Studio VMWare Wi-Fi Windows Windows 8 Windows 8.1 Windows 10 Windows Server 2012 XBMC Xpenology ZigBee

Categories


Archives