Month: November 2017

  • A Switch to share 4 USB 3.1 devices with 4 PC

    I currently have a USB Switch ATEN US224. I would like to upgrade it with the ATEN US434

    Aten US434 Image

    Click to Read More

    Briefly said, I would be able to share 4 USB 3.1 devices with 4 PC instead of sharing 4 USB 2.0 devices with 2 PC.

    I.e.: Currently I have this (Aten US224):

    And I would like this, which is close to 90€ (Aten US434):

    There is also a cheaper version, named Aten US424, to share 4 usb 2.0 with 4 PC:

    Edit 28/05/2019 I got the Aten US424.

    Loading

    ,
  • Plex Media Server not matching/downloading metadata anymore

    Since a few days, My Plex Media Server, hosted on my Synology, was not able to match movies anymore. And when matching movies manually, it was sometimes downloading the covers but never the metadata. Deleting the Service plugin solved the problem.

    Click to Read More

    I read that IPV6 could be the cause of such a problem, and that turning it off on the Synloloy was the solution. I tried that but without success.

    Was solved my problem was to:

    1. Stop Plex via the DSM’s Package Manager
    2. Log in my NAS as an administrator, in a SSH console, via Putty and enter root mode.
    3. Enter Plex’s Plugin folder using a command like: cd /volume1/Plex/Library/Application\ Support/Plex\ Media\ Server/Plug-ins/
    4. Delete the service plugin:  rm -R Services.bundle
    5. Restart Plex via the DSM’s Package Manager

    Loading

  • How to capture a Synology Package during installation

    I recently discovered GateOne, a free HTML5 web-based terminal emulator and SSH client for which there is a Package for Synology on the SynoCommunity. Unfortunately, the setup doesn’t work anymore on the most recent DSM versions. As SynoCommunity prevents users to manually download their SPK, I did recover it from Synology’s temp download in order to fix myself the issues reported here and recreate a package.

    [EDIT 30/12/2018] I have posted a new version of this script here.

    Click to Read More

    So, as one cannot manually download the Synology package (SPK file), the idea is to simply capture the SPK during its installation (even if that installation fails).

    First, log into a SSH console via putty and enter root mode.

    Create the following script, named ‘capture.sh’

    #!/bin/bash
    VOLUME=$1
    TARGET=$2

    if [ -z “$VOLUME” ]; then
    echo “usage: capture <source VOLUME> <target dir>”
    exit 0
    fi

    if [ -z “$TARGET” ]; then
    echo “usage: capture <source VOLUME> <target dir>”
    exit 0
    fi

    pattern=”volume[0-9]+”
    if [[ ! $VOLUME =~ $pattern ]]; then
    echo “The name of the source volume must be like ‘volume<i>’ where <i> is numeric”
    exit 0
    fi

    if [ ! -d “/$VOLUME/@tmp” ]; then
    echo “Temporary dir not found: /$VOLUME/@tmp”
    exit 0
    fi

    if find “/$VOLUME/@tmp/” -mindepth 1 -print -quit | grep -q .; then
    rm -R /$VOLUME/@tmp/*
    fi

    echo “Press any key to stop the capture”

    if [ -t 0 ]; then stty -echo -icanon -icrnl time 0 min 0; fi

    count=0
    keypress=”
    while [ “x$keypress” = “x” ]; do
    let count+=1
    echo -ne $count’\r’
    keypress=”`cat -v`”
    cp -R “/$VOLUME/@tmp” “$TARGET/SynoCapture”
    done

    if [ -t 0 ]; then stty sane; fi

    echo “$count captures done”
    exit 0

    This script will

    1. first, delete the temporary folder from the volume where you will install the package to be captured. Ex.: /volume1/@tmp
    2. next, loop until you press any key. And during the loop, it will copy any (new) content from the temporary folder into a folder named ‘SynoCapture’ on a target shared folder. Ex.: on your NAS’ web folder /var/services/web/

    So, concretely,

    1. Run the script via a command like: ./capture volume1 /var/services/web/
    2. Install your package via the package manager
    3. Stop the script by pressing any key once the package has been installed
    4. (You may now uninstall your package)

    Voilà, first step accomplished. Now, look into your capture (Ex.: in \\<Your NAS>\web\SynoCapture\).

    1. You should see a folder named “@synopkg\@download\<Package>”. This folder contains the package but without its file extension .spk (Ex.: @SYNOPKG_DOWNLOAD_<Package>).  Gotcha !!!
    2. You should also see a folder named “pkginstall”. This one contains the package deflated.
    3. Now, a little extra… you should also find a folder name “pkglist.tmp” containing two files: synoserver.enu and : otherserver.enu (with possibly other extensions depending on your DSM language?). Those files contains the URL’s of all SPK available respectively on the official Synology website and on the various SPK servers that you configured in your Package Center > Settings > Package Sources.

    If you are running Windows 10 with Powershell, copy the content of those files into on file named input.txt and open a powershell in the folder where you have saved that input.txt file. Execute next this to filter the file and extract the URL’s:

    select-string -Path input.txt -Pattern ‘http[^”]*\.spk[^”]*’ -AllMatches | % { $_.Matches } | select-object Value > output.txt

    You can copy/paste the content of output.txt into MyJDownloader (asking for a “deep link analysis”!). Magic !

    Loading

  • WordPress RewriteRule to “Redirect” after moving the blog

    I did reconfigure my Synology Web Stations to access my blog directly at www.beatificabytes.be instead of www.beatificabytes.be/wordpress/. The problem was to redirect next the old pages still referenced by google onto their new address. Ex.: www.beatificabytes.be/wordpress/softwares onto www.beatificabytes.be/softwares. Using a RewriteRule did the trick.

    Click to Read More

    Concretely, I did configure a Virtual Host in the Web Station

    WebStation VirtualHost

    Next, I did reconfigure wordpress’s wp-config.php by replacing:

    define(‘WP_HOME’,’/wordpress’);
    define(‘WP_SITEURL’,’/wordpress’);
    define(‘WP_SITEURL’, $pageURL . ‘/wordpress’);

    with:

    define(‘WP_HOME’,’https://www.BeatificaBytes.be’);
    define(‘WP_SITEURL’,’https://www.BeatificaBytes.be’);
    define(‘WP_SITEURL’, $pageURL’);

    Finally, I did remove “/wordpress” from all URL’s in my own posts. I didn’t use a Search & Replace plugin like the “Better Search and Replace” to do the update directly in the database. Instead, I did use the plugin “Broken Link Checker” to Bulk Edit broken URLs.

    Bulk Edit Broken URLIt took more time but was a much more “clean” approach as I only touched for sure broken links. (Notice: This Plugin runs in the background so you need patience for it to get the complete list of broken URLs. What’ really great is that for broken external links, it suggests the replacement by an archived version of the missing pages – via the WayBack Machine)

    WayBack Machine

    NB.: Here is another nice trick to list all broken URL’s in a website

    wget --spider -o /var/log/wget.log -e robots=off -w 1 -r -p http://<youraddress>

    Finally, I had to redirect all old pages still referenced on Google to their new location. The obvious solution was to use a RewriteRule to be added in the .htaccess file used by WordPress (In my case, in /var/services/web/wordpress/.htaccess). Unfortunately, it took me hours to find the trick as, instead of reading the whole apache’s RewriteEngine documentation, I tried to figure out myself how to do it, based on samples found on the web.

    Finally, I read these french documentations:

    And it’s only by reading the documentation about the flag that I understood the need to use the special flag [R] (I already tried at least more than 20 various rules before understanding I had to specify the flag R(edirect)…)

    So, here it is: RewriteRule ^wordpress/(.*)$ /$1 [R,L]

    • Match any path starting with “wordpress/” and followed by “anything else”
    • Replace it with the part matching “anything else”
    • And if a match was found, do a R(edirect) and this was the L(ast) rule to apply (i.e.: stop).

    I didn’t change anything else. Also, changes in the .htaccess are taken into account immediately, without the need to restart the WebStation.

    # Synology PHP
    AddHandler default-handler .htm .html .shtml
    AddHandler php-fastcgi .php
    AddType text/html .php
    Action php-fastcgi /php56-fpm-handler.fcgi
    # Synology PHP

    # BEGIN WordPress
    <IfModule mod_rewrite.c>
    RewriteEngine On
    RewriteBase /
    RewriteRule ^wordpress/(.*)$ /$1 [R,L]
    RewriteRule ^index\.php$ – [L] RewriteCond %{REQUEST_FILENAME} !-f
    RewriteCond %{REQUEST_FILENAME} !-d
    RewriteRule . /index.php [L] </IfModule>

    # END WordPress

    Et voilà.

    NB.: Here is a useful website to test online .htaccess RewriteRule’s

    Loading

    ,
  • Synology Package Sample to illustrate how scripts and wizards are executed

    I had troubles to use variables in various scripts or to create wizards via shell scripts. So I have created a dummy package logging useful information in a file to understand what’s going on during the installation, the upgrade and the uninstallation of a Synology Package.

    Click to Read More

    This package is named MODS SPK Tracer and is available on my SPK Server. Obviously, i has been created with my Synology Package Creator tool for Windows 😉

    Once installed, upgraded or removed (and obviously reinstalled), you can access its log file either by clicking on its icon in DSM’s Main Menu, or by via the Package Center.

    Mods SPK Tracer

    This package comes with shell scripts creating on the fly “installation”, “upgrade” and “uninstallation” wizard (install_uifile.sh, uninstall_uifile.sh, upgrade_uifile.sh). The purpose is to illustrate how to inject environment variables in the JSON wizard and how to use php in such scripts. Briefly said, they must generate a JSON wizard and store it in the standard log file $SYNOPKG_TEMP_LOGFILE

    While testing those wizard scripts, I have discovered that, at runtime, only the running script is stored in the temporary folder. The other ones are not available. No way therefore to call another script from the running one.

    The Wizards are exporting one variable to the installation scripts, for illustration purpose (I.e.: how to prompt the user for some input to be used later by the scripts)

    Finally, the wizard scripts also logs the environment variables exported for them by the DSM. Not a lot are available during the execution of the wizard because the SPK is actually not yet expanded.

    The package comes next with the standard installation scripts, calling all a generic script that log the environment variables exported for them by the DSM. So, you can see in which script you have access to which variable. The scripts preinst, postinst, preuninst, postuninst, preupgrade and postupgrade have access to the same variables. But it’s not the case for the start-stop-status script.

    Those scripts are also displaying info during the installation/upgrade/uninstallation process for the user. For that purpose, they write in the standard log file $SYNOPKG_TEMP_LOGFILE. Obviously the wizard scripts can’t use this trick to display information to the user. But they don’t need that as they actually display real screens (rendition of their JSON).

    Notice: often, variables accessible for a script must be persisted in a file to be retrieved later by another script. Ex.: the postinst script can store a variable received from the install_uifile wizard in a file so it can be read by the postupgrade or postuninst script later.

    Notice: the log file is only available in the Package Center if its path is returned by the start-stop-status script.

    Notice: the INFO file of this Package is quite standard.

    What’s interesting is to see the order of execution. Ex.: for an upgrade

    SPK Tracer order

    Also, during an upgrade, the script to stop, preuninst and postuninst are the versions of the previous package, not the versions of the new package !!! (Obviously).

    During an upgrade, preupgrade and preinst scripts are executed from a temporary folder (/volume1/@tmp/pkginstall/scripts), while postupgrade, postinst, and the script to start, are executed from the target installation directory (/var/packages/<Package Name>/scripts)

    Loading

  • Install a Simple SPK Server on Synology

    There is a really excellent project named SSPKS available here to host your own SPK Server on your NAS.

    Click to Read More

    Pre-installation

    To install it, you will need several other things first :

    1. Git, to be installed as explained here.
    2. Composer, to be installed as explained here.

    Get the sources

    Now, open a SSH Console using Putty, log in as an administrator and enter the root mode.

    Look for the Git URL of the SSPKS project : https://github.com/jdel/sspks.git

    Clone GitHub Repository
    Clone GitHub Repository

    In the SSH console, type the command:

    cd

    git clone https://github.com/jdel/sspks.git

    You should see the following output:

    Cloning into ‘sspks’…
    remote: Counting objects: 1443, done.
    remote: Total 1443 (delta 0), reused 0 (delta 0), pack-reused 1443
    Receiving objects: 100% (1443/1443), 1.31 MiB | 705.00 KiB/s, done.
    Resolving deltas: 100% (717/717), done.
    Checking connectivity… done

    complete the source

    Run the following command (it’s using the script named “composer” created as illustrated in the How to “install Composer on Synology”):

    cd sspks

    composer install –no-dev

    It should display the following output:

    Loading composer repositories with package information
    Installing dependencies from lock file
    Warning: The lock file is not up to date with the latest changes in composer.json. You may be getting outdated dependencies. Run update to update them.
    Package operations: 2 installs, 0 updates, 0 removals
    Failed to download mustache/mustache from dist: The zip extension and unzip command are both missing, skipping.
    The php.ini used by your command-line PHP is: /usr/local/etc/php56/php.ini
    Now trying to download from source
    – Installing mustache/mustache (v2.11.1): Cloning a3f6d55996
    Failed to download symfony/yaml from dist: The zip extension and unzip command are both missing, skipping.
    The php.ini used by your command-line PHP is: /usr/local/etc/php56/php.ini
    Now trying to download from source
    – Installing symfony/yaml (v3.2.1): Cloning a7095af4b9
    Generating autoload files

    Next, move the complete stuff to your web site and link it with a folder ‘package’ where you will store your spk files. Here, I am using a folder in the web repository.

    cd..

    cp -R sspks /var/services/web/sspks

    cd /var/services/web/

    mkdir packages

    cd sspks

    chmod o+w cache

    rm -R packages

    ln -s /var/services/web/packages packages

    In a browser, open the test page: http://<your NAS>/sspks/selftest.php

    If everything is OK, copy now some spk filez in to the ‘package’ folder (I.e.: in \\<Your_NAS>\web\packages). For each spk file named XXX.spk, add:

    • its logo named XXX_thumb_72.png (size 72×72)
    • its logo named XXX_thumb_120.png (size 120×120)
    • its INFO file named XXX.nfo
      • This one can be extracted from the spk

    Finally, open the main page: http://<your NAS>/sspks

    Et voilà.

    Loading

  • Install Composer on Synology

    Here is how to install Composer on a Synology, required among other to install various php applications available on GitHub, like the “Simple SPK Server“.

    Click to Read More

    To install Composer, the following extensions must be loaded into php: curl, openssl and phar.

    Connect into your DSM, open the Web Station via the Main Menu and enter the PHP Settings. There, select first the “PHP version” = “PHP 5.6”, tick the Extensions: curl, openssl and phar, and click Apply. Next, do the same for the “PHP version” = “PHP 7.0”.

    WebStation Composer Option

    Configuring extensions for php as illustrated above is only valid for the WebStation.

    Open a SSH Console via Putty, log in as an administrator and enter next the root mode.

    To load extensions into php, their respective php.ini file must be updated manually (Ex.: Edit them from a SSH console using VI). Path to php.ini are:

    • php70: /usr/local/etc/php50/php.ini
    • php73: /usr/local/etc/php73/cli/php.ini

    In php ini, under the section [PHP] add the following lines

    extension = phar.so
    extension = openssl.so
    extension = zip.so

    To install Composer, use following commands:

    cd /usr/local/bin
    curl -s http://getcomposer.org/installer | php70

    This should display the following message:

    All settings correct for using Composer
    Downloading…

    Composer (version 1.3.1) successfully installed to: /usr/local/bin/composer.phar
    Use it: php composer.phar

    On Synology, php is not the command to use to run Composer. Instead, one should use php56 or php70. Ex.:

    php70 composer.phar –version

    To make use of it more easily, you can create a script. Use the command vi

    vi composer

    Enter the modification mode by typing the letter “i”.

    Type the following text:

    #!/bin/bash
    php56 /usr/local/bin/composer.phar $*

    Press ‘Esc’ to quit the modification mode.

    To write the changes and quit vi, type next “:wq” (without the quotes).

    Make the script executable with the following command:

    chmod +X composer

    Try now:

    composer –version

    Et voilà.

    NB.:

    • The following command can also be used to install ‘composer’ with the ‘php’ command: curl -sS https://getcomposer.org/installer | php — –install-dir=/usr/local/bin –filename=composer
    • The following command can be used to update ‘composer’ : sudo composer self-update

    Loading

  • Launch a SSH console onto Synology with Putty

    Here is how to connect onto a Synology and run a SSH console to, e.g., run linux commands, execute scripts, etc…

    Click to Read More

    Enable SSH

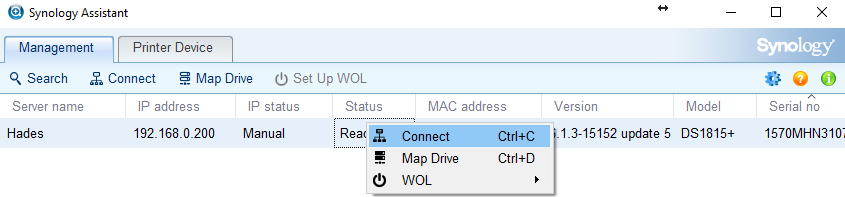
    Log as admin into your Synology via the DSM web interface. If you don’t know its URL anymore, run the Synology Assistant on your PC (The setup can be found for your model on Synology’s download page) to find your NAS. Right-click on it to connect.

    Synology Assistant

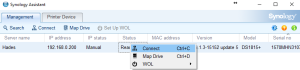
    Notice that for illustration purpose, my NAS is named here “Hades” and has 192.168.0.200 as local IP.

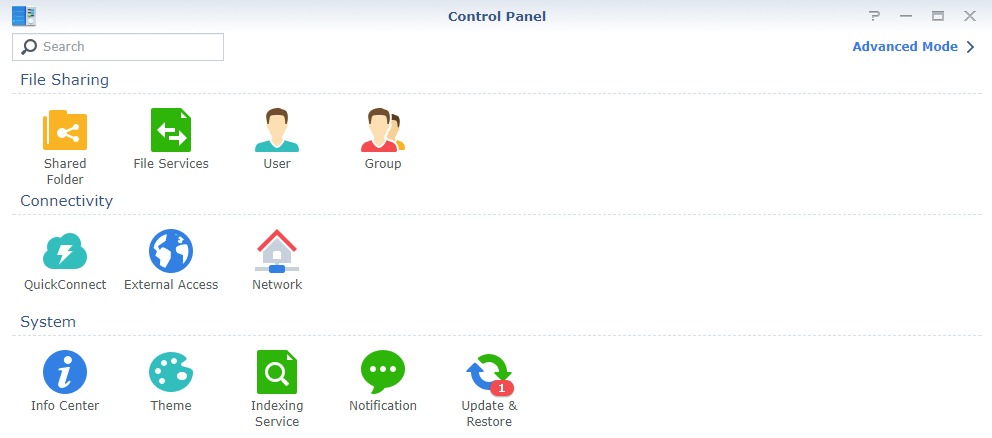
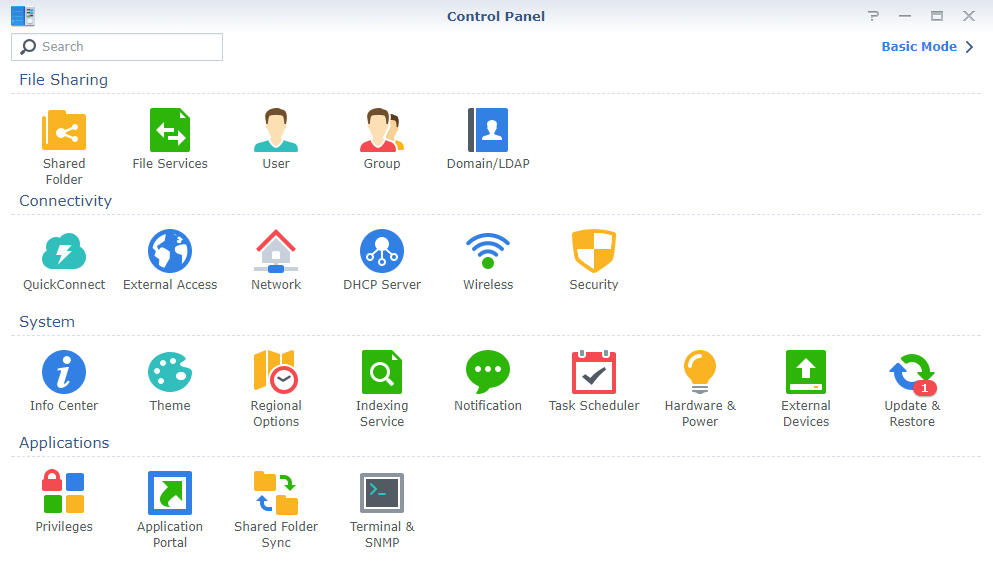
    Once logged in DSM, open the Control Panel. If you see only three lines of icons (titled File Sharing, Connectivity and System), then click on the blue link “Advanced Mode” in the top-right corner.

    Control Panel Basic

    You should see a dark “console” icon named Terminal & SNMP in a fourth section named Applications.

    Control Panel Advanced

    Click on that icon and in the tab Terminal appearing now, tick the option Enable SSH service. Configure the Port number that your want to use, E.g. 22, 5022, or any port still free.

    Control Panel Terminal

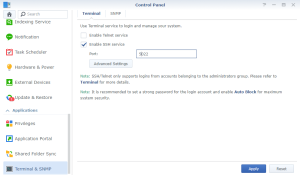
    Notice the message: only account in the administrators group will be able to log in SSH console. On the opposite, you won’t be able to log in with the root account.

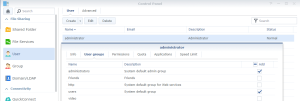
    The System default user should be such an administrator account. But you can create another one and add it in the administrators User group. Ex. here after a user named “administrator”:

    Control Panel User Administrator

    Also, as recommended, go next into the Security section of the Control Panel and enter the Account tab to tick the option Enable auto block. E.g.: you can block there any IP address which failed 3 times to log in during the last 15′. You can also tick the option Enable block expiration to unblock such IP after e.g. 15 days.

    Control Panel Security Account

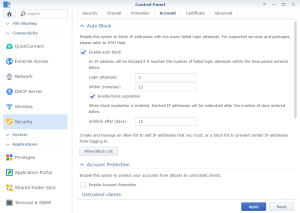
    Notice: this “auto block” feature has been very useful for me when I started to use a VPN on my NAS to access internet. Many IP, mainly from Russia and China, have been blocked.

    PS.: SSH is recommended over Telnet, as using encrypted communications. But if you really want, you can also enable it.

    Install Putty and open a SSH console

    Download Putty from here and install it on your PC. It’s an open source SSH and telnet client.

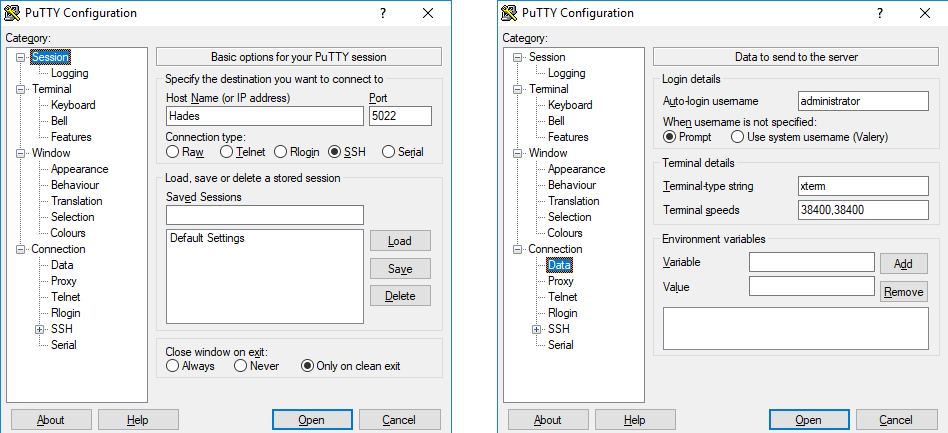
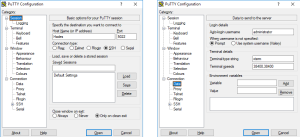
    Run Putty and enter an administrator account in the Auto-login username of the category Connection > Data (as illustrated bellow in the right screenshot, I am user the user named “administrator” created previously and member of the User Group “Administrators”). Next enter your Host Name (or IP address) and Port in the Category Session (as illustrated bellow in the left screenshot). Check that the selected Connection Type is SSH.

    Putty SSH Console

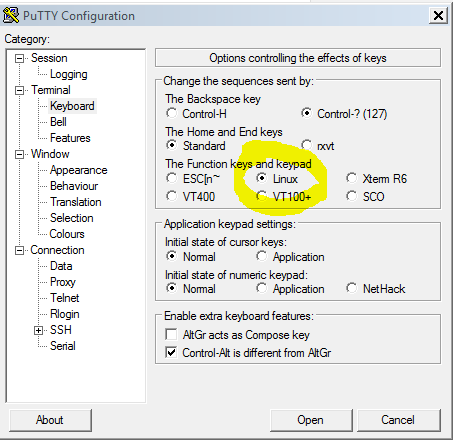
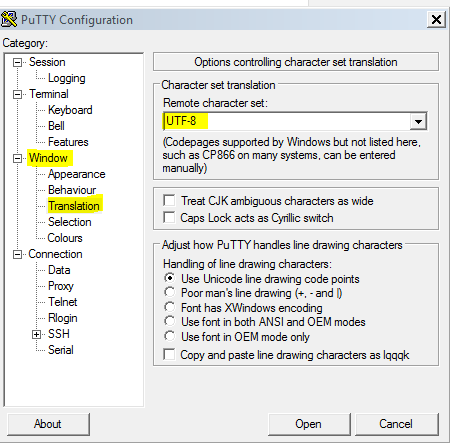
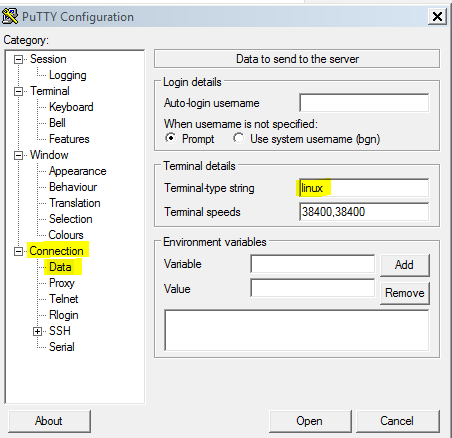
    In order to avoid weird characters to be displayed on the console, when connecting to a linux, you have to also define the following settings (found here):

    Terminal > Keyboard > The function Keys and Keypad = Linux

    Window > Translation > Remote Character Set = UTF-8

    putty_accents2

    Connection > Data > Tarminal Type String = linux

    putty_accents3

    Finally, select the Default Settings entry and click on the Save button next to it. This is important to keep your setting for the next time you will run Putty.

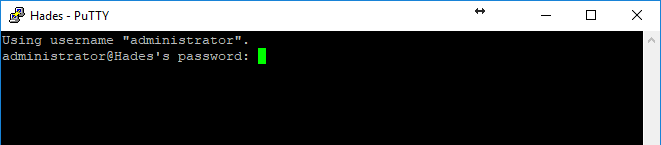
    Now, click on the Open button and the bottom-right. This will start the SSH session with the preconfigured account “administrator”. You just have to type his password.

    Putty SSH Console Login

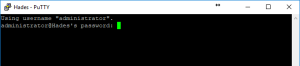
    Notice: on the first use, Putty will display a warning message about the encryption. You have to accept it.

    PS.: You can similarly open a Telnet session if you did enable it.
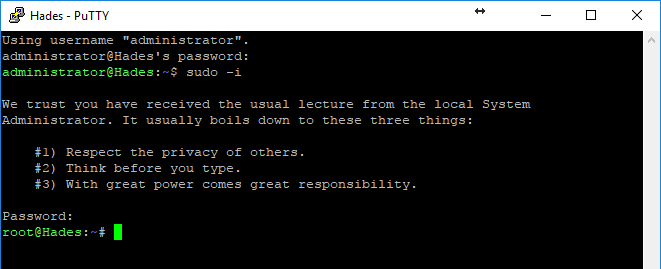
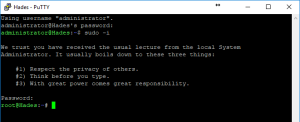
    Enter root mode

    Although you may not log in as root in a SSH console on your Synology, you may enter “root” mode by typing the following command:

    sudo -i

    You will be prompted for a password. Type again the password of the administrator account.

    Voilà, you are now connected on your NAS as a root.

    Control Panel User Root

    Enjoy.

    PS.: Here is the official Synology documentation to log on your NAS via SSH or Telnet.

    Loading