Month: December 2017

  • Unattended GPG key generation to sign Synology Packages

    I am going to add a feature in my own version of SSPKS to sign Synology packages. But to do this, I need a way to create GPG key from a non-interactive script.

    Click to Read More

    I found the required documentation here and a sample here. I did adapt that sample to:

    • not require a passphrase as mentioned in the Synology documentation. This would break the build process.
    • to generate some entropy without the rng-tools (not available out-of-the-box for Synology)

    Obviously, you need gpg. I am using gpg2 made available by installing the package gpgme via ipkg as explained here.

    Create keys in your personal key rings

    First, put the parameters to be used by gpg into a file named ‘gpgKey‘ (don’t forget that it must be linux compliant => not CRLF (/r/n) but only LF (/n)*). Here under, I am using RSA 2048. Use your own name, comment and email address.

    Key-Type: RSA
    Key-Length: 2048
    Subkey-Type: RSA
    Subkey-Length: 2048
    Name-Real: Type Here your name
    Name-Comment: Type Here some comment
    Name-Email: Type Here your email
    Expire-Date: 0
    %no-protection
    %commit

    Next, save the following script in a file named ‘createGpgKey.sh’ (don’t forget about CRLF 😉 )

    #!/usr/bin/env bash
    if [ ! -f ~/.gnupg/gpg.conf ]; then
    mkdir -p -m 0700 ~/.gnupg
    touch ~/.gnupg/gpg.conf
    chmod 600 ~/.gnupg/gpg.conf
    tail -n +4 /opt/share/gnupg/gpg-conf.skel > ~/.gnupg/gpg.conf

    touch ~/.gnupg/{pub,sec}ring.gpg
    fi

    #generate some entropy
    (dd if=/dev/zero of=/dev/null) & pid=$!

    #generate the key (and a folder to be used later 😉
    mkdir -p -m 0700 gpg
    gpg2 –verbose –batch –gen-key ./gpgkey

    #kill the entropy generator
    kill $pid

    Then, move those two files into a public shared folder of your Synology. Ex.: ‘\\<Your Nas>\temp

    And open a ssh console as explained here (no need to enter the root mode) to go into the shared folder: cd /var/services/temp

    Finally, here is the output you should see when running your script: sh createGpgKey.sh

    gpg: skipping control `%no-protection’ ()
    gpg: writing self signature
    gpg: RSA/SHA1 signature from: “1418FFE0 [?]”
    gpg: writing key binding signature
    gpg: RSA/SHA1 signature from: “1418FFE0 [?]”
    gpg: RSA/SHA1 signature from: “71C22B00 [?]”
    gpg: writing key binding signature
    gpg: RSA/SHA1 signature from: “1418FFE0 [?]”
    gpg: RSA/SHA1 signature from: “71C22B00 [?]”
    gpg: writing public key to `/var/services/homes/<current user>/.gnupg/pubring.gpg’
    gpg: writing secret key to `/var/services/homes/<current user>/.gnupg/secring.gpg’
    gpg: /var/services/homes/<current user>/.gnupg/trustdb.gpg: trustdb created
    gpg: using PGP trust model
    gpg: key 1418FFE0 marked as ultimately trusted

    The keys are now stored into your home’s gpg folder: ls ~/.gnupg/

    You can check that the key id displayed above are stored using:

    • gpg2 —list-keys

    gpg: checking the trustdb
    gpg: 3 marginal(s) needed, 1 complete(s) needed, PGP trust model
    gpg: depth: 0 valid: 1 signed: 0 trust: 0-, 0q, 0n, 0m, 0f, 1u
    /var/services/homes/<current user>/.gnupg/pubring.gpg
    ——————————————–
    pub 2048R/1418FFE0 2017-12-26
    uid Your Name (Your Comment) Your Email Address
    sub 2048R/71C22B00 2017-12-26

    • gpg2 —list-secret-keys

    gpg: checking the trustdb
    gpg: 3 marginal(s) needed, 1 complete(s) needed, PGP trust model
    gpg: depth: 0 valid: 2 signed: 0 trust: 0-, 0q, 0n, 0m, 0f, 2u
    /var/services/homes/<current user>/.gnupg/secring.gpg
    ——————————————–
    sec 2048R/1418FFE0 2017-12-26
    uid Your Name (Your Comment) Your Email Address
    ssb 2048R/71C22B00 2017-12-26

    *: the trick to replace all CRLF by LF is to edit the file with notepad++, use the menu Encoding > Convert to UTF-8, and next do CTRL-H to search and replace /r/n with /n using the search mode = Extended. You can finally check that there is no more CRLF by using the menu View > Show Symbol > Show End of Line.

    NB.: the script could be a bit slow if there is not enough entropy (up to 45sec on my NAS)… (to download a big file within the download station can help 😉

    You can now export your public key using either your name, your email or the key id (from illustration here above, the key id is 1418FFE0): gpg2 –armor –export 1418FFE0 > gpgkey.asc

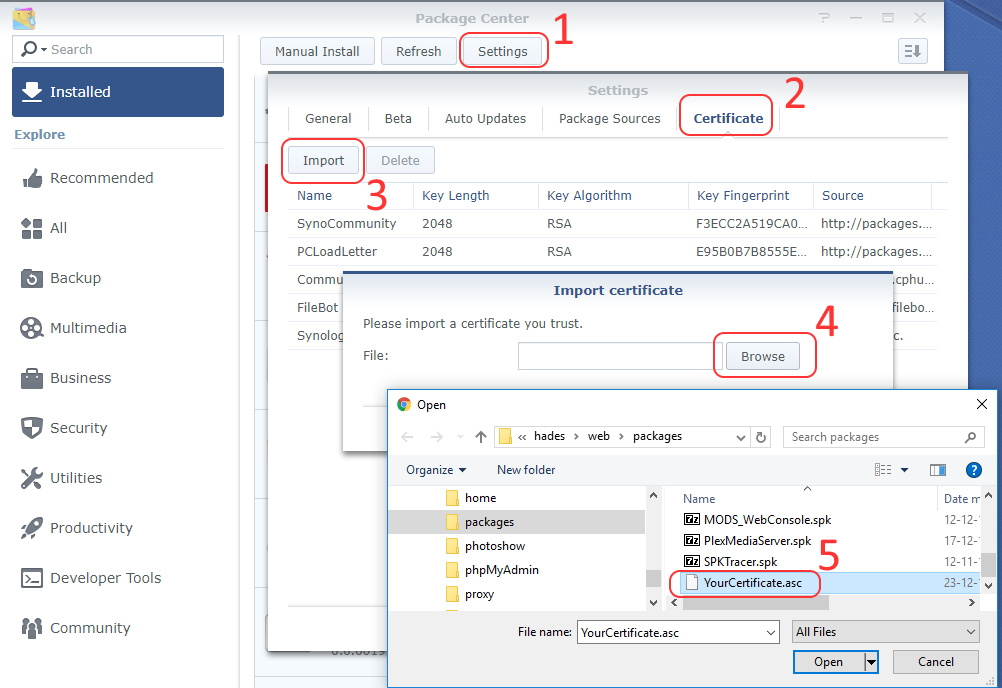
    This file ‘gpgkey.asc’ must be copied in the root folder of your SSPKS server, so it will automatically be added as a trusted publisher for anyone who is adding your SSPKS url in his list of “Package Sources”.

    Now, assume that you have the package to be signed (a spk file) and the ‘CodeSign.php’ script from Synology’s toolkit (it can be downloaded from github) in the same shared folder ‘temp’ used previously… Then, you can sign this package using: php CodeSign.php –sign=YourPackage.spk –keydir=~/.gnupg –keyfpr=1418FFE0

    Create keys in specific key rings

    Instead of using your personal key rings, you could prefer to store your keys in a dedicated folder… To do so, you can use the following parameters in your gpgKey file:

    Key-Type: RSA
    Key-Length: 2048
    Subkey-Type: RSA
    Subkey-Length: 2048
    Name-Real: Type Here your name
    Name-Comment: Type Here some comment
    Name-Email: Type Here your email
    Expire-Date: 0
    %no-protection
    # Write public key into a file pub.gpg
    %pubring gpg/pubring.gpg
    # Write secret key into a file sec.gpg
    %secring gpg/secring.gpg
    %commit

    Once the script createGpgKey.sh executed, you will find two files pubring.gpg and secring.gpg in the folder gpg (created by the script that run in /var/services/temp/).

    gpg: Generating a basic OpenPGP key
    gpg: skipping control `%no-protection’ ()
    gpg: writing public key to `gpg/pubring.gpg’
    gpg: writing secret key to `gpg/secring.gpg’
    gpg: writing self signature
    gpg: RSA/SHA1 signature from: “F93A0789 [?]”
    gpg: writing key binding signature
    gpg: RSA/SHA1 signature from: “F93A0789 [?]”
    gpg: RSA/SHA1 signature from: “8AAC41CF [?]”
    gpg: writing key binding signature
    gpg: RSA/SHA1 signature from: “F93A0789 [?]”
    gpg: RSA/SHA1 signature from: “8AAC41CF [?]”

    You can now sign your package using: php CodeSign.php –sign=YourPackage.spk –keydir=/var/services/temp/gpg –keyfpr=F93A0789

    You can also check your keys using:

    • gpg2 –no-default-keyring –secret-keyring ./gpg/secring.gpg –keyring ./gpg/pubring.gpg –list-secret-keys
    • gpg2 –no-default-keyring –secret-keyring ./gpg/secring.gpg –keyring ./gpg/pubring.gpg –list-keys

    And you can export your public key to be used in your SSPKS using:

    • gpg2 –no-default-keyring –keyring ./gpg/pubring.gpg –armor –export F93A0789 > gpgkey.asc

    Create keys with a passphrase

    In order to provide a passphrase, replace ‘%no-protection‘ in the parameters file with:

    Passphrase: Type Here your passphrase

    Loading

  • Install the Synology Toolkit and Sign SPK packages

    Since a long time, I was waiting to have enough free time to investigate how to sign my own packages with Synology’s toolkit. It’s now finally done!

    Click to Read More

    Initial installations

    1. First, install IPKG as explained here.
    2. Next, install the official Synology package “python3
      1. Alternative: install python3 using the command: ipkg install python3
    3. Then, create a symlink into /usr: ln -s /usr/local/bin/python3 /usr/bin/python3
      1. if using python installed with ipkg, create a symlink into /usr: ln -s /opt/bin/python3 /usr/bin/python3
    4. install gpg using the command: ipkg install gpgme
      1. This was needed as gpg was installed on my NAS without gpg-agent (? to be investigated later)…
    5. Now, install GIT as explained here.
    6. Finally run:
      1. cd /volume1/
        1. There was not enough free space in the system partition to install the toolkit!!
      2. mkdir -p toolkit
      3. cd toolkit/
      4. git clone https://github.com/SynologyOpenSource/pkgscripts-ng pkgscripts
      5. cd pkgscripts/

    If you want to use the toolkit for other purpose than signing

    You can check the available platform for your DSM version in the toolkit (e.g. here for 6.1). Run : ./EnvDeploy -v 6.1 --list

    It should display a list like this one:

    Available platforms: 6281 alpine alpine4k armada370 armada375 armada38x armadaxp avoton braswell broadwell bromolow cedarview comcerto2k dockerx64 evansport grantley hi3535 kvmx64 monaco qoriq x64 rtd1296 denverton apollolake

    • N.B.: The major and minor version (E.g. 6.1 for major=6 and minor =1) of your DSM can be found using: cat /etc.defaults/VERSION
    • N.B.: the platform of your Synology can be found in this list based on your model (See the column “Package Arch”). The model of your Synology can be found running the command:  cat /etc.defaults/synoinfo.conf | grep -m 1 ‘upnpmodelname’ | cut -d “=” -f 2
    • N.B.: You can also check the CPU of your Synology using: cat /proc/cpuinfo | grep -m 1 ‘model name’ | cut -d “:” -f 2 | cut -d “@” -f 1

    And you can configure the toolkit by running the following command with your DSM version (E.g.: 6.1) and platform (E.g.: avoton) as parameter: ./EnvDeploy -v 6.1 -p avoton

    • NB: the platform must be in lower case !!!

    In order to sign packages

    You have to create a GPG key. Type: /opt/bin/gpg2 --gen-key

    Once prompted, choose:

    • RSA and RSA (default)
    • key size 1024, 2048 or 4096
    • key does not expire
    • And do not type any passphrase. Just press ‘Enter’ without typing any character until it accepts to not make your key secure.

    gpg (GnuPG) 2.0.18; Copyright (C) 2011 Free Software Foundation, Inc.
    This is free software: you are free to change and redistribute it.
    There is NO WARRANTY, to the extent permitted by law.

    Please select what kind of key you want:
    (1) RSA and RSA (default)
    (2) DSA and Elgamal
    (3) DSA (sign only)
    (4) RSA (sign only)
    Your selection? 1
    RSA keys may be between 1024 and 4096 bits long.
    What keysize do you want? (2048) 2048
    Requested keysize is 2048 bits
    Please specify how long the key should be valid.
    0 = key does not expire
    <n> = key expires in n days
    <n>w = key expires in n weeks
    <n>m = key expires in n months
    <n>y = key expires in n years
    Key is valid for? (0) 0
    Key does not expire at all
    Is this correct? (y/N) y

    GnuPG needs to construct a user ID to identify your key.

    Real name: vletroye
    Email address: <obfuscated>
    Comment: BeatificaBytes’ Packages
    You selected this USER-ID:
    “vletroye <obfuscated>”

    Change (N)ame, (C)omment, (E)mail or (O)kay/(Q)uit? O
    You need a Passphrase to protect your secret key.

    You don’t want a passphrase – this is probably a *bad* idea!
    I will do it anyway. You can change your passphrase at any time,
    using this program with the option “--edit-key”.

    We need to generate a lot of random bytes. It is a good idea to perform
    some other action (type on the keyboard, move the mouse, utilize the
    disks) during the prime generation; this gives the random number
    generator a better chance to gain enough entropy.
    We need to generate a lot of random bytes. It is a good idea to perform
    some other action (type on the keyboard, move the mouse, utilize the
    disks) during the prime generation; this gives the random number
    generator a better chance to gain enough entropy.
    gpg: key 9ABC9981 marked as ultimately trusted
    public and secret key created and signed.

    gpg: checking the trustdb
    gpg: 3 marginal(s) needed, 1 complete(s) needed, PGP trust model
    gpg: depth: 0 valid: 1 signed: 0 trust: 0-, 0q, 0n, 0m, 0f, 1u
    pub 2048R/9C293482 2017-12-23
    Key fingerprint = 4AB4 051C EF8D 009D 4BF3 D78F EEBC 5B44 9C29 3481
    uid vletroye (BeatificaBytes’ Packages) <obfuscated>
    sub 2048R/4C18D693 2017-12-23

    You can now:

    • view public keys using: gpg2 --list-keys
    • view private keys using: gpg2 --list-secret-keys
    • delete a private key: gpg2 --delete-secret-key <user name> (you can also use the <email> or <key id>, displayed after pub xxxxR/ where xxxx is the keysize, e.g.: 1024)
      • Ex.: gpg2 --delete-secret-key vletroye
      • Ex.: gpg2 --delete-secret-key 9C293482
    • delete a public key: gpg2 --delete-key <user name>
    • You can also use specific rings (Ex.: if you did copy them somewhere else than the default user’s home folder : ~/.gnupg)
      • gpg2 --no-default-keyring --secret-keyring /root/.gnupg/secring.gpg --list-keys
      • gpg2 --no-default-keyring --secret-keyring /root/.gnupg/secring.gpg --list-secret-keys
      • gpg2 --no-default-keyring --keyring /root/.gnupg/secring.gpg --list-keys
      • gpg2 --no-default-keyring --keyring /root/.gnupg/secring.gpg --list-secret-keys

    And last but not least… you can finally sign a package located e.g. under /web/packages, using: php CodeSign.php --sign=/volume1/web/packages/YourPackage.spk --keydir=/root/.gnupg --keyfpr=9C293482

    Now that this package is signed, add your certificate into the list of trusted publishers within your Synology’s Package Center.

    1. First, run: gpg2 --armor --export <user name> > YourCertificate.asc
    2. Next copy this one into a public shared folder. E.g.: cp YourCertificate.asc /volume1/web/packages/
    3. Finally:
      1. import it: Package Center > Settings > Certificate > Import > Browse >
      2. and only trust Synology Inc. and trusted publishers: Package Center > Settings > General
    Import Certificate
    Import Certificate
    Trusted Publishers
    Trusted Publishers


    Instead of manually importing your certificate as illustrated above, if you are using SSPKS to distribute your packages, you can copy it there: cp YourCertificate.asc /var/services/web/sspks/gpgkey.asc

    Doing so, it will automatically be added as a trusted publisher for anyone who is adding your SSPKS url in his list of “Package Sources”.


    Loading

  • Find Synology information using Shell commands

    The model of your Synology can be found running the command:  cat /etc.defaults/synoinfo.conf | grep -m 1 ‘upnpmodelname’ | cut -d “=” -f 2

    The CPU of your Synology can be found using: cat /proc/cpuinfo | grep -m 1 ‘model name’ | cut -d “:” -f 2 | cut -d “@” -f 1

    The version of your DSM can be found using: cat /etc.defaults/VERSION

    Loading

  • Download all Images from Imgur’s account for backup reasons

    I have been looking for a quite long hour how to download all images from my Imgur account.

    The solution is damn stupid simple: use the button “Download account images” in the “Settings” page.

    Click to Read More

    Download Imgur Images
    Download Imgur Images

    This button will download a zip file with all your images…

    To download a public album, of any user, you can also simply use MyJdownloader 😉

    Loading

  • Plex Server not found after Synology update to DSM 1.10.1.4602

    After updating DSM on my Synology, Plex Media Player was not able to find the Plex Server running there.

    Plex Server Not Found

    Click to Read More

    Plex Server was clearly running as I was able to connect via http://<My Synology>:32400/web/index.html

    But it was not responding to any request to display Libraries or to play any Movies… To solve this, I had to :

    1. Stop the package Plex via the DSM Package Center
    2. Log in my NAS as an administrator, in a SSH console, via Putty and enter root mode.
    3. Find Plex process still running via the command: ps -gaceux | grep plex
      1. This command displayed: plex 13150 0.2 0.2 677640 17832 ? Sl Dec17 7:41 Plex Media Server
    4. Kill plex’s remaining process: kill -9 13150
    5. Possibly do also delete the Plex’s Plugin Service as done here.
    6. Start the package Plex via the DSM Package Center

    Et voilà.

    IMO, the problem was that I didn’t stop properly Plex Package before updating my DSM. The Plex instance running at that time apparently didn’t completely shutdown. But it was not really running fine anymore either. Unfortunately, that instance was preventing a new one to start (as it was still using the port 32400).

    Loading

  • Batch Convert SVG to PNG

    Conversion SVG

    The easiest way to convert a bunch of svg images into png: ConversionSVG + InkScape

    Click to Read More

    It’s very straightforward and the quality is much better than various online tools

    • Install first InkScape and next ConversionSVG.
    • Run ConversionSVG,
    • Select the output “Format”  = .PNG,
    • Select the “Exportation Zone” = Dessin
    • Set the desired “Size” for the output images.
    • Select the “Folder” containing the svg images to be converted
    • Select bellow the target folder to store the converted images.
    • Click “Convert

    Et voilà 😉

    Loading