• Rii mini i25: an Air Mouse/Wireless keyboard working with Windows, NVidia Shield TV, Plex…

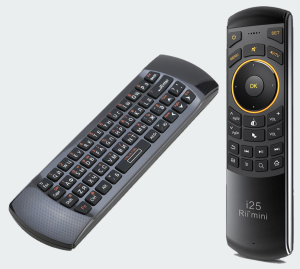
    I just bought an Rii min i25 (< 35€) as an alternative for the NVidia Remote Controle (~50€). I am not disappointed !

    Rii Mini i25
    Rii Mini i25

    Click to Read More

    Although mine is not a model with audio (microphone and headphone), it’s clearly a great accessory to replace the native remote of the NVidia Shield TV. Notice that if it looks really nice, it’s not heavy. As a consequence, it does not feel robust in hand.

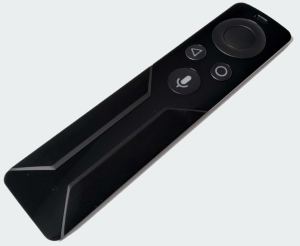
    Remote NVidia Shield TV
    Remote NVidia Shield TV

    I did test it with Plex, both on Windows 10 and on NVidia Shield TV. Everything is working out of the box, except the fast forward and fast rewind. Those two keys will probably need some remapping.

    Both on Windows and NVidia, I did use the wireless keyboard successfully (including the FN keys: mute, Home, PgDn, PgUp, End, Del, Ctrl-Alt-Del), as well as the Air Mouse.

    Regarding the Remote Control:

    • Volume + and  – worked both on Windows and NVidia.
    • Power off only worked on Windows not on NVidia.
      • But it was switching off Netflix.
    • Search and Home worked on NVidia
    • To do a selection in Netflix on NVidia, I had to lock the mouse before clicking on OK!
    • Fast Forward (+10 sec) and Fast Rewind (-10 sec) work fine within Netflix but not in Plex.
    • I noticed in Netflix that the arrows (left/right) which could be used to move forward or backward in the scenes was “sometimes” not working…
    • I noticed that sometimes, the axes up/down and left/right appeared to be inverted. I did fix that by keeping the remote on the table, parallel to the screen, keyboard up (i.e. just in front of me), for 10 long seconds.
    • To scroll the page in Chrome, take the remote (keyboard down), move the mouse onto the background of the page (where there is no field) and press the “turn back arrow”. Move next the remote up and down.
    • To enter the search bar in Chrome, (keyboard down) simply press the “search key”. To exit the search bar (keyboard up), press the “Esc” key.

    From installation perspective, there is nothing to do: just plug the receiver in a USB port and switch on the remote (Button On/Off, on the side, next to the micro USB Charging Port).

    Using the air mouse is very convenient. The experience is very similar to using the remote pointer of Smart Samsung TVs (a smart remote with a large trackpad). NB.: if the mouse pointer is out of alignment with your wrist, simply lock it using the ‘Lock’ button, the one with an arrow icon:

    Lock Button Rii mini i25

    As mentioned above, the keys can be reprogrammed by sending an IR signal from another remote whose the behavior must be copied.

    If you want to use an AZERTY model you will need the “External keyboard Helper Pro“.

    Loading

  • ‘Add Mirror…’ option is grayed out in Windows’ Disk Management

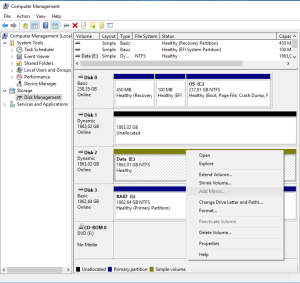
    How to ‘Add Mirror’ on a disk containing data when the option is grayed-out although you have another very similar disk available and empty? Check that your two disks are “Dynamic” and shrink the volume on the disk with data!

    Click to Read More

    I had a 2 TB disk with a unique volume (on one single partition), containing data.

    I did add a new 2 TB disk to be used as a mirror of the existing one. I went into the Disk Management tool to “add Mirror” but found that this option was not available. The menu was disabled:

    Add Mirror Grayed Out
    Add Mirror Grayed Out

    First thing to check: the two disks to be used must be “Dynamic”. Right-click on “Disk x” to “Convert to Dynamic Disk …”.

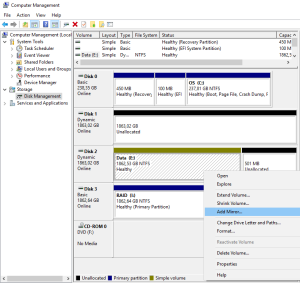
    Next, to be able to create a mirror, the system needs some free space to create its own reserved partition on the disk. So, right-click on the Volume of the disk with data to “Shrink Volume…” (Try first with 1 Mb). Once the disk has been shrunk, the menu “Add Mirror…” becomes accessible.

    Add Mirror Enabled
    Add Mirror Enabled

    Et voilà.

    NB.:

    • It does not matter if the disks are MBR or GPT.
    • Once the volume shrunk, you will possibly have to reboot.
    • If you encounter an issue while adding a mirror, do a “Check Disk” (Properties > Tools > Check).
    • If you can really not get rid of the error “DiskPart has referenced an object which is not up-to-date.” although rebooting, do an “Extend Volume” of 1 MB! (Sound silly, I know…) and then “Add Mirror”.
    • In my case, while the disks were re-syncing, I did remove the mirror, did an “Extend Volume” to reuse the whole free space, and was still able to do an “Add Mirror”.
    • MS Partition & Volume Info here.

    Mirror using DiskPart

    • Run DiskPart in a cmd prompt started as Administrator
    • list disk
    • select disk x [x=disk containing the volume to be mirrored]
    • list volume
    • select volume x [x=volume to be mirrored]
    • add disk x [x=disk to be used for mirroring]

    Loading

  • Check if Samsung Smart TV is alive with Php Server Monitor

    Samsung Smart TVs have two http ports that can be queried from Php Server Monitor: 8000 and 8001.

    Click to Read More

    If the TV is on, querying on http://IP:8000, you get the response:

    Server is running...

    If the TV is on, querying on http://IP:8001/ms/1.0/, you get a response like:

    {
      "DUID": "08f0d181-0096-1000-82d5-c4576e33a21d",
      "Model": "14_X14_BT",
      "ModelName": "UE48H6500",
      "ModelDescription": "Samsung TV RCR",
      "NetworkType": "wired",
      "SSID": "",
      "IP": "192.168.0.180",
      "FirmwareVersion": "Unknown",
      "DeviceName": "[TV]Samsung LED48",
      "DeviceID": "08f0d181-0096-1000-82d5-c4576e33a21d",
      "UDN": "08f0d181-0096-1000-82d5-c4576e33a21d",
      "Resolution": "1920x1080",
      "CountryCode": "BE",
      "SmartHubAgreement": "true",
      "ServiceURI": "http://192.168.0.180:8001/ms/1.0/",
      "DialURI": "http://192.168.0.180:8001/ws/apps/",
      "Capabilities": [
        {
          "name": "samsung:multiscreen:1",
          "port": "8001",
          "location": "/ms/1.0/"
        }
      ]
    }

    When the TV is Off (powered off or in standby mode), you won’t get any response from those ports but:

    ERR_CONNECTION_TIMED_OUT

    Loading

  • Synology Package Creator for shell scripts and php pages

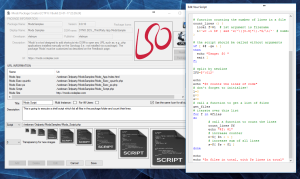
    I did upgrade “Mods“, my Windows Tool used to create dummy packages adding shortcuts on DSM’s desktop to open web pages.

    Now, “Mods” is able to package shell scripts and php webpages…

    Mods
    Mods

    Click to Read More

    It is available here on GitHub.

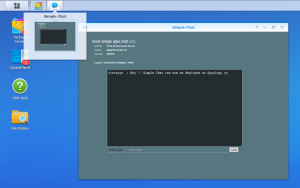
    For example, you could package apps like Chris Hager’s Most Simple Ajax Chat Ever

    Simple Chat on DSM
    Simple Chat on DSM

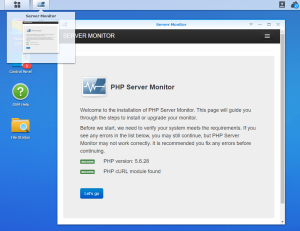
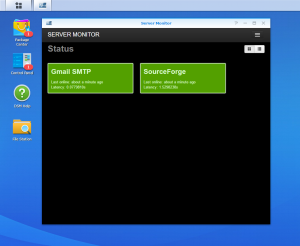
    Or package a more advanced tool like php Server Monitor

    Server Monitor
    Server Monitor
    Server Monitor Running
    Server Monitor Running

    This Tool is available here on GitHub.

    Loading

  • Create Panorama from pictures and video

    Image Composite Editor
    Image Composite Editor

    The best free tool available to create Panorama is IMO ICE, Image Composite Editor, from the Microsoft Research Lab. Not only it’s able to join pictures, but it’s also auto-completing the gaps !!! It can even create a panorama from a panning video.

    Click to Read More

    Basic usage is very simple to create a panorama, with a set of pictures taken in a raw:

    • Press CTRL-N to create a new Panorama
    • Open the folder containing the pictures to be used, press CTRL-A to pick them all and press ENTER to continue
    • There a 4 steps: Import, Stitch, Crop and Export. For simple panorama, go directly to step 3.
    • Click on “Auto Complete” (top-right of the screen) or on “Auto Crop”. The result with “Auto Complete” is amazing.
    • Click on step 4, Export, to save the result.

    Et voilà 😉

    Download: http://research.microsoft.com/en-us/um/redmond/projects/ice/

    Loading

  • Create a VPN to download from a Synology

    In order to hide my NAS, I wanted it to use its own VPN, while my public IP was still visible when surfing with any other devices in my LAN.

    To do so, I subscribed to HMA! (HideMyAss!) and applied their configuration procedure on my Synology. Et voilà.

    Click to Read More

    I did try both a L2TP and a OpenVPN VPN with success. Tricks:

    • For a L2TP VPN, use your PPTP password and NOT your account password
    • For a OpenVPN VPN, use your account password
    • Although using Port Forwarding to access my NAS from internet, I did not had to open the required ports !!!
      • L2TP: UDP 500, 4500 and 1701
      • Open VPN : 443 if using TCP, 553 is using UDL
    • If you are using a DDNS, go to the  Control Panel > External Access and Click Update to verify the public IP of your NAS. It must now be your VPN IP.
    • Check that downloading a torrent (with this procedure), your tracker IP is your VPN IP.
    • Check you IP calling ipify from your NAS.
      • A very simple way to do this is to call the following php page on your Web Station:
    <?php 
     $ip = file_get_contents('https://api.ipify.org');
     echo "My public IP address is: " . $ip;
    ?>
    • Soon after enabling the VPN, I started to be attacked on Telnet port! I am using Security’s Auto-Block feature to prevent brute force attacks.
    • On a mobile device (or anything else) connected directly to Internet (not via your LAN), type your VPN IP in a browser. You should see the default home page of your web station if this one is enabled.
      • I would recommend to replace this default page by a php page returning a header 404.
    <?php
     header("HTTP/1.0 404 Not Found");
    ?>
    • If you are using a DDNS on your NAS, you won’t be able to access your router and VDSL modem via that domain name. Indeed, only your NAS is accessible via this VPN IP. If possible, configure another DDNS on your VDSL modem or router.
      • Ex.: I am using duckdns.org for free. They have a great support page here with detailed configurations for many different devices.
      • Doing so, you can access your NAS and your router or modem via their own Domain name.
    • “Tested OK” both when accessed from LAN or from Internet:
      • Download Station via Synology Download Station for Chrome (https://www.download-station-extension.com)
      • JDownloader via Chrome extension and via https://my.jdownloader.org
      • Plex Server via App or via http://DDNS name:port/web or via http://plex.tv
      • DSM via its admin port
      • Apps: DS Cam, DS File, DS Audio, DS Get, DS Photo, DS Video, DS Cloud and DS Note are all wokring fine using Quick Connect (All those I tested via their DDNS name + custom port or DSM admin port worked too)
      • Cloud Sync (with Hubic)
      • FTP Server

    Loading

  • PC waking up in sleep mode

    Recently, I noticed that my PC was waking up from sleep mode without me explicitly clicking the mouse, pressing a key on the keyboard or sending a magic packet…

    I found this problem was due to an update of the Ethernet drivers which allowed any packet to wake up the computer…

    Click to Read More

    This is a problem which comes back regularly when updating drivers. Each time, I wonder what’s wrong again. So, here are some tricks to find the cause.

    First:

    • Put the computer at sleep and wait until it wakes up.

    Next, look for the last device which turned on the PC:

    • Execute in a Dos prompt : powercfg -lastwake
    C:\WINDOWS\system32>powercfg -lastwake
    Wake History Count - 1
    Wake History [0]
     Wake Source Count - 1
     Wake Source [0]
     Type: Device
     Instance Path: USB\VID_046D&PID_C52B&2b3c7d9c&0&3
     Friendly Name:
     Description: USB Composite Device
     Manufacturer: (Standard USB Host Controller)
    Device 0xC52B is a USB Receiver for Wireless Mouse 
    Vendor 0x046D is Logitech Inc.
    • Go into the Device Manager, find that device and open its properties. In its “Power Management” tab, disallow the device to turn on the computer. If the option is not available, this device is not causing your issue.
      • If your PC has been waked up by the Ethernet Controller, it can be because any packet can wake it up. In the Power Management tab, tick the option “Only allow a magic packet to wake the computer”.

    If this does not help:

    • Open the “Event Viewer” (eventvwr) > “Windows Logs” > “System”.
    • “Filter Current Log” on “Event Source” = Power-Troubleshooter to find which device did wake up your PC:
    The system has returned from a low power state.
    Sleep Time: ‎2016‎-‎12‎-‎24T09:40:11.549148000Z
    Wake Time: ‎2016‎-‎12‎-‎24T09:41:07.347715900Z
    Wake Source: Device -Intel(R) Ethernet Connection (2) I219-V

    You can also look for the list of devices able to wake up the PC:

    • Type in a Dos Prompt: powercfg -devicequery wake_armed
    C:\WINDOWS\system32>powercfg -devicequery wake_armed
    Logitech HID-compliant Unifying keyboard
    HID-compliant mouse
    HID Keyboard Device
    HID Keyboard Device (001)
    Logitech HID-compliant Unifying Mouse
    Intel(R) Ethernet Connection (2) I219-V
    Logitech HID-compliant Unifying Mouse (001)

    The PC can also be waked up by Timers (Scheduled Tasks):

    • Type in a Dos Prompt: powercfg -waketimers
    • Open the “Task Scheduler” and find the task mentioned by the command above.
    • In the tab “Conditions” of that task, disable the option “Wake the computer to run this task”

    You call also disable all tasks that could wake up the PC at once:

    • Open the “Power Options” > “Change plan settings” > “Change advanced power settings”. Under “Sleep”, disable “Allow wake Timers”

    Finally, you could also have to disable the Automatic Maintenance:

    • Open “Change Automatic Maintenance settings” and disable “Allow scheduled maintenance to wake up my computer at the scheduled time”

    Loading

  • Cannot access my NAS from Internet Since I have enabled Wifi on my modem

    I just discovered that I was not able to access my NAS anymore from internet. The problem was that I did re-enabled the Wifi by accident on my Vdsl modem.

    Click to Read More

    Tthe DHCP server gave unfortunately the first free IP of the IPv4 pool to “an unknown Wifi device” instead of assigning this IP to my router as it used to be the case in the past. Port Forwarding from internet to my router, defined using that first IP, couldn’t work anymore.

    I just did assign a static IP to my router in the Vdsl modem’s DHCP server settings (and re-disabled the WiFi). I did reboot next the router.

    Loading

  • Use an Azerty Bluetooth Keyboard on a NVidia Shield TV

    A real pain in: out of the box, it is impossible to use an Azerty physical keyboard with a NVidia Shield TV console… You need an app for that! I am personally using the “External Keyboard Helper Pro”.

    Click to Read More

    You can get it on Google Play

    Loading

  • Synology’s Could Sync Consuming Internet Quota With Google Drive

    I noticed that between 50GB and 100Gb of my Internet Quota was consumed per day since two weeks. After investigation, I found it was due to the Cloud Sync service of my Synology Nas “looping” infinitely.

    Click to Read More

    The first step was to identify the device downloading some many Gb per day.

    I did enable the logging service on my router and turn on the logging of its firewall for all outgoing connections.

    I did export the log of the firewall into notepad++, cleaned up a bit the log to keep the source and destination IP only.

    I did copy that into Excel and created a pivot table to see which source was doing many connection and onto which external IP (eliminating known destinations as the DNS of google 8.8.8.8 and 8.8.4.4, the Synology’s KeepAlive service 118.163.30.162, Broadcast 192.168.0.255, …) I saw that most connections were onto 172.217.16.193, 172.217.21.202, 172.217.22.42, … from my NAS.

    Using a IP who IS service, I found that 172.217 belongs to Google. Why was my NAS connection to Google ? I did look all the packages installed on my NAS and “tilt”: Cloud Sync was configured to sync two google accounts… Having a quick look into the current status of Cloud Sync, I noticed it was “syncing” 1 file… apparently for ever.

    I did connect on my NAS via Telnet and looked into /var/log/cloudsync/daemon.log

    In there, I found that cloud sync was logging, in a loop, errors like:

    Dec 10 11:19:26 [ERROR] gd-pull-event-by-list-handler.cpp(89): ListDirectory: ListRemoteSubitems failed (retrying) [-1000] User rate limit exceeded
    Dec 10 11:19:26 [ERROR] gd-transport.cpp(2195): error reason: [rateLimitExceeded].
    Dec 10 11:19:26 [ERROR] gd-transport.cpp(2196): error message: [Rate Limit Exceeded].
    Dec 10 11:19:26 [ERROR] gd-transport.cpp(2238): Hit rate limitation.
    Dec 10 11:19:26 [ERROR] gd-transport.cpp(3082): [-1000] User rate limit exceeded. URL=’https://www.googleapis.com/drive/v2/files?fields=nextLink%2Citems%28id%2Ctitle%2CmimeType%2CfileSize%2CmodifiedDate%2Cmd5Checksum%2CdownloadUrl%2CalternateLink%2Cparents%28id%29%2Clabels%28trashed%29%29&q=trashed%20%3D%20false%20and%20%271QmcGFz7PI0P_0TUlaAJkNfzWRw%27%20in%20parents’

    I will look into a solution to this issue and temporarily unlinked the Google Drive account from Coud Sync…

    voilà voilà.

    Loading

Tags


Acer iDea 510 AirPlay Android Backup DD-WRT DNS DS209+ DS713+ DS1815+ FlexRaid Galaxy Galaxy S2 Galaxy S7 Google Assistant Google Home HTPC Kies MCE MySQL Nabi 2 Nvidia TV Shield One Plus One OpenHab Outlook Philips Hue Plex RAID Raspberry PI Remote Desktop Root Access Samsung Scripts Synology Team Build Visual Studio VMWare Wi-Fi Windows Windows 8 Windows 8.1 Windows 10 Windows Server 2012 XBMC Xpenology ZigBee

Categories


Archives