My PC built on top of an Asus P9X79 Pro can be waked up from Lan when it is in Sleep Mode (=S1 state) but not when it has been completely turned off (=S5 state). Googling a bit I found the exact solution on Ryan’s Bliggity Blog: enable the “Network Stack” in the Bios.
Click to Read MoreClick to Close
So, as a resume, here is my configuration:
Windows Power Options
Open Control Panel > Hardware and Sound > Power Options
Click on “Change what the power buttons do” on the left
Click on “Change settings that are currently unavailable”
Uncheck the option “Turn on fast start-up (recommended)”
Bios
Enter your UEFI bios (I am using the latest version when posting his)
Click on “Exit/advanced mode” button in the upper-right corner and enter the advanced mode
Go to the “Advanced” tab and select the entry “APM”
Enable the option “Power On By PCI/E/PCI”.
Enable also the “Network Stack”
Possibly go next to the “Boot” tab and
Either disable the option “Fast Boot”
Or if you enable it, enable its sub-option “Network Stack Driver Support”
Network adapter settings:
Open Control Panel > Network and Internet > Network and Sharing Center
Click on “Change Adapter Settings” (on the left)
Right-Click the Network Adapter “Intel(R) 82579V Gigabit Network Connection” and select “Properties”
In the “Networking Tab”, click “Configure”
In the “Power Management” tab, yous should now see and tick the option “Wake on Magic Packet from power off state”
Keep the “Wake on Magic Packet” option ticked too (to wake from Sleep State).
All about System Power States can be found on Intel website:
System Power State S0 the ON state: The system is completely operation, fully powered and completely retains the context.
System Power State S1 the Sleep state: The system consumes less power than S0 state. All Hardware & Processor context is maintained.
System Power State S2 the Sleep state: The system consumes less power than S1 state. Processor loses power and processor context and contents of the cache are lost.
System Power State S3 the Sleep state: The system consumes less power than S2 state. Processor & Hardware context, cache contents, and chipset context are lost. The system memory is retained.
System Power State S4 the Hibernate state: The system consumes the least power compared to all other sleep states. The system is almost at an OFF state, expect for a trickle power. The context data is written to hard drive (disk)and there is no context retained.
System Power State S5 the OFF state:The system is in a shutdown state and the system retains no context. Note that in power state S4 the system can restart from the context data stored on the disk, but in S5 the system requires a reboot.
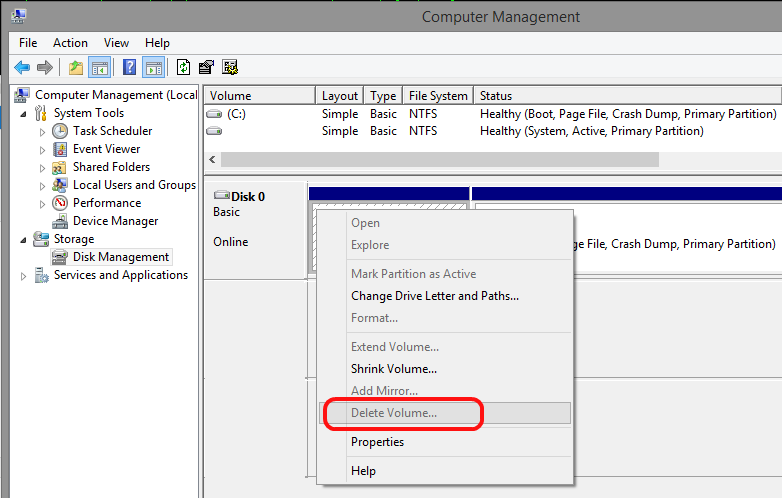
I was recently unable to format a SDHC card with Windows Explorer or the Disk Management console (diskmgmt.msc). I did apply the same trick as when I was unable to delete a volume of a SDHC card.
The symptom was the same: in the Computer Management > Disk Management console… the “Delete Volume…” menu was dimmed (disabled)…
The solution was to format or delete the volume using command ‘Diskpart’ in a Dos prompt.
Click to Read MoreClick to Close
See here how menu is disabled when I want to delete it:
To solve this, I used the solution published on Internet by Salty Wagyu : diskpart. Here is the list of commands to be used in a dos prompt run as Administrator:
Diskpart
List Disk
Select Disk x (where x is the number corresponding to your SD Card)
I have a plugin for TFS 2010 that reads a config file containing custom section handlers. When I deployed my plugin on TFS 2013, it thrown the following error when trying to instantiate those section handlers :
A first chance exception of type ‘System.Configuration.ConfigurationErrorsException’ occurred in System.Configuration.dll
Additional information: An error occurred creating the configuration section handler for xxxxx: Could not load file or assembly ‘xxxxx’ or one of its dependencies. The system cannot find the file specified.
The problem was that there was no adequate probing path defined for .NET 4.5 in the TFS 2013 Services’ web config.
Click to Read MoreClick to Close
TFS 2013 Services are loading plugins from C:\Program Files\Microsoft Team Foundation Server 12.0\Application Tier\Web Services\bin\Plugins.
But once those plugins loaded, they can only load their own dependencies from the GAC or from the TFS 2013 Services’ bin folder (C:\Program Files\Microsoft Team Foundation Server 12.0\Application Tier\Web Services\bin). I.e.: the sub-folder ‘Plugins’ of that bin folder is not probed…
In my case, when my plugin read its custom section, it needs to load the assembly containing the related custom section handlers (actually, the plugin and the custom handlers are in the very same assembly…). It works fine if I deploy the assembly in TFS 2013 Services’ bin folder (or in the GAC I presume) but I cannot bring myself to simply do that. Especially taking into account that it was working fine within TFS 2010.
Having a look at TFS 2013 Services’ web config, in order to specify my own probing path, I noticed that there was already one defined, but ONLY for .Net 2.0. I.e.: here is the <runtime> section of C:\Program Files\Microsoft Team Foundation Server 12.0\Application Tier\Web Services\web.config
I still have that very old webcam that I wanted to reuse under Win8 x86 on the PC of my daughter… It works fine with the drivers for Win2000 installed in compatibility mode…
Wow, what a fancy look & feel !!! That’s my first impression 😀
But what I really care about, is that all the services I was using on DSM 4.3 are still running fine… And it seems to be the case once a few issues fixed…
Click to Read MoreClick to Close
After the upgrade, various packages had to be updated. Unfortunately, the updates did not all passed successfully. I got errors like “failed to download” (notice: I did an update of all my packages before upgrading from DSM 4.3 to 5.0 as recommended by users on Synology’s forum)
I discovered soon that I was actually unable to download and install any other packages. And looking into Control Panel > Update & Restore, I saw the Status “Connection failed. Please check your Internet connection“.
I was unable to play Internet radio within the Audio Station and trying to “Update Now” the DDNS service (Control Panel > External Access > Update Now), I was receiving a message like “Network error occurred. Please check your DNS and network settings.“
As Download Station was still able to download, the internet connection was not the issue. So, based on the hypothesis that it should be a DNS issue, I did force a DNS address manually in Control Panel > Network > General > Manually configure DNS Server. I did set the IP of my Adsm Modem as it’s configured to forward DNS request to my provider. But I could have tried with Google’s DNS: 8.8.8.8 or 8.8.8.4
And it solved all the issues above ?!
As a reminder, my DHCP server is configured on my Buffalo Router to provide the IP of my NAS as a DNS Server (I run the “DNS Server” package of Synology) and the IP of my ADSL model as a fallback. It used to work fine before the upgrade and as I didn’t change anything else in my infra, I thought that some behavior could have change in some Syno’s services. I did try various changes and found one that was solving the issues without manual configuration of a DNS IP on my Syno:
I had to “Enable resolution services” in my Synology’s “Control Panel > DNS Server > Resolution” settings. Simple, no ?
But I discovered then another issue: my Plex Server was not accessible anymore (when opened from DSM’s start menu). It was trying to start on the IP address of an unused Ethernet port – There are two Ethernet ports on the DS713+ and only the second one of mine was plugged on my Switch. The IP used by Plex Server was therefore a default one: 169.254.x.x. So, I did connect the first Ethernet ports on my Switch and did a reboot. I was next able to access the Web UI on the IP assigned now to my NAS’s first Ethernet port.
But it was not solving everything. Indeed, plex.tv was still not able to reach my NAS since my ADSL Modem was forwarding the default port of Plex (32400) onto the IP of the second Ethernet port and not on the first one (I.e.: on the IP Plex Server was actually listening on). As my NAS is only connected to one LAN, I decided to enable the Link Aggregation to merge the two ports into a “virtual single one”. Doing so, I would have only one IP assigned to my NAS and both Ethernet port used together to increase a bit the bandwidth: Control Panel > Network > Network Interface > Create > Create Bond > IEEE 802 Dynamic Link Aggregation. I did complete the Wizard (using DHCP the get an IP) and went to reconfigure my DHCP server (on my Buffalo Router): I.e.: I did update the static leases and assigned the static IP wanted for my NAS on the MAC address currently used by the Dynamic Link Aggregation (It’s available in the Control Panel > Info Center > Network > Bond 1).
Once the DHCP server and the Synology reconfigured, I did reboot both (to avoid caching effect). Unfortunately, when accessing my server via plex.tv, it was still not displayed as “online” 🙁 Also, in the “Plex Media Server”‘s settings “myPlex”, I was unable to connect with my login/password and worst, I was unable to change any settings in my Plex Server: Saving changes was always failing… I found a note about a known issue on the Synology website:
DSM 5.0: Known Issue – Plex Media Server
Users need to manually set read permission for the “plex” user at the User page in Control Panel to allow Plex Media Server to read the shared media folder content.
But trying this fix didn’t solve my issues.
I thought then that there could be a more recent version of the Plex Server on plex.tv than on Synology… And indeed. The version I had was 9.8 and there was a 9.9 on Plex.tv. I did download the spk for my processor (DS713+ = Intel) and did install it manually. And Bingo, my Plex Media Server was now able to connect to myPlex and it appeared as “Online” in plex.tv !!!
So, to conclude, the following services are now running fine:
Download Station (it resumes the download of your the torrent without any issue)
Surveillance Station (the time line is not broken)
DNS Server (once the “Resolution Service” enabled as mentioned above)
Video Station (has been updated)
Photo Station (has been updated)
Webalizer (has been updated)
Plex (After a manual update as mentioned above and some reconfiguration of the IP/Ethernet port used)
WordPress (has been updated)
phpMyAdmin
Changes I noticed:
As usually, after the upgrade of WordPress (If you do so), you will have to reset the permalinks’ format (via Dashboard > Settings > Permalinks > Common Settings > re-select your structure and “Save Changes”). Otherwise, links to your posts (E.g.: found via google or kept as favorites by readers) won’t work anymore..
The DDNS service is now named “External Access”. Nothing has changed and nothing needs to be reconfigured.
MySQL has been replaced by MariaDB (a fork of the original project). Start it once to finalize the update (you will have to provide your password). phpMyAdmin still runs fine and connects automatically to MariaDB with your current root login and password.
You will now get a monthly report by email with the status of the disks. Ex.:
Dear user,
The following is your monthly report regarding the health of disks on <serverName>. You can also check the health of individual disks at Storage Manager > HDD/SSD > Health Info.
When trying to watch a movie streamed by the Plex Server of my DS713+, I used to get an error “Cannot load M3U8: 404 not found” (only on mobile devices or within a browser). This was due to a wrong “temp” directory configured (out-of-the-box) for transcoding purpose.
Click to Read MoreClick to Close
Watching movies was working fine with the Plex Theater on my PC.
I had the error message “Cannot load M3U8: 404 not found” only when trying to play movies within Chrome (on a PC or on a tablet).
I read on the web that this error could be due to the NAS struggling with transcoding the movie (which is done or not depending on the client’s spec). Plex clearly states that one needs a dual-core NAS to be able to do transcoding. But I have a DS713+. So it should have been fine
I also read that Plex Theater (on Windows) does not need any transcoding. As it was working fine, I definitively though there should be something wrong with the configuration of the transcoding…
I did look at the logs of Plex Server (in \\<MyNas>\plex\Library\Application Support\Plex Media Server\Logs) and found that error:
[code]ERROR – Exception handled: boost::filesystem::temp_directory_path: Not a directory: “/volume1/Plex/tmp_transcoding”[/code]
Checking directly on the NAS via telnet, I found that the right path should have been /volume1/Plex/Library/tmp_transcoding (Notice: “Plex” starts here with a upper case although the related shared folder accessible via SMB starts with lower case!!!)
So, I did force that correct value via the Plex server web interface > Settings > Transcoder > Show Advanced Settings > Transcoder temporary directory.
I have just moved my blog from my Synology DS209+ to my new DS713+.
If you see this, it means that the migration is successful 😉
Click to Read MoreClick to Close
The setup of the new DS713+ was straightforward and really easy using the setup Wizard of Synology. It took more time to screw the two drives (WD SE 2TB WD2000F9YZ) in the trays. Those trays look cheap (plastic) and fragile, but they are really easy to use, plug and unplug.
1/ I did use http://find.synology.com to search for my new DS. It worked fine and found both the 209+ and the 713+. From there I did start the setup on the 713+. It automatically download the latest version of DSM and install it.
2/ Once installed, a wizard opens within DSM to configured the most important features:
Create a volume with the disks (I didn’t create the default “Hybrid RAID (SHR)” as already suggested during the setup. I did a RAID 0 using the wizard instead).
Users and Shared Folders
File Station
Other Packages (I did re-install all my favorite packages): Audio Station, Cloud Station, CouchPotato Custom*, DNS Server, Download Station, Git, Mail Server, Mail Station, Media Server, Photo Station, phpMyAdmin, Plex Media Server, Python, Python 3, Surveillance Station Time Backup, Video Station, Web Console*, Config File Editor*, Webalizer, WordPress
…
3/ In the Package Center, I did reconfigure the custom “Package Sources” (required for * above):
http://packages.missilehugger.com : ‘Config File Editor’ and ‘Web Console’
4/ Via the Control Panel > Terminal, I did enable “telnet”
5/ I did next set a fix IP for the DS713+ on my DD-WRT router (under “static leases” in the “Service” tab) and did connect on the DS713+ via telnet to force it to renew its IP with the command “/etc/rc.network restart”
6/ I did also reinstall the package Perl, BootStrap Installer (Install Ipkg) and iPKGui (manage ipkg packages) – both from packages.quadrat.de – and configured the following package source: http://ipkg.nslu2-linux.org/feeds/optware/syno-e500/cross/unstable (name ‘cross’, type ‘scr/gz’, file ‘cross-feed.Conf’)
7/ I did install the “web-Console” package and logged in with admin/admin. Then I did restart the web-console after changing the password via the command (typing also the #) : #users modify admin
Notice: I didn’t use Synlogy’s migration wizard to backup and restore the full “configuration settings” as I wanted to clean a bit my NAS and restore/reconfigure only what I really still need. More details on migration methods are provided on Synology’s wiki.
Click to Read ‘Wordpress’ PartClick to Close
1/ Regarding WordPress, once the package installed, I did:
Export the ‘wordpressblog’ database from my DS209+
I did copy the following folders from the DS209+ on the DS713+
\wordpress\wp-content\icons
\wordpress\wp-content\themes
\wordpress\wp-content\uploads
\wordpress\wp-content\plugins
I did restore that backup on the DS713+
I had to reset the “Header Image” via Appearance>Themes>Customize.
I did check that all the plugin’s where enabled. All settings where correctly recovered from the backup restored previously.
I didn’t re-install the plugin MultiDomain as I am now using the DNS package of Synology to solve the issue I had in the past when accessing my blog from my intranet or from internet.
2/ I did copy the other webpages in /web from the DS209+ onto the DS713+
3/ I did reconfigure the port-forwarding on my DD-WRT (via the tab “NAT/QoS”) to forward the traffic on port 80 to the DS713+ instead of DS209+. I also configured “Wake on Lan” on the DD-WRT (via the “Administration” > “WOL”) to be able to wake-up my new NAS although it should run 24/7.
Et voilà… the “web part” of the DS713+ is up and running 😛
Click to Read ‘Photo Station’ PartClick to Close
1/ To move the Photo albums, I did use Synology’s “Main menu” > “Backup and Restore” feature on the DS209+.
On the DS713+, enable the “Network Backup” service (without rsync) via “Main Menu” > “Network Backup”. This is going to create a Shared Folder ‘NetBackup’.
Back to the DS209+, In the “Backup” tab of the “Backup and Restore” wizard, click create and select “Data Backup type”.
In the wizard, type a name for the backup and select “Network Backup (Synology Server)”. Let the DS209+ find the DS713+ (clicking into the “server name” combo-box) and use this one as server name for the backup destination (fill manually the password for the username and pick “NetBackup” as shared folder. Keep in mind the name of the “folder” to be created in “NetBackup” to store the backup).
In the tab where you can select application data, configuration, etc… pick
In the “Application” part, select “Photo Station”
In the “Shared folder” part, select “photo”
And finally “Back up immediately after the wizard finished”
2/ Next, on the DS713+, using the same “Main menu” > “Backup and Restore” feature, I did the restore
In the “Restore” tab, click on “Restore” and select “data”.
In the wizard, select “Local Restoration” and keep next “NetBackup” and select the name of the “folder” where the DS209+ stored its backup.
Do not select any “configuration settings to restore”
Select however all “items to restore” in the next screen. You will see that there is a “conflict” for the Shared Folder “photo”. No matter, the existing folder on the target will be overwritten.
Et voilà. It’s magic: all the photo and thumbnails are restored, including the albums, smart albums, covers, etc…
One thing is however not restored via this process: the users’ privileges… I presume that this is because I didn’t restore the users table. I had to grant access to the users to each album manually via the “Parameters” > “User accounts” menu of Photo Station.
Click to Read ‘Surveillance Station’ PartClick to Close
1/ To move the Surveillance Station settings, I did use also Synology’s “Main menu” > “Backup and Restore” feature on the DS209+.
First, I did disable all my camera in the Surveillance Station of the DS209+ via the “Main Menu” > “Surveillance Station” > “IP Camera”
Next, I did delete all the records as I wanted to only migrate the “settings”
Finally, I did a backup of ‘surveillance’ as I did for the Photo Station here above. I only had to provide another folder-name under ‘NetBackup’ than for the photo
2/ Next, on the DS713+, I did
“Stop” the Surveillance Station, via “Package Center” > “Surveillance Station” > Action “Stop”.
Restore the ‘surveillance’ following the same procedure as for the Photo Station.
Once the restore completed, “Run” the Surveillance Station, via “Package Center” > “Surveillance Station” > Action “Run”.
Go to the “Main Menu” > “Surveillance Station” > “IP Camera” and re-enable the camera. You can see that not only the camera are restored, but also the patrol settings, etc…
Notice: the paid licences have been transferred !!! What is weird: I was able to re-enable the camera also on the DS209+. Both NAS were then consuming stream from all the camera… I was not expecting the licenses to be usable on several devices ?!
Click to Read ‘Audio and Video Station’ PartClick to Close
1/ Simply copy the content of the Shared Folders “music” and “video” from DS209+ to DS713+. Audio Station and Video Station will re-index the files.
2/ Reconfigure Video Station (Collections and Custom Libraries must be redefined)
3/ Recreate your favorite Web Radio Station in the Audio Station
This is a bit of work but I didn’t find a backup/restore similar to the one available for the ‘photo’ and the ‘surveillance’. And I didn’t want to restore the full configuration of my DS209+ as-is.
Click to Read ‘Other’ PartClick to Close
1/ Reconfigure the other port-forwarding rules on the DD-WRT to transfer all required traffic to the DS713+:
Admin: 5000
WebDav and WebDav https: 8000 and 8443
Enable WebDav via “Main Menu” > “Control Panel” > “WebDAV”
Configure the port 8000 and 8443 resp. for http
CouchPotato: 5050
2/ Reconfigure the WorkGroup via “Main Menu” > ” Configuration Panel” > “Win/Mac/NFS” > “Windows File Service”
3/ Enable “Recycle Bin”, “Windows ACL” and “File Indexing” on required shared folders via “Main Menu” > ” Configuration Panel” > “Shared Folder” > (select a folder) “Edit”.
4/ Reconfigured the “DNS server” as made on DS209+. Or, use the “Export Zone” > “Complete Zone settings” menu of the “DNS Server” on DS209+ and then “Create” > “Import Zone” menu of the “DNS Server” on the new DS.
5/ Recreate the MySQL Backup Task and the reconfigure Time Backup’s tasks.
Click to Read ‘DDNS’ PartClick to Close
I also had to register my DDNS’ domain name olympe.diskstation.me for my new DS713+ instead of for my DS209+.
1/ Log in https://myds.synology.com
2/ Click on the “Unlink” icon on the row of your old DS.
3/ Select the old DS and click on “Delete” on the right side of the “DDNS status” header.
4/ Go now to the “Control Panel” of the new DS and click on “DDNS”.
5/ Click on “Add” and re-register the DS with the domain name that used to be linked to the old DS.
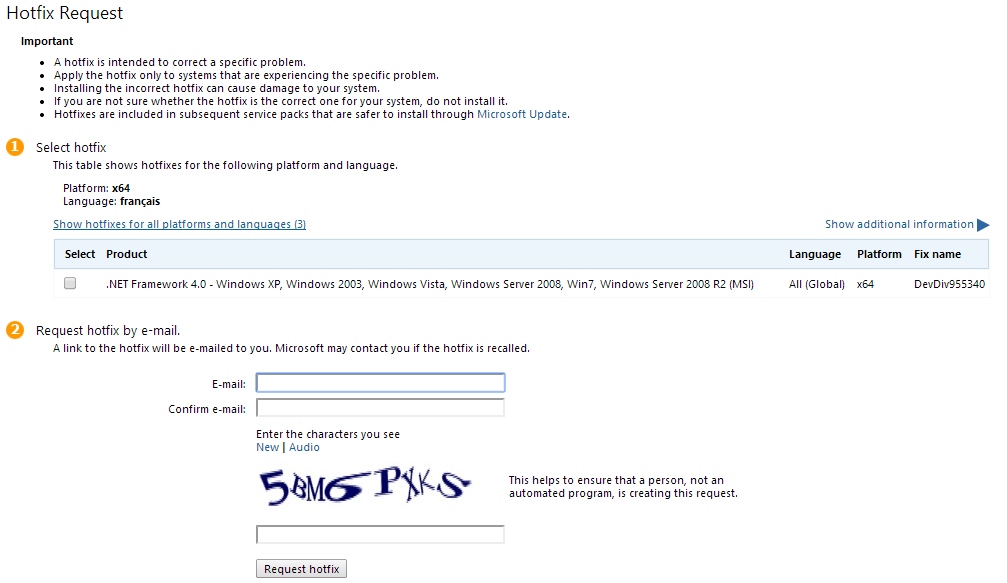
I found a kb (article from the knwledge base) of Microsoft mentioning an existing hotfix but not providing a link to download this one.
Here is a link to request Microsoft for such hotfix without going through the long and expensive process of a phone call, etc… E.g.: for a dummy kb 1234567: Click here.
Click to Read MoreClick to Close
I found a post that give all the requested details on that process: http://www.pesikov.tk/blog/request-download-kb-update-hotfix-directly-without-contacting-microsoft-customer-support-services/
Only notice that you must now use a parameter “ln” in the URL to enforce the language of the page. Ex.: http://support.microsoft.com/hotfix/KBHotfix.aspx?kbnum=1234567&ln=en-us.
Quite often, when I stop the Visual Studio debugger (possibly mainly when I just did an “edit and continue“) the mouse enters a kind of “ClickLock” mode: the text is automatically highlighted between the current mouse location and the location where it was when I stopped the debugger. Impossible to move the mouse (or the cursor using the arrows) without highlighting text (I.e.: doing a text selection)… So, impossible to work anymore as pressing any key will immediately delete the selection.
I found only a few reports about that “issue/behavior” on the web. I still have no idea how to prevent it. But I found a way to halt it when it occurs: Press Alt-Gr + CTRL + SHIFT
I used to root Kids’ tablet Fuhi Nabi 2 in order to be able to install Google Play. But I got a notification from Fuhi two weeks ago announcing that Google Play was now available out of the box with their latest update… This one upgrades from Android 4.0.1 to 4.1.1… So, hop, hop, hop, I immediately decided to rollback my tablet to a stock Rom and give a try to that new update. Piece of cake… if you know how to proceed…
Click to Read MoreClick to Close
The Nabi 2 had Rom 1.9.37 and TWRP Recovery Image 2.2.2.1.
I had a touch screen calibration issue with more recent TWRP. I didn’t try to most recent one however (E.g.: 2.6.3.0).
All TWRP versions tested for Nabi 2 can be found here as well as the native Recovery Image from Fuhu.
Download the stock Rom 2.0.5 and unzip it from your PC onto a SD card under \TWRP\Backups\<device serial number>\abcdstock123, then re-plug the SD into the Nabi 2
This is the folder where TWRP did store my backup when I did root the device
There should be 4 files: boot.emmc.win, boot.emmc.win.md5, recovery.emmc.win an System.ext4.win
Install PDA.Net, to be found here, if not available anymore on your PC.
Boot the Nabi 2 in recovery mode by pressing both the Volume + Button and the Power Button.
Press twice the Volume – Button to move to the menu “Recovery Kernel”
Press once the Volume + Button to enter the selected menu
it takes quite a few seconds to enter. Be patient.
Once entered in Teamwin (TWRP), select “Restore”
Then select “Using external SD” and pick the Stock Rom version 2.0.5 copied on the SD
Only restore System and Boot, but not your data!
I presume that all your data, if any, are in gmail, google+, etc…
Once the restore completed, reboot the system.
It will take some time to reboot, installing the various packages, etc…
Once back into Android, go to the “Settings” > “About” > “System Updates” > “Check now” for updates, “Download” it and install. Android will reboot at the end of that update.
This was actually the “first part” of the upgrade from the Stock Rom 2.0.5 to 2.3.11. With that first part, you are not yet running Android 4.1.1. You have to redo the step here above once more to install the “second part”.
Notice: I had an issue with the installation of the “first part”. I think that the “update” file was corrupted because I lost the Wi-Fi connection for a few seconds during the download. So, I had to restart the operation and it went then well.
I had a bigger issue when I tried to install the “second part” of the update. During the reboot, I got the red triangle dead Android picture… This is because I still had traces of rooted files on the tablet. The update din’t recognize some system files and refused to proceed further… Fortunately, there is a solution…
Download the fix OTA2.zip to be found here (named Part2 Work Around)
Copy the zip as is onto the SD card under \TWRP\ and re-plug the SD into the Nabi 2
Reboot into Recovery mode as explained previously
Now, instead of “Restore”, select “Install” and pick the file OTA2.zip from the “external SD”
As far as I am concerned, I did a “Wipe Cache/dalvik” after the installation..
Reboot the system.
Et voilà. The Nabi 2 is now running a fresh Jelly Bean with all kids’ favorite games re-installed from Google Play. Big big thanks to XDA-Developers’ community for providing such a great support!!
Notice: I am now running a US version instead of a UK version… But I don’t care as everything seems ok 😛
Click to Read MoreClick to Close
I am not that happy about the upgrade…
For sure, the new Android interface for the parents is great. But there is no real change for my kids except that:
It’s much slower to boot
It freezes regularly while my kids are unlocking the screen immediately after the boot. The lock screen start to slide and then freeze in the middle of the screen. I have no choice but hard-reboot (keeping the power button pressed for some seconds)
It also freezes sometimes while my kids are playing. Not often but still… I never had any issue in the past.
And a problem that I always had: when charging the tablet, the tablet always completely switch off and it’s a real pain to reboot it once charged. I always have to wait a bit (> 1 minute) after unplugging the tablet before being finally able to boot. Possibly due to the fact I am on 230V/50Hz and some kind of protection ? It looks indeed like the tablet refuses to boot because the battery is too hot…