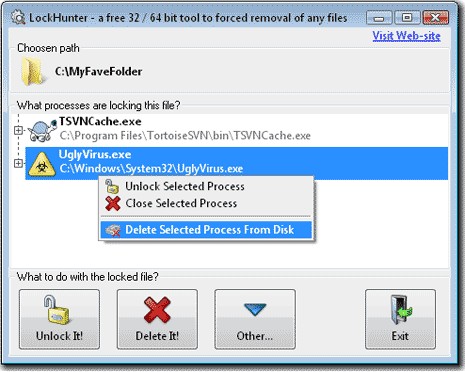
• Startup Manager: CodeStuff Starter

    CodeStuff Starter
    CodeStuff Starter

    CodeStuff Starter is the simplest and most efficient piece of software I found to manage the programs that starts automatically whenever windows is loading, as well as all the running services and processes (although I usually use respectively the native “Services Administration Tool” of Windows and “Process Explorer” of SysInternals to manage those). It’s also a freeware

    Click to Read More

    It enumerates usually much more that the native System Configuration’s startup pane (press Start key-R and type msconfig to open this one) and from the following sources:

    • the hidden registry entries used to start a soft once or each time windows boot.
    • the startup folders’ items (accessible via the menu: Start > All Programs > Startup)
    • some of the initialization files inherited from the old windows versions (E.g.: Win.ini)
    The two first sources are grouped by Current User, All Users and Default User (the profile used to create new users). Notice that the native “System Configuration” only shows the sources for the current user…

    Using Starter, the user could choose to disable selected entries, edit them, create new, or delete them permanently (while they can only be disabled via the native “System Configuration” tool of Windows). You have also various interesting contextual menu available on each item, like “search on internet”, “Launch”, “File Properties”, “Explore file folder” and the whole “System context menu”…

    Details: http://codestuff.obninsk.ru/products_starter.html

    Download: http://codestuff.obninsk.ru/products_starter.html

    Found Issue: on Windows 7 x64, CodeStuff starter is not showing entries from “HKLM\Software\Microsoft\Windows\CurrentVersion\Run” (local machine) but only from “HKCU\Software\Microsoft\Windows\CurrentVersion\Run” (current user) and “HKLM\Wow6432Node\Software\Microsoft\Windows\CurrentVersion\Run”. The native “System Configuration” is therefore still usefull as it’s showing those entries!

    Loading

  • Visual Similarity Duplicate Image Finder

    Visual Similarity Duplicate Image Finder
    Visual Similarity Duplicate Image Finder

    I didn’t test many duplicate image finders but Visual Similarity Duplicate Image Finder is  really a great one.

    It’s actually comparing images to find similar ones instead of only looking for “duplicates” issued from multiple copies of the same original picture. E.g.: it’s reporting as similar several photos of the same scene taken with e.g. someone who was moving. It’s also able to find “identical” images (e.g. abstract) with different colors.

    Click to Read More

    This can help you in removing the photos that you do not want, and keep only the best ones.

    Before starting to scan folders, you can specify the minimal percentage of similarity you want between “duplicates”, the minimal/maximal size of the pictures to be compared, as well as the minimal/maximal creation date of those pictures.

    Once found, duplicates are listed and displayed side-by-side in a preview pane.

    A demo version of Visual Similarity Duplicate Image Finder is available. It’s not trial, but has some limitations. E.g.: it’s only displaying the 10 first duplicates found…

    Details: http://www.mindgems.com/products/VS-Duplicate-Image-Finder/VSDIF-About.htm

    Download: http://www.mindgems.com/products/VS-Duplicate-Image-Finder/VSDIF-Download.htm

    I did test several Freewares without being satisfied by any (so far)… the best ones was VisiPics… But even this one didn’t identify the duplicates so well and didn’t display those side-by-side in the preview pane… It remains the very best freeware I found for that.

    Loading

  • Samsung Kies licence agreement: “Accept” button not visible

    I am starting to hate Samsung’s softwares as much as those of HP (I experience too many issues with their softs on my PC, mainly due to my atypical hardware, I admit) !

    I have been stuck on the “licence agreement” dialog window of the latest Samsung Kies update for a while because this stupid window does not auto-resize on PC with small display (e.g.: Mini-Laptop). As a consequence, the “accept” button is not visible. And no, it’s not possible to move the window, it’s a fixed size not movable dialog box 🙁

    Fortunately, you can accept the licence agreement with the keyboard.

    Click to Read More

    1. Click on the licence agreement screen to give it the focus.
    2. Press on “Tab” and “Enter” successively until you get a message “do you really want to cancel” (“Tab” move the focus to the next control in the screen. You get the message when the focus reach the “accept” button).
    3. Click “No” (The focus goes back to the “accept” button).
    4. Press “Shift-Tab” to go back to the previous control. This one is the checkbox “I agree” (I guess :))
    5. Press the “Space Bar” to check the checkbox.
    6. Press “Tab” and “Enter” to accept the licence agreement

    That’s it.

    Loading

  • Galaxy S2: Hardware ID Missing

    Since a recent Kies update, my Galaxy S2 started to throw the exception “Hardware ID Missing” every time it was plugged into my PC.

    The reason is a “bug” in the version of the SAMSUNG USB Driver for Mobile Phones installed with the Kies update. Fortunately, there is a elementary solution.

    Click to Read More

    This solution consists in installing an older version of the Samsung Driver. E.g.:  v1.4.8.0 available here, or 1.4.103 available here. I did use the 1.4.103 with success. No need to uninstall first the version currently installed. You will simply have to confirm during the setup that you want to install that version although another one is already installed.

    This issue prevents Kies to connect with the phone via USB. Concretely you see the “connecting” message for a while as well as a spinning icon looping indefinitely.

    Loading

  • Samsung Kies error: PDLR has stopped working

    After a recent update, Kies started to throw the exception “PDLR has stopped working”.

    If you are looking how to solve that issue, I did google on that too and found a radical solution.

    Click to Read More

    A solution often mentioned on the web is to remove the following line from the config file (or to completely delete the file) :

    [xml][/xml]

    This config file is located in “%programfiles%\Samsung\Kies\External\FirmwareUpdate\KiesPDLR.exe.config” (on x64 platform: “%programfiles% (x86)”).

    This fix didn’t work for me. But another one did the trick: I did an “advanced” uninstall of Kies using the free “Revo Uninstaller” and did next a fresh re-install.

    Loading

  • Expand/Collapse content in WordPress

    I am using the plugin “JQuery Collapse-O-Matic” to let the reader expand or collapse parts of my posts…

    The documentation is available on the author’s website. As you can see, there are a lot of options to manage groups, scrolling, colors, pictures, etc, etc, etc…

    Click to Read More

    I mainly use the basic options to display a title to show the content and one to hide it:

    [expand title="Click to Read More" swaptitle="Click to Close"]

    some content

    [/expand]

    I found, so far, once issue with the “WordPress 2012” theme I am using:

    • When there is no content anymore after the closing tag, there is no space left between the collapsed block and the bottom line of the post.
    • If there is one blank line after the closing tag, there is a huge space (several lines) displayed between the collapsed block and the bottom line of the post.
    However, if you apply the “Align Full” style on the opening tag (only), one blank line will be kept between collapsed block and the bottom line of the post, which makes it more readable. Otherwise, the “link” to expand the block is barely visible.
    This issue does also not occur
    • if the opening tag to expand/collapse the block is not at the beginning of the line, i.e.: if there are some text in front of it.
    • if the previous line is not the last one of a paragraph. I.e.: if it ends with a simple line break (Shift-Enter) instead of a end-of-paragraph (Enter).

    Copy the code here above and paste it into your post with Ctrl-Shift-V, to paste-in-plain-text (without formatting!)

    Loading

  • Syntax highlighting in WordPress

    I am using the plugin “Syntax Highlighter Evolved” to color the code samples embedded in my posts.

    This one is based, as many others, on the code syntax highlighter developed in java-script by Alex Gorbatchev.

    Click to Read More

    Here is the list of supported syntaxes [syntax name: tag]:

    ActionScript3: as3, actionscript3
    Bash/shell: bash, shell
    ColdFusion: cf, coldfusion
    C#: c-sharp, csharp
    C++: cpp, c
    CSS: css
    Delphi: delphi, pas, pascal
    Diff: diff, patch
    Erlang: erl, erlang
    Groovy: groovy
    JavaScript: js, jscript, javascript
    Java: java
    JavaFX: jfx, javafx
    Perl: perl, pl
    PHP: php
    Plain Text: plain, text
    PowerShell: ps, powershell
    Python: py, python
    Ruby: rails, ror, ruby
    Scala: scala
    SQL: sql
    Visual Basic: vb, vbnet
    XML: xml, xhtml, xslt, html, xhtml

    The easiest it to use the tags here above as shortcode around your “code”, like this: [tag]my code[/tag] where tag can be php, vb, shell, ….

    Here is a sample from Alex G.’s website using the tag “php” as a shortcode:

    [php]// SyntaxHighlighter makes your code snippets
    // beautiful without tiring your servers.
    // http://alexgorbatchev.com
    var setArray = function(elems) {
    this.length = 0;
    push.apply(this, elems);
    return this;
    }[/php]

    There are various options than can be set using parameters: [tag parameter=”value”]my code[/tag]. Those options are listed in the “settings” page of the plugin (See via the WordPress admin dashboard).

    The various issues I found are:

    1. Although using the parameter gutter=”true”, I cannot remove the line numbering but keep the toolbar.
    2. Copy/Paste code from an IDE does not provide a nice output:
      • The indentation is lost,
      • some lines of code become formatted as “paragraphs” and extra blank lines appears therefore
    There is however a trick to keep the original formatting of the code when copy/pasting this one.
    1. Copy first your code from the IDE
    2. Next, in your post, select the HTML view
    3. Then, in this view, add your tags [tag][/tag]
    4. Finally, paste your code between those tags and switch back to the Visual view

    If you prefer to convert your code into HTML+CSS, the best online tool I found is Pygments (Python Syntax Highlighter) which supports for free much more languages than most others, has a simple interface and display not  advertisement.

    Loading

  • Synchronize with an array of disks

    Months ago, I did backup a very large disk of my PC (E:\) to multiple smaller disks connected one after one, using a e-sata cradle (G:\).

    Recently one of those small backup disk started to experience NTFS Errors and I did lost its content. To avoid restarting a complete backup of E:\, I had to find which data were lost to redo a backup of those only.

    Click to read more

    First, I did recreate the complete folder structure (i.e.: without the files) of the remaining backup disks in one folder of my PC (C:\Temp\Backups). I did reconnect the disks one after one via the e-sata Cradle and did execute each time the following command in a MS-DOS console:

    [powershell gutter=”true”] MkDir C:\Temp\Backups
    XCopy G:\ C:\Temp\Backups /T /E[/powershell]

    More details typing “XCopy /?” in your console:

    /T Creates directory structure, but does not copy files. Does not include empty directories or subdirectories. /T /E includes empty directories and subdirectories.

    The result was 22.036 folders – 0 bytes.

    Notice that the target folder (C:\Temp\Backups) must exists !

    Next, using BeyondCompare, I did a “Folder Compare” between “C:\Temp\Backups” and “E:\”.

    I did first select the option to see only the orphans, via the menu “View/Show Orphans“.

    And I did next add a “Filter” to “Exclude files”  with a name “*.*”, via the “glasses” icon (i.e.: I did exclude all the files – in order to only compare the directory structure and backup the missing ones. Otherwise, no folder in C:\Temp\Backups would have appeared as orphans as they are all empty while their equivalent folders on E:\ have content).

    Finally, in BeyondCompare, I did select all the orphan folders on E:\ and used the contextual menu “Copy To Folder…“. In the “Action” field of the “Copy to Folder” dialog box, I did pick G:\ as a destination folder.

    Et voilà.

    Loading

  • Image Browser: FastStone

    Faststone Image Viewer
    Faststone Image Viewer

    FastStone is from far my favorite Image Browser (since ACDSee started to become a monster pointlessly full over overkill features). It’s also a Freeware for non-commercial use.

    Click to Read More

    As an Image Browser, FastStone is really light and fast while supporting many graphic formats, including obvious ones (gif, jpeg, png, pcx, tiff) but also ico, camera raw files, …

    It comes with some other small pieces of software that I use each time I transfer photos from my camera to my NAS.

    • An ultra light and quick Image Viewer. I like this one as it opens in seconds (full screen or windowed, as configured) when double clicking an image in Windows Explorer. Next, moving the mouse to screen edges, menu appears with the most common actions such as cropping, resizing, opening the image with an external tools (ex.: Paint.Net :)), …
    • a batch Image Renamer supporting “expressions”, search & replace, renaming preview, …
    • a batch Image Converter supporting resizing, Lossless JPEG rotations, color adjustments, auto-rotate based on EXIF information…

    FastStone also offers Side-by-side Image Comparison, Red-Eye removal, musical slideshow with transitions, …

    Details: http://en.wikipedia.org/wiki/FastStone_Image_Viewer

    Download: http://www.faststone.org

    Loading

  • About This List of Softwares

    The purpose of this page is to keep track of all the programs I like, most of them being freewares.

    Click to Read More

    Indeed, when re/installing a PC, I usually hardly remember the exact name of some tools I only use twice a year or “silent” services installed once years ago; ex.: Image Duplicate FInder, Software KVM, …

    My criteria to adopt a software is quite simple: it must help me (or my computer) to be more efficient and productive. And I observed that such a software match the following acronyms:

    • KISS: It must be very easy to use/understand (also for non IT users).
      • I am not afraid of command lines but prefer obviously user-friendly interfaces.
    • YAGNI: It may not have plenty of features not directly related to its main purpose.
    • DRY: It should not have overlaps with another software I like.

    Notice: I am using those programs on x64/x86 [Windows 7: not anymore] Windows 8 and [Server 2008 R2: not anymore] Server 2012 Essentials.

    Loading

Tags


Acer iDea 510 AirPlay Android Backup DD-WRT DNS DS209+ DS713+ DS1815+ FlexRaid Galaxy Galaxy S2 Galaxy S7 Google Assistant Google Home HTPC Kies MCE MySQL Nabi 2 Nvidia TV Shield One Plus One OpenHab Outlook Philips Hue Plex RAID Raspberry PI Remote Desktop Root Access Samsung Scripts Synology Team Build Visual Studio VMWare Wi-Fi Windows Windows 8 Windows 8.1 Windows 10 Windows Server 2012 XBMC Xpenology ZigBee

Categories


Archives